Introduction
A zipper running through the roof of a rectangular crochet case changes where every color band has to terminate. This crochet zipper pouch pattern uses DK cotton, a 3.5 mm crochet hook, and an approximately 7-inch zipper to create a practical rectangular case measuring about 18 × 12 cm. The project is suited to an intermediate skill level because accurate zipper placement and panel alignment matter. Use the finished pouch for crochet hooks, stitch markers, pencils, sewing tools, or other small supplies.
The Design: What Makes This Crochet Zipper Pouch Different
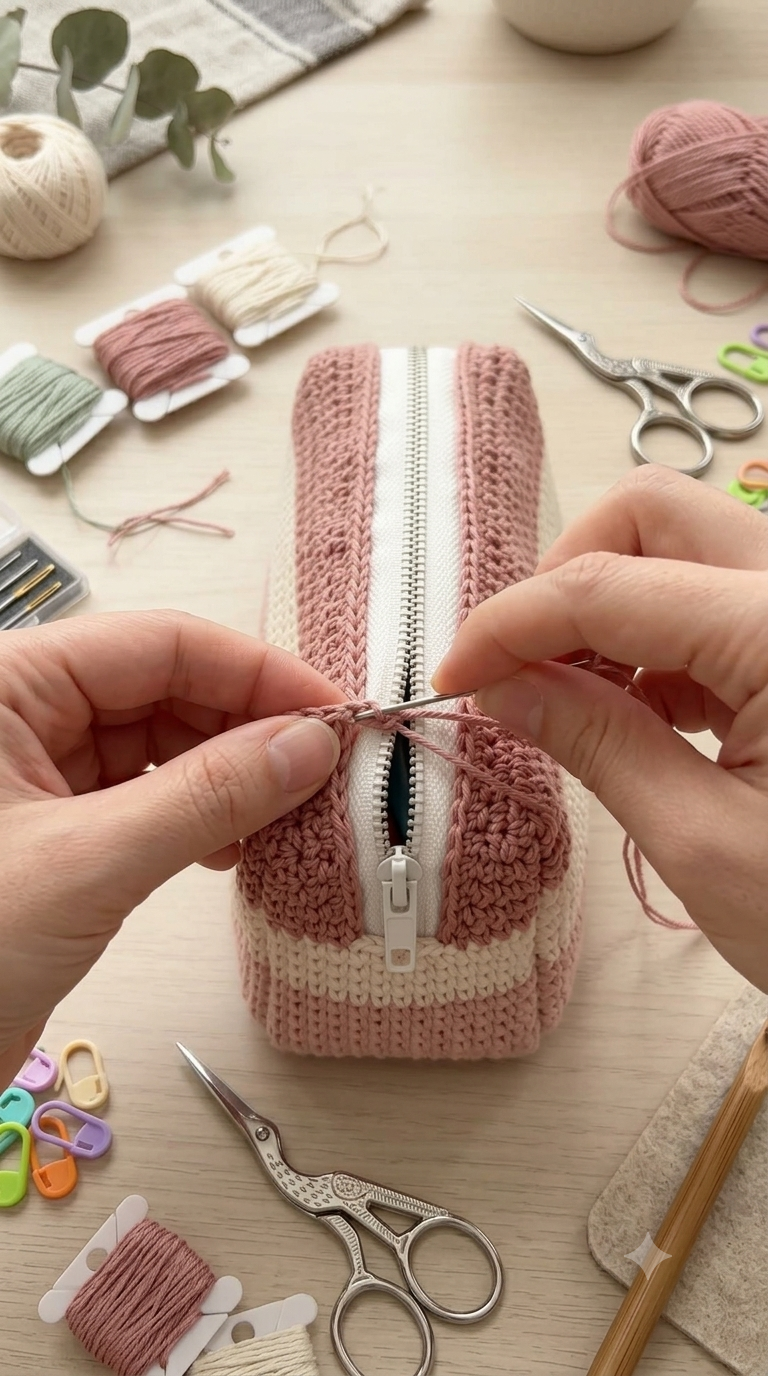
The photographed pouch has three structural details that define its appearance: a zipper running along the center of the top, contrasting panels positioned parallel to the zipper, and a broad cream stripe crossing the lower section. The direction of those color blocks matters. The long dusty-rose sections emphasize the zipper line, while the horizontal cream band separates the upper walls from the base.
A dense DK cotton fabric gives this crochet notions pouch enough structure to maintain its rectangular profile without stuffing. Cotton also produces clear stitches around the edges, which helps when matching panels during assembly. A comparable published zipper pouch uses DK cotton with a 3.5 mm crochet hook.
One common construction error is crocheting the entire opening before checking the zipper length. That can leave excess crochet fabric around the zipper and cause rippling. For this zippered crochet pouch, measure the zipper first and check both sides of the opening before permanently sewing it into position.
Project Info at a Glance
| Skill Level | Time | Finished Size | Hook | Best For |
|---|---|---|---|---|
| Intermediate | Approx. 4–6 hours | Approx. 18 × 12 cm | 3.5 mm | Hooks, notions, pencils and small tools |
The finished measurement is a target size for this adaptation. Actual dimensions depend on yarn, individual tension, zipper length and gauge.
Materials and Tools
Yarn
- Dusty rose — DK / Light #3 cotton — approximately 30–35 g
- Cream — DK / Light #3 cotton — approximately 15–20 g
- Sewing thread — cream or dusty rose for attaching the zipper
A smooth, tightly spun cotton works particularly well for this construction because the fabric needs enough definition to support the rectangular shape. The two yarn colors should be from the same yarn line or have closely matched thicknesses.
Tools
- 3.5 mm crochet hook
- 6.5–7 inch / approximately 17–18 cm zipper
- Yarn needle
- Sewing needle
- Matching sewing thread
- Stitch markers
- Scissors
- Sewing clips or pins
- Tape measure
- Optional cotton lining fabric
Abbreviations
- ch — chain
- sc — single crochet
- hdc — half double crochet
- sl st — slip stitch
- st — stitch
- sts — stitches
- BLO — back loop only
- RS — right side
- WS — wrong side
An invisible decrease is normally used to reduce circumference in three-dimensional crochet pieces. This rectangular pouch does not require invisible decreases because its shape comes from flat panels and seams.
Gauge and Sizing
A practical target gauge is approximately 22 single crochet stitches × 24 rows = 10 cm. Treat this as a starting point rather than the controlling measurement. The zipper is the critical dimension.
Before continuing beyond the first few rows, compare the width of the main panel with the usable length of the zipper. The crochet should fit the zipper without being stretched aggressively. If 40 stitches produce a panel that is too wide or narrow, change the foundation chain and maintain the new stitch count consistently throughout the corresponding panels.
Pattern — Step by Step
This pouch uses flat rectangular components rather than amigurumi rounds. Turn at the end of every row unless another instruction is given.
Front Main Panel
Yarn: dusty rose and cream.
Row 1: With dusty rose, ch 41. Sc in second ch from hook and across. (40)
Rows 2–8: Ch 1, turn, sc across. (40)
Change to cream.
Rows 9–15: Ch 1, turn, sc across. (40)
Change back to dusty rose.
Rows 16–26: Ch 1, turn, sc across. (40)
Check the side edges. There should be no increases or decreases, and all 26 rows should contain 40 stitches.
Fasten off. Leave approximately 25 cm of yarn if the panel will be joined using a yarn needle.
Back Main Panel
Yarn: dusty rose and cream.
The back panel must match the front panel exactly.
Row 1: With dusty rose, ch 41. Sc in second ch from hook and across. (40)
Rows 2–8: Ch 1, turn, sc across. (40)
Change to cream.
Rows 9–15: Ch 1, turn, sc across. (40)
Change to dusty rose.
Rows 16–26: Ch 1, turn, sc across. (40)
Fasten off and leave a long sewing tail.
Place the front and back panels together. The width, total row count and position of the cream stripe should match before assembly begins.
Left Zipper Panel
Yarn: dusty rose.
Row 1: Ch 41. Sc in second ch from hook and across. (40)
Rows 2–5: Ch 1, turn, sc across. (40)
Fasten off and leave approximately 30 cm for joining.
This narrow rectangular section forms one side of the zipper channel. Check its length against the zipper before continuing.
Right Zipper Panel
Yarn: dusty rose.
Row 1: Ch 41. Sc in second ch from hook and across. (40)
Rows 2–5: Ch 1, turn, sc across. (40)
Fasten off and leave approximately 30 cm for joining.
Place both zipper panels beside each other. They must have identical dimensions or the zipper can twist after installation.
Cream Zipper Accent Strips — Make 2
Yarn: cream.
Row 1: Ch 41. Sc in second ch from hook and across. (40)
Row 2: Ch 1, turn, sc across. (40)
Fasten off with a 25 cm tail.
These narrow strips create the pale channel immediately beside the zipper. Place one between each dusty-rose zipper panel and the zipper tape.
Keep both cream strips parallel. A difference in tension between the two pieces can make one side of the top opening appear shorter.
Base Panel
Yarn: dusty rose.
Row 1: Ch 41. Sc in second ch from hook and across. (40)
Rows 2–12: Ch 1, turn, sc across. (40)
Fasten off and leave a long sewing tail.
The wider base gives the pouch its rectangular footprint. A narrow base would create a flatter pencil-case profile instead of the structured shape shown in the reference image.
Side Panels — Make 2
Yarn: dusty rose and cream.
Row 1: With dusty rose, ch 13. Sc in second ch from hook and across. (12)
Rows 2–8: Ch 1, turn, sc across. (12)
Change to cream.
Rows 9–15: Ch 1, turn, sc across. (12)
Change to dusty rose.
Rows 16–26: Ch 1, turn, sc across. (12)
Fasten off, leaving approximately 30 cm for sewing.
Repeat for the second side panel.
Before attaching either side, place it against the front panel. Rows 9–15 should line up with the cream stripe. Repeat the check against the back panel.
Attaching the Zipper
Use an approximately 17–18 cm zipper, adjusting the crochet width when necessary to suit the actual zipper.
Place the zipper face up on a flat surface. Position one cream accent strip beside each side of the zipper tape. Add the dusty-rose zipper panels outside the cream strips.
Measure both ends before pinning. The exposed zipper tape should be balanced at each end.
Clip or pin from the center outward rather than starting at one end. This reduces the risk of pushing excess crochet fabric toward the opposite end.
Thread a sewing needle with matching thread. Backstitch through the zipper tape and crochet edge, keeping the stitches away from the zipper teeth.
Do not pull the thread tightly enough to gather the crochet. The zipper tape should remain flat.
Repeat on the opposite side.
Open and close the zipper several times. Correct any rippling, trapped yarn or uneven positioning before joining the zipper assembly to the body.
Optional Fabric Lining
A lining is optional, but it prevents small objects such as stitch markers and needles from working through gaps in the crochet fabric.
Cut two pieces of cotton fabric slightly larger than the finished front and back panels. Allow enough fabric for folded seam allowances.
Fold the raw edges toward the wrong side and press them. Position the lining inside the assembled crochet shell.
Keep the upper folded lining edge approximately 3–4 mm below the zipper teeth. Hand-sew the lining to the zipper tape and interior crochet without catching the exterior stitches.
Check the zipper again. Fabric extending too close to the teeth can become trapped in the slider.
Assembly
- Place the front and back panels on a flat surface and confirm that their width, height and cream color bands match.
- Attach one dusty-rose zipper panel to each cream zipper accent strip, keeping the 40-stitch edges aligned.
- Center the zipper between the two completed top sections and secure the components with clips or pins before making permanent stitches.
- Sew the zipper tape to the crochet using matching sewing thread, then test the zipper from fully closed to fully open.
- Attach the completed zipper section to the upper edges of the front and back panels. Keep the zipper centered between the two walls.
- Sew one long edge of the dusty-rose base panel to the lower edge of the front panel.
- Attach the opposite long edge of the base panel to the lower edge of the back panel. Check that the base remains flat rather than twisting.
- Add the two side panels. Match the boundaries of the cream stripe before sewing the dusty-rose sections.
- Install the optional lining. Keep its upper folded edge 3–4 mm away from the zipper teeth and test the slider before finishing the seam.
- Weave every yarn tail through at least 3 cm of dense crochet, reverse direction once, trim the excess and complete a final zipper test.
The finished construction produces a rectangular crochet case with a centered zipper, contrasting cream band and structured dusty-rose base.
7 Technical Tips for a Cleaner Crochet Zipper Pouch
- Mark every color-change row. A one-row difference between the side and main panels creates a visible break in the cream stripe. Place a stitch marker through Row 9 of every relevant panel before assembly.
- Keep the zipper within 2 mm of the center line. An offset zipper makes one top section wider and can distort the rectangular profile. Measure both sides before sewing through the zipper tape.
- Do not add stuffing. Stuffing pushes the walls outward and reduces usable storage space. This pouch gets its structure from dense crochet, rectangular seams and the optional fabric lining.
- Avoid decreases at the corners. Decreasing removes width and rounds the profile. Maintain the specified stitch counts so the bottom corners remain defined.
- Pin the cream stripe first. A side panel positioned one or two rows too high creates a broken horizontal band. Match both boundaries of the cream section before sewing the remaining seam.
- Keep lining fabric 3–4 mm below the zipper teeth. Fabric installed directly against the coil can catch in the slider. Open and close the zipper several times before securing the final lining stitches.
- Weave yarn tails through at least 3 cm of crochet. Short tails can work free around high-stress zipper and base seams. Reverse the weaving direction once before trimming each tail.
Adjusting the Size
The zipper should control the final width. If using a longer zipper, crochet a foundation chain that reaches approximately the usable zipper length without stretching. Count the resulting stitches and use that number consistently for the front, back, base and zipper strips.
For example, if your gauge requires 46 stitches instead of 40 to match the zipper, every long rectangular component should use the adjusted 46-stitch width. Do not alter only the zipper strips.
Change the pouch depth separately by adjusting the width of the side and base panels. Adding rows to the base produces a deeper case, while removing rows creates a flatter crochet pencil case.
Color Placement
The dusty rose and cream combination works because the pattern uses color direction as part of the construction. The cream body stripe runs horizontally, while the cream sections beside the zipper run lengthwise.
When substituting colors, assign one shade as the dominant color and the other as the structural accent. Changing colors randomly between panels makes seam alignment more obvious.
For a closer match to the reference image, keep dusty rose across the base, lower edge, upper walls and zipper-side panels. Reserve cream for the broad horizontal band and the narrow strips directly beside the zipper.
Finishing the Pouch
Place the completed case on a flat surface before trimming the final yarn tails. All four lower corners should contact the surface without one corner lifting significantly higher than the others.
Inspect the zipper from above. The two cream strips should remain approximately equal in width from one end to the other. If one strip curves inward, inspect the zipper stitching for excessive tension.
Open the case fully and inspect every interior seam. Reinforce loose corner stitches before adding tools or other contents.
For a washable cotton crochet pouch, check the care instructions for the specific yarn, zipper and lining fabric. Components with different washing requirements should be cleaned according to the most restrictive material.
Conclusion
Measure the zipper before committing to the final panel width because that dimension controls the proportions of the entire case. Once the crochet sections are complete, dry-fit the base, side panels, zipper strips and cream band before sewing permanent seams. The next practical step is to crochet a small gauge swatch with the selected DK cotton and compare the resulting stitch width with the zipper. Save this crochet zipper pouch pattern to Pinterest or share the completed case on Instagram with #DustyRoseZipperPouch. For this specific design, would you keep the cream stripe at seven rows or make it narrower to give the dusty-rose sections more height?









