Introduction
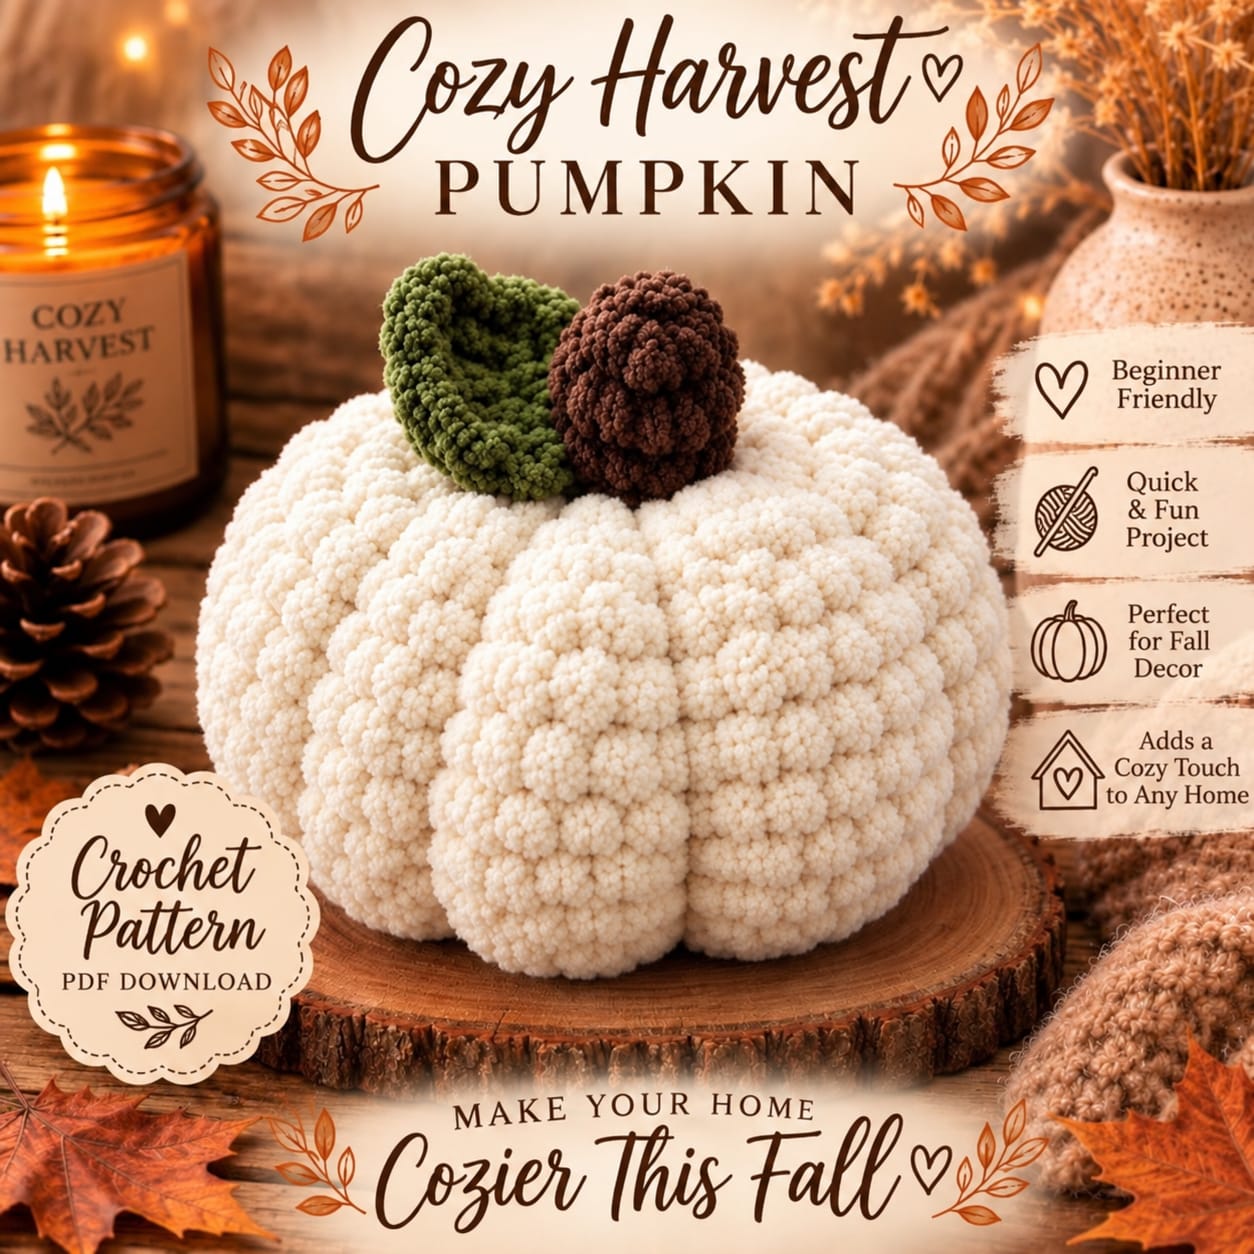
Rows of cream bobbles have to compress into pumpkin ribs without burying the brown stem under their own thickness. This white chunky bobble crochet pumpkin pattern uses bulky velvet or chenille yarn, a 6 mm hook, fiberfill, a crocheted stem, and one olive leaf. The intermediate project targets approximately 23 × 17 cm and produces a substantial freestanding pumpkin for autumn tabletop decoration.
The instructions below are an original photo-inspired reconstruction based on visible structure; published patterns cited later are used only for sizing, gauge, and material benchmarks.
The Design: What Makes This Bobble Pumpkin Different
The photographed pumpkin combines two kinds of texture. Its cream body has closely packed raised bumps, while deep vertical channels divide that surface into broad ribs. A chunky crochet pumpkin made only with bobbles can become spherical, so this reconstruction uses a 36-stitch body followed by six external sculpting passes to pull the circumference inward. Bulky chenille gives the bumps enough volume without requiring oversized stitch counts. The short dark-brown stem is deliberately narrower than the crown opening, and one folded olive leaf supplies the only accent color. Published velvet pumpkin patterns commonly use bulky #5 yarn with hooks from about 3.75 to 6 mm, while super-bulky pumpkin patterns often move to 8–9 mm. The primary failure is loose bobble spacing; visible background gaps make the surface look dotted instead of densely textured.
Project Info at a Glance
| Skill Level | Time | Finished Size | Hook | Best For |
|---|---|---|---|---|
| Intermediate | Approx. 4–6 hours | Target approx. 23 cm wide × 17 cm high | 6 mm body / 5 mm accents | Fall centerpieces, shelves, mantels |
The 23 × 17 cm dimensions are a photo-based reconstruction target rather than a measurement from an identifiable published version. Heather J. Anderson’s published super-bulky Chunky Fall Pumpkin reaches approximately 9 inches / 23 cm wide in its large size, while Maggie Haskell’s bulky velvet pumpkin reaches an 18-inch / 46 cm circumference. Those current specifications provide useful scale benchmarks for the pictured cream pumpkin.
Materials and Tools
Yarn
- Warm cream / ivory — bulky #5 chenille or velvet — approximately 180–220 g
- Chocolate brown — worsted #4 or firm bulky yarn — approximately 20–25 g
- Olive green — worsted #4 — approximately 20–25 g
Bernat Velvet is one suitable yarn type for the body; published velvet pumpkin patterns use the same bulky #5 category. A smooth worsted yarn is preferable for the stem and leaf because it holds those smaller shapes more clearly than soft chenille.
Tools
- 6 mm crochet hook for the cream body
- 5 mm crochet hook for stem and leaf
- Polyester fiberfill — approximately 250–325 g
- Extra-long tapestry needle
- Standard tapestry needle
- Strong cream yarn or upholstery thread for sculpting
- Scissors
- Locking stitch marker
Abbreviations
- MR — magic ring
- sc — single crochet
- inc — 2 sc in one stitch
- dec — single crochet decrease
- ch — chain
- sl st — slip stitch
- hdc — half double crochet
- dc — double crochet
- tr — treble crochet
- BO — bobble stitch
- BLO — back loop only
- st/sts — stitch/stitches
For an invisible decrease, insert the hook through the front loops of the next two stitches, yarn over and pull through both front loops, then yarn over and finish the sc.
Bobble Stitch
For this reconstruction, BO means a 5-dc bobble worked into one stitch.
Yarn over, insert the hook into the stitch, yarn over and pull up a loop, yarn over and pull through two loops. Repeat that partial dc four more times in the same stitch. Six loops remain on the hook. Yarn over and pull through all six loops.
Push the finished bobble toward the outside of the pumpkin before continuing.
Gauge
With bulky chenille and a 6 mm hook, target approximately 11–12 sc per 10 cm in firm single crochet. Bobble rounds will be substantially thicker.
Just Be Crafty’s published bulky velvet pumpkin uses a 6 mm hook with a gauge of 12 stitches over 10 cm in half-double crochet BLO. Maggie Haskell recommends an even smaller 3.75 mm hook for Bernat Velvet to limit holes around stuffing. For this larger bobbled construction, start at 6 mm but reduce to 5.5 mm if the filling remains visible between stitches.
Pattern — Step by Step
Work the body in a continuous spiral. Mark the first stitch of every round.
Textured Cream Pumpkin Body
Yarn: cream bulky #5 chenille or velvet.
R1: 6 sc in MR. (6)
R2: inc ×6. (12)
R3: (sc, inc) ×6. (18)
R4: (2 sc, inc) ×6. (24)
R5: (3 sc, inc) ×6. (30)
R6: (4 sc, inc) ×6. (36)
The body has now reached its 36-stitch medium plateau.
R7: sc around. (36)
R8: (BO, sc) ×18. (36)
R9: sc around. (36)
R10: (sc, BO) ×18. (36)
R11: sc around. (36)
R12: (BO, sc) ×18. (36)
R13: sc around. (36)
R14: (sc, BO) ×18. (36)
R15: sc around. (36)
R16: (BO, sc) ×18. (36)
R17: sc around. (36)
R18: (sc, BO) ×18. (36)
R19: sc around. (36)
R20: (BO, sc) ×18. (36)
R21: sc around. (36)
R22: (sc, BO) ×18. (36)
R23: sc around. (36)
R24: (BO, sc) ×18. (36)
R25: sc around. (36)
R26: (sc, BO) ×18. (36)
R27: sc around. (36)
R28: (4 sc, dec) ×6. (30)
R29: (3 sc, dec) ×6. (24)
Begin stuffing. Place fiberfill against the lower and outer walls first, then fill the center.
R30: (2 sc, dec) ×6. (18)
Add more stuffing, keeping the pumpkin firm but compressible.
R31: (sc, dec) ×6. (12)
Complete the stuffing before the final round.
R32: dec ×6. (6)
Fasten off with a 60 cm tail. Thread the tail through the front loops of the remaining six stitches and close the opening.
Checking the Body Before Sculpting
The unsculpted body should look like a rounded cream cushion rather than a finished pumpkin. Measure the circumference through the widest point.
If the body is substantially below 50 cm around, add stuffing only if the stitches are not already stretched. If the circumference exceeds approximately 60 cm, remove a small amount of filling before sculpting.
The external shaping strands will reduce both circumference and apparent height.
Creating Six Deep Pumpkin Ribs
Cut approximately 180 cm of strong cream yarn or upholstery thread.
Thread the extra-long needle.
Insert through the bottom center and exit at the crown.
Bring the yarn down the outside of the pumpkin and return through the bottom center.
Pull until the first valley becomes visible.
Repeat five more times, spacing the passes approximately 60 degrees apart.
After the sixth pass, inspect the pumpkin from above. Adjust the tension before knotting permanently.
The valleys should be deep enough to divide the bobbled surface but not so tight that the cream yarn cuts completely between the raised stitches.
Optional Eight-Rib Version
The photographed body can visually read as six to eight broad sections depending on viewing angle. For a more densely segmented version, make eight sculpting passes approximately 45 degrees apart.
Reduce the tension slightly compared with the six-rib method. Eight very tight passes can produce a narrow crown and an excessively pinched base.
Flattening the Pumpkin Base
Set the sculpted pumpkin on a hard surface.
Press downward gently with both hands.
Massage filling away from the exact bottom center and toward the lower sides.
A stable finished base should measure approximately 11–13 cm across.
If the pumpkin rocks, reopen the sculpting knot and redistribute the tension before attaching the topper.
Short Brown Stem
Yarn: chocolate brown worsted #4; 5 mm hook.
R1: 6 sc in MR. (6)
R2: inc ×6. (12)
R3: sc around. (12)
R4: sc around. (12)
R5: sc around. (12)
R6: sc around. (12)
R7: sc around. (12)
R8: sc around. (12)
R9: sc around. (12)
R10: (sc, inc) ×6. (18)
R11: sc around. (18)
R12: sc around. (18)
Fasten off with a 45 cm tail.
Stuff the lower two-thirds firmly and leave the upper third slightly softer. Target a finished stem approximately 7–8 cm tall.
Adding Stem Texture
Thread a separate 50 cm length of brown yarn.
Run the needle from the base to the top along the outside of the stem.
Return through the stem interior.
Repeat four to six times around the circumference.
Pull each strand only enough to form shallow vertical channels.
This gives the stem the ridged appearance visible in the photograph without changing its stitch counts.
Large Olive Pumpkin Leaf
Yarn: olive green worsted #4; 5 mm hook.
Ch 17.
Starting in the second chain from the hook, work:
sl st, sc, hdc, dc, dc, tr, tr, tr, dc, dc, hdc, hdc, sc, sc, sl st, sl st.
Work 3 sc into the final foundation chain.
Rotate the work and crochet along the unused loops on the opposite side:
sl st, sl st, sc, sc, hdc, hdc, dc, dc, tr, tr, tr, dc, dc, hdc, sc, sl st.
Join at the leaf base.
Leaf Textured Edge
Ch 1.
*Sc in the next 2 stitches, ch 2, sl st in the second chain from hook.*
Repeat toward the point.
At the tip work sc, ch 3, sl st in first ch, sc.
Repeat the small-point sequence down the opposite side.
Fasten off with a 35 cm tail.
Leaf Center Vein
Join olive yarn at the base.
Surface sl st along the original foundation chain to the point.
Fasten off.
For additional structure, add two short diagonal surface-slip-stitch veins on each side of the center.
Folding the Leaf
The leaf in the reference is not displayed completely flat. Fold it gently along the center vein so the two sides form a shallow V.
Make two hidden stitches through the lower 2 cm of the fold.
Do not sew the upper half closed.
The resulting leaf should stand partly upright beside the stem.
Optional Small Leaf
If a second foliage element is wanted, ch 11.
Starting in the second chain work:
sl st, sc, hdc, dc, tr, tr, dc, hdc, sc, sl st.
Work 3 sc at the tip and mirror the sequence down the opposite side.
Add a center surface-crochet vein and fasten off with a 25 cm tail.
Attaching the Stem
Position the stem over the crown opening.
The 18-stitch base should overlap the center of several pumpkin ribs rather than sitting inside only one groove.
Use the 45 cm tail to sew around the complete stem base.
Pass several stitches deeper into the pumpkin body for reinforcement.
The stem should remain vertical when the pumpkin is rotated, but do not use it as a carrying handle.
Attaching the Olive Leaf
Position the leaf immediately beside the stem.
Angle its point outward rather than vertically upward.
Sew the lower 2–3 cm to the cream body.
Add one hidden stitch through the folded center if the leaf falls flat.
Leave the outer edge unattached.
Optional Curly Vine
The reference emphasizes the single leaf, but a small tendril can be added without changing the body.
With olive yarn, ch 20.
Starting in the second chain, work 3 sc in each of the first 15 chains.
Work one sc in each of the final four chains.
Fasten off with a 25 cm tail.
Attach the straight end beneath the leaf and leave the spiral free.
Assembly
- Crochet the cream body from the 6-stitch magic ring through the 36-stitch plateau and complete all alternating bobble and single-crochet rounds before beginning the decreases.
- Stuff the body through R29–R31, keeping the filling firm enough to support the bobbles but compressible enough for deep exterior sculpting.
- Close the final six stitches and massage the body until the filling is distributed evenly around the widest section.
- Run six sculpting passes from bottom center to crown at approximately 60-degree intervals, adjusting each pass before securing the final knot.
- Flatten the lower center by hand until the pumpkin rests on an approximately 11–13 cm contact area without rocking.
- Crochet the 12-round brown stem, stuff its lower two-thirds, and add four to six shallow exterior shaping lines for vertical texture.
- Make the olive leaf, add the center vein and pointed edging, then fold the lower 2 cm along the centerline to create the upright shape.
- Sew the stem over the crown depression with stitches passing into several neighboring pumpkin ribs rather than only through the gathered center.
- Attach the folded leaf beside the stem through its lower 2–3 cm, leaving the upper leaf and textured edge free.
- Weave all remaining tails through matching dense stitches, reshape the six pumpkin ribs by hand, and check the finished piece from the front and overhead before display.
The completed pumpkin should show a dense cream bobble surface divided into broad vertical ribs, a short ridged brown stem, and one dimensional olive leaf.
7 Technical Tips
- Fiberfill shows through the body: reduce the 6 mm hook to 5.5 mm before continuing past the first 36-stitch bobble section. Velvet pumpkin designers commonly work below the yarn label’s suggested hook size because loose chenille stitches expose stuffing.
- The bobbles disappear into the fabric: push every 5-dc bobble toward the right side before making the following sc. A bobble accidentally pushed inward creates a visible flat spot approximately 1–2 cm across.
- The sculpting yarn cuts into the chenille: stop tightening once each valley reaches approximately 2–3 cm deep at the widest point. Excess pressure can bury the shaping strand and distort adjacent bobbles.
- The pumpkin rocks after sculpting: redistribute filling away from the exact bottom center until the contact area measures roughly 11–13 cm across. A pointed base will remain unstable even when the six exterior valleys are evenly spaced.
- The stem tilts after attachment: catch at least three neighboring body sections with the reinforcement stitches below its 18-stitch base. Sewing only to the gathered crown gives a 7–8 cm stem too small an anchor.
- The leaf collapses flat: stitch approximately 2 cm of the lower center fold before attaching it to the pumpkin. Sewing the entire leaf perimeter removes the raised V-profile visible beside the stem.
- The chenille tails work loose: weave each tail through at least 6 cm of dense matching stitches and reverse direction once. Short straight tails can migrate through slippery polyester pile when the stuffed pumpkin is handled.
Why Bobbles Change the Pumpkin Construction
A bobble body cannot be treated exactly like a plain single-crochet pumpkin. Each raised cluster adds thickness and consumes more yarn than the stitch occupying the same position in a smooth fabric.
Amberly Lauterwasser’s current Bobble Pumpkin pattern specifically supports making the design in different yarn sizes, while its standard #4 version measures approximately 3–4 inches high and 5.75 inches wide. The photograph is considerably larger and uses a much thicker-looking cream surface.
Alternating bobble rounds with plain sc rounds keeps the fabric manageable. Working bobbles in every stitch of every round would make this 36-stitch body excessively dense and difficult to sculpt.
Verified Chunky Pumpkin Size Benchmarks
Heather J. Anderson’s Chunky Fall Pumpkin uses super-bulky yarn with a 9 mm hook. Published sizes are approximately 5 inches wide × 3 inches tall, 7 × 4 inches, and 9 × 5 inches.
The large 9-inch width converts to approximately 23 cm, closely matching the target width selected for this photo reconstruction.
That published design uses a worked-flat ribbed construction rather than a bobbled round body, so its stitch counts are not substituted into this pattern.
Verified Velvet Pumpkin Benchmarks
Maggie Haskell’s Lux Velvet Pumpkin uses Bernat Velvet, categorized as bulky/super bulky in the listing, with a 3.75 mm hook. Published circumferences are approximately 33 cm, 38 cm, and 46 cm.
The listed yardage ranges from approximately 49 to 98 m. The designer specifically recommends using a relatively small hook with velvet to prevent openings that expose the fiberfill.
Just Be Crafty’s velvet pumpkin uses bulky #5 yarn with a 6 mm hook, approximately 38 yards, and a 12-stitch × 8-row gauge over 10 cm in hdc BLO. Its finished pumpkin measures approximately 4.5 × 2.5 inches.
Verified Super-Bulky Yardage Benchmark
The Unraveled Mitten’s Chunky Fall Pumpkin lists approximately 53–141 yards / 48–129 m of super-bulky yarn across its three sizes.
One suggested yarn, Lion Brand Wool-Ease Thick & Quick, contains approximately 106 yards / 97 m per 170 g.
Because the reconstruction uses yarn-intensive bobbles and targets roughly 23 cm width, keeping at least 180–220 g of cream yarn available is practical. Exact consumption still depends strongly on chenille thickness and bobble tension.
Verified Bulky Pumpkin Hook Options
Current chunky pumpkin patterns span a broad hook range because bulky yarn constructions differ substantially. Crochet 365 Knit Too’s 2024 Chunky Pumpkin uses super-bulky yarn with an 8 mm hook for the body and a 4 mm hook for smaller details.
Its large pumpkin measures approximately 4.5 inches wide × 4.25 inches tall and uses approximately 55–60 yards.
Cyprianne Nolan’s Chunky Pumpkin lists 6.5 and 8 mm hooks with Bernat Velvet and provides five sizes. These benchmarks support treating hook size as dependent on the exact chenille rather than assigning one universal bulky-yarn hook.
Why a 6 mm Hook Is Used Here
The pictured bobbles need room to expand, but the base fabric must remain dense enough to hide white fiberfill. A 6 mm hook sits between the very tight 3.75 mm velvet constructions and the 8–9 mm super-bulky ribbed patterns.
Make the first 12 rounds before committing to the hook size.
If the chenille is particularly thin, switch to 5 or 5.5 mm. If it is a true super-bulky #6 yarn rather than bulky #5, test 7 or 8 mm instead and check the resulting dimensions.
Choosing the Cream Yarn
The body is warm ivory rather than optic white.
Useful color names include cream, vanilla, ivory, natural, oatmeal, and antique white.
Chenille with a dense pile gives the bobbles the rounded appearance shown in the reference. Very loose eyelash-style yarn makes individual clusters difficult to distinguish.
Choosing the Brown Stem Yarn
Use a yarn with less pile than the pumpkin body.
Chocolate, coffee, walnut, bark, or dark chestnut provide enough contrast against cream.
A smooth worsted yarn also makes the shallow exterior stem channels more visible.
If only chenille is available, use a hook approximately 1 mm smaller than the body hook and reduce stuffing.
Choosing the Olive Leaf Yarn
The leaf is a muted yellow-green rather than bright emerald.
Look for olive, moss, fern, lichen, or avocado.
Use a smooth yarn with visible stitch definition because the leaf relies on its center vein and pointed outline.
The green can be slightly lighter than the brown stem while remaining substantially darker than the cream body.
Using Velvet Instead of Chenille
Velvet creates a smoother raised cluster than coarse chenille. Its slippery pile, however, makes stitch counting and tail management more demanding.
Place a locking marker in the first stitch of every round.
Count all 36 stitches after each bobble round rather than waiting until the decreases begin.
Weave velvet tails through several directions because the smooth polyester core can move through the finished fabric.
Using Super-Bulky Wool Blend
Super-bulky wool blend produces a firmer pumpkin with more visible individual stitch legs.
Heather J. Anderson’s pattern uses yarns such as Wool-Ease Thick & Quick with a 9 mm hook.
If substituting a similar #6 yarn here, test a 7–8 mm hook first. The same 36-stitch body may finish considerably larger than the 23 cm reconstruction target.
Making the Pumpkin Smaller
Stop increasing at 30 stitches.
Use the sequence 6 → 12 → 18 → 24 → 30, then alternate sc and bobble rounds for approximately 14–16 plateau rounds.
Decrease 30 → 24 → 18 → 12 → 6.
Shorten the stem to approximately 5–6 cm and begin the leaf with ch 13.
Making a Mini Pumpkin
Use worsted #4 yarn and a 4 mm hook.
Stop at 24 stitches.
Work approximately eight textured plateau rounds.
Decrease 24 → 18 → 12 → 6.
Use four or six exterior shaping passes depending on the finished circumference.
Making a Larger Pumpkin
Increase beyond the medium plateau to 42 stitches.
After R6 at 36 stitches, work R7: (5 sc, inc) ×6. (42).
Maintain 42 stitches for the required height, alternating textured and plain rounds.
Decrease 42 → 36 → 30 → 24 → 18 → 12 → 6.
Plan additional yarn because every 42-stitch bobble round contains 21 clusters.
Making the Pumpkin Squatter
Remove four to six plateau rounds without changing the 36-stitch maximum.
The circumference remains broad while the vertical dimension decreases.
Use stronger sculpting tension only after the body has been shortened.
Do not compensate by overstuffing because that pushes the pumpkin back toward a spherical profile.
Making the Pumpkin Taller
Add two complete sc-and-bobble round pairs before R28.
Each pair maintains 36 stitches.
Keep the lower and upper decrease sections unchanged.
Lengthen the stem only if the body becomes substantially taller than the 17 cm target.
Making Eight Ribs Instead of Six
Mark eight evenly spaced points around the crown before sculpting.
Run one strand through each point and the bottom center.
Pull each pass slightly less than for six ribs.
Check the pumpkin from above after every second pass because small spacing errors become more obvious with eight sections.
Making the Bobbles Larger
Replace the 5-dc bobble with a 6-dc bobble.
The clusters will project farther and consume more yarn.
Work a test section first because thick chenille can make a 6-dc cluster too large for the alternating BO/sc spacing.
If neighboring bobbles touch excessively, return to five partial dc legs.
Making a Smoother Version
Replace every bobble round with hdc or sc.
Keep the 36-stitch plateau and external sculpting method.
The resulting pumpkin will use less yarn and show the six ribs more clearly.
The surface will no longer reproduce the heavily clustered texture of the photograph.
Adding a Second Leaf
Make another leaf beginning with ch 13.
Use fewer tr stitches through the center so it finishes smaller.
Place it behind the main olive leaf at approximately a 45-degree angle.
Attach only the lower portion so both leaf tips remain independent.
Adding a Curved Stem
Extend the stem by four to six 12-stitch rounds.
Stuff the lower half firmly and the upper half lightly.
Run a brown shaping strand along one side and pull until the stem bends.
Secure the strand inside the base before attaching the stem to the pumpkin.
Correcting a Flat Bobble
Push the cluster from the inside toward the outside before the body is fully stuffed.
If the bobble was accidentally completed with too few partial dc stitches, mark it and continue rather than attempting to cut the yarn.
Minor variation disappears within the textured surface.
A sequence of several flat bobbles, however, creates a visible stripe and is better corrected by undoing that round.
Correcting Uneven Ribs
Do not knot the sculpting yarn after the first pass.
Complete all six passes and compare their spacing from above.
Slide each strand slightly across the chenille surface until the sections are balanced.
Only then tighten and secure the final knot at the base.
Correcting an Overstuffed Body
If the exterior sculpting strand barely changes the silhouette, reopen the six-stitch crown before attaching the stem.
Remove fiberfill in small handfuls.
Close the opening again and repeat the shaping test.
The body should resist compression but still yield enough to create visible vertical channels.
Correcting an Oversized Crown Hole
Thread cream yarn through the front loops around the opening.
Pull until the gap measures less than approximately 2 cm.
Knot on the inside if possible.
The stem base will cover the remaining opening, but it should not be responsible for holding loose body stitches together.
Care and Storage
Check the care instructions for the selected chenille or velvet yarn. Spot cleaning is the least disruptive option for a heavily stuffed decorative pumpkin.
Never lift the pumpkin by its stem or leaf.
Support the body with both hands when moving it.
For seasonal storage, place the pumpkin in a container large enough that the bobbles are not compressed beneath heavier decorations. Reshape the ribs by hand when bringing it back out.
Sources
Chunky sizing, super-bulky yarn, hook size, and yardage benchmarks were checked against Heather J. Anderson’s Chunky Fall Pumpkin on Ravelry, which specifies super-bulky yarn, a 9 mm hook, approximately 53–141 yards, and finished widths from 5 to 9 inches.
Velvet circumference and tight-hook benchmarks were checked against Maggie Haskell’s Lux Velvet Pumpkin on Ravelry, which uses Bernat Velvet, a 3.75 mm hook, approximately 54–107 yards, and published circumferences from 33 to 46 cm. Additional construction guidance came from Zamiguz’s Free Crochet Pumpkin Pattern, which specifically discusses using a smaller hook with velvet to reduce stuffing gaps.
A 6 mm bulky-velvet benchmark was checked against Just Be Crafty’s Velvet Crochet Pumpkin, which uses #5 bulky velvet, approximately 38 yards, a 6 mm hook, and a gauge of 12 stitches × 8 rows per 10 cm in hdc BLO.
Current bobble-pumpkin construction was compared with Lautercreek Farm’s Crochet Bobble Pumpkin, whose standard #4 yarn version measures approximately 3–4 inches high × 5.75 inches wide and can be scaled with thicker yarn. Its Ravelry listing is available as Bobble Pumpkin by Amberly Lauterwasser.
Another current chunky benchmark came from Crochet 365 Knit Too’s Chunky Pumpkin, published in 2024 with super-bulky yarn, an 8 mm body hook, approximately 55–60 yards, and a large body measurement of roughly 4.5 × 4.25 inches. Bulky velvet sizing was also compared with Cyprianne Nolan’s Chunky Pumpkin, which lists 6.5 and 8 mm hooks and five size options.
Conclusion
The raised cream clusters define the surface, but controlled compression is what turns the stuffed form into a pumpkin. Keep the 36-stitch body firm without packing it solid, then divide it with six evenly spaced sculpting passes before adding the stem or leaf. Your next step is to crochet through the first two bobble rounds and check that the fiberfill will remain hidden at a 6 mm hook size. Save this white chunky bobble crochet pumpkin pattern to Pinterest or share the finished version on Instagram with #WhiteBobblePumpkin. Would you keep the single folded olive leaf shown here, or add a small curling vine beside the brown stem?









