Introduction
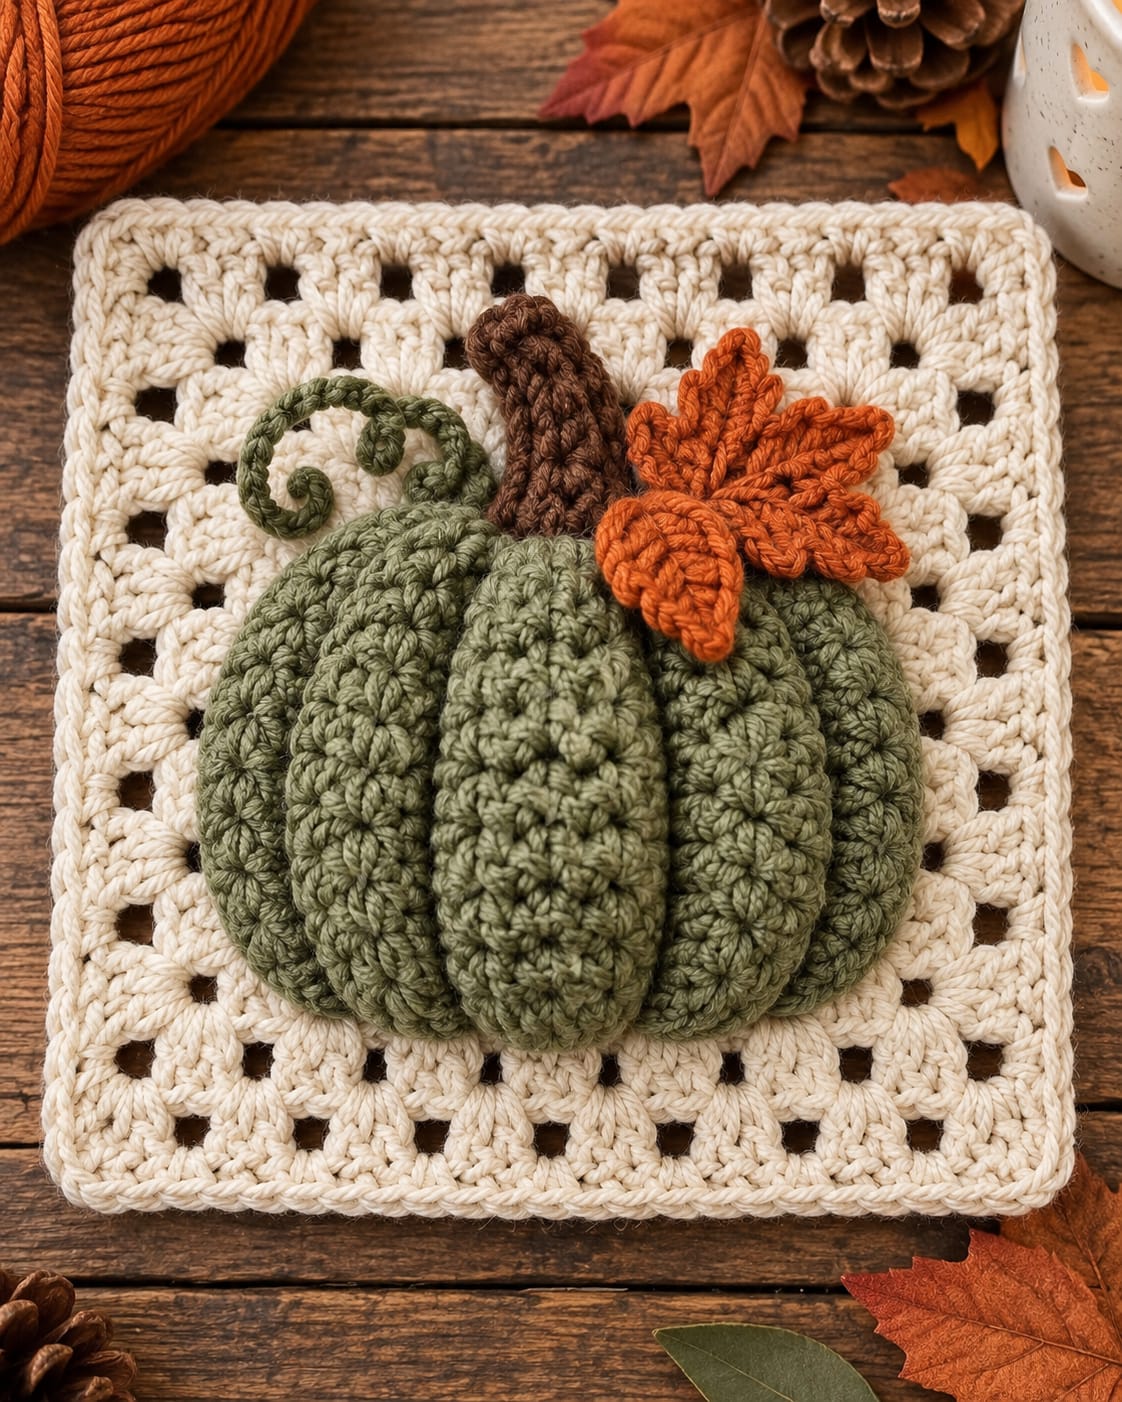
A sage pumpkin this thick needs more than surface embroidery to keep five raised ribs visible against an open cream square. This 3D pumpkin granny square crochet pattern uses worsted yarn, a 5 mm hook, dimensional pumpkin lobes, a brown stem, orange maple leaf, and curled green vine. The intermediate block finishes at approximately 20 × 20 cm and works for fall cushions, runners, bags, or blankets.
The Design: What Makes This Pumpkin Granny Square Different
The reference treats the pumpkin as a separate dimensional appliqué rather than building its shape into the cream granny background. Five overlapping sage lobes create the strongly raised center, while a tall brown stem, orange maple leaf, and spiral vine extend beyond the pumpkin crown. The cream square stays comparatively flat and open, which prevents the botanical centerpiece from disappearing into surrounding texture. This raised pumpkin granny square is therefore larger than many published pumpkin motifs: current patterns commonly measure 10–15 cm, while this reconstruction targets 20 cm to accommodate the broad appliqué. A worsted 5 mm combination is supported by several current pumpkin-square patterns. The common mistake is sewing every lobe edge flat; that removes the overlap responsible for the pumpkin’s three-dimensional rib structure.
Project Info at a Glance
| Skill Level | Time | Finished Size | Hook | Best For |
|---|---|---|---|---|
| Intermediate | Approx. 4–6 hours | Approx. 20 × 20 cm | 5 mm | Fall blankets, cushions, runners, bags |
The instructions below are an original photo-inspired reconstruction based on visible structure; published patterns cited later are used only for sizing, gauge, and material benchmarks. Current pumpkin granny-square patterns range from approximately 10 cm with worsted yarn and a 4 mm hook to 15 cm with worsted yarn and a larger hook. A recent 3D DK version measures 11 × 11 cm with a 3.5 mm hook. The larger 20 cm target here leaves enough background around the substantial raised pumpkin.
Materials and Tools
Yarn
- Warm cream — worsted #4 cotton or acrylic — approximately 55–65 g
- Sage green — worsted #4 — approximately 45–55 g
- Medium brown — worsted #4 — approximately 10–15 g
- Burnt orange — worsted #4 — approximately 15–20 g
Plan approximately 125–155 g total yarn. The pumpkin consumes more yarn than a flat appliqué because five separate lobes overlap across the center. For yarn selection, smooth worsted cotton or cotton-acrylic gives the clearest lobe and maple-leaf definition.
Tools
- 5 mm crochet hook
- 4.5 mm hook — optional for the stem, leaf, and vine
- Tapestry needle
- Scissors
- Locking stitch markers
- Blocking mat and pins
Abbreviations
- MR — magic ring
- ch — chain
- sc — single crochet
- hdc — half double crochet
- dc — double crochet
- tr — treble crochet
- sl st — slip stitch
- BLO — back loop only
- sp — space
- st/sts — stitch/stitches
An invisible decrease is not required because the pumpkin lobes are flat shaped pieces rather than closed stuffed forms.
Finished Component Measurements
- Cream square: approximately 20 × 20 cm
- Complete pumpkin: approximately 13–14 cm wide × 10–11 cm high
- Center lobe: approximately 5 × 10 cm
- Side lobes: approximately 4.5 × 9 cm
- Brown stem: approximately 6 cm tall
- Orange maple leaf: approximately 7–8 cm across
Pattern — Step by Step
Construct the cream granny square first. The pumpkin, stem, leaf, and vine are made separately and attached after the square has been blocked. This keeps appliqué tension from changing the background dimensions.
Cream Granny Square — Round 1
Yarn: warm cream.
Make MR.
R1: Ch 3, 2 dc in MR, ch 2. *3 dc in MR, ch 2.* Repeat three more times. Join with sl st to top of beginning ch 3.
Count: four 3-dc groups and four ch-2 corner spaces.
Cream Granny Square — Round 2
Sl st across to first corner space.
Ch 3, 2 dc, ch 2, 3 dc in same corner.
Ch 2.
*In next corner work 3 dc, ch 2, 3 dc; ch 2.*
Repeat around.
Join.
Cream Granny Square — Round 3
Sl st to corner.
In corner work 3 dc, ch 2, 3 dc.
Ch 2, 3 dc in next side space, ch 2.
*Work 3 dc, ch 2, 3 dc in next corner; ch 2, 3 dc in side space, ch 2.*
Repeat around.
Join.
Cream Granny Square — Round 4
Work a standard granny expansion round.
Place 3 dc, ch 2, 3 dc in every corner.
Work 3 dc in every side ch-2 space with ch 2 between groups.
Join.
Cream Granny Square — Round 5
Repeat the established granny expansion.
Keep all four corners identical.
Join.
Cream Granny Square — Round 6
Repeat the established granny expansion once more.
Check that opposite sides have identical numbers of 3-dc groups.
Join.
Square Stabilizing Round
R7: Ch 1.
Sc in every dc and ch-2 side space.
In each corner work:
sc, ch 2, sc.
Join and fasten off.
Block the square to approximately 20 × 20 cm.
Sage Pumpkin Construction
The photographed pumpkin is best reconstructed as five overlapping pieces: one wide center lobe, two medium lobes, and two outer lobes. This method creates real depth without stuffing.
Center Pumpkin Lobe — Make 1
Yarn: sage green.
Ch 15.
Row 1: Hdc in second ch from hook and across. (14)
Row 2: Ch 1, turn. 2 hdc in first st, hdc in next 12 sts, 2 hdc in final st. (16)
Row 3: Ch 1, turn. Hdc across. (16)
Row 4: Ch 1, turn. 2 hdc in first st, hdc in next 14 sts, 2 hdc in final st. (18)
Rows 5–7: Ch 1, turn. Hdc across. (18)
Row 8: Ch 1, turn. Hdc2tog, hdc in next 14 sts, hdc2tog. (16)
Row 9: Ch 1, turn. Hdc across. (16)
Row 10: Ch 1, turn. Hdc2tog, hdc in next 12 sts, hdc2tog. (14)
Fasten off, leaving a 45 cm tail.
Center Lobe Edging
Join sage at the lower center.
Sc evenly around the complete lobe.
At the upper and lower midpoint, place 2 sc into the turning area if required to keep the edge flat.
Join and fasten off.
Medium Pumpkin Lobe — Make 2
Yarn: sage green.
Ch 14.
Row 1: Hdc in second ch from hook and across. (13)
Row 2: Ch 1, turn. 2 hdc in first st, hdc in next 11 sts, 2 hdc in final st. (15)
Rows 3–6: Hdc across. (15)
Row 7: Hdc2tog, hdc in next 11 sts, hdc2tog. (13)
Rows 8–9: Hdc across. (13)
Fasten off with a 40 cm tail.
Sc evenly around each piece.
Outer Pumpkin Lobe — Make 2
Yarn: sage green.
Ch 12.
Row 1: Hdc in second ch from hook and across. (11)
Row 2: 2 hdc in first st, hdc in next 9 sts, 2 hdc in final st. (13)
Rows 3–6: Hdc across. (13)
Row 7: Hdc2tog, hdc in next 9 sts, hdc2tog. (11)
Row 8: Hdc across. (11)
Fasten off with a 40 cm tail.
Sc evenly around each lobe.
Creating the Raised Pumpkin Ribs
Lay the two outer lobes on the cream square first.
Overlap the two medium lobes over their inner edges by approximately 1–1.5 cm.
Place the center lobe last so it overlaps both medium pieces.
The assembled pumpkin should measure approximately 13–14 cm across.
Do not sew yet.
View the arrangement from the front and adjust the pieces until five clear vertical ribs remain visible.
Brown Stem
Yarn: medium brown. Use 4.5 or 5 mm hook.
Ch 11.
Row 1: Sc in second ch from hook and across. (10)
Row 2: Ch 1, turn. Sc in next 8 sts, sl st in final 2 sts. (10)
Row 3: Ch 1, turn. Sl st in next 2 sts, sc in next 8 sts. (10)
Row 4: Ch 1, turn. Sc across. (10)
Row 5: Ch 1, turn. Sc in next 7 sts, sl st in final 3 sts. (10)
Fasten off with a 35 cm tail.
The uneven row heights create the slight natural bend visible in the reference.
Brown Stem Edging
Join brown yarn at the base.
Sc around both long edges and the curved top.
Work 2 sc in the upper turning points where required.
Fasten off.
Orange Maple Leaf
Yarn: burnt orange.
The leaf is worked as one small central shape with five pointed lobes.
Maple Leaf Center
Make MR.
R1: 10 sc in MR. Join. (10)
R2: Ch 1. 2 sc in each stitch around. Join. (20)
Top Maple Lobe
Ch 8.
Starting in second ch from hook work:
sl st, sc, hdc, dc, tr, dc, hdc.
Sl st into next two stitches of the center.
Upper Side Lobe
Ch 6.
Starting in second ch work:
sl st, sc, hdc, dc, hdc.
Sl st into next two center stitches.
Repeat once more for the opposite upper-side lobe.
Lower Side Lobes
Ch 5.
Starting in second ch work:
sl st, sc, hdc, dc.
Sl st into next two center stitches.
Repeat on the opposite side.
Fasten off with a 40 cm tail.
Maple Leaf Edging
Join orange yarn near the base.
Sc around the complete outer perimeter.
At each pointed lobe tip work:
sc, ch 2, sl st into first ch, sc.
Continue around.
Fasten off.
Raised Maple Leaf Veins
Join orange yarn at the lower center.
Surface sl st toward the top point.
Fasten off.
Repeat short surface-slip-stitch lines from the center toward each side lobe.
These raised lines reproduce the strongly defined leaf veins visible in the photograph.
Green Curly Vine
Yarn: sage green.
Ch 30.
Starting in second chain from hook, work 3 sc in each of the first 20 chains.
Work one sc in each remaining chain.
Fasten off with a 30 cm tail.
The increased section should form a natural spiral while the final straight section provides an attachment point.
Optional Second Vine Curl
Ch 16.
Work 3 sc in each chain.
Fasten off.
Attach this shorter spiral beside the main vine if the upper-left space needs the double-curl appearance shown in the reference.
Positioning the Pumpkin
Place the assembled pumpkin approximately 2.5–3 cm above the lower cream border.
Center it horizontally.
The pumpkin should cover much of the square’s central openwork while leaving a visible cream frame around all sides.
Pin all five lobes temporarily.
Do not attach the stem or maple leaf until the pumpkin body is secure.
Sewing the Outer Lobes
Begin with the left outer lobe.
Sew its outside edge to the cream square.
Secure approximately the lower third of its inner edge.
Leave the upper inner section free.
Repeat for the right outer lobe.
This partial attachment prevents the finished pumpkin from looking like five flat patches.
Sewing the Medium Lobes
Position one medium lobe over each outer lobe.
Sew around the lower and outside edge.
Add two or three hidden stitches along the overlapping inner edge.
Leave the center-facing upper edge slightly raised.
Sewing the Center Lobe
Place the center lobe over both medium pieces.
Secure its lower edge first.
Sew upward along both sides, catching only the lower layer where the pieces overlap.
Leave approximately 5–8 mm of the upper side edges free so the center lobe retains visible depth.
Attaching the Stem
Position the stem behind the pumpkin crown.
Approximately 2 cm of its lower end should disappear behind the center lobe.
Sew the hidden lower section firmly to the cream square.
Add one small attachment stitch near the middle of the stem if necessary.
Leave the curved top free.
Attaching the Maple Leaf
Place the orange maple leaf to the upper-right side of the stem.
Overlap its lower center with the pumpkin crown.
Sew through the central leaf area and lower sections of the five lobes.
Leave the pointed tips free.
The completed leaf should retain a slight raised profile.
Attaching the Vine
Place the straight end of the sage vine beneath the left side of the stem.
Sew approximately 2–3 cm of the straight section to the square.
Leave the spiral free.
Arrange the curl so it remains inside the cream border rather than extending beyond the square.
Assembly
- Crochet the seven-round cream granny background and block it to approximately 20 × 20 cm before constructing the dimensional appliqué.
- Make one center, two medium, and two outer sage pumpkin lobes, then edge each piece and compare their heights before assembly.
- Arrange the five lobes on the blocked square with approximately 1–1.5 cm overlap between neighboring pieces and confirm a total pumpkin width near 13–14 cm.
- Sew the two outer lobes first, attaching their outside edges firmly while leaving part of each inner edge free for dimensional overlap.
- Add the two medium lobes over the outer pieces, then position the center lobe last so five separate raised ribs remain visible.
- Crochet the curved brown stem and insert its lower 2 cm behind the center pumpkin lobe before stitching it securely to the background.
- Make the five-point burnt-orange maple leaf, add its raised surface-crochet veins, and position it to the upper-right side of the stem.
- Crochet the sage spiral vine and attach only its straight lower section beside the stem, leaving the curled section free from the background.
- Add hidden reinforcement stitches beneath any pumpkin lobe that rotates while keeping the upper overlapping edges visibly raised.
- Weave all tails through matching dense stitches and lightly reshape the 20 cm cream perimeter without pressing the pumpkin, maple leaf, or vine flat.
The finished square should have a flat cream openwork frame supporting five overlapping sage pumpkin ribs, one brown stem, a raised orange maple leaf, and a freely curling green vine.
7 Technical Tips
- The pumpkin loses its ribbed appearance: overlap neighboring lobes by approximately 1–1.5 cm instead of placing them edge to edge. Sewing the complete inner edge of every piece flat removes the shadow line that separates the five ribs.
- The cream square cups beneath the appliqué: block it to the full 20 × 20 cm measurement before sewing on any sage pieces. Attaching a 13–14 cm pumpkin to an unblocked center can pull the open granny spaces inward.
- The center lobe twists sideways: mark the vertical centerline of the cream square before sewing it. A displacement of even 1 cm becomes conspicuous because the brown stem visually continues that same center axis.
- The maple leaf curls into a cup: loosen the sc edging or switch to a 5 mm hook for the perimeter. A tight edge around five pointed lobes contracts the outer circumference and forces the center upward.
- The stem falls flat: secure at least 2 cm of its lower section behind the pumpkin crown. One attachment stitch at the stem base creates a hinge rather than the upright 6 cm profile shown in the reference.
- The spiral vine becomes a corkscrew knot: work exactly three sc into each foundation chain and stop the increased section after approximately 20 chains. Four or more stitches per chain produce a substantially tighter coil.
- The finished border becomes distorted: keep the dimensional appliqué at least 2 cm inside the cream perimeter. Sewing a pumpkin lobe or leaf directly into border stitches transfers its tension to the square edge.
Why Separate Lobes Work Better Here
Several crochet pumpkin appliqués build the pumpkin as one flat oval and add rib lines afterward. That method works well for small squares. The photographed motif, however, has strong shadows between the sage sections, indicating much greater depth.
Separate overlapping pieces reproduce that structure more accurately. A current pumpkin appliqué tutorial likewise uses three independent pieces specifically because their overlapping edges create raised ribs rather than relying only on embroidered lines.
The five-lobe version expands the same principle. It adds width and makes the central rib visibly dominant.
Verified Pumpkin Square Benchmarks
A 2025 Fern and Fable Makers Guild Pumpkin Granny Square specifies worsted #4 yarn and a 5 mm hook. The designer notes that yarn and hook size can be changed according to the required square dimensions.
More Than Yarn’s Pumpkin Granny Square uses worsted yarn with approximately 3.5–4 mm hooks and produces an average square near 4 × 4 inches / 10 × 10 cm.
Sammi Zheng’s current Pumpkin Granny Square uses worsted #4 yarn and a 5 mm hook and measures approximately 4.3 × 4.3 inches / 11 × 11 cm.
CreatedbyCarolynCo’s current pumpkin square measures approximately 4.5 × 4.5 inches / 11.4 × 11.4 cm using a 4 mm hook.
A 2026 3D Pumpkin Granny Square by Larysa Shakhrai uses DK yarn and a 3.5 mm hook and also finishes at approximately 11 × 11 cm. These smaller published blocks support scaling the reconstruction upward when a much larger dimensional appliqué is required.
Choosing the Sage Green
The pumpkin in the reference is muted olive-sage rather than conventional orange.
Useful yarn shade descriptions include sage, lichen, moss, olive, and eucalyptus.
Select a medium-value shade that contrasts clearly with the cream background.
A pale green too close to the cream will make the overlapping lobe edges harder to distinguish.
Choosing the Cream Background
Warm ivory gives the square an autumn palette without competing with the sage and burnt orange.
Look for natural, ecru, oatmeal, vanilla, or warm cream.
A smooth yarn is useful because the granny clusters need enough stitch definition to remain visible behind the textured pumpkin.
Choosing the Orange Leaf
The maple leaf provides the strongest color contrast in the motif.
Choose burnt orange, rust, copper, pumpkin, or terracotta.
Keep the orange medium-dark rather than fluorescent.
The brown stem should remain visibly darker than the leaf so the two upper components do not merge.
Worsted Cotton Versus Acrylic
Cotton gives the separate pumpkin lobes crisp edges and helps the maple points retain their shape. Acrylic produces a lighter, springier square and is practical when many motifs will be joined into a blanket.
A cotton-acrylic blend combines moderate structure with lower finished weight.
Use the same yarn family for all four colors whenever possible. Different fibers can produce noticeably different component dimensions even when the hook and stitch counts remain unchanged.
Making a Smaller 15 cm Square
Use DK yarn with a 3.5–4 mm hook.
Stop the cream background one granny round earlier.
Reduce each pumpkin lobe foundation by approximately two chains.
Make the stem from ch 8 rather than ch 11 and reduce the maple leaf lobe chains by one or two stitches.
Target a pumpkin width near 9–10 cm.
Making an 11 cm Square
Current published pumpkin granny squares demonstrate that approximately 11 cm is practical with DK or worsted yarn depending on hook size.
For this dimensional construction, make only three pumpkin lobes rather than five.
Use a center lobe and two smaller side pieces.
Keep the maple leaf near 4 cm across and replace the long spiral vine with a short ch-12 curl.
Making a 25 cm Square
Keep the pumpkin appliqué unchanged and add granny rounds to the cream background.
This preserves the proportions of the botanical centerpiece while creating more visible negative space.
Add one or two cream rounds after R6 before working the stabilizing sc perimeter.
Block to 25 × 25 cm before attachment.
Making the Pumpkin Wider
Increase the overlap less rather than enlarging every individual lobe.
Reducing overlap from 1.5 cm to approximately 8 mm can add several centimeters to the complete pumpkin width.
Do not eliminate overlap entirely.
The raised rib structure depends on one piece visibly crossing over its neighbor.
Making the Pumpkin More Dimensional
Insert a very thin layer of polyester fiberfill beneath the center three lobes before the final attachment stitches.
Use only enough to lift the crochet approximately 5–8 mm.
Keep stuffing away from the lobe edges.
Heavy filling converts the appliqué into a bulky stuffed form and can distort the granny background.
Making a Flat Pumpkin Version
For a blanket intended for frequent use, omit the five separate lobes.
A published pumpkin appliqué approach begins with a circular or oval center and shapes the sides with hdc and dc stitches.
Surface slip stitches can then be added vertically to suggest ribs.
This reduces thickness and makes the finished square easier to stack with neighboring motifs.
Making the Maple Leaf Larger
Increase the top lobe from ch 8 to ch 10.
Increase the upper side lobes from ch 6 to ch 8.
Increase the lower lobes from ch 5 to ch 6.
Add one additional sc between leaf lobes if the center begins to cup.
Making the Leaf More Textured
After completing the center vein, add four short diagonal surface-slip-stitch veins.
Start each at the central vein and work toward one side point.
Stop approximately 5 mm before the outer edging.
This leaves enough flexible fabric for the leaf tips to curve naturally.
Making the Stem Taller
Increase the foundation to ch 15.
Work approximately 14 sc across each full-width row.
Place the slip-stitch shaping sections on the same side for two rows, then move them to the opposite side.
The resulting stem will develop a more pronounced S-curve.
Using the Square for a Pillow
Make four 20 cm squares and join them into a 2 × 2 front panel.
The motif field will measure approximately 40 × 40 cm before outer edging.
Use flat or plain granny squares for the pillow back if a less textured reverse surface is preferred.
Join through the cream borders rather than any appliqué component.
Using the Squares for a Table Runner
Make three to five motifs.
Join them in one row through the cream stabilizing rounds.
Three 20 cm blocks produce approximately 60 cm of motif length before the joining seam and final perimeter.
Add two cream border rounds around the completed strip to unify the edges.
Using the Squares for a Fall Blanket
Alternate dimensional pumpkin squares with plain cream, sage, or maple-leaf blocks.
This reduces overall weight and prevents every section of the blanket from having the same raised thickness.
A 5 × 6 layout of 20 cm squares creates a motif field around 100 × 120 cm before joining adjustments and border rounds.
Place the dimensional pumpkins away from heavily used fold lines.
Joining Multiple Squares
Block every motif before joining.
Place two squares side by side.
Use cream yarn to work relaxed slip stitches through corresponding back loops.
Keep the pumpkin appliqués clear of the seam.
Check the joined edge after every square because tight slip stitches can shorten a 20 cm side.
Fixing an Uneven Pumpkin
Remove the center lobe before changing the outer pieces.
Measure from the square centerline to the outside edge of each outer lobe.
The measurements should match within approximately 5 mm.
Reposition the medium pieces only after the two outer edges are symmetrical.
Fixing a Lobe That Curls
Inspect the sc edging first.
If the edging is tighter than the hdc body, remove it and work the perimeter with the larger 5 mm hook.
Light blocking can correct a minor curl.
Do not stretch one lobe substantially larger than its matching partner.
Fixing a Distorted Granny Square
Measure both diagonals after blocking.
A difference greater than approximately 1 cm indicates that one corner or side is tighter.
Correct the cream background before sewing on the pumpkin.
Once five overlapping lobes are attached, substantial reblocking becomes more difficult.
Yarn Tail Management
Use the long lobe tails for assembly whenever their position allows it.
After sewing, run each tail through at least 5 cm of matching dense stitches.
Change direction once before trimming.
Do not weave sage or orange tails through open cream granny spaces where they remain visible from the front.
Blocking the Finished Square
Pin only the cream perimeter.
Set all four sides to approximately 20 cm and compare the diagonals.
Do not place pins through the pumpkin ribs.
Support the maple leaf and vine so they dry in the desired position.
If steam blocking is appropriate for the selected yarn, keep direct heat away from acrylic fibers.
Care
Follow the yarn manufacturer’s washing instructions.
Place the square or finished project inside a laundry bag if machine washing is permitted.
Reshape the five pumpkin lobes and maple points while damp.
Dry flat when possible.
Avoid pressing the appliqué beneath heavy objects because prolonged compression reduces the visible overlap between the ribs.
Sources
Current yarn-weight and hook benchmarks were checked against Fern and Fable Makers Guild’s Pumpkin Granny Square, which specifies worsted #4 yarn and a 5 mm hook, and More Than Yarn’s Pumpkin Granny Square, which uses worsted yarn with 3.5–4 mm hooks and reports an average 4 × 4 inch square.
Finished-size comparisons were checked against Sammi Zheng’s Pumpkin Granny Square, which uses worsted yarn, a 5 mm hook, and measures approximately 11 × 11 cm; CreatedbyCarolynCo’s Pumpkin Granny Square, which reports approximately 4.5 × 4.5 inches with a 4 mm hook; and Larysa Shakhrai’s 3D Pumpkin Granny Square, which uses DK yarn, a 3.5 mm hook, and finishes at approximately 11 × 11 cm.
Pumpkin construction was compared with the raised Crochet Pumpkin Appliqué tutorial, which uses overlapping separate pieces to create pronounced ribs, and Maria’s Blue Crayon Pumpkin Appliqué, which uses worsted yarn, a 4 mm hook, and a chained vine. A current step-by-step pumpkin-square reference was also checked at VivCrochets’ Pumpkin Granny Square tutorial.
Conclusion
The five overlapping sage lobes control the dimensional effect of this square, so arrange them before making any permanent attachment stitches. Keep the pumpkin near 13–14 cm wide, center its largest lobe on the 20 cm cream background, and leave the inner lobe edges partially free. The brown stem, burnt-orange maple leaf, and spiral vine should attach through their bases rather than their tips. Make and block the cream square first, then test the complete appliqué arrangement with pins. Save this 3D pumpkin granny square crochet pattern to Pinterest or share the finished block on Instagram with #SagePumpkinGrannySquare. Would you keep the pumpkin sage green or substitute burnt orange while retaining the orange maple leaf?









