Introduction
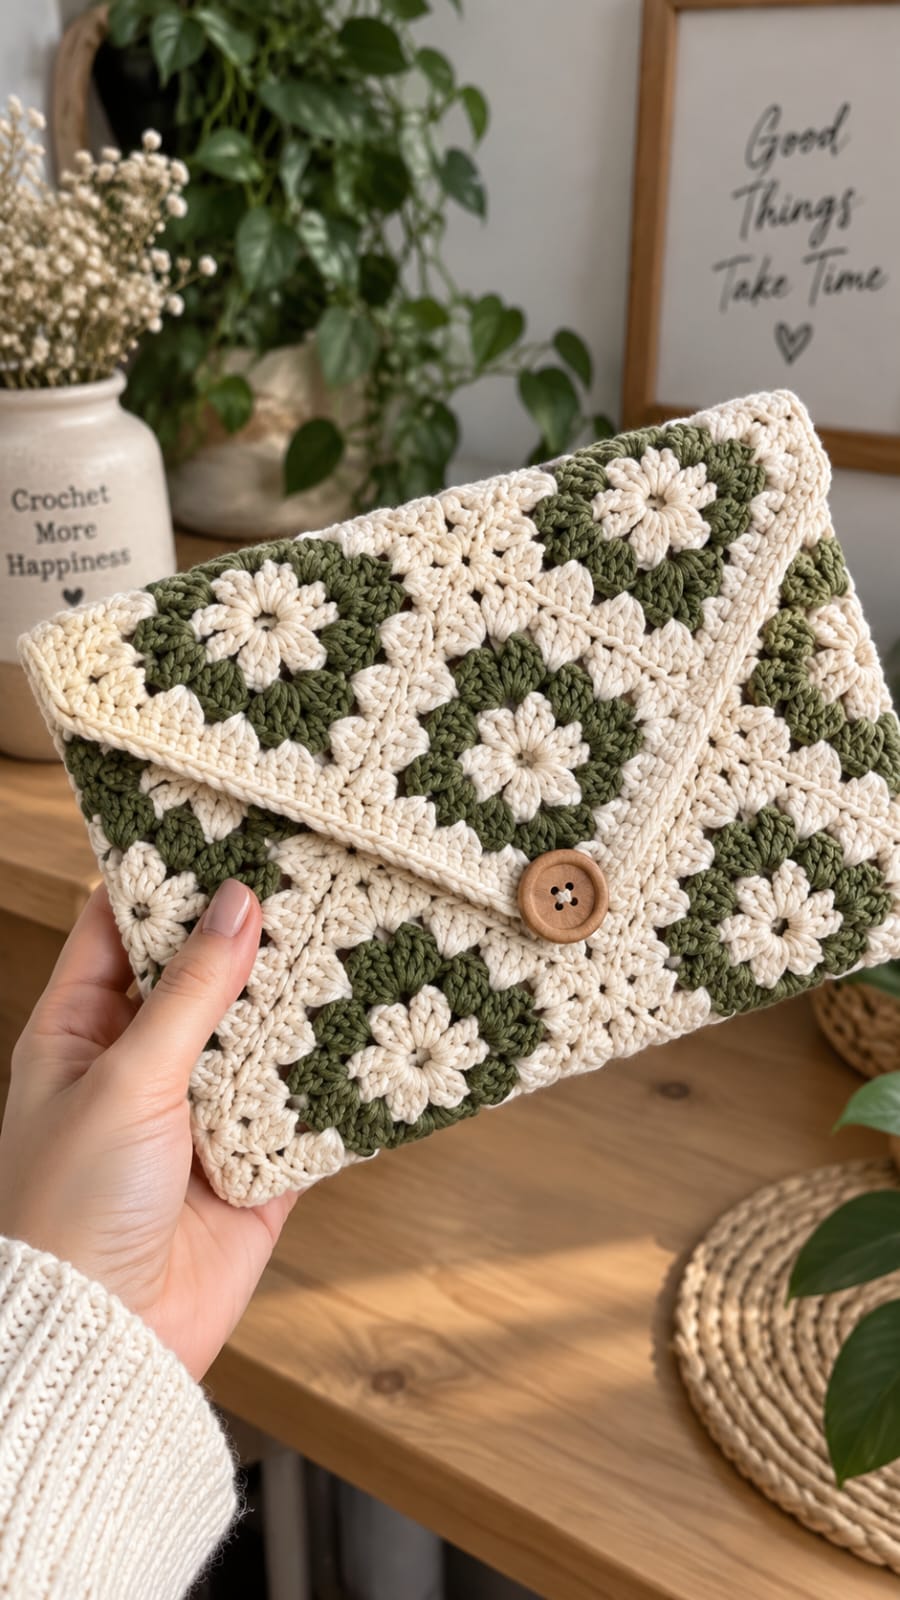
The envelope flap on this clutch has to cross several flower-square seams without letting a single cream daisy twist off-center. This flower granny square clutch crochet pattern reconstructs the photographed bag with DK cotton, a 4 mm hook, sage green and cream motifs, a wooden button, and a triangular flap. The intermediate project finishes near 23 × 15 cm and provides compact storage for everyday essentials.
The Design: What Makes This Granny Square Clutch Different
The bag combines small floral motifs with envelope construction rather than using one oversized folded granny square. Cream flower centers alternate with sage backgrounds, while inverse cream squares break up the green grid and keep the front panel visually balanced. A triangular flap crosses the upper front, so its edge needs a firm crochet border that resists stretching around the button closure. The photographed sage green granny square bag also appears substantially denser than a market tote; cotton or cotton-blend yarn is therefore a better structural choice than highly elastic fibers. Published granny-square clutches provide useful benchmarks: Fiona Field’s DK cotton-blend version measures 9 × 5 inches with a 4 mm hook, while Marie Bruandet’s flower-square purse measures 22 × 15 cm. The recurring construction error is joining unblocked motifs, which produces stepped seams and a skewed flap.
Project Info at a Glance
| Skill Level | Time | Finished Size | Hook | Best For |
|---|---|---|---|---|
| Intermediate | Approx. 7–10 hours | Approx. 23 × 15 cm closed | 4 mm | Clutch, project pouch, tablet accessory pouch |
The finished measurement is based on published clutch and floral purse benchmarks rather than an exact specification for the photographed item. Fiona Field’s Granny’s Clutch Bag uses DK cotton blend, a 4 mm hook, 150–200 m of yarn, and finishes at approximately 23 × 13 cm. Marie Bruandet’s Daisy Granny Square Purse uses DK cotton and measures approximately 22 × 15 cm.
Materials and Tools
Yarn
- Warm cream — DK #3 cotton or cotton blend — approximately 80–100 g
- Sage green — DK #3 cotton or cotton blend — approximately 70–90 g
- Total yarn — approximately 150–190 g / 350–445 m, depending on motif size and lining choice
For comparison, Fiona Field’s DK clutch uses 150–200 m, while a published daisy granny-square purse by Marie Bruandet uses 150–180 m for a smaller motif arrangement. This reconstruction reserves additional yarn for the full envelope flap, reinforced perimeter, and motif layout visible in the photograph.
Tools
- 4 mm crochet hook
- 3.5 mm hook — optional for the final button loop
- Wooden button — approximately 28–32 mm diameter
- Tapestry needle
- Locking stitch markers
- Scissors
- Blocking mat and pins
- Optional cotton lining fabric
- Optional sewing needle and matching thread
Abbreviations
- MR — magic ring
- ch — chain
- sc — single crochet
- hdc — half double crochet
- dc — double crochet
- tr — treble crochet
- sl st — slip stitch
- CL — cluster
- BLO — back loop only
- sp — space
- st/sts — stitch/stitches
An invisible decrease is not needed because the bag is constructed from flat motifs and a flat flap rather than shaped stuffed pieces.
About This Photo-Inspired Reconstruction
This pattern is reconstructed from the visible geometry of the reference image. It is not presented as the original designer’s published instructions. Yarn quantities, motif arrangement, flap shaping, and final dimensions are calculated from the photograph and checked against current published granny-square clutch and flower-bag specifications.
Make one test motif before producing the complete set. Target approximately 5.5–6 cm square after blocking. A small adjustment in motif width multiplies across the joined panel and changes the finished clutch substantially.
Pattern — Step by Step
Use US crochet terminology. The flower motifs are worked in joined rounds with the right side facing. Make two color arrangements so the cream and sage sections can alternate across the bag.
Flower Square A — Cream Flower with Sage Corners
Yarn: warm cream and sage green.
R1: With cream, make MR. Ch 2, work 12 dc into MR. Join with sl st. (12 dc)
R2: Ch 2. Work 2 dc together in the same stitch, ch 1. *Dc2tog in next stitch, ch 1.* Repeat around. Join. (12 clusters, 12 ch-1 spaces)
R3: Sl st into next ch-1 space. Ch 1. Work 3dc-cluster in same space, ch 2. *3dc-cluster in next ch-1 space, ch 2.* Repeat around. Join. (12 clusters, 12 ch-2 spaces)
Fasten off cream.
R4: Join sage in any ch-2 space. Ch 2, 2 dc, ch 2, 3 dc in same space to form first corner.
Work 3 hdc in next ch-2 space.
Work 3 sc in next ch-2 space.
Work 3 hdc in next ch-2 space.
*In next space work 3 dc, ch 2, 3 dc; 3 hdc in next space; 3 sc in next space; 3 hdc in next space.*
Repeat around, forming four corners.
Join.
R5: Ch 1. Sc in every stitch around. In each corner ch-2 space work sc, ch 2, sc.
Join and fasten off.
Block to approximately 5.5–6 cm square.
Flower Square B — Sage Flower with Cream Corners
Yarn: sage green and warm cream.
Repeat Flower Square A, using sage for R1–R3 and cream for R4–R5.
Block to exactly the same dimensions as Square A.
Alternative Six-Petal Flower Center
The flowers in the photograph read as compact cream blossoms rather than conventional flat granny clusters. For a stronger six-petal appearance, substitute the following center.
R1: 12 sc in MR. (12)
R2: *Sl st in next stitch, ch 3, 2 dc in next stitch, ch 3, sl st in same stitch.* Repeat six times. (6 petals)
Fasten off.
Join the background color behind the petal bases and work the squaring round into six evenly distributed rear attachment points.
Keep this variation consistent across every motif used in the same bag.
Motif Quantity
For a clutch approximately 23 × 15 cm, make enough 5.5–6 cm motifs to construct a rectangular body approximately four motifs wide and four to five motif units tall before folding.
A practical photo-inspired arrangement uses 16 full squares for the main body plus additional motifs or triangular sections for the flap.
Because the photograph partially hides the rear construction, treat this quantity as a layout target rather than an original-pattern stitch specification.
Suggested Color Layout
Alternate Square A and Square B rather than placing identical motifs in uninterrupted rows.
For a four-square row:
A – B – A – B
For the next row:
B – A – B – A
Continue the checker arrangement.
This distributes sage across the surface and prevents the cream motifs from merging into one visually solid band.
Joining the Granny Squares
Block all motifs before joining.
Place two squares right sides up with corresponding edges touching.
Using cream yarn, insert the hook through the back loop of one square and the corresponding back loop of the neighboring square.
Work a relaxed slip stitch.
Continue across the complete edge.
Do not pull the joining yarn tightly.
Join the motifs into rows first, then connect the rows.
Checking the Main Panel
Lay the joined panel flat.
Measure its width at the top, center, and bottom.
The three measurements should differ by no more than approximately 5 mm.
Check both diagonals as well.
If one diagonal is noticeably shorter, inspect the motif joins before proceeding to the envelope construction.
Lower Clutch Body
Fold the joined motif panel so the lower section forms a pouch approximately 23 cm wide × 15 cm high.
Keep the right sides facing outward.
Align corresponding motif seams along both side edges.
Pin or mark the fold before sewing.
The remaining upper portion becomes the envelope flap.
Side Seams
Join cream yarn at the lower corner.
Working through both layers, sc evenly up the first side.
Fasten off.
Repeat along the second side.
Keep the seam stitch count identical on both sides.
A difference of even two or three stitches can pull the clutch opening toward one corner.
Triangular Envelope Flap
If your motif layout creates a rectangular upper section rather than the triangular point visible in the reference, shape the flap with decreasing cream rows.
Join cream yarn at one upper side.
Row 1: Sc evenly across the upper flap edge.
Row 2: Ch 1, turn, skip first stitch, sc across to final 2 stitches, sc2tog. (2 sts decreased)
Row 3: Ch 1, turn, sc across.
Row 4: Repeat Row 2.
Continue alternating one decrease row and one even row until the flap narrows to approximately 5–6 cm at its point.
Fasten off.
Flap Border Round 1
Join cream yarn at the upper corner where the flap meets the body.
Sc evenly along the first diagonal edge.
At the flap point work 3 sc.
Sc evenly along the opposite diagonal edge.
Continue across the upper back edge if required.
Fasten off.
Flap Border Round 2
Join cream at one upper corner.
Work hdc in every stitch along the flap edge.
At the point work 3 hdc in the center stitch.
Continue along the opposite edge.
Fasten off.
This second border produces the firm cream outline visible around the photographed envelope flap.
Button Loop
Mark the exact center of the flap point.
Join cream yarn.
For a 30 mm wooden button, ch 8–10.
Sl st back into the same attachment point to form a loop.
Test the loop around the actual button before fastening off.
The loop should stretch over the button without hanging loosely when the clutch is closed.
Wooden Button
Close the flap and mark where the loop reaches the front panel without stretching.
Position a 28–32 mm wooden button at that point.
Sew it through dense crochet rather than an open flower-center space.
Pass strong thread or matching yarn through the button several times.
Knot securely on the inside.
Optional Inner Button Reinforcement
Crochet a small cream disc:
R1: 6 sc in MR. (6)
R2: inc ×6. (12)
Fasten off.
Place the disc directly behind the wooden button inside the bag.
Sew through the button, clutch fabric, and reinforcement disc together.
This distributes the closure load across a wider area.
Optional Fabric Lining
Measure the completed pouch after the side seams are finished.
Cut two cotton rectangles approximately 1.5 cm larger than the internal pouch dimensions on all sides.
Place fabric right sides together.
Sew the side and bottom seams with approximately a 1 cm seam allowance.
Turn the upper raw edge toward the wrong side.
Insert the lining into the clutch.
Hand-sew it just below the crochet opening.
Do not stitch through the envelope flap.
Optional Interfacing
For a firmer envelope profile, fuse lightweight interfacing to the lining before assembly.
Keep the interfacing approximately 5 mm inside each fabric seam allowance.
Avoid very rigid bag stabilizer unless the clutch is intended to hold a tablet or similar flat object.
The granny-square surface should retain some flexibility.
Assembly
- Crochet one test flower square, block it to approximately 5.5–6 cm, and confirm that the fabric is dense enough for a clutch before making the full motif set.
- Make the required cream-and-sage flower squares in alternating color arrangements, keeping every finished motif within approximately 3 mm of the target size.
- Block all motifs individually and arrange them in the checker layout before joining so no large uninterrupted patch of one background color develops.
- Join squares through corresponding back loops with relaxed slip stitches, completing horizontal rows before connecting the rows vertically.
- Fold the joined panel into the pouch shape and align both side seams so corresponding granny-square corners meet at the same height.
- Close both sides with cream single crochet, maintaining the same seam stitch count on the left and right edges.
- Shape the remaining upper section into the triangular envelope flap and add two cream border rounds along its exposed edges.
- Make the center button loop at the flap point, then close the bag and mark the wooden button position without stretching the loop.
- Sew the button securely to the front panel and add the optional lining only after testing that the flap closes squarely over the pouch.
- Weave all remaining tails through dense matching stitches, reshape the corners by hand, and confirm a final closed size near 23 × 15 cm.
The finished clutch should form a firm rectangular pouch with alternating cream-and-sage flower motifs, a centered triangular envelope flap, cream perimeter edging, and one wooden button closure.
7 Technical Tips
- The motif grid becomes crooked: block every square to within approximately 3 mm of the same width before joining. A 5 mm discrepancy repeated across four motifs can distort the finished clutch by roughly 2 cm.
- The joins form raised cords: loosen the slip-stitch seam or move to a 4.5 mm hook for joining only. Tight joining stitches shorten the shared edge and force adjacent flower squares to cup.
- The flap pulls toward one side: count the stitches along both diagonal edges before working Border Round 2. A difference greater than two stitches usually indicates uneven decrease placement or edge spacing.
- The wooden button stretches the crochet: add the 12-stitch reinforcement disc behind the closure. A 28–32 mm button repeatedly pulling against one granny cluster can enlarge the surrounding openings.
- The flower centers twist after assembly: join squares only after they have been blocked completely dry. Joining damp or differently sized motifs transfers seam tension directly into the circular flower centers.
- The button loop hangs open: test the chain around the actual button before finishing it. For a 30 mm button, begin around 8–10 chains and adjust according to yarn elasticity rather than relying on a fixed chain count.
- The clutch collapses when held: add a cotton lining or lightweight interfacing instead of tightening the crochet gauge excessively. A fabric insert supports the 23 × 15 cm body without shrinking the floral motifs.
Why DK Cotton Works for This Bag
A clutch needs more dimensional stability than a scarf or throw.
DK cotton produces clearly defined flower clusters and comparatively firm seams without making the finished pouch excessively thick.
Fiona Field’s published Granny’s Clutch Bag uses DK cotton blend with a 4 mm hook. Marie Bruandet’s flower-square purse also specifies DK cotton, providing a second useful benchmark for a small floral handbag.
Pure cotton has less spring than acrylic. That helps the envelope flap retain its triangular profile and reduces stretching around the wooden button.
Verified Size and Hook Benchmarks
Fiona Field’s Granny’s Clutch Bag is published at approximately 9 × 5 inches / 23 × 13 cm. It uses DK cotton-blend yarn, a 4 mm hook, and approximately 150–200 m.
Marie Bruandet’s Daisy Granny Square Purse uses DK cotton and is reported at approximately 22 cm wide × 15 cm high. The published listing specifies a 4 mm hook, while the project description notes a 3.5 mm hook for the photographed sample.
Nancy Brown’s larger Granny Square Clutch Bag uses worsted yarn, 4.25 and 5 mm hooks, and approximately 200–274 m. Its finished circumference is about 22 inches with an 8-inch depth.
Those measurements support a target near 23 × 15 cm for the compact envelope-style reconstruction.
Flower Square Stitch Benchmark
For a more detailed daisy motif, Passionate Crafter publishes a six-round square beginning with 8 sc, increasing to 16 sc, then building 16 floral clusters before squaring the motif.
Its fifth round finishes with 15 stitches per side / 60 stitches total, and Round 6 increases that to 17 stitches per side / 68 total.
That construction is useful when a larger flower square is wanted, but the photographed clutch needs smaller motifs. The compact version above therefore stops earlier and uses fewer structural rounds.
Alternative Daisy Square
Made by Gootie’s published daisy square provides another construction option.
Its center begins with 8 hdc.
The flower round forms 8 treble clusters, followed by a squaring round containing 44 dc and four ch-2 corners.
Later rounds add puff-stitch corners and a final single-crochet perimeter.
Use this motif if stronger petal definition is preferred, but make a swatch first because the extra rounds produce a larger square.
Making the Clutch Wider
Add one complete motif column rather than stretching the existing squares.
At a blocked motif width of approximately 5.75 cm, one additional column adds roughly 5.75 cm before seam compression.
Keep the flap point centered over the new width.
If the button remains in the original position, the closure will appear visibly offset.
Making the Clutch Taller
Add one horizontal motif row to the lower pouch section.
Do not automatically enlarge the flap by the same amount.
A flap covering approximately the upper half of the front panel retains the envelope proportion shown in the reference.
Move the wooden button only after the complete flap has been bordered.
Making a Tablet Pouch
Measure the device and add approximately 2–3 cm to both width and height for ease.
Calculate the required motif count using the blocked square measurement.
Add a fabric lining and lightweight interfacing.
For electronics, avoid an oversized wooden button that can press directly against the screen through a thin lining.
Making a Zippered Version
Omit the button loop and shorten the envelope flap or remove it entirely.
Hand-sew a zipper along the upper pouch opening.
Fiona Field’s published granny-square clutch uses a zipper, demonstrating that a zip closure works well with DK floral construction.
Choose a zipper approximately 1–2 cm shorter than the internal opening so its ends do not distort the crochet corners.
Making a Wristlet
Ch approximately 45–50 with cream yarn.
Sl st back along the complete chain.
Fold into a loop.
Attach both ends to an upper side seam through several dense stitches.
Test the attachment under moderate load before weaving in the tails.
Making a Crossbody Version
A flower granny-square clutch can also accept a long strap.
Work a strap approximately 110–125 cm long using several rows of tightly worked sc.
Attach it to reinforced upper side seams rather than open motif corners.
For a removable strap, sew metal rings to fabric reinforcement tabs inside the lining.
Choosing the Sage Green
The photographed green is muted and earthy rather than bright.
Useful shade descriptions include sage, moss, olive, eucalyptus, and lichen.
Choose a medium-value green that remains visibly darker than the cream.
If the values are too similar, the alternating flower-square geometry becomes difficult to read from a distance.
Choosing the Cream
Warm ivory or natural cotton matches the photographed background more closely than optical white.
Use the same cream for the flower petals, inverse motif backgrounds, joining seams, and flap border.
Repeating one neutral across those areas ties the separate squares into a single bag structure.
A mercerized cotton creates sharper stitch definition, while a softer cotton blend produces a less rigid hand.
Changing the Color Layout
The construction does not depend on sage green.
Try cream with terracotta, dusty rose, denim blue, charcoal, or muted mustard.
Keep one color dominant in the motif backgrounds and repeat the lighter shade in the border.
Two-color construction also reduces the number of yarn tails compared with a multicolored granny-square bag.
Keeping the Flower Centers Consistent
Make all centers in one production batch.
Then complete all petal rounds.
Finish with the background rounds.
This assembly-line method makes changes in hand tension easier to notice because the same stitch sequence is repeated continuously.
Count every flower before changing color.
Managing Yarn Tails
Weave motif tails before joining the complete panel.
Run each tail through at least 4–5 cm of matching dense stitches.
Change direction once.
Do not carry dark sage tails behind open cream flower centers because they can show through the gaps.
Leave only joining and final-border tails until the bag is assembled.
Blocking the Motifs
Pin each motif by its four corners first.
Measure both horizontal and vertical dimensions.
Add side pins only after the square reaches its target measurement.
Allow the motifs to dry completely before unpinning.
Do not stretch the flower center separately from the square background.
Blocking the Finished Clutch
After assembly, dampen the crochet lightly according to the yarn label.
Insert a dry folded towel or blocking form inside the pouch.
Shape the side seams vertically.
Center the triangular flap over the button.
Allow the bag to dry closed without pulling the button loop under heavy tension.
Care
Follow the yarn manufacturer’s washing instructions.
Remove detachable straps before washing.
If the bag contains a wooden button, prolonged soaking can affect the finish of untreated wood.
Reshape the motif grid while damp and dry the clutch flat.
For a lined version, check that the lining fabric and crochet yarn have compatible washing requirements.
Sources
Clutch dimensions, yarn weight, hook size, and yardage benchmarks were checked against Fiona Field’s Granny’s Clutch Bag on Ravelry, which specifies DK cotton blend, a 4 mm hook, 150–200 m of yarn, and a finished size of 9 × 5 inches.
Flower-purse dimensions were compared with Marie Bruandet’s Daisy Granny Square Purse, which uses DK cotton, lists 150–180 m, and reports a finished sample approximately 22 × 15 cm. A larger clutch benchmark came from Nancy Brown’s Granny Square Clutch Bag, which uses worsted yarn, 4.25 and 5 mm hooks, and 200–274 m.
Flower-square stitch construction was cross-checked with Passionate Crafter’s Daisy Granny Square and Made by Gootie’s Daisy Granny Square. Current floral bag construction was also compared with HanJan Crochet’s Flower Granny Square Bag and Wilmade’s Granny Square Bag.
Conclusion
Motif consistency determines whether this envelope clutch closes squarely. Make one 5.5–6 cm sample first, then keep every flower square within roughly 3 mm of that measurement before joining. The cream slip-stitch seams should remain flexible, while the triangular flap needs a firmer two-round border to carry the wooden button loop without stretching. After assembling the pouch, test the closure before adding an optional cotton lining. Save the finished flower granny square clutch crochet pattern to Pinterest or share the project on Instagram with #SageFlowerClutch. For this exact design, would you keep the natural wooden button or replace it with a cream crochet-covered button?









