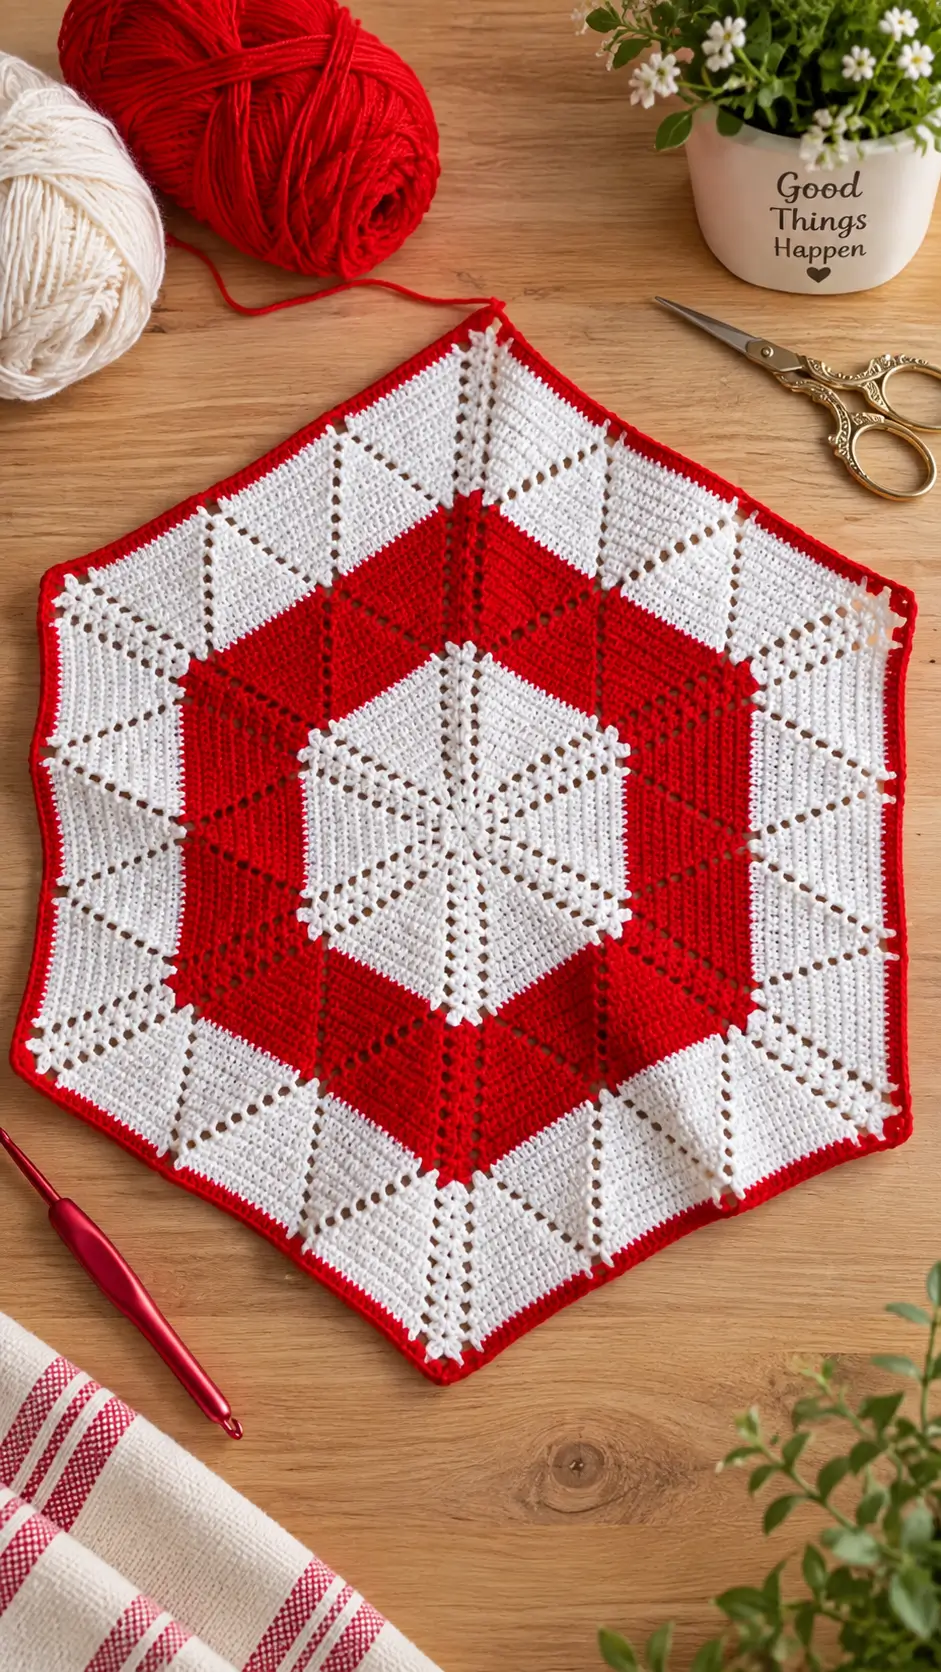
Six points force every increase in this doily to stay aligned with the center, or the entire red star shifts visibly off axis. This hexagon star crochet doily pattern uses red and white cotton, a 3 mm hook, and repeated corner spaces to build a medium-to-large table piece. Intermediate crochet skills are appropriate. The flat construction also makes the finished piece practical beneath a centerpiece or seasonal table arrangement.
The Design: What Makes This Hexagon Star Different
The design depends on three structural decisions. First, six permanent corner points divide every round into equal sectors, preventing the six point star crochet pattern from becoming circular. Second, eyelet lines run from the center toward those corners; the open stitches interrupt otherwise dense fabric and make the geometry readable. Third, color changes are made by complete bands rather than scattered motifs, producing the strong red star visible inside the white outer field.
The central white section needs to remain relatively flat because every later round inherits its geometry. A common mistake in a red and white crochet doily is adding too many stitches between corners. The fabric then waves even though the six points appear correct. Too few stitches cause the opposite problem: the corners pull upward and the centerpiece cups.
Six repeated corner sections provide the basic geometry required for this type of crochet hexagon.
Project Info at a Glance
| Skill Level | Time | Finished Size | Hook | Best For |
|---|---|---|---|---|
| Intermediate | 6–10 hours | Approx. 43–50 cm | 3.0 mm | Table centerpiece |
Finished dimensions depend on yarn weight, crochet tension, number of expansion rounds, and blocking.
Materials and Tools
Yarn
The photographed piece appears to use yarn heavier than classic size-30 crochet thread. For this version, choose smooth cotton with enough stitch definition to keep the eyelet lines sharp.
- Red yarn — size-10 crochet cotton or light sport cotton — approximately 40–60 g.
- White yarn — size-10 crochet cotton or light sport cotton — approximately 40–60 g.
Use the same yarn line and weight for both colors. Mixing yarn thicknesses can distort the six sides and make the color sections block at different rates.
Tools
- 3.0 mm crochet hook
- Tapestry needle
- Scissors
- Six locking stitch markers
- Blocking pins
- Blocking mat
- Tape measure
Abbreviations
- MR — magic ring
- ch — chain
- sc — single crochet
- dc — double crochet
- tr — treble crochet
- sl st — slip stitch
- sp — space
- st/sts — stitch/stitches
- rep — repeat
- picot — ch 3, sl st into first chain
Invisible decrease is an amigurumi shaping method and is not required for this flat crochet project.
Hexagon Star Crochet Doily Pattern — Step by Step
This piece is worked from the center outward in joined rounds. Six corner spaces control the shape throughout the pattern.
Place one stitch marker in each corner space. Move the six markers upward as the work progresses. This makes an accidentally missed corner much easier to detect.
Central White Hexagon
Yarn: White
R1: MR, ch 3, 2 dc, ch 2; *3 dc, ch 2* ×5 into ring. Join with sl st. (18 dc, 6 ch-2 spaces)
R2: Sl st to corner. Ch 3, 2 dc, ch 2, 3 dc in same corner; *ch 1, (3 dc, ch 2, 3 dc) in next corner* ×5. Join. (36 dc, 6 ch-1 spaces, 6 corners)
R3: Sl st to corner. *(3 dc, ch 2, 3 dc) in corner, ch 1, 3 dc in next ch-1 sp, ch 1* around. Join. (54 dc)
R4: Work *(3 dc, ch 2, 3 dc)* in each corner. Work 3-dc groups in each side space, separating groups with ch 1. Join.
R5: Repeat R4. Each side gains one additional 3-dc group.
R6: Repeat the established expansion, maintaining exactly six corner spaces.
Check the center before continuing. It should rest flat without being stretched. Rippling usually indicates excess stitches or an accidental additional increase.
White Eyelet Expansion
The open radial lines are an important feature of this design. Each corner remains a permanent eyelet and expansion point.
R7: Ch 3. Dc in each dc and ch-1 space across the first side. In corner work *(dc, ch 2, dc)*. Repeat around. Join.
R8: Ch 3. Dc in every dc across each side. In every corner work *(dc, ch 2, dc)*. Join.
R9: Repeat R8.
R10: Repeat R8. Add one picot near the midpoint of each side if you want the small raised white details visible in the reference design.
Do not add extra increases at the side midpoints. The six corners are the primary expansion points.
Red Middle Star Band
Yarn: Red
Change to red at one of the six corners.
R11: Ch 3, dc across the side; *(dc, ch 2, dc)* in each corner. Continue around and join.
R12: Repeat R11.
R13: Repeat R11.
R14: Repeat R11.
R15: Repeat R11.
R16: Repeat R11.
The red section should now form a broad six-sided band around the white center. Keep checking that all six corners point directly away from the center.
Red Eyelet Spokes
The photographed design contains narrow openings that break up the solid red fabric. Controlled ch-1 spaces create a similar effect without making the band excessively lacy.
R17: Ch 3, dc across each side to the final stitch before the corner, ch 1, skip 1 st, then *(dc, ch 2, dc)* in corner. Ch 1, skip 1 st, continue in dc. Repeat around.
R18: Dc in each dc and dc in each ch-1 space. Retain *(dc, ch 2, dc)* at all six corners.
R19: Repeat R17.
R20: Repeat R18.
Keep the eyelets narrow. Larger chain spaces change the proportions of the radial lines and can make the red section considerably more open than the reference piece.
White Outer Band
Yarn: White
Change to white at a corner.
R21: Ch 3 and dc in every stitch. Work *(dc, ch 2, dc)* in each corner.
R22: Repeat R21.
R23: Work dc across each side, but place *ch 1, skip 1* at approximately one-quarter, one-half, and three-quarter positions along each side. Keep the six corners unchanged.
R24: Dc into every dc and ch-1 space. Maintain the corner increases.
R25: Repeat R23, aligning openings vertically with the previous eyelets.
R26: Repeat R24.
R27: Repeat R23.
R28: Repeat R24.
The outer white field should be wider than a simple edging. For a larger table centerpiece, repeat R23 and R24 one or two additional times.
Measure the piece after each additional pair of rounds. Adding rounds changes both the diameter and the amount of yarn required.
Decorative White Detail
Yarn: White
Small picots can reproduce the raised points visible around portions of the white sections.
R29: *Sc in next 5 sts, picot, sc in next 5 sts* across each side, adjusting the final interval as needed so the picots remain evenly distributed. At each corner work *(sc, ch 2, sc)*.
If the finished piece will regularly sit beneath glasses, plates, or serving dishes, this decorative round can be omitted. A flatter surface is more practical for table use.
Red Perimeter
Yarn: Red
R30: Sc in every stitch around. In each ch-2 corner work *(sc, ch 2, sc)*.
R31: Sc in each sc. Work *(sc, ch 2, sc)* at all six corners.
Fasten off. Leave approximately a 15 cm tail for secure weaving.
The narrow red border visually closes the outer white field while preserving the six-point geometry.
Assembly and Finishing
- Lay the completed doily face up and check that all six sides have comparable stitch density.
- Weave the white color-change tails through white stitches rather than carrying them into the red sections.
- Weave red tails through red fabric for at least 4–5 cm before reversing direction.
- Wet the cotton piece evenly in cool water if the yarn manufacturer’s care instructions permit wet blocking.
- Remove excess water carefully without twisting the crochet.
- Place the center of the doily on a blocking mat and mark its position.
- Pin all six outer points first, keeping their distance from the center equal.
- Pin the midpoint of every side after the six corners are positioned.
- Adjust the eyelet spokes so each runs visually from the center toward its corresponding outer point.
- Allow the piece to dry completely before removing the blocking pins.
The completed doily should form a flat six-sided centerpiece with aligned radial openings, distinct red and white sections, and a narrow red perimeter.
7 Technical Tips for a Flat Hexagon Doily
- Mark all six corners. Missing one corner increase for a single round can shorten that sector and pull the finished hexagon off center. Keep exactly six corner markers in place.
- Check for rippling every two rounds. A ruffled side usually indicates excess fabric caused by accidental increases between the corners. Correct the problem before adding another wide band.
- Keep corner chain spaces consistent. Changing from ch 2 to ch 3 partway through the project lengthens the points. The difference becomes more obvious after blocking.
- Measure opposite points during blocking. The three point-to-point measurements should ideally remain within approximately 5 mm of one another.
- Count eyelet positions. A misplaced ch-1 opening is particularly visible against the solid white sections. Count from the nearest corner instead of estimating the midpoint visually.
- Pin the six points before the sides. Pinning straight edges first can lock unequal tension into the fabric. Establishing the six points first controls the overall geometry.
- Keep yarn tails away from openwork. A tail crossing an eyelet can remain visible from the front. Weave at least 4–5 cm through dense stitches before reversing direction.
Gauge, Size, and Yarn Substitution
Gauge affects a doily differently from a fitted garment because blocking can significantly change both diameter and openness. Yarn thickness, stitch height, number of rounds, personal tension, and blocking all contribute to the final measurement.
For this version, a finished size of approximately 43–50 cm is a practical target. Treat that measurement as a range rather than an exact guarantee.
If your piece is substantially smaller, adding complete expansion rounds is preferable to suddenly switching to a much larger hook. Abrupt hook changes can alter the appearance of the stitches and eyelets.
For a result close to the photographed design, choose yarn with smooth stitch definition. Cotton is particularly useful for flat decorative crochet because blocking can define the six points and radial lines clearly.
When substituting yarn, make a small test section first. A thicker sport or DK cotton will produce a larger piece with fewer rounds, while fine crochet thread requires considerably more stitching to reach the same diameter.
How to Keep the Six-Point Shape Flat
A successful crochet hexagon depends on distributing expansion evenly around six fixed axes. Each side needs to grow at approximately the same rate.
If one corner is missed, that side receives less fabric. If an extra increase is accidentally placed on another side, the opposite problem develops. The defect may appear minor during an early round but becomes increasingly visible as more rounds are added.
Lay the project on a flat surface after every three or four rounds. The six points should remain equally spaced. Minor unevenness can be corrected during blocking, but blocking should not be used to compensate for major stitch-count errors.
Another warning sign is cupping. When the center rises like a shallow bowl, the fabric does not have enough circumference for its current diameter. Severe rippling indicates excessive circumference.
Color Placement
The red-and-white arrangement depends on unequal color bands rather than simple alternating stripes.
White dominates the center. Red creates the broad middle field, then white returns as the largest outer contrast section. A final narrow red line frames the perimeter.
This sequence creates three distinct geometric zones. Close inspection shows the individual eyelets and stitches. At normal table distance, the central white section reads as a six-point motif. From farther away, the broad red middle section becomes the dominant star.
Changing to equal-width stripes would produce a substantially different appearance even if the underlying stitch construction remained the same.
For a Christmas table centerpiece, retain the red and white combination shown in the reference. Other two-color combinations can use the same construction. Navy with natural cotton, charcoal with cream, or two contrasting shades from the same color family preserve the geometric structure.
Blocking the Finished Crochet Doily
Blocking is particularly important for this design because the eyelet lines and six outer points depend on symmetry.
Start at the center and measure outward rather than stretching one side until it appears straight. Pin the six points at equal distances from the center. Once those positions are fixed, adjust the straight sides between them.
Measure across three pairs of opposite points. If one measurement differs noticeably, reposition the corresponding pins while the crochet remains damp.
Next, align the eyelet spokes. Each radial opening should point toward its corresponding corner instead of drifting sideways. This small adjustment has a large effect on the appearance of the finished star.
Allow cotton to dry fully before removing the pins. Removing them while the fibers remain damp can allow the points to contract before the blocked shape has stabilized.
Conclusion
Block the six corners before judging the final geometry; an unblocked cotton hexagon can appear uneven even when its corner placement is correct. After drying, measure the three opposite point-to-point dimensions and correct differences greater than approximately 5 mm during a second blocking. This gives the hexagon star crochet doily pattern its defined radial structure and balanced outer points. Your next variation can reverse the red and white sections while keeping the same six-sector construction. Save the finished version to Pinterest and share the blocked project on Instagram with #RedHexagonStarDoily. Which section would you make dominant on the next version: the red middle star or the white six-point center?









