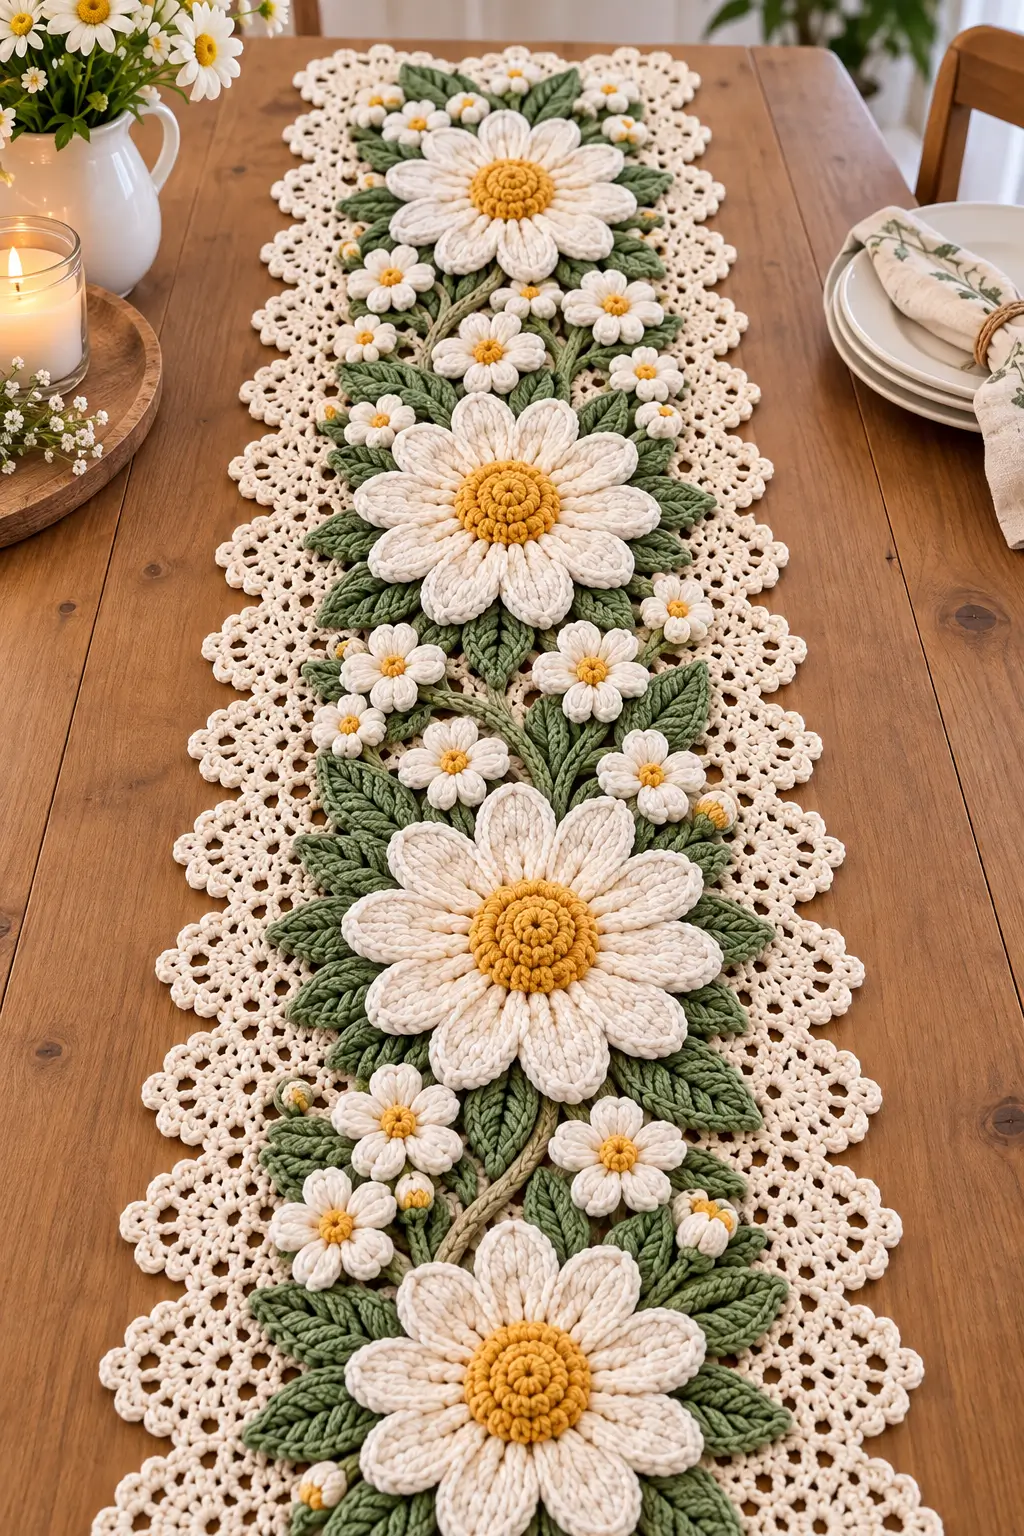
Four oversized daisies have to stay raised while the cream lace beneath them remains flat. This crochet daisy table runner pattern combines dimensional white petals, mustard-yellow centers, sage leaves, branching stems, small flowers, buds, and an openwork foundation. Use worsted cotton for the raised botanical motifs and a lighter cotton for the lace. The project suits intermediate crochet skills and can be adjusted to fit a long dining table.
The Design: What Makes This Daisy Runner Different
The first structural decision is scale. Instead of repeating dozens of identical flat daisies, the runner uses four dominant flowers spaced along a central botanical line. Each main daisy has long raised petals and a thick spiral center, so the flowers remain visually separate from the cream foundation underneath.
The second decision concerns foliage. Pointed sage leaves are arranged in overlapping pairs and clusters rather than worked as one continuous border. That construction lets the 3D crochet daisy pattern expand beyond the narrow center strip without making the entire foundation bulky.
Small daisies and closed buds form the third level. They fill gaps between large flowers and keep long stem sections from looking empty. One common mistake is attaching every petal and leaf edge to the lace. Doing that removes the raised effect. Only the center and selected rear attachment points need to be stitched firmly to the foundation.
Project Info at a Glance
| Skill Level | Estimated Time | Comparable Size | Recommended Hook | Construction |
|---|---|---|---|---|
| Intermediate | 20–30 hours | Approx. 46 × 114 cm | 3.5–4 mm motifs; 3–3.5 mm lace | Separate motifs sewn to lace base |
The photographed runner appears longer than some published daisy table runners, so treat 46 × 114 cm as a starting reference rather than a fixed measurement. Extend the foundation before adding the border if the runner needs to cover a longer dining table.
Materials and Tools
Yarn
- Cream or warm ivory DK cotton — approximately 250–350 g for the lace foundation and border
- Natural white worsted or Aran cotton — approximately 180–250 g for large and small daisy petals
- Mustard yellow worsted cotton — approximately 50–80 g for flower centers and buds
- Sage or olive green worsted cotton — approximately 180–250 g for leaves and stems
- Light olive or beige-green cotton — approximately 30–50 g for secondary stems if a two-tone botanical effect is wanted
Yarn quantities are working estimates for the photo-inspired version. Final consumption changes with yarn thickness, hook size, number of small flowers, and runner length.
Tools
- 3.5 mm crochet hook for most floral motifs
- 3 mm crochet hook for a firmer lace foundation if needed
- Tapestry needle
- Stitch markers
- Sharp scissors
- Blocking mat
- Rustproof blocking pins
- Flexible measuring tape
Abbreviations
- MR = magic ring
- sc = single crochet
- hdc = half double crochet
- dc = double crochet
- tr = treble crochet
- sl st = slip stitch
- ch = chain
- BLO = back loop only
- FLO = front loop only
- sp = space
- st/sts = stitch/stitches
- rep = repeat
An invisible decrease is useful only where a closed bud requires shaping; insert the hook through the front loops of the next two stitches before completing one single crochet.
Crochet Daisy Table Runner Pattern — Step by Step
Pattern note: This is an original photo-inspired construction based on the visible features of the supplied image. Hidden stitches, original gauge, exact yarn, and concealed attachment methods cannot be determined from a photograph. Make one complete flower and leaf before producing all motifs.
Large Daisy Center Base — Make 4
Yarn: mustard yellow
R1: Work 6 sc in MR (6).
R2: Inc in every st around (12).
R3: (Sc 1, inc) ×6 (18).
R4: (Sc 2, inc) ×6 (24).
R5: (Sc 3, inc) ×6 (30).
Fasten off with a 30 cm tail. The circle forms the support for the raised center and the large white petals.
Raised Spiral Daisy Center — Make 4
Yarn: mustard yellow
Ch 46.
Row 1: Starting in second ch from hook, work sc across (45).
Row 2: Ch 1, turn. Work 2 hdc into each stitch across (90).
The strip will curl naturally. Coil it tightly from one end, keeping the lower edge flat. Sew through the underside every 1–1.5 cm to form a round raised center approximately 5–6 cm across.
Attach the spiral centrally over the yellow base circle. Do not flatten the upper ridges while sewing.
Large Daisy Petals — Make 48
Yarn: natural white. Twelve petals are used for each large daisy.
Ch 16.
Row 1: Starting in second ch from hook, sl st in next 2 ch, sc in next 2, hdc in next 3, dc in next 5, hdc in next 2, work 5 hdc in final ch. Continue down the opposite side of the foundation chain.
Work hdc in next 2, dc in next 5, hdc in next 3, sc in next 2, sl st in final 2 sts.
Row 2: Ch 1 and work sc evenly around the entire petal. Place 3 sc around the rounded tip so it does not pull inward.
Row 3: Sl st through the center line from the petal base toward the tip, then return to the base through the reverse side. This creates the raised central ridge visible in the reference image.
Fasten off with a 20 cm sewing tail.
Assemble Each Large Daisy
Arrange twelve petals evenly behind one mustard center. The petal bases should overlap slightly while the outer two-thirds remain free.
Sew through each petal base and the outer edge of the yellow circle. Check the spacing after attaching petals 3, 6, 9, and 12 so one side does not become crowded.
Once all petals are attached, sew the raised spiral over the center base. The completed large flower should measure approximately 17–22 cm across depending on yarn and tension.
Small Daisy — Make 16–22
Yarn: white and mustard yellow
R1: With yellow, work 6 sc in MR (6).
R2: Inc ×6 (12).
Change to white.
R3: *Sl st in next st, ch 6, starting in second ch work sc, hdc, 2 dc, hdc down the chain, sl st in next base st* ×6.
Fasten off and leave approximately 20 cm for assembly. Six petals produce a compact filler flower that contrasts with the twelve-petal focal daisies.
Small Closed Daisy Bud — Make 8–12
Yarn: white, mustard yellow and sage green
With yellow:
R1: 6 sc in MR (6).
R2: Inc ×6 (12).
R3: Sc around (12).
Change to white.
R4: BLO sc around (12).
R5: (Sc 1, dec) ×4 (8).
Add a very small amount of stuffing or use yarn tails to maintain the rounded shape.
Change to sage.
R6: Dec ×4 (4).
Fasten off and close the opening. Embroider three or four short green stitches upward over the lower white section to imitate sepals.
Large Pointed Leaf — Make 28–36
Yarn: sage green
Ch 18.
Row 1: Starting in second ch from hook, sc in next 2, hdc in next 3, dc in next 4, tr in next 5, dc in next 2, work 5 hdc in final ch. Rotate to work down the opposite side of the starting chain.
Work dc in next 2, tr in next 5, dc in next 4, hdc in next 3 and sc in next 2.
Row 2: Ch 1. Work sc around the outer edge, placing (sc, ch 2, sc) at the pointed end.
Row 3: Surface sl st along the central foundation chain from base to tip. Add two or three short diagonal surface-slip-stitch lines on each side to suggest leaf veins.
Fasten off with a 20 cm tail. Block the leaf to approximately 9–12 cm long.
Small Leaf — Make 16–20
Yarn: sage green
Ch 11.
Row 1: Sc in second ch, hdc in next 2, dc in next 3, hdc in next 2, sc in next, 3 sc in final ch. Work along the second side with sc, hdc in next 2, dc in next 3, hdc in next 2 and sc.
Row 2: Sl st around the edge. Place ch 2 at the tip to sharpen the point.
Fasten off with a 15 cm sewing tail.
Raised Main Stems — Make 5–7 Sections
Yarn: sage or light olive
For a long section, ch 60. For a short branch, ch 25–40.
Row 1: Starting in second ch, sc across.
Row 2: Ch 1, turn and work BLO sc across.
Fasten off with a long sewing tail.
Curve the strip gently rather than keeping it rigidly straight. The reference arrangement uses stems to connect groups visually while allowing flowers and leaves to cover many attachment points.
Openwork Lace Foundation
Yarn: cream DK cotton
Ch 65.
Row 1: Dc in fourth ch from hook and in each ch across.
Row 2: Ch 4, turn, skip 1 st, dc in next, *ch 1, skip 1, dc in next* across.
Row 3: Ch 3, turn, dc in each dc and each ch-1 sp across.
Row 4: Ch 5, turn, skip 2 sts, sc in next, *ch 5, skip 2 sts, sc in next* across.
Row 5: Ch 5, sc in first ch-5 sp, *ch 5, sc in next ch-5 sp* across.
Repeat Rows 3–5 until the foundation reaches approximately 105–135 cm, depending on the table and planned floral spacing.
Finish on a solid dc row before beginning the outer lace.
Scalloped Lace Border
Yarn: cream
Round 1: Work sc evenly around the entire foundation. Place 3 sc at each corner.
Round 2: *Ch 6, skip approximately 3 sts, sc in next* around.
Round 3: Work (2 sc, 5 dc, 2 sc) into every ch-6 loop.
Round 4: Sl st to the center dc of the first shell. *Ch 6, sc in center dc of next shell* around.
Round 5: Into each ch-6 loop work (2 sc, hdc, 3 dc, picot, 3 dc, hdc, 2 sc).
Fasten off and weave the tail through the reverse of the lace.
The finished border should create repeated rounded points along both sides. Block the entire lace foundation before any raised flower or leaf is attached.
Assembly
- Block the cream lace foundation to its final length and width, keeping the central axis straight from one short end to the other.
- Position the four large daisies along the centerline. Keep approximately 20–30 cm between flower centers and place the end flowers several centimeters inside the border.
- Pin each large daisy through its yellow center and petal bases. Sew the center firmly to the foundation while leaving most of every white petal unattached.
- Lay the raised stems between the four focal flowers. Form gentle curves and branching lines rather than one continuous straight stem.
- Arrange large sage leaves around each focal flower, alternating their directions. Sew each leaf at the base, central vein, and one additional rear point rather than stitching the complete perimeter.
- Place small daisies along the stems and inside open areas between the large flowers. Vary their angles so the six petals do not form repeated horizontal rows.
- Add smaller leaves beside the filler daisies and along narrow branches. Leave enough cream lace visible to separate one botanical cluster from the next.
- Position closed buds mainly near branch ends and between small flowers. Attach each bud through its green base so the white and yellow portions remain raised.
- Check the complete runner from at least one meter away before completing the remaining sewing. Correct crowded areas by moving leaves or small daisies rather than shifting the four main flowers.
- Weave structural tails through at least 4–5 cm of matching stitches. Block only the lace border and exposed leaves after assembly; avoid pressing the raised daisy centers and petals flat.
After assembly, the foundation and scalloped edges should lie flat while the flowers, buds, stems, and foliage remain dimensional.
7 Technical Tips for a Dimensional Daisy Runner
- Uneven petal spacing produces a visibly lopsided large daisy. Divide the yellow center into four quarters and place three petals inside each quarter before permanently sewing all twelve.
- A thick yellow center can buckle the foundation. Keep the completed raised spiral approximately 5–6 cm across and attach it through multiple small stitches around its lower edge rather than one tight central knot.
- Leaf tips can twist after drying. Block each large leaf with one pin at the base, one beside the midpoint and one directly through the tip, maintaining a straight central vein.
- Branches look mechanical when every stem follows the runner centerline. Offset branch ends by approximately 4–8 cm to either side and hide intersections underneath flowers or large leaves.
- Small daisies disappear if they touch the focal flower centers. Leave approximately 2–4 cm of foliage or visible lace between a filler flower and the yellow center of a large daisy.
- Heavy motifs can pull open lace spaces during handling. Catch at least three separate foundation stitches when attaching each large flower and spread those anchor points across a 4–6 cm area.
- Visible yarn tails reduce the definition of an openwork runner. Weave each tail through 4–5 cm of same-color stitches on the reverse and change direction before cutting the excess.
Adjusting the Table Runner Size
This crochet flower table runner is easier to resize before the motifs are sewn down. For a shorter runner, use three large daisies rather than four and reduce the foundation by one complete floral interval. For a longer dining table, add foundation rows first, then insert another large daisy with a surrounding leaf cluster.
Keep the floral spacing proportional. If one large flower measures 20 cm across, leaving approximately 20–30 cm between flower centers creates overlap between petals, leaves, and filler motifs without turning the entire centerpiece into one continuous solid mass.
Width can also be altered through the lace border. Add another openwork round when extra width is required, but block a sample first. Every additional shell round increases both width and yarn consumption.
How to Keep the 3D Daisy Petals Raised
The dimensional petals are the main difference between this runner and a conventional flat lace design. Their attachment points matter more than additional stuffing or extra-thick yarn.
Sew each large petal only across the lower 2–3 cm near its base. The remaining length should rest freely over leaves and lace. When two petals overlap, attach the lower petal first and allow the upper one to cross it naturally rather than stitching the two pieces together.
The central slip-stitch ridge also helps each petal hold a slightly convex shape. If the yarn is very soft, damp-block the petals over a narrow rolled towel before assembly. Do not press them under a flat blocking board.
Placing the Leaves and Small Daisies
Start with the four main flowers, then work outward. Large leaves belong closest to the focal daisies because their scale supports the larger petals. Smaller foliage works better along stems and around buds.
A useful placement ratio is two or three large leaves for every major flower quadrant, followed by one or two small leaves around nearby filler blossoms. The photographed composition is dense, but the cream foundation still appears between clusters. That exposed lace is important because it separates the dimensional motifs visually.
Small flowers should not form identical rows. Rotate them and change their distances from the stems. A few closed buds near branch ends also break the repetition created by multiple six-petal daisies.
Blocking and Care
Block the foundation before motif assembly because correcting a distorted lace base becomes difficult once thick flowers have been attached. Pin the scalloped border at every repeated point and measure both long edges so they finish at the same length.
After assembly, use localized damp blocking on leaves and exposed lace rather than soaking the complete piece every time it needs reshaping. Cotton can become heavy when wet, and the weight of four large flowers can stretch unsupported lace.
For storage, roll the runner loosely around a clean cardboard or fabric-covered tube with the flowers facing outward. Folding directly through a large yellow center can leave a permanent crease in the raised petals or foliage.
Conclusion
Make one complete large flower, one small daisy, one bud, and two leaf sizes before producing the remaining motifs. Measure those blocked samples against the intended table and adjust the foundation before assembly begins. The four large daisies should establish the runner’s rhythm; stems, smaller flowers, buds, and foliage then fill the spaces without hiding the cream lace. This crochet daisy table runner pattern can be lengthened by repeating one complete botanical section rather than stretching the existing arrangement. Save the finished layout to Pinterest and share your completed runner on Instagram with #3DCrochetDaisyRunner. Which detail would you change first: the number of large daisies or the density of sage leaves?









