Introduction
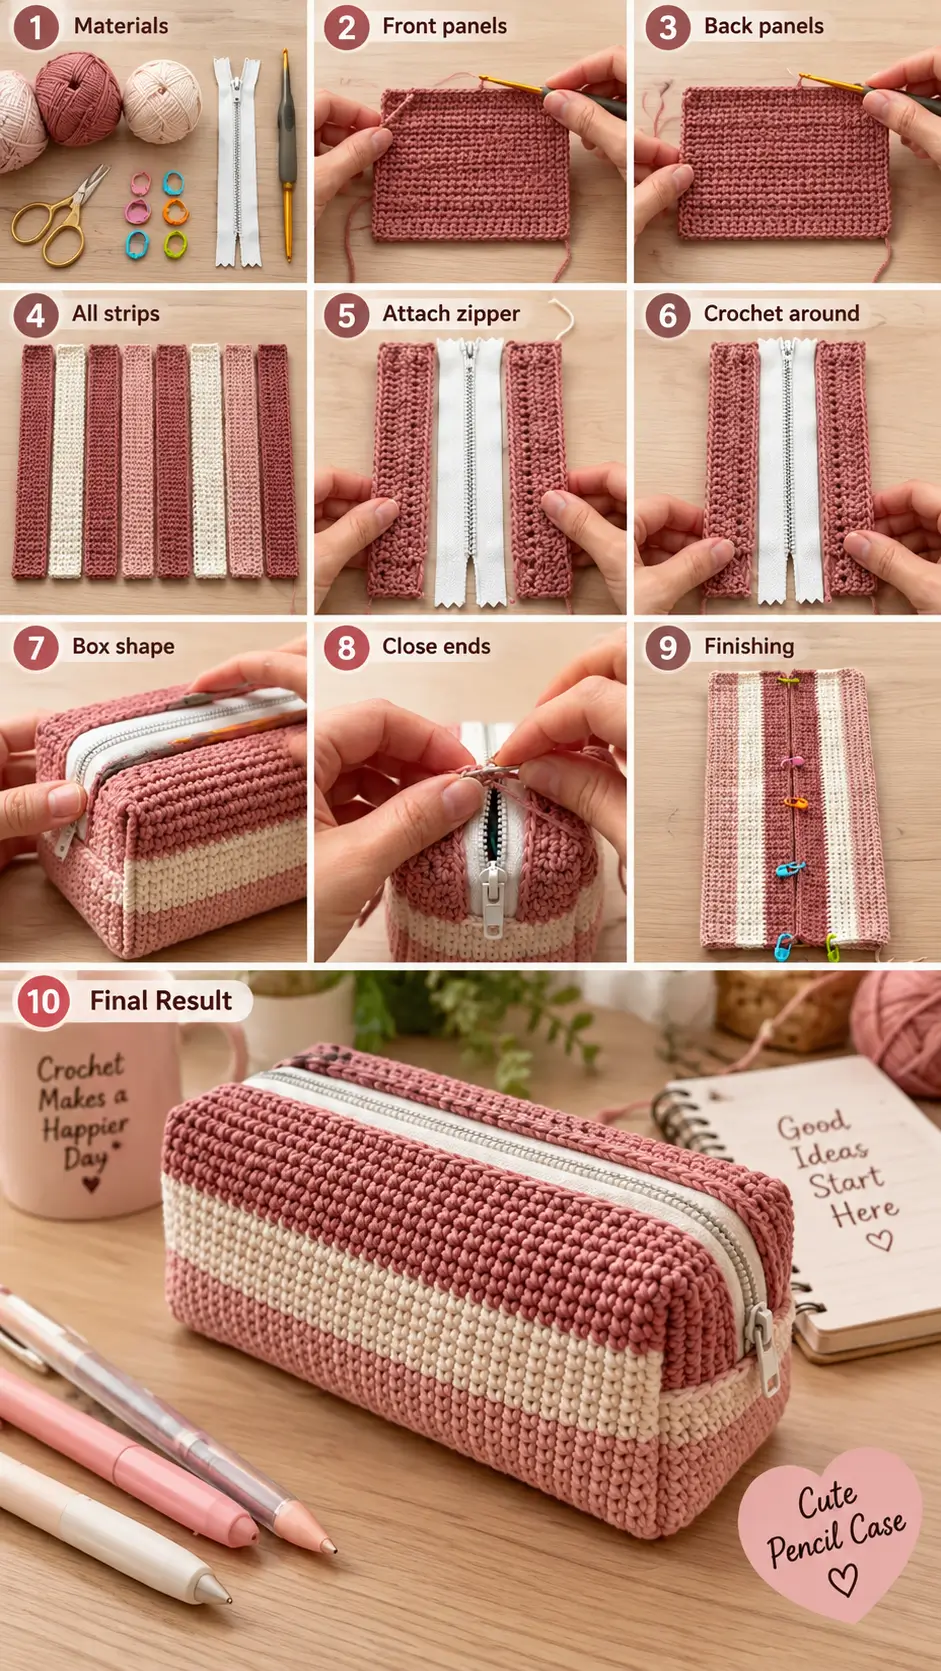
A pencil case fails as soon as its longest pencils push against a short zipper. This striped crochet pencil case pattern solves that geometry with an 8-inch opening, sport-weight cotton, a 3.5 mm hook and box-shaped side panels. Finished at roughly 20 × 8 × 7.5 cm, it is an advanced-beginner project designed for pens, crochet hooks and compact stationery.
The Design: What Makes This Pencil Case Different
The reference uses three structural decisions that distinguish it from a flat crochet pouch. First, its front and back walls continue into a defined bottom rather than simply meeting at a seam. That creates usable depth. Second, narrow end gussets hold the rectangular cross-section so the case remains box-shaped after filling. Third, two narrow crochet bands frame the zipper instead of forcing zipper tape directly between thick body panels.
The dense single crochet is equally functional. Cotton worked at a firm gauge limits stretch around heavy pens and markers. A common mistake in a crochet pencil case with zipper is making the opening wider than the zipper tape can support; the fabric then buckles at each end. This box crochet pencil case instead treats the zipper length as a primary measurement. The closest verified construction uses an 8-inch zipper and Category 2 cotton.
Project Info at a Glance
| Skill Level | Time | Finished Size | Hook | Best For |
|---|---|---|---|---|
| Advanced beginner | Approx. 3–5 hours | 20 × 8 × 7.5 cm | 3.5 mm | Pens, pencils and crochet hooks |
Project time is an estimate. Finished dimensions depend on yarn, gauge and individual tension.
Materials and Tools
Yarn
Use approximately 175–225 yards of sport-weight cotton. Cotton works particularly well for this construction because its relatively low stretch helps the rectangular walls resist distortion.
- Dusty rose — Sport / Category 2 cotton — approximately 60% of total yarn
- Warm cream — Sport / Category 2 cotton — approximately 25% of total yarn
- Pale blush — Sport / Category 2 cotton — approximately 15% of total yarn
The color percentages are working estimates for reproducing the striped appearance shown in the reference.
Tools
- 3.5 mm crochet hook
- 8-inch / 20 cm zipper
- Yarn needle
- Sewing needle
- Matching polyester sewing thread
- Scissors
- Stitch markers
- Tape measure
- Pins or sewing clips
- Lightweight cotton lining fabric — optional
Abbreviations
- ch — chain
- sc — single crochet
- sl st — slip stitch
- st — stitch
- sts — stitches
- RS — right side
- WS — wrong side
- BLO — back loop only
- FO — fasten off
An invisible decrease is unnecessary for this rectangular construction because its shaping comes from separate panels rather than decreasing amigurumi rounds.
Striped Crochet Pencil Case Pattern
This pencil case is worked primarily in rows rather than a continuous spiral. Measure after every major component because zipper compatibility matters more than an arbitrary stitch total.
The instructions below create a photo-matched striped box pencil case measuring approximately 20 × 8 × 7.5 cm. Gauge differences can alter the final measurements, so compare the crochet regularly with the 20 cm zipper.
Main Front, Bottom and Back Panel
Yarn: dusty rose, warm cream and pale blush.
Ch 45.
Row 1: Sc in second ch from hook and each ch across. (44)
Rows 2–15: Ch 1, turn, sc across. (44)
Change to warm cream.
Rows 16–24: Ch 1, turn, sc across. (44)
Change to pale blush.
Rows 25–31: Ch 1, turn, sc across. (44)
Change to dusty rose.
Rows 32–40: Ch 1, turn, sc across. (44)
Change to warm cream.
Rows 41–49: Ch 1, turn, sc across. (44)
Change to dusty rose.
Rows 50–64: Ch 1, turn, sc across. (44)
Fasten off, leaving approximately 40 cm of yarn for sewing.
The exact row total can be adjusted to match your gauge. The zipper edge should measure approximately 20 cm without stretching the crochet.
Left Side Gusset
Yarn: dusty rose.
Ch 19.
Row 1: Sc in second ch from hook and across. (18)
Rows 2–20: Ch 1, turn, sc across. (18)
Fasten off. Leave approximately 50 cm of yarn for sewing.
Check the finished gusset against the side of the folded main panel. It should create the depth of the pencil case without needing to be stretched.
Right Side Gusset
Yarn: dusty rose.
Ch 19.
Row 1: Sc in second ch from hook and across. (18)
Rows 2–20: Ch 1, turn, sc across. (18)
Fasten off. Leave approximately 50 cm of yarn for sewing.
Place both side gussets together before assembly. Their width, length and row count should match.
Zipper Band One
Yarn: dusty rose.
Ch 45.
Row 1: Sc in second ch from hook and across. (44)
Rows 2–5: Ch 1, turn, sc across. (44)
Fasten off and leave a long sewing tail.
Place the finished band beside the closed zipper. The crochet should follow the usable zipper length without being pulled or stretched.
Zipper Band Two
Yarn: dusty rose.
Ch 45.
Row 1: Sc in second ch from hook and across. (44)
Rows 2–5: Ch 1, turn, sc across. (44)
Fasten off and leave a long sewing tail.
Compare the second zipper band directly with the first. Correct any noticeable length difference before installing the zipper.
Cream Stripe Placement
The pencil case uses a broad cream stripe running horizontally around the center of the pouch. The stripe is created directly while crocheting the main panel rather than being sewn on afterward.
If you modify the row counts to accommodate a different gauge, keep the cream section at approximately one-quarter to one-third of the visible side height. This maintains the proportions of the photographed design.
Blush Transition Stripes
The pale blush sections form narrower transitions between the dusty rose and cream areas. Keep these sections narrower than the central cream stripe.
For a clean color change, begin the new yarn on the final yarn-over of the last stitch in the preceding color. The loop already on the hook will then match the next row.
Attach the Zipper
Use an 8-inch / approximately 20 cm zipper.
Place one crochet zipper band along each side of the zipper tape. Keep the crochet away from the zipper teeth so the slider has an unobstructed path.
Use matching polyester sewing thread for the initial attachment. Work small backstitches through the zipper tape and the inner edge of each crochet band.
Maintain a consistent distance between the seam and zipper teeth.
Open and close the zipper several times while sewing. If the slider catches a crochet loop, move that section of the seam farther from the teeth before continuing.
Optional Fabric Lining
A lightweight cotton lining can be added after the outer crochet shell has been assembled.
Measure the inside of the finished pencil case rather than cutting the lining from the nominal exterior dimensions. Seam thickness reduces the available internal space.
Cut the lining with appropriate seam allowances. Sew the short ends, then form boxed corners corresponding to the depth of the crochet shell.
Fold the upper raw edge inward and hand-sew it to the zipper tape below the existing crochet attachment stitches.
Keep every lining stitch away from the zipper teeth.
Assembly
- Lay the main panel flat and mark the fold positions for the front, bottom and back with removable stitch markers.
- Fold the panel into a U shape. Check that the front and back reach exactly the same height.
- Pin the first side gusset to one open end. Match the upper and lower corners before distributing the remaining stitches.
- Sew or slip-stitch the gusset to the front, bottom and back edges. Repeat the process on the opposite side.
- Position one zipper band along the upper front edge and the second band along the upper back edge.
- Center the closed zipper between the two bands. Align both ends before sewing permanently.
- Sew the zipper securely to both crochet bands with matching thread. Test the slider repeatedly during installation.
- Close the small openings between each zipper-band end and the corresponding side gusset. Reinforce these joins because repeated opening places additional stress on them.
- Install the optional lining only after checking that the crochet shell sits squarely. Sew the lining to the zipper tape rather than through the visible exterior crochet.
- Weave every yarn tail through at least 4 cm of dense single crochet, reverse direction once, trim the excess and test all four corners and the zipper.
The finished pencil case should have a flat rectangular base, matching side profiles and a centered zipper that opens without pulling the crochet inward.
7 Technical Tips for a Better Crochet Pencil Case
- Mark every panel corner. A corner positioned even two rows away from its intended location can twist the side gusset and make the finished pencil case lean toward one end.
- Measure the zipper opening before assembly. Aim for approximately 20 cm for an 8-inch zipper; stretching a shorter crochet edge during installation can create permanent ripples.
- Do not add stuffing. The rectangular shape comes from tight crochet, side gussets and the optional fabric lining; stuffing reduces storage space and interferes with the zipper.
- Monitor single-crochet tension. If a 10 cm section stretches by more than approximately 5 mm during normal handling, a smaller hook may produce a more stable pouch fabric.
- Pin the gusset corners first. Attaching a gusset progressively from only one corner can accumulate a row mismatch at the opposite end and distort the box shape.
- Keep sewing stitches 2–3 mm from the zipper teeth. Thread or crochet fibers positioned too close to the teeth can catch the zipper slider.
- Weave yarn tails in two directions. Run each tail through several stitches, reverse direction and pass through additional stitches so repeated flexing at the seams does not pull the tail free.
Adjusting the Pencil Case Size
The easiest way to resize this striped crochet pencil case pattern is to choose the zipper first. The zipper establishes the practical maximum length of the opening.
For a longer case, add foundation chains until the crochet edge matches the chosen zipper without stretching. Maintain the same number of rows in both zipper bands.
To create a deeper case, increase the width of both side gussets equally. Every change made to one gusset must be repeated on the other.
For a taller case, add rows to the corresponding front and back sections of the main panel. Keep the stripe sequence symmetrical unless an intentionally asymmetrical color layout is wanted.
Choosing Yarn for a Structured Pencil Case
Sport-weight cotton gives this design a dense surface without producing excessively thick seams. The fiber also has less elasticity than many acrylic yarns, which helps the case retain its rectangular dimensions when filled with pens.
If DK cotton is substituted, make a gauge sample before starting. A thicker yarn can increase both the width and height of every panel even when the stitch counts remain unchanged.
Velvet and chenille yarns are poor matches for this particular construction. Their bulk makes zipper installation harder, and the fibers can obscure the clean horizontal stripe boundaries visible in the reference design.
Finishing the Striped Crochet Pencil Case
Measure the zipper before cutting yarn: that single check determines whether the finished box opens cleanly or buckles at both ends. Once the main panel, two gussets and zipper bands match their target dimensions, assemble the shell before installing an optional lining.
The next practical step is to crochet a gauge swatch in sport cotton with the 3.5 mm hook, then calculate the foundation width required for your 8-inch zipper. Save this striped crochet pencil case pattern to Pinterest and share the finished color combination on Instagram with #StripedCrochetPencilCase.
Which stripe would you change on this dusty-rose pencil case: the broad cream center band or the narrow blush transitions?









