Introduction
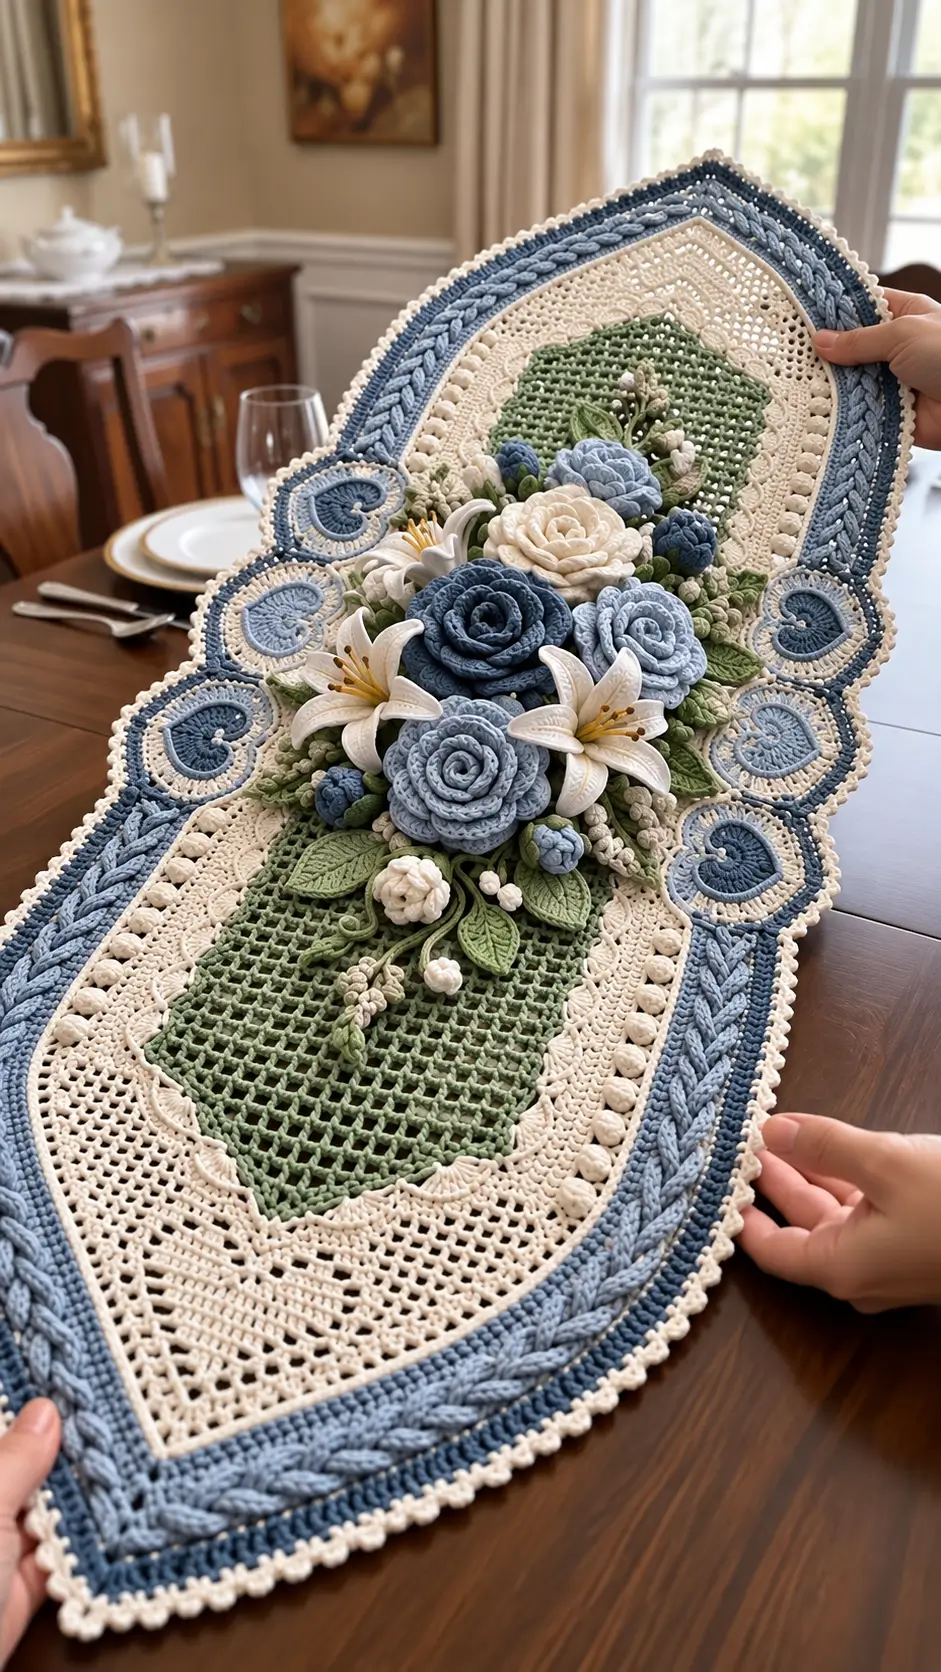
A lily needs six pointed petals around exposed stamens, while a rose needs overlapping circular layers; putting both on one runner requires two completely different flower structures. This blue rose crochet table runner pattern combines dimensional blue roses, ivory lilies, sage leaves, floral vines, heart-shaped side medallions and a raised blue border. Use cotton yarn and firm tension for an intermediate-to-advanced dining-table centerpiece.
The Design: What Makes This Floral Runner Different
The construction separates the runner into three systems. First comes an elongated ivory-and-sage lace foundation. Second, blue borders and repeated side medallions provide a structured frame. Finally, dimensional roses, lilies, buds and leaves are sewn over the center rather than built directly into the lace.
The floral arrangement also depends on contrast. Large denim-blue roses establish the darkest points, pale blue roses bridge them, and ivory flowers interrupt the blue mass. Sage leaves form a lower layer that prevents petals from disappearing against the green center panel.
The most common mistake with a 3D crochet flower table runner is attaching every flower before blocking the foundation. Once large roses are sewn down, correcting a distorted oval or rippled border becomes substantially harder.
Project Info at a Glance
| Skill Level | Construction | Size | Hook | Best For |
|---|---|---|---|---|
| Intermediate–Advanced | Modular lace with sewn 3D flowers | Adjustable; comparable handmade rose runners reach about 140 × 40 cm | 2–4 mm depending on yarn | Dining tables, sideboards and display tables |
The exact dimensions of the photographed runner cannot be measured reliably from the image. A comparable handmade crochet rose runner is documented at approximately 140 × 40 cm, while floral table-runner patterns commonly provide adjustable lengths.
Materials and Tools
Yarn
- Ivory — fine cotton or fingering-weight cotton — main lace, lilies and outer edging
- Sage green — fingering or sport cotton — central panel, leaves, vines and sepals
- Pale blue — fingering or sport cotton — roses, medallions and border details
- Denim blue — fingering or sport cotton — focal roses and raised border
- Dark blue — small quantity — shadow accents and selected buds
- Yellow or golden beige — small quantity — lily stamens
- White — small quantity — filler buds and miniature flowers
Published crochet roses range considerably in scale. A DK rose made with a 4 mm hook can measure about 5 cm across, while a worsted rose using a 5.5 mm hook can reach approximately 5–7.5 cm. For this runner, use the smaller hook that produces firm petals with the selected yarn.
Tools
- 2 mm crochet hook for fine flowers and leaves
- 2.5–3.5 mm crochet hook for roses and border work if using heavier yarn
- Tapestry needle
- Sharp scissors
- Locking stitch markers
- Blocking mat
- Rust-resistant pins
- 0.5 mm floral wire — optional for lily petals and leaves
Abbreviations
- MR — magic ring
- ch — chain
- sc — single crochet
- hdc — half double crochet
- dc — double crochet
- tr — treble crochet
- inc — increase
- dec — decrease
- sl st — slip stitch
- sp — space
- st/sts — stitch/stitches
- BLO — back loop only
For any shaped three-dimensional component, an invisible decrease is worked through the front loops of the next two stitches before completing one sc.
Pattern — Step by Step
Complete the flat runner first. Block it to the required dimensions, make all dimensional components separately, arrange the complete bouquet without sewing, and attach the flowers only after their positions have been checked.
Large Layered Blue Rose — Make 2–3
Yarn: denim blue.
Foundation: Ch 55.
Row 1: Starting in second ch from hook, sc across (54).
Row 2: Ch 4, dc in same st, skip 2 sts, (dc, ch 2, dc) in next st. Repeat across.
Row 3 — Inner petals: In the first four ch-2 spaces work (sc, 4 dc, sc).
Row 3 — Middle petals: In the next six spaces work (sc, 6 dc, sc).
Row 3 — Outer petals: Work (hdc, 7 dc, hdc) into each remaining ch-2 space.
Fasten off, leaving approximately 35 cm for sewing.
Roll from the small-petal end. Keep the first two rotations tight, then reduce the rolling tension as the petals become larger.
Sew repeatedly through the underside of the complete rose. Pass the needle through several layers rather than anchoring only the center.
Pale Blue Rose — Make 3–5
Yarn: pale blue.
Foundation: Ch 43.
Row 1: Sc in second ch from hook and across (42).
Row 2: Create repeated (dc, ch 2, dc) groups across the row.
Row 3: Work 4 dc petals through the first third, 5–6 dc petals through the middle third, and 7 dc petals through the final third.
Fasten off with a 30 cm tail.
Roll and stitch the flower from the smallest petals outward.
Medium Blue Rose — Make 2–4
Yarn: pale or medium blue.
Foundation: Ch 34.
Row 1: Sc in second ch from hook and across (33).
Row 2: Form repeated ch-2 petal spaces across.
Row 3: Work 4–6 dc into each petal space, gradually increasing petal size toward the final end.
Fasten off. Leave a 25 cm tail.
Roll into a compact rose and stitch securely across the underside.
Small Blue Rosebud — Make 6–10
Yarn: denim or pale blue.
Foundation: Ch 16.
Row 1: Sc in second ch from hook and across (15).
Row 2: Ch 3, 4 dc in next st, sl st in next st. Repeat across.
Fasten off with a 20 cm sewing tail.
Roll tightly. Unlike an open rose, the final petals should remain mostly upright.
White Lily — Make 3–5
Yarn: ivory or white.
A lily requires six individual pointed petals. Published crochet lily patterns commonly use six petals and hooks around 2–4 mm depending on yarn weight.
Lily Petal — Make 6 per Flower
Foundation: Ch 12.
Row 1: Starting in second ch from hook: sc, hdc, 2 dc, 4 tr, 2 dc, hdc.
Work 3 sc in the final chain.
Continue along the opposite side:
hdc, 2 dc, 4 tr, 2 dc, hdc, sc.
Row 2: Sc around the complete petal. Work (sc, ch 2, sc) at the pointed tip.
Fasten off. Leave a 15 cm tail.
Optional floral wire can be crocheted into Row 2 when stronger petal curvature is required.
Lily Assembly
Arrange three petals as the lower layer. Place the remaining three petals above them so the points alternate rather than align.
Sew all six bases together.
Curve the petal tips slightly backward after assembly.
Lily Stamens — Make 5–6 per Lily
Yarn: golden beige or yellow.
Ch 7.
Sl st back through 5 chains.
At the exposed tip, form a small knot using several wraps of yarn.
Make five or six stamens and secure them as a group in the center of the lily.
Large Sage Leaf — Make 12–18
Yarn: sage green.
Foundation: Ch 13.
R1: Starting in second ch from hook: sc, hdc, 2 dc, 5 tr, 2 dc, hdc, 3 sc in final ch.
Continue along the opposite side:
hdc, 2 dc, 5 tr, 2 dc, hdc, sc.
R2: Sc around. Work a picot at the tip and additional small picots along the edges if a lightly serrated outline is wanted.
Fasten off. Leave a 15 cm tail.
Surface-crochet or embroider a central vein from the base to the tip. Add diagonal veins on both sides.
Small Leaf — Make 10–16
Yarn: sage green.
Foundation: Ch 9.
R1: Starting in second ch from hook: sc, hdc, 4 dc, hdc, 3 sc in final ch.
Continue down the opposite side:
hdc, 4 dc, hdc, sc.
R2: Sc around, placing 3 sc at the pointed tip.
Fasten off with a 12 cm sewing tail.
White Berry Bud — Make 10–20
Yarn: ivory.
R1: 6 sc in MR (6)
R2: inc ×6 (12)
R3: sc around (12)
R4: dec ×6 (6)
Add a very small amount of stuffing before closing.
Fasten off. Leave a 12 cm tail.
Small Flower Bud — Make 5–8
Yarn: blue or ivory.
R1: 6 sc in MR (6)
R2: inc ×6 (12)
R3: sc around (12)
R4: (sc, dec) ×4 (8)
Add a small amount of stuffing.
R5: dec ×4 (4)
Fasten off. Leave a sewing tail.
Bud Sepal
Yarn: sage green.
R1: 6 sc in MR (6).
R2: Repeat around: sc, ch 4, sl st in second ch from hook, sc in next 2 ch.
Fasten off and place beneath the bud.
Curled Green Tendril
Yarn: sage green.
Ch 18–25.
Work 2 sc into every chain.
The excess stitches force the chain into a spiral.
Fasten off with a 10 cm tail.
Use several tendrils near the lower and upper edges of the floral arrangement rather than distributing them evenly throughout the bouquet.
Central Sage Lace Panel
Yarn: sage green.
Begin with a chain approximately 10–15 cm shorter than the desired green center section.
R1: Dc in fourth ch from hook and across. Work 6 dc in the final chain, continue down the opposite side, and work 5 additional dc into the starting end. Join.
R2: Dc around, increasing evenly at both curved ends.
R3: Ch 4, skip 1 st, dc in next st. Repeat around.
R4: Ch 4, dc into the next ch-space. Repeat around to continue the mesh.
R5: Repeat the mesh pattern while adding extra spaces around both curved ends as required.
Continue until the green center reaches the required width.
Lay the piece flat after every two rounds. Add more increases if the ends cup inward; reduce them if the fabric begins to ripple.
Ivory Lace Frame
Yarn: ivory.
Join to the outside edge of the sage panel.
R1: Sc evenly around.
R2: Ch 4, skip 1 st, dc in next st; repeat around.
R3: Work 2 dc into each ch-space.
R4: Ch 5, skip 2 sts, sc in next st; repeat around.
R5: Work 5 dc into each ch-5 space.
R6: Ch 5 between adjacent shell centers.
R7: Work 7 dc into each ch-5 space.
Continue alternating openwork and solid shell sections until the ivory frame reaches the required width.
Ivory Bobble Detail
Yarn: ivory.
Join at the outer edge of the lace frame.
R1: Sc around.
R2: *Sc in next 3 sts, work a 5-dc bobble in next st.* Repeat around.
Adjust spacing slightly at the curved ends so the bobbles remain evenly distributed.
Denim Blue Inner Border
Yarn: denim blue.
R1: Join yarn and sc around.
R2: Dc around, increasing at both rounded ends.
R3: Sc around.
Fasten off.
Raised Braided Blue Border
Yarn: pale blue.
The photographed runner has a prominent raised cable-like band. This version uses repeated elongated clusters to produce a similar braided texture.
R1: Join pale blue and sc around.
R2: *Skip 2 sts, work 5 elongated dc around the post or into the designated base stitch, skip 2 sts, sc in next st.* Repeat around.
R3: Work the next group in the opposite direction so adjacent raised groups overlap visually.
Continue around the border, keeping every raised group oriented consistently.
Fasten off.
Heart-Shaped Side Medallion — Make 6–10
Yarn: pale blue, denim blue and ivory.
R1: 6 sc in MR (6)
R2: inc ×6 (12)
R3: (sc, inc) ×6 (18)
Now begin forming the heart lobes.
R4: Work 6 dc into one section, sl st at the center indentation, then 6 dc into the opposite section. Work progressively shorter stitches toward the lower point.
R5: With denim blue, sc around the heart, placing 3 sc at the bottom point.
R6: Change to ivory and work sc around. Add a small picot at the bottom point if desired.
Fasten off with a 20 cm tail.
Block every medallion to the same dimensions before attaching it to the runner.
Ivory Outer Picot Edge
Yarn: ivory.
Join at the outside edge.
R1: Sc evenly around.
R2: *Sc in next 3 sts, ch 3, sl st into first ch to form picot.* Repeat around.
At the curved ends, modify the number of plain sc between picots when required to maintain even spacing.
Fasten off and weave the tail through at least 4 cm of dense border stitches.
Planning the Central Flower Arrangement
Place all major flowers on the runner before threading the sewing needle. Start with the darkest blue rose slightly away from the exact geometric center. This creates a focal point without making the bouquet look mechanically symmetrical.
Position pale-blue roses around the dark focal flower. Leave narrow gaps for leaves rather than allowing every rose to touch its neighbor.
Place the white lilies between the blue roses. Their pointed petals should extend beyond the circular outline of the roses, which breaks up the repeated round flower shapes.
Add ivory roses or buds where another blue flower would make the arrangement too dark.
Finish with sage leaves, white berries and curled tendrils. The smallest elements should extend toward both ends of the green panel so the floral arrangement tapers gradually.
Assembly
- Complete the sage center, ivory lace, blue borders and outer edging before attaching any dimensional flowers.
- Wet-block the flat runner to its final dimensions and allow it to dry completely.
- Position the large dark-blue rose near the central floral area and pin it through the underside.
- Arrange the pale-blue and ivory roses around the focal flower, changing the direction of their outer petals.
- Insert the white lilies between the roses, keeping their pointed petals visible rather than burying them beneath adjacent flowers.
- Slide sage leaves beneath the large blooms. Keep approximately one-half to two-thirds of each major leaf visible.
- Add the smaller blue buds, ivory berries and green sepals around the outside of the main flower group.
- Position curled tendrils and narrow floral vines toward both ends to create a tapered transition from bouquet to lace.
- Sew large flowers at three or more points across their undersides. Attach long leaves at the base and again approximately one-third of the way toward the tip.
- Turn the runner over, weave every tail through dense stitches, correct loose attachments and reshape the rose and lily petals by hand.
The finished runner should remain flat through its green and ivory foundation while the roses, lilies, leaves and buds form a concentrated raised centerpiece.
7 Technical Tips
- Prevent the large roses from rotating. Sew each major rose at a minimum of three underside points. A single central attachment lets the flower turn whenever the runner is lifted.
- Keep lily petals pointed. Reduce the hook by approximately 0.25–0.5 mm if the petals collapse under their own weight. Loose stitches produce a rounded petal that loses the characteristic lily shape.
- Check the oval after every two rounds. Cupping at either end indicates too few increases. A wavy perimeter indicates too many increases.
- Control the blue cable border. Count the base stitches between every raised group. One missing repeat can gradually shift the entire braid toward the inside of a curved end.
- Do not bury the leaves. Keep at least half of each large leaf visible beyond the flower edge. Leaves showing only 5–10 mm appear accidental rather than structural.
- Anchor long leaves twice. Sew at the base and again roughly one-third of the distance toward the tip. This prevents the leaves from rotating underneath heavy roses.
- Hide dark tails carefully. Weave blue and green tails through at least 4 cm of matching dense stitches. Never carry a dark tail across an open ivory mesh section.
Adjusting the Runner Length
The central foundation controls most of the finished length. Measure the usable center area of the dining table before making the starting chain.
For a shorter runner, reduce the straight section while retaining enough length for the central bouquet and tapered floral ends. For a longer version, add mesh repeats to the sage foundation before beginning the curved ends.
Do not simply add the final border width to the foundation measurement. The ivory lace, blue cable bands and picot edging expand both the width and the length.
Make a small gauge sample and block it before calculating the starting chain. Cotton can change noticeably after wet blocking.
Color Placement
Use the darkest denim blue sparingly. One or two large dark roses create more definition than distributing the same shade equally across every flower.
Pale blue should occupy a larger proportion of the flower arrangement and border. It connects the dark focal roses to the ivory background without producing a severe transition.
Keep the lilies ivory or soft white. Their purpose is to interrupt the circular blue flower shapes as well as provide a lighter value.
Sage green belongs in both the center panel and foliage. Repeating the same green family ties the three-dimensional bouquet to the flat runner beneath it.
Blocking the Runner
Block the flat runner before sewing down the bouquet. Start by pinning the two curved ends at matching measurements.
Establish the centerline next. Measure from that line to both long edges at several points so the runner does not dry with one side wider than the other.
Pin each heart medallion and raised border repeat into position. The side motifs should follow the runner’s curve without folding over one another.
Allow the foundation to dry fully before removing the pins.
Finishing the Roses and Lilies
Shape the roses only after they are securely attached. Pull the inner petals slightly inward and move the larger outer petals away from the center at different angles.
For the lilies, keep the six petal tips distinct. Three petals should form the lower layer while the other three occupy the gaps above them.
Check the bouquet from directly overhead. This exposes unwanted gaps, hidden leaves and clusters containing too much of one blue shade.
Then view the runner from table height. Reposition any lily that disappears behind a rose when seen horizontally.
Care and Storage
Lift the runner by supporting the flat foundation rather than pulling on the roses or raised border. Dimensional crochet puts substantial force on attachment stitches when the textile is moved.
For storage, place acid-free tissue loosely around the flower heads and roll the runner around a wide tube. Avoid folding directly through the central bouquet.
If reblocking becomes necessary, concentrate moisture and pins on the flat lace. Reshape individual petals by hand instead of pressing the complete floral centerpiece flat.
Conclusion
Make one rose, one lily, one leaf and a short border sample before beginning the full runner. Those components establish flower diameter, petal firmness and the hook combination required for the chosen yarn. Complete and block the sage-and-ivory foundation before positioning the bouquet, then attach the darkest rose first and build outward with pale-blue roses, white lilies and leaves. This sequence keeps the blue rose crochet table runner pattern structurally balanced while preserving its dimensional center. Save the finished runner to Pinterest and share it on Instagram with #BlueRoseCrochetRunner. For your version, would you keep the lilies ivory or replace them with pale-blue flowers? “`0









