Introduction
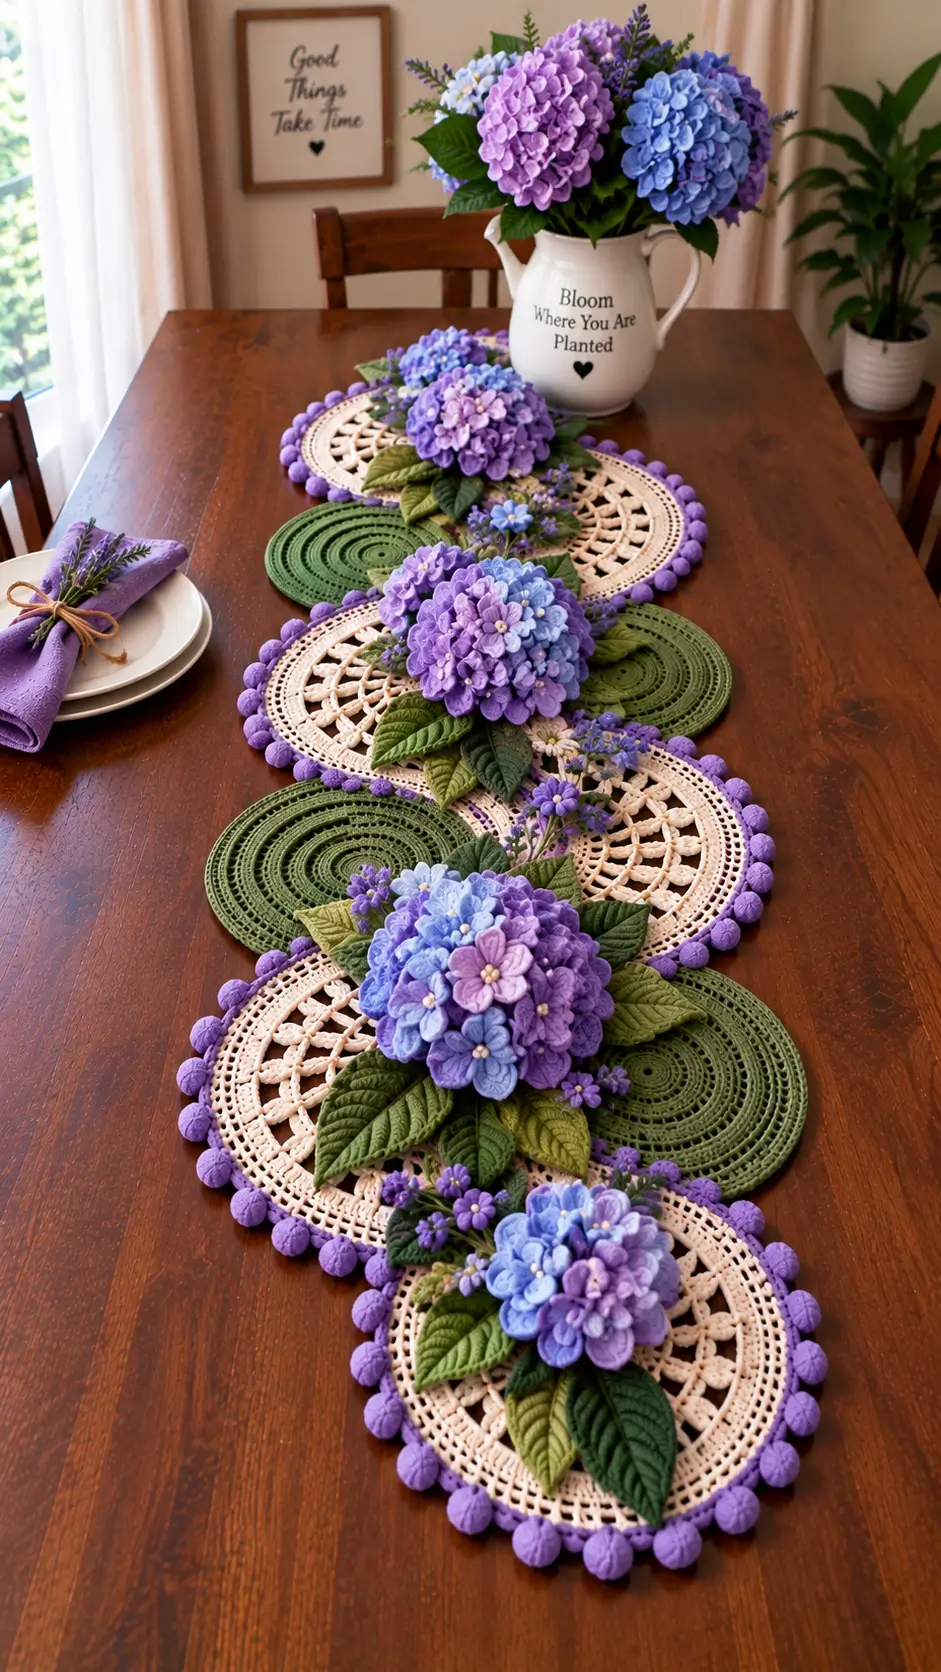
A hydrangea head is not one flower but a mass of small florets, so the cluster—not a single oversized petal—is the key construction problem. This crochet hydrangea table runner pattern uses 4-ply cotton, a 2 mm hook, layered leaves, lace circles, and repeated flower clusters. The project is intermediate and modular, making individual sections replaceable if a dining-table centerpiece becomes stained or damaged.
The Design: What Makes the Hydrangea Runner Different
Three structural decisions control this design. First, each hydrangea is assembled from separate four-petal florets rather than crocheted as one flat disk. That produces the irregular dome visible in real mophead hydrangeas and prevents the hydrangea crochet flower from reading as a conventional rosette.
Second, broad leaves sit beneath each cluster. Their job is visual and mechanical: they separate purple and blue petals from the cream lace while distributing the flower head across a wider attachment area.
Finally, overlapping cream and green disks create the length of the crochet flower table runner without requiring one large foundation piece. A common mistake is spacing every floret at exactly the same angle. Hydrangeas look more convincing when neighboring petals overlap and the color distribution is deliberately uneven.
Project Info at a Glance
| Skill Level | Time | Finished Size | Hook | Best For |
|---|---|---|---|---|
| Intermediate | 12–18 hours, depending on floret count | Modular; reference hydrangea blossom approximately 6 cm | 2 mm | Dining tables, sideboards, removable centerpieces |
The 6 cm measurement is a reference size for an individual crochet hydrangea blossom. The final table runner length is modular and can be changed by adding or removing circular motifs.
Materials and Tools
Yarn
- Lavender — fingering/4-ply cotton — quantity according to runner length — hydrangea florets
- Purple — fingering/4-ply cotton — quantity according to runner length — florets and dimensional edging
- Periwinkle blue — fingering/4-ply cotton — quantity according to runner length — accent florets
- Olive green — fingering or DK cotton — quantity according to runner length — leaves
- Dark green — fingering or DK cotton — quantity according to runner length — leaves and circular motifs
- Cream — fingering cotton — quantity according to runner length — openwork lace motifs
- Pale yellow or cream — fine cotton — flower centers
Exact gram quantities depend on the number of motifs and hydrangea clusters. Make one complete flower-and-motif section first, weigh the yarn used for that section, then multiply the amount by the number of sections required for your table.
Tools
- 2 mm crochet hook
- Tapestry needle
- Sharp scissors
- Locking stitch markers
- Rust-resistant pins
- Blocking mat
- Optional thin floral wire for additional leaf structure
Abbreviations
- MR — magic ring
- sc — single crochet
- inc — 2 sc in one stitch
- dec — single crochet decrease
- sl st — slip stitch
- ch — chain
- hdc — half double crochet
- dc — double crochet
- tr — treble crochet
- BLO — back loop only
- st/sts — stitch/stitches
For three-dimensional pieces, an invisible decrease is worked through the front loops of the next two stitches before completing one sc; this reduces the visible ridge produced by a conventional decrease.
Pattern — Step by Step
The photographed project is a botanical crochet table runner rather than an amigurumi figure. Its main components are hydrangea florets, flower bases, veined leaves, cream lace circles, green circular motifs, filler flowers, and dimensional purple edging.
Hydrangea Floret — Make 20–35 per Large Cluster
Yarn: lavender, purple, or periwinkle.
R1: 6 sc in MR (6)
R2: Work the following into each of the first four stitches: sl st, ch 2, 2 hdc, ch 2, sl st. Leave the final two foundation stitches as the attachment side.
This creates four compact petals around a small central opening.
Change colors between lavender, blue, and purple florets. Avoid arranging the colors in exact concentric rings; an irregular distribution gives the finished hydrangea a more natural structure.
Fasten off. Leave a 10 cm tail when the floret will be sewn individually.
Flower-center variation: Add a small cream or pale-yellow French knot through the center after assembly. Use the light centers selectively rather than adding one to every floret.
Hydrangea Cluster Base — Make 1 per Flower Head
Yarn: green.
R1: 6 sc in MR (6)
R2: inc ×6 (12)
R3: (sc, inc) ×6 (18)
R4: (2 sc, inc) ×6 (24)
R5: (3 sc, inc) ×6 (30)
R6: (4 sc, inc) ×6 (36)
Fasten off. Leave a 20 cm sewing tail.
The 36-stitch plateau creates a medium flower foundation. Keep this component flat or slightly cupped rather than stuffing it.
Sew the first florets around the outside edge. Position another group between those flowers, then fill the center. The petals should overlap enough to conceal most of the green base.
Large Leaf — Make 4–6 per Major Flower Cluster
Yarn: olive or dark green.
Foundation: Ch 17.
R1: Starting in second ch from hook: sc, hdc, 2 dc, 8 tr, 2 dc, hdc, 3 sc in final ch. Continue down the opposite side of the foundation: hdc, 2 dc, 8 tr, 2 dc, hdc, sc. Sl st to first sc.
R2: Ch 1, sc around the leaf, working 3 sc into the tip. Sl st to join.
Fasten off. Leave a 15 cm sewing tail.
Surface-crochet or embroider a line from the base to the tip to form the central vein. Add short diagonal stitches extending from the center vein toward both outer edges.
Small Leaf — Make as Required
Yarn: olive green.
Foundation: Ch 13.
R1: Starting in second ch from hook: sc, hdc, 2 dc, 5 tr, 2 dc, hdc, 3 sc in final ch. Continue down the opposite side with hdc, 2 dc, 5 tr, 2 dc, hdc, sc.
R2: Sc around the leaf, placing 3 sc at the tip.
Fasten off. Leave a 12 cm sewing tail.
Position these smaller leaves beneath filler flowers and between the major hydrangea clusters.
Green Circular Motif — Make 4–6
Yarn: dark or olive green.
R1: 6 sc in MR (6)
R2: inc ×6 (12)
R3: (sc, inc) ×6 (18)
R4: (2 sc, inc) ×6 (24)
R5: (3 sc, inc) ×6 (30)
R6: (4 sc, inc) ×6 (36)
R7: (5 sc, inc) ×6 (42)
For a larger disk, continue the same six-increase sequence until the required diameter is reached.
Finish with one round of slip stitches to create a defined outer edge.
Fasten off and weave in the tail.
Cream Openwork Circle — Make 5–7
Yarn: cream fingering cotton.
R1: 6 sc in MR (6)
R2: inc ×6 (12)
R3: (ch 3, skip 1 st, sl st in next st) ×6
R4: Sl st to first ch-3 space, ch 3, 3 dc in each ch-3 space; join.
R5: Ch 5, skip 2 dc, sc in next dc; repeat around.
R6: Work 5 dc into each ch-5 space.
R7: Ch 5 between the centers of adjacent shells.
R8: Work 7 dc in each ch-5 space.
R9: Sc around, distributing stitches evenly so the disk remains flat.
Fasten off and block the motif before assembly.
The photographed runner contains detailed radial lace. This simplified motif reproduces its principal structure: a cream circular foundation, open spaces, radiating sections, and an outer border suitable for dimensional edging.
Purple Dimensional Edge
Yarn: purple.
Join the purple yarn to the outside edge of a cream motif.
R1: Sc evenly around.
R2: *Ch 3, work 4 dc together into the same st, ch 1, sl st in next 2 sts.* Repeat around.
The clustered double crochets form small raised knobs around the perimeter. Adjust the number of stitches between clusters slightly if required so the motif remains flat after blocking.
Fasten off. Weave the tail through at least 4 cm of solid border stitches.
Small Filler Flower — Make 3–8 per Section
Yarn: lavender, blue, or purple.
R1: 6 sc in MR (6)
R2: *(sl st, ch 2, hdc, ch 2, sl st) in next st.* Repeat six times.
Fasten off. Leave a 10 cm sewing tail.
For a four-petal filler flower, work petals into only four foundation stitches and reserve the remaining stitches for attachment.
Pale Flower Centers
Yarn: cream or pale yellow.
Use a small French knot or compact embroidered knot in the center of selected blue, lavender, and purple florets.
Fasten the yarn securely on the reverse side of the flower.
Do not add identical centers to every floret. Scattered pale centers create stronger separation between the individual flowers inside each hydrangea cluster.
Assembly
- Block every cream and green circular motif to a consistent diameter before joining the runner.
- Arrange the cream motifs along the table axis, overlapping neighboring circles by approximately 15–25% of their diameter.
- Insert green circular motifs between the cream disks. Alternate their positions from one side of the centerline to the other.
- Sew the overlapping motifs together only where they make contact. Leave the remaining perimeter free so the layered circular construction remains visible.
- Position each completed hydrangea cluster over a cream motif or at a junction between two motifs. Pin the cluster before sewing.
- Arrange four to six large leaves beneath each major flower head. Point the leaf tips outward and allow selected leaves to overlap the green circular motifs.
- Sew each hydrangea through its green foundation. Catch the runner at several distributed attachment points rather than pulling one central stitch tightly.
- Add the small leaves and filler flowers to spaces between the major clusters. Keep these secondary elements lower than the main hydrangea heads.
- Attach the purple dimensional border to the selected cream circles. Weave yarn tails through solid border stitches rather than across open chain spaces.
- Lay the complete runner on a flat surface. Correct twisted motif junctions with hidden joining stitches and block the foundation again if required.
The finished runner should lie flat through the circular foundation while the leaves and hydrangea florets create the raised surface structure.
7 Technical Tips for a Cleaner Hydrangea Table Runner
- Mark every round start. Place a locking stitch marker in the first stitch whenever a circular component is worked continuously. A missed round start can shift the increase points and distort the disk into a spiral.
- Do not overfill the hydrangea base. The flower obtains its volume from 20–35 overlapping florets rather than stuffing. A heavily padded base can turn the hydrangea into an obvious sphere.
- Control visible decreases. Use an invisible decrease whenever a three-dimensional supporting component requires shaping. A conventional decrease can leave a horizontal bar visible between the flowers.
- Check floret spacing before sewing. Pin the outer florets approximately 5–10 mm apart before filling the middle. Starting at the center can create excessive density there while leaving green foundation visible around the perimeter.
- Correct loose tension early. If large gaps appear between stitches in a structural base, reduce the hook by approximately 0.25–0.5 mm. Dense foundations hold sewn flowers more securely than loose fabric.
- Anchor long leaves twice. Pin and sew each large leaf near its base and again roughly one-third of the distance toward its tip. A single attachment point allows the leaf to rotate when the runner is moved.
- Keep yarn tails out of open lace. Weave each tail through at least 4 cm of solid border stitches and reverse direction once. Dark green or purple tails carried across cream chain spaces remain visible from the front.
Adjusting the Table Runner Length
The modular construction makes length adjustment easier than altering a single large crochet foundation. Measure the usable center section of the table first. Then make and block one cream motif and one green motif before calculating the final quantity.
For a shorter centerpiece, use three major hydrangea clusters with alternating circular motifs between them. A medium runner can use four or five main flower clusters. Longer dining tables can take additional repeated sections without changing the individual flower pattern.
Do not calculate final length by adding the diameter of every motif. The circles overlap during assembly, so each new section contributes less than its full blocked diameter.
Color Placement for the Hydrangea Clusters
Use lavender and medium purple as the dominant shades, then insert periwinkle-blue florets irregularly throughout each flower head. Avoid dividing one hydrangea into separate blue and purple halves.
A useful starting ratio is roughly half lavender and purple combined, one-third blue, and the remaining florets in lighter or darker variations. The exact distribution can change between clusters.
Keep the leaves in at least two green values. Dark green beneath pale blue flowers creates separation, while olive leaves prevent every cluster from having the same contrast pattern.
The cream circular motifs provide the lightest large area in the runner. Purple edging then connects those neutral motifs back to the hydrangea palette without requiring another full flower cluster.
Blocking and Finishing
Block the circular motifs before the dimensional flowers are attached. Pin each circle at evenly spaced points around its circumference and check the diameter in several directions.
Leaves can also be lightly blocked before assembly. Keep the central vein aligned from the base to the pointed tip so the finished leaf does not curve sideways.
After the flowers are attached, avoid aggressive flattening of the completed runner. The foundation should remain level, but the hydrangea petals need to retain their layered structure.
Inspect the reverse side before final use. Trim only after every tail has been woven securely through dense stitches. Open lace provides little resistance to a short tail, particularly when the runner is repeatedly moved or folded.
Conclusion
Build one complete motif section before committing yarn to the full runner. That sample establishes the blocked disk diameter, floret density, leaf scale, and amount of overlap required for your table. Once those measurements are fixed, repeat the module until the required length is reached. Photograph the finished crochet hydrangea table runner pattern from directly above so the alternating cream and green circles remain visible beneath the flowers. Save the project to Pinterest and share the finished arrangement on Instagram with #HydrangeaTableRunner. For the next version, test one controlled change: should the central hydrangea clusters contain more periwinkle blue, or should purple remain the dominant flower color?









