Introduction
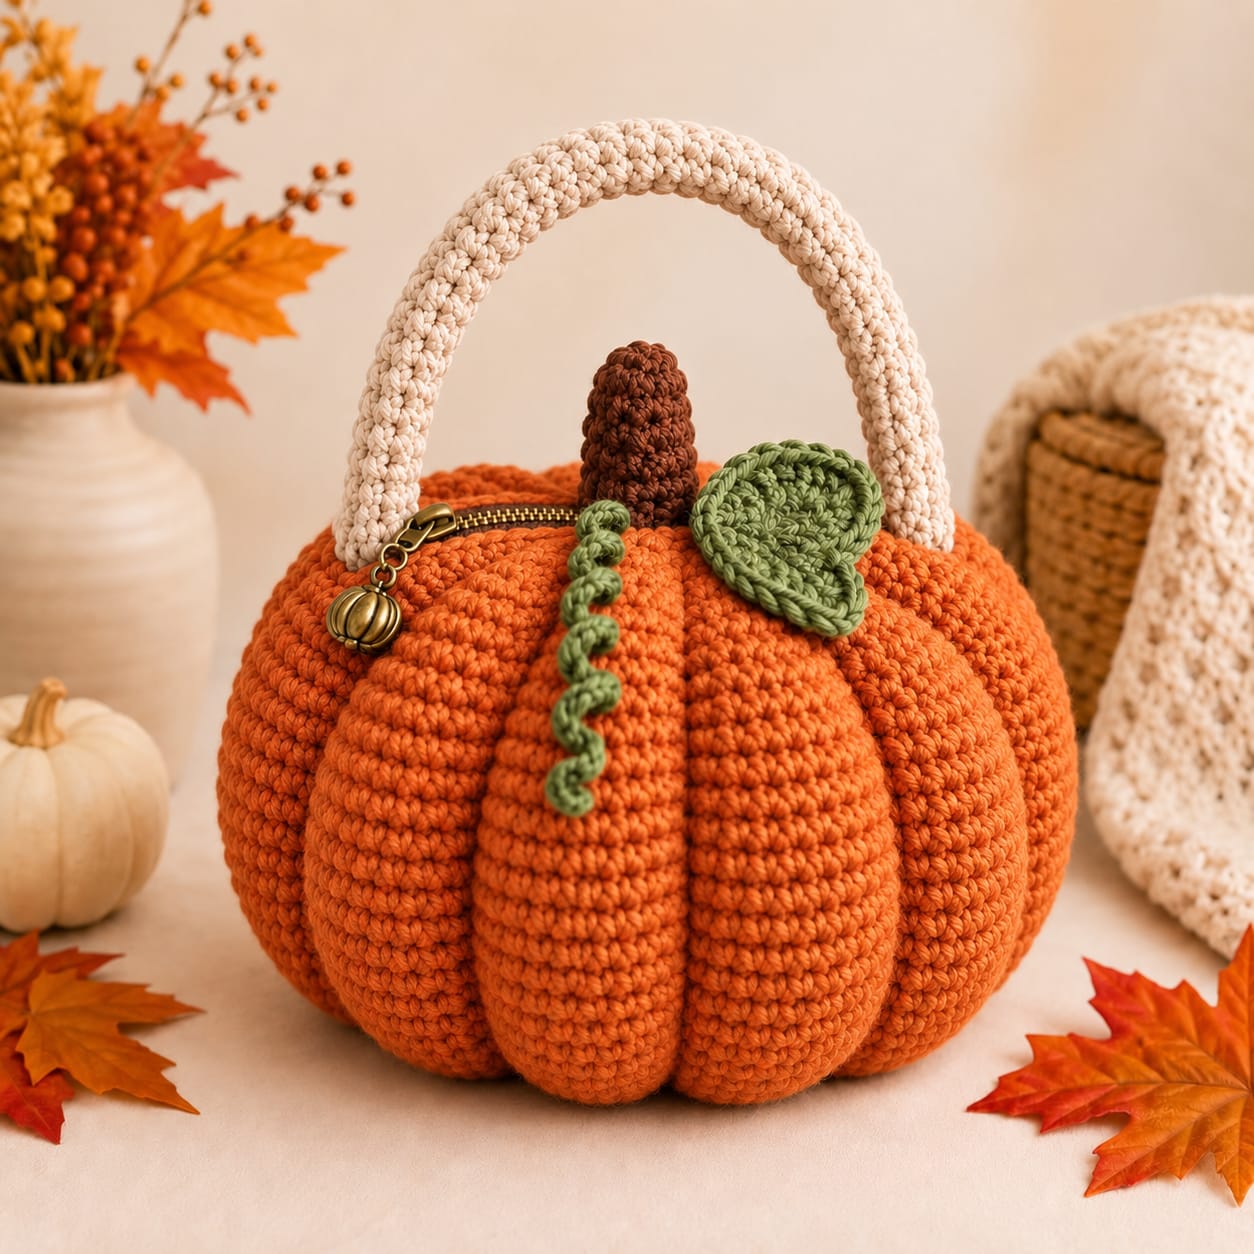
A pumpkin handbag needs deep ribs without letting those same grooves steal usable space from the zippered opening. This crochet pumpkin purse pattern uses orange worsted yarn, a 4.5 mm hook, a reinforced cream handle, zipper, brown stem, green leaf, and spiral vine. The finished purse measures approximately 22 cm wide. Intermediate construction produces a functional fall handbag rather than a stuffed decoration.
The Design: What Makes This Pumpkin Purse Different
The photographed purse combines three structures that normally compete with each other: a rounded pumpkin body, a rigid top opening, and a tall arched handle. The body therefore needs enough circumference for pronounced lobes while the upper rounds remain comparatively stable for zipper installation. Eight vertical sculpting channels divide the orange shell without closing the bag cavity. A second structural choice is the thick cream handle. Its attachment points sit outside the zipper ends so carrying force transfers into reinforced body sections instead of the zipper tape. Finally, the brown stem, olive leaf, and crochet pumpkin vine are concentrated at the crown. A common pumpkin handbag crochet mistake is sculpting the ribs too tightly. Excess tension narrows the opening, distorts the zipper, and makes the bag difficult to line.
Project Info at a Glance
| Skill Level | Time | Finished Size | Hook | Best For |
|---|---|---|---|---|
| Intermediate | Approx. 8–12 hours | Approx. 22 cm wide × 18 cm high | 4.5 mm body / 4 mm details | Fall handbag, Halloween purse, seasonal accessory |
Published pumpkin bags vary considerably by construction. One Ravelry design measures approximately 17 cm in diameter and 18 cm high using a 3 mm hook, while a crossbody pumpkin bag measures 20 × 17 cm. A current Etsy pumpkin purse lists approximately 9 inches wide × 8 inches tall with worsted-weight yarn and a 4.25 mm hook. Those measurements support a roughly 20–23 cm target for this photographed handbag.
Materials and Tools
Yarn
- Pumpkin orange — worsted/Aran #4 — approximately 220–260 g
- Warm cream — worsted/Aran #4 — approximately 80–100 g
- Chestnut brown — worsted/Aran #4 — approximately 20–25 g
- Olive or sage green — worsted/Aran #4 — approximately 20–30 g
- Orange sculpting yarn — approximately 8–10 m
For comparison, a Ravelry pumpkin bag made with macramé cotton lists 200–220 m, while a larger 26-inch-circumference pumpkin tote lists 530–550 m. Another current pumpkin-purse pattern uses 60 g of DK held double with a 5 mm hook. The photographed purse has a dense body and substantial handle, so reserve more yarn than a small trick-or-treat pouch requires.
Tools
- 4.5 mm crochet hook for orange body
- 4 mm crochet hook for stem, leaf, vine, and handle
- 20 cm zipper in antique brass, bronze, or dark brown
- Optional pumpkin zipper charm — approximately 15–25 mm
- 35 × 55 cm lining fabric
- Cotton cord — approximately 45 cm for handle reinforcement
- Large tapestry needle
- Sewing needle and strong thread
- Stitch markers
- Scissors
- Tape measure
Abbreviations
- MR — magic ring
- sc — single crochet
- inc — increase
- dec — decrease
- hdc — half double crochet
- dc — double crochet
- sl st — slip stitch
- ch — chain
- BLO — back loop only
- st/sts — stitch/stitches
An invisible decrease catches the front loops of two adjacent stitches before completing one single crochet, reducing the horizontal bar that a conventional decrease can leave on dense fabric.
Gauge
Target approximately 16–17 sc × 18–19 rounds = 10 × 10 cm before shaping.
The bag needs a dense fabric because it is not stuffed. Hold the swatch against a light source. If large gaps are visible between stitches, reduce the hook to 4 mm.
Do not deliberately crochet so tightly that the fabric becomes rigid. The orange body must still bend enough to form eight pumpkin channels.
Pattern — Step by Step
The body is worked in a continuous spiral from the base upward. Place a locking marker in the first stitch of every round.
Orange Pumpkin Purse Body
Yarn: pumpkin orange.
R1: 6 sc in MR. (6)
R2: inc ×6. (12)
R3: (1 sc, inc) ×6. (18)
R4: (2 sc, inc) ×6. (24)
R5: (3 sc, inc) ×6. (30)
R6: (4 sc, inc) ×6. (36)
R7: (5 sc, inc) ×6. (42)
R8: (6 sc, inc) ×6. (48)
R9: (7 sc, inc) ×6. (54)
R10: (8 sc, inc) ×6. (60)
The flat base now contains 60 stitches.
Turn the Base into the Bag Wall
R11: BLO sc around. (60)
R12: sc around. (60)
R13: sc around. (60)
R14: sc around. (60)
R15: sc around. (60)
R16: sc around. (60)
Expand the Pumpkin Middle
R17: (9 sc, inc) ×6. (66)
R18: sc around. (66)
R19: sc around. (66)
R20: sc around. (66)
R21: sc around. (66)
R22: sc around. (66)
R23: sc around. (66)
R24: sc around. (66)
The 66-stitch middle creates the broadest portion of the pumpkin.
Shape the Upper Body
R25: (9 sc, dec) ×6. (60)
R26: sc around. (60)
R27: sc around. (60)
R28: (8 sc, dec) ×6. (54)
R29: sc around. (54)
R30: sc around. (54)
R31: (7 sc, dec) ×6. (48)
R32: sc around. (48)
R33: sc around. (48)
Do not decrease farther. The remaining circumference forms the zipper opening.
Reinforced Top Rim
R34: BLO sc around. (48)
R35: sc around. (48)
R36: sc around. (48)
Sl st in the next stitch.
Fasten off with a 30 cm tail.
Measure the opening before buying or installing the zipper. The zipper should lie flat across the opening without stretching the crochet.
Creating the Pumpkin Ribs
The photograph shows approximately eight pronounced lobes.
Flatten the empty bag gently and mark eight equally spaced vertical positions around the circumference.
Cut an orange strand approximately 180 cm long.
Thread it onto a long tapestry needle.
Begin inside the bag near the base.
Bring the needle out through the bottom edge at the first marker.
Run the yarn vertically along the outside of the body.
Insert it through the upper rim directly above the starting point.
Travel down the inside of the bag and exit at the next bottom marker.
Repeat around all eight sections.
Apply only enough tension to create a groove approximately 5–8 mm deep.
Do not secure the shaping strand until all eight lobes have been compared.
Alternative Surface-Crochet Ribs
If a sculpting strand makes the empty bag collapse inward, create the ribs with surface slip stitches instead.
Join orange yarn at the base.
Surface sl st vertically through approximately 20–22 rounds.
Fasten off.
Repeat at eight evenly spaced positions.
Surface crochet adds raised ribs rather than deep channels. It therefore preserves more interior capacity and can be useful when the purse will carry larger objects.
Cream Crochet Handle
Yarn: warm cream.
The reference handle is thick, rounded, and approximately 40–45 cm from attachment point to attachment point.
Ch 73.
Row 1: sc in second ch from hook and across. (72)
Row 2: ch 1, turn, sc across. (72)
Row 3: ch 1, turn, sc across. (72)
Row 4: ch 1, turn, sc across. (72)
Row 5: ch 1, turn, sc across. (72)
Fasten off, leaving approximately 100 cm.
Forming the Tubular Handle
Cut cotton cord approximately 42–45 cm long.
Lay the cord along the center of the crocheted strip.
Fold the strip lengthwise around it.
Using the cream tail, mattress stitch the two long edges together.
Keep the seam on the underside of the handle.
Do not pull the seam so tightly that the tube becomes flat.
The finished handle should measure approximately 2.5–3 cm thick.
Handle Reinforcement Discs — Make 2
Yarn: warm cream.
R1: 6 sc in MR. (6)
R2: inc ×6. (12)
R3: (1 sc, inc) ×6. (18)
Sl st and fasten off, leaving a 40 cm tail.
These discs sit inside the purse behind the handle ends. They distribute pulling force across a larger area of the orange fabric.
Attaching the Handle
Place the handle ends approximately 3–4 cm outside the zipper ends.
Insert each handle end approximately 2 cm down the side of the purse.
Position one reinforcement disc behind each attachment point inside the bag.
Using strong cream yarn, stitch through the handle, orange body, and reinforcement disc.
Work a rectangular attachment area approximately 3 × 3 cm.
Repeat several passes.
Do not attach the handle only to the topmost crochet round.
Brown Pumpkin Stem
Yarn: chestnut brown.
R1: 6 sc in MR. (6)
R2: inc ×6. (12)
R3: BLO sc around. (12)
R4: sc around. (12)
R5: sc around. (12)
R6: sc around. (12)
R7: sc around. (12)
R8: sc around. (12)
R9: (2 sc, dec) ×3. (9)
R10: sc around. (9)
R11: sc around. (9)
Sl st.
Fasten off, leaving approximately 40 cm.
Lightly fill the stem with brown yarn scraps rather than dense stuffing.
Green Pumpkin Leaf
Yarn: olive or sage green.
Ch 12.
Starting in the second chain from the hook work:
sl st, sc, hdc, dc, dc, tr, dc, dc, hdc, sc, sc.
Work 3 sc into the final chain.
Continue along the opposite side:
sc, sc, hdc, dc, dc, tr, dc, dc, hdc, sc, sl st.
Do not fasten off.
Leaf Edging
Ch 1.
Sc evenly around the leaf.
At the point work:
sc, ch 2, sl st into first ch, sc.
Continue around.
Sl st at the base.
Fasten off, leaving approximately 35 cm.
Leaf Vein
Join green yarn at the base.
Surface slip stitch along the central foundation chain.
Fasten off near the leaf point.
The finished leaf should measure approximately 8–10 cm.
Green Curly Vine
Yarn: olive or sage green.
Ch 28.
Starting in the second chain from the hook, work 2 sc in each chain.
For the final six chains, work 3 sc in each chain.
Fasten off, leaving a 30 cm tail.
The unequal circumference created by the increases forces the strip into the spiral visible on the front of the purse.
Installing the Zipper
Use a zipper approximately 20 cm long, but measure the finished crochet opening before installation.
Open the zipper.
Center it beneath the reinforced rim.
Pin or clip the zipper tape to the inside of the crochet.
The zipper teeth should sit approximately 4–6 mm below the upper edge.
Using strong sewing thread, backstitch through the zipper tape and the inner loops of the crochet.
Stitches should be approximately 4–5 mm apart.
Work the first side completely.
Close the zipper and check alignment.
Only then sew the second side.
The zipper should close without forcing the pumpkin lobes inward.
Optional Pumpkin Zipper Charm
The photographed purse has a small antique-brass pumpkin charm attached to the zipper pull.
Select a charm approximately 15–25 mm tall.
Open a small jump ring.
Pass it through the zipper-pull opening.
Add the charm.
Close the ring completely with jewelry pliers.
Keep the charm light enough that it does not drag the zipper open when the bag is carried.
Fabric Lining
A lining prevents keys and other small objects from stretching the sculpted crochet body.
Measure the purse after the ribs have been formed.
Cut two fabric pieces approximately 1.5 cm larger than the measured interior profile on every seam edge.
Place right sides together.
Sew the sides and curved base with a 1 cm seam allowance.
Leave the top open.
Turn the upper raw edge inward approximately 1 cm.
Insert the lining into the purse.
Hand-sew its folded edge to the zipper tape.
Do not sew the lining directly through the visible outer pumpkin ribs.
Assembly
- Complete the orange body through R36 and measure the opening before selecting the final zipper length.
- Mark eight equally spaced rib positions and sculpt the orange body with shallow 5–8 mm vertical channels.
- Install the zipper approximately 4–6 mm below the reinforced top edge and test it in both directions.
- Insert the fabric lining and hand-stitch its upper edge to the inside of the zipper tape.
- Position the cream handle ends 3–4 cm beyond the zipper ends and place reinforcement discs behind them.
- Secure each handle end through the orange body and reinforcement disc across an area approximately 3 × 3 cm.
- Place the brown stem at the crown between the handle attachment points without obstructing the zipper path.
- Position the green leaf beside the stem and anchor only its base so the outer portion remains dimensional.
- Attach the green spiral vine at the stem base and allow it to hang naturally down the front center lobe.
- Add the optional pumpkin zipper charm, weave all yarn tails into matching dense stitches, and perform a loaded handle test before use.
The completed bag should retain eight visible orange lobes while the zipper, lining, and cream handle remain structurally independent of the sculpting strands.
7 Technical Tips
- The zipper develops waves: stop sculpting when the rib channels reach approximately 5–8 mm. Deeper channels shorten the upper circumference and force a previously flat 20 cm zipper into an arc.
- The handle pulls the rim upward: reinforce each attachment with an internal disc at least 4 cm across. Sewing a thick handle only to one or two rim rounds concentrates the load in too few stitches.
- The bag collapses when empty: use dense worsted cotton or a firm cotton blend and add fabric lining. Extremely soft acrylic can stretch between the eight shaping channels when the purse is loaded.
- One pumpkin lobe is visibly narrower: mark all eight vertical positions before tightening the first sculpting strand. Compare the body from above after every two channels rather than waiting until all eight are fixed.
- The zipper catches the leaf: keep the leaf base at least 1.5 cm from the moving zipper slider. Attach only the lower leaf section so its point can be repositioned away from the zipper track.
- The cream handle stretches after use: place a 42–45 cm cotton cord inside the crocheted tube. A hollow worsted-yarn handle can lengthen several centimeters under the combined weight of a phone, wallet, and keys.
- The vine loses its spiral: work two single crochets into every foundation chain and three into the final six chains. Stretching the finished vine during blocking can permanently relax the curl.
Why This Pumpkin Body Is Not Stuffed
A decorative amigurumi pumpkin and a pumpkin purse need different internal structures.
Stuffing gives a decorative pumpkin its volume, but filling a handbag body would eliminate storage capacity.
The purse instead obtains its shape from three components: dense crochet fabric, controlled expansion through the middle rounds, and shallow external rib shaping.
The lining adds another layer of support.
When the purse is empty, the body may relax slightly. Once small personal items are added, the rounded pumpkin silhouette becomes more pronounced.
Why the Opening Stops at 48 Stitches
The body expands to 66 stitches at its widest point but returns to 48 stitches at the rim.
This reduction gives the purse a rounded shoulder without closing the top.
Reducing farther would create a stronger pumpkin silhouette but leave insufficient space for a practical zipper.
Keeping all 66 stitches at the top would make the purse read more like a cylindrical bucket.
The 48-stitch opening therefore balances pumpkin shaping against access to the interior.
Keeping the Pumpkin Shape Without Fiberfill
The lining should be slightly smaller than the outer crochet shell.
That prevents heavy contents from pushing directly against the orange stitches.
For additional structure, insert lightweight bag stabilizer between the lining and crochet along the lower half only.
Do not use rigid stabilizer across the eight ribs.
The channels need enough flexibility to retain their rounded transitions.
Choosing the Orange Yarn
The reference uses a saturated pumpkin orange with a slightly muted autumn tone.
Useful color names include pumpkin, burnt orange, spice, persimmon, cinnamon orange, and harvest orange.
A smooth yarn makes the horizontal single-crochet rounds clearly visible.
Cotton gives the strongest bag structure.
A cotton-acrylic blend reduces weight while maintaining useful stitch definition.
Soft acrylic can also work, but the lining and handle reinforcement become more important.
Choosing the Cream Handle Yarn
The handle should contrast clearly with the orange body.
Use warm cream, natural, oatmeal, or light beige rather than bright white when matching the reference.
A low-stretch cotton is preferable for the outer handle tube.
Keep the hook approximately 0.5 mm smaller than the body hook so the handle fabric remains dense around the internal cord.
Adjusting Handle Length
The 40–45 cm handle creates a hand-carry or short forearm purse.
For a smaller hand handle, reduce the foundation to approximately 55–60 chains.
For shoulder carrying, increase the finished handle to approximately 55–65 cm.
A long crossbody strap requires a different construction.
Use a tightly crocheted strap or webbing reinforcement rather than extending the thick arched tube beyond approximately 65 cm.
Making a Smaller Pumpkin Purse
Stop the body expansion at 48 stitches.
Work six to eight straight rounds.
Decrease to 42 stitches for the upper body.
Keep the opening at 42 stitches.
Use a zipper approximately 15–17 cm, subject to the finished measurement.
Reduce the handle to approximately 32–36 cm.
A smaller bag can use six pumpkin lobes rather than eight.
Making a Larger Pumpkin Handbag
Continue the standard increase sequence beyond 66 stitches.
Next increase: (10 sc, inc) ×6. (72)
Following increase: (11 sc, inc) ×6. (78)
Work the middle at 72 or 78 stitches according to the required width.
Reduce gradually before the opening.
For a bag wider than approximately 28 cm, use two handles or a reinforced shoulder strap. One central arched handle can distort a large unsupported rim.
Changing the Number of Pumpkin Ribs
Six lobes produce a simpler, broader pumpkin.
Eight lobes more closely match the photographed purse.
Ten lobes create narrower sections and require shallower channels.
The shaping positions do not have to correspond exactly to individual crochet stitches because the channels are added after the body is complete.
Measure the physical circumference instead.
Divide that measurement by the desired number of lobes and mark equal intervals.
Zipper Length Adjustment
Do not select the zipper from the nominal 22 cm bag width alone.
The zipper spans only the top opening, which is narrower than the widest pumpkin circumference.
Complete R36 first.
Flatten only the top rim without crushing the body.
Measure from one handle-side opening point to the other.
Select the nearest zipper length that fits without stretching.
A slightly shorter zipper can be centered. A zipper that is too long creates bulky folded ends.
Making the Leaf More Dimensional
Use a 3.5 mm hook for the final edging while keeping the main leaf at 4 mm.
The tighter edge causes the leaf to cup slightly.
After attaching the base, bend the point away from the purse.
Do not sew the leaf flat across its full surface.
The reference relies on the raised edge and curved tip to separate the green element from the orange body.
Making a Longer Curly Vine
Increase the foundation chain from 28 to 36–40 chains.
Work two single crochets into each chain.
Use three single crochets per chain through the final eight chains for a tighter lower curl.
The finished vine should hang across only one or two pumpkin lobes.
An excessively long spiral can catch on the zipper pull during use.
Stem Placement
The brown stem belongs close to the visual center of the bag but does not have to sit on the geometric center of the zipper.
Shift it slightly toward the rear side of the opening.
This keeps the zipper slider path clear.
The leaf can then angle forward and partly overlap the orange crown.
Before permanent attachment, open and close the zipper several times with all topper pieces pinned in position.
Adding the Pumpkin Charm
A small bronze charm reinforces the autumn theme without changing the crochet structure.
Match the metal finish to the zipper teeth and slider.
Antique brass works particularly well with orange, cream, olive, and brown.
Keep the charm below approximately 25 mm unless the zipper pull is unusually large.
Heavy charms add repeated downward force to the slider and can make a lightweight zipper harder to operate.
What Fits Inside
A purse around 22 cm wide and 18 cm high is suitable for compact everyday items.
A phone, card wallet, keys, small cosmetics, and folded reusable bag should fit when the lining follows the outer body closely.
Do not fill the purse until the ribs disappear.
The sculpted outer shape depends on leaving some space between the contents and the widest circumference.
Flat items should sit toward the lining center rather than being pushed directly into one lobe.
Loaded Handle Test
Before regular use, place approximately 1 kg of soft contents inside the finished purse.
Lift the bag approximately 10 cm above a padded surface.
Hold it for 30 seconds.
Inspect both handle attachments.
No orange stitches should elongate visibly around the reinforcement discs.
If the attachment area stretches, add additional stitches through a wider section before carrying personal items.
Care and Storage
Follow the care instructions supplied with the selected yarn.
Remove loose accessories from the purse before washing when possible.
Protect the zipper and metal charm from prolonged soaking.
After cleaning, reshape the eight pumpkin lobes while the crochet is damp.
Support the handle in its natural arch during drying.
Store the purse with clean tissue or a lightweight cloth inside so the pumpkin body retains its volume without being tightly packed.
Conclusion
The functional challenge in this pumpkin bag is keeping the orange lobes pronounced without sacrificing the zipper opening. Build the body to its broad 66-stitch middle, reduce gradually to the reinforced rim, and form eight shallow channels only after the shell is complete. The cream tubular handle needs internal reinforcement, while the brown stem, olive leaf, and spiral vine should remain clear of the zipper path. Make the orange body first and measure its actual opening before purchasing the closure. Save this crochet pumpkin purse pattern to Pinterest or share the finished handbag on Instagram with #PumpkinPurseCrochet. Would you keep the cream handle shown here or match it to the orange pumpkin body?









