Introduction
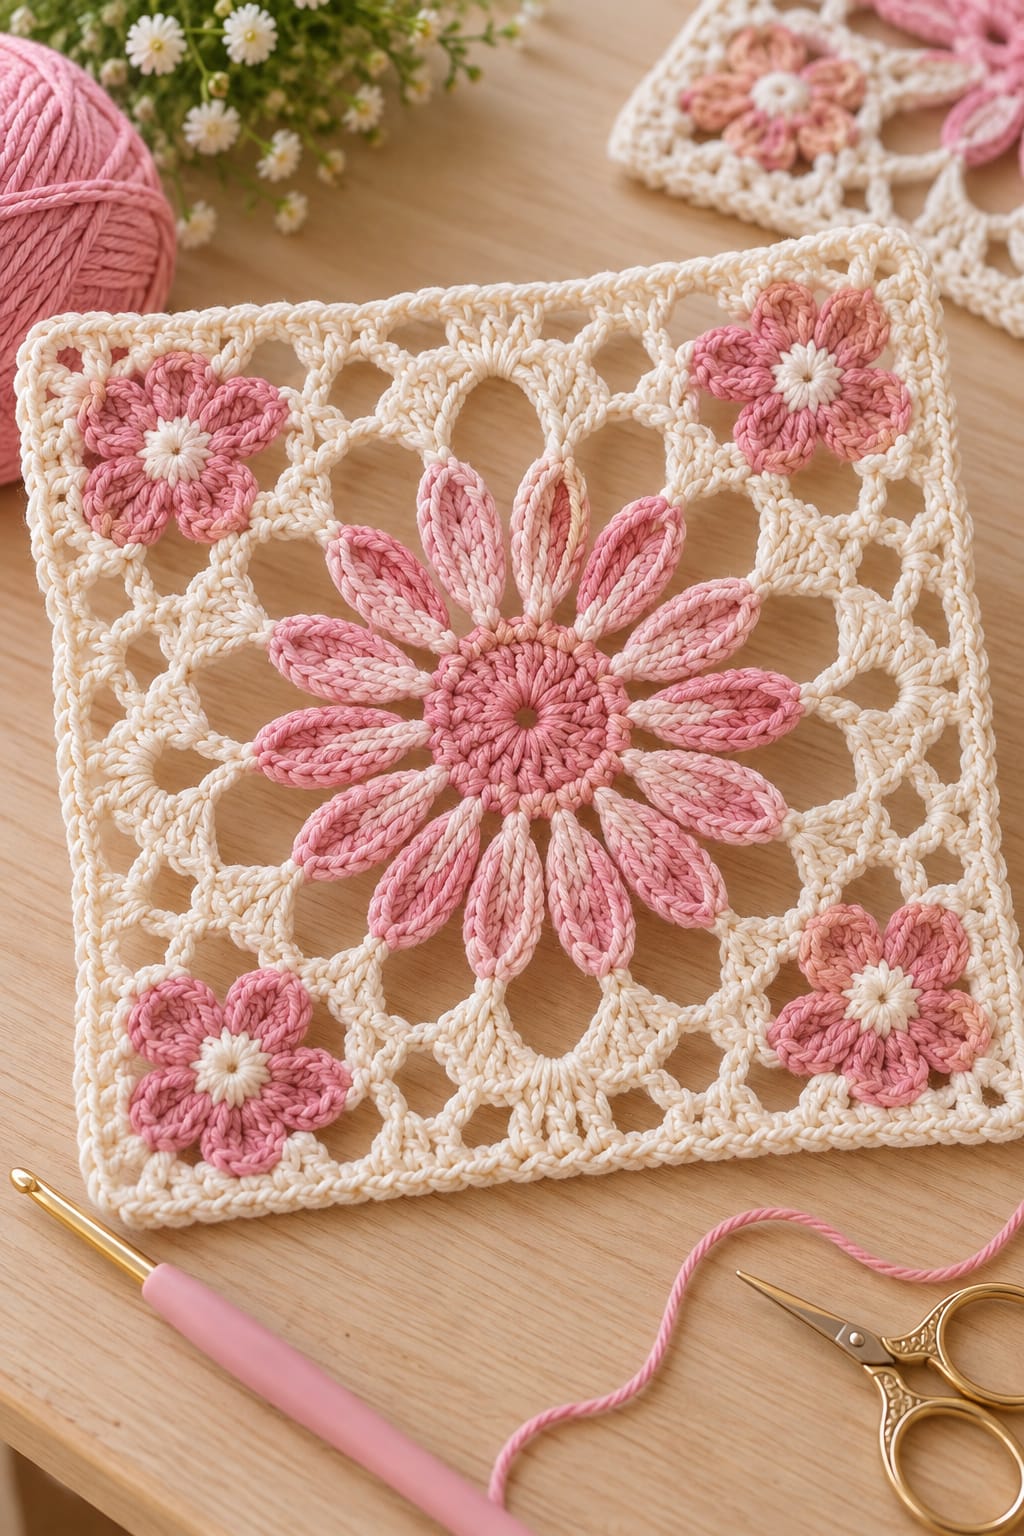
Twelve long pink petals have to reach a square frame without closing the open spaces that make this floral block distinctive. This pink flower granny square crochet pattern uses cotton yarn, a 3.5 mm hook, layered pink petals, cream corner flowers, and an open lace background. The intermediate square finishes at approximately 20 cm. Its flat construction works well for blankets, cushion panels, bags, and joined table linens.
The Design: What Makes This Flower Granny Square Different
The central flower is larger than a conventional daisy motif and uses twelve narrow elongated petals around a compact pink center. Each petal is outlined so the center remains visually separate from the cream lace behind it. The second structural decision is the open square frame. Chain spaces and tall stitches convert the circular flower into four corners without filling the background with dense crochet. Finally, four smaller five-petal flowers sit close to the corners, repeating the pink-and-cream palette at a reduced scale.
Published crochet flower granny square patterns show substantial variation in construction: examples use 2.5 mm hooks with 4-ply cotton, 5 mm hooks with Aran yarn, and 6 mm hooks with worsted yarn. A frequent mistake in an openwork granny square is tightening the chain arches. Short arches pull the corners inward even when the flower itself lies flat.
Project Info at a Glance
| Skill Level | Time | Finished Size | Hook | Best For |
|---|---|---|---|---|
| Intermediate | Approx. 1.5–2.5 hours | Approx. 20 × 20 cm | 3.5 mm | Blankets, bags, cushions, table linens |
Published flower granny squares range from approximately 11.5 cm to 30.5 cm depending on yarn and hook size. The 20 cm target here is selected for the larger twelve-petal centerpiece and broad openwork frame visible in the reference.
Materials and Tools
Yarn
- Warm cream — DK/light #3 cotton — approximately 25–30 g
- Medium dusty pink — DK/light #3 cotton — approximately 18–22 g
- Pale blush pink — DK/light #3 cotton — approximately 8–12 g
A current Ravelry flower granny square made with DK yarn lists approximately 46–50 m total yardage, while an Aran flower square lists 23–27 m. The larger openwork motif here uses additional yarn for the elongated petals and outer frame, so keeping roughly 60–75 m available is a practical target.
Tools
- 3.5 mm crochet hook
- Tapestry needle
- Scissors
- Blocking mat
- Rust-resistant pins
- Stitch markers
- Tape measure
Abbreviations
- MR — magic ring
- ch — chain
- sc — single crochet
- hdc — half double crochet
- dc — double crochet
- tr — treble crochet
- dtr — double treble crochet
- inc — increase
- sl st — slip stitch
- sp — space
- st/sts — stitch/stitches
An invisible decrease is not required because the motif expands outward in flat rounds and uses no decreasing amigurumi sections.
Gauge and Finished Measurements
Work one complete motif and block it before checking size.
Target measurements:
- Central flower: approximately 12–13 cm across
- Large petal: approximately 4.5–5 cm long
- Small corner flower: approximately 4–5 cm across
- Finished square: approximately 20 × 20 cm
Square dimensions matter more than a conventional row gauge because much of the design consists of chain spaces. Blocking should correct minor differences, but it should not be used to stretch a significantly undersized motif.
Pattern — Step by Step
Large Pink Flower Center
Yarn: medium dusty pink.
R1: 6 sc in MR. (6)
R2: inc ×6. (12)
R3: (1 sc, inc) ×6. (18)
R4: (2 sc, inc) ×6. (24)
Join with sl st.
The center should remain flat. If it cups before the petals are added, loosen R4 slightly.
Petal Foundation Round
R5: *Sc in next 2 stitches, ch 6.* Repeat around 12 times. Join with sl st. (12 ch-6 spaces)
Each chain space supports one long petal.
Count all 12 spaces before continuing. An incorrect number at this point changes the radial symmetry of the entire flower.
Large Petals — Make 12
Work into the first ch-6 space:
Petal 1: sc, hdc, 2 dc, 3 tr, 2 dc, hdc, sc.
Sl st into the next two foundation stitches.
Repeat the same sequence in every ch-6 space.
Join after the twelfth petal.
Do not fasten off if you are adding the contrasting petal outline.
Pink Petal Outline
The reference shows elongated petals with a visibly defined edge. Use pale blush for the outline if stronger two-tone separation is wanted.
Join pale blush at the base of any petal.
Sl st up the first side of the petal.
At the point, work:
sl st, ch 2, sl st into the top stitch.
Continue with surface slip stitches down the opposite side.
Move directly to the next petal base.
Repeat around all 12 petals.
Fasten off.
Alternative Narrow Petal Construction
If your DK cotton creates petals wider than those in the reference, use this sequence instead:
sc, hdc, dc, 3 tr, dc, hdc, sc.
This removes two double crochets and creates a narrower leaf-shaped petal.
Make all 12 petals with the same version. Mixing wide and narrow petals makes the central flower look irregular after blocking.
Cream Openwork Foundation
Yarn: warm cream.
Turn the flower to the wrong side.
Join cream yarn behind the base of any petal.
R6: *Ch 7, sl st behind the base of the next petal.* Repeat around. (12 ch-7 spaces)
These arches sit behind the flower rather than across the front surface.
Open Lace Round
R7: Sl st into first ch-7 space.
Ch 3.
Work 3 dc, ch 5, 3 dc in the same space.
In the next two ch-7 spaces, work 3 dc, ch 4, 3 dc.
Repeat this three-space sequence around.
The four larger ch-5 spaces establish the future square corners.
Join with sl st.
Squaring Round
R8: Sl st to the first corner space.
Ch 3.
Work 2 dc, ch 4, 3 dc in the corner space.
Ch 4.
Work 3 dc into the next side space.
Ch 4.
Work 3 dc into the following side space.
Ch 4.
In the next corner space work 3 dc, ch 4, 3 dc.
Repeat around.
Join.
Large Lace Arch Round
R9: Sl st into the first corner.
Work sc, ch 6, sc in the corner space.
Ch 7.
Sc into the next 3-dc group.
Ch 7.
Sc into the next 3-dc group.
Ch 7.
Work sc, ch 6, sc in the next corner.
Repeat around.
The long side arches should remain loose. They form the large negative spaces visible between the central flower and outer frame.
Decorative Triangle Fans
R10: Work into each ch-7 side arch:
3 dc, ch 2, 3 dc.
In each corner ch-6 space work:
3 dc, ch 3, 3 dc.
Between fans, ch 3.
Join.
The grouped stitches form small triangular structures around the large central flower.
Outer Square Frame
R11: Ch 1.
Sc evenly across the first side.
Work sc, ch 3, sc in the corner.
Continue around all four sides.
Join.
Count the stitches on every side.
Each side must contain the same number before the final frame round is added.
Final Cream Border
R12: Ch 2.
Hdc in every stitch and chain space along the first side.
In each corner ch-3 space work:
2 hdc, ch 2, 2 hdc.
Repeat around.
Join and fasten off.
The square should now measure close to 20 × 20 cm after blocking.
Small Corner Flower — Make 4
The reference places one small pink five-petal flower near each corner.
Cream Flower Center
Yarn: warm cream.
R1: 6 sc in MR. (6)
R2: inc ×6. (12)
Join and fasten off.
Five Pink Petals
Yarn: medium dusty pink.
Join pink yarn to any stitch.
Petal 1: Ch 5, 2 tr in same stitch, ch 5, sl st in same stitch.
Sl st into the next two stitches.
Petal 2: Ch 5, 2 tr in same stitch, ch 5, sl st in same stitch.
Continue distributing five petals evenly around the 12-stitch center.
For the final spacing, use one attachment point after two stitches where necessary.
Fasten off, leaving approximately 25 cm for sewing.
Shaping the Small Petals
Insert the hook into the outer ch-5 loop of one petal.
Work 5 sc around the chain loop.
At the top, work ch 2.
Work another 5 sc down the second chain side.
Sl st at the base.
Repeat around the remaining four petals.
This creates the rounded five-petal flowers visible at the corners.
Attaching the Four Corner Flowers
Block the main square first.
Place one small flower approximately 2–2.5 cm inward from each corner.
Rotate the flowers so one petal points diagonally toward the corner.
Using the long pink tail, sew through the back of the flower center.
Add one hidden stitch near the base of each petal.
Do not sew around the complete petal perimeter.
The outer half of each petal should remain slightly raised from the lace background.
Optional Two-Tone Small Flowers
The corner flowers can use pale blush and medium pink together.
Make the center in cream.
Work three petals in medium pink and two petals in blush.
Alternate the colors around the flower.
For a more uniform result, work all five petals in medium pink and add pale-blush surface slip stitches along their outer edges.
How the Circular Flower Becomes a Square
The transition depends on four evenly spaced corner points.
The central flower begins with twelve petals.
Twelve divides evenly into four groups of three.
That makes every third space a natural corner position.
The remaining two spaces in each group form one side of the square.
This relationship is useful when checking R7 and R8. If a corner appears one petal too early or too late, the error usually occurred when the twelve rear chain spaces were counted.
Keeping the Lace Open
The cream background should not become a dense granny-square fabric.
Large chain arches are part of the design.
Do not replace the ch-7 spaces with extra double crochet simply because the fabric looks open before blocking.
Blocking expands those arches and defines the triangular lace structures.
For bags or garments that require less open space, reduce ch-7 arches to ch-5 and add one extra double crochet group where required.
Blocking the Main Square
Place the finished square on a blocking mat.
Pin all four corners first.
Measure diagonally from corner to corner.
Both diagonal measurements should match.
Next, pin the midpoint of each side.
Adjust the remaining lace arches.
Target 20 cm across both horizontal and vertical dimensions.
Allow the square to dry completely before removing the pins.
Blocking the Large Pink Petals
Pin each petal separately.
Pull from the base toward the point rather than stretching sideways.
Target approximately 4.5–5 cm from petal base to tip.
Keep all twelve tips at approximately equal distance from the flower center.
Do not flatten the contrasting surface outline.
If one petal remains shorter, reshape that petal rather than stretching the entire square around it.
Why Cotton Works Well for This Square
Cotton gives the long petals and open chain arches enough definition to hold their shape after blocking.
Loopara’s published flower granny square uses 4-ply combed cotton with a 2.5 mm hook. Make & Do Crew also demonstrates its daisy granny square with cotton yarn, while other flower squares use DK and worsted fibers.
A DK cotton is a useful middle ground for the larger motif shown here.
It creates a substantial square without making the flower excessively thick.
A cotton-acrylic blend can also be used when a softer blanket fabric is preferred.
Choosing the Pink Shades
The reference uses two related pink values rather than a single flat shade.
Select one medium dusty pink for the central disc and primary petal areas.
Add pale blush or shell pink around the elongated petal edges.
The smaller flowers can use the medium shade alone.
A useful palette is:
- Center: dusty rose
- Petals: medium rose pink
- Petal outline: blush pink
- Lace: warm cream or natural
Avoid bright white if you want the softer contrast shown in the reference. Natural cotton or warm ivory produces a closer result.
Making the Central Flower Larger
To increase the flower diameter without changing the square frame, lengthen the petal foundation arches.
Replace each ch 6 with ch 7.
Work:
sc, hdc, 2 dc, 4 tr, 2 dc, hdc, sc
into each arch.
Block the petals to approximately 5.5 cm.
Do not enlarge the center beyond 24 stitches unless the outer lace is also recalculated. A larger center pushes the petal bases outward and reduces the negative space between the flower and frame.
Making a Smaller Flower Square
Use sport or fingering-weight cotton with a 2.5–3 mm hook.
Keep the same stitch counts.
The completed square will reduce naturally because each stitch occupies less space.
A published flower granny square made with 4-ply cotton and a 2.5 mm hook confirms that fine cotton is suitable for detailed floral blocks.
Make a complete test square before estimating blanket dimensions because the open chain arches respond strongly to blocking.
Using Aran or Worsted Yarn
Flower granny squares are also commonly worked in heavier yarn.
One Ravelry flower granny square specifies Aran yarn with a 5 mm hook and uses approximately 23–27 m. Another published floral granny block uses a 6 mm hook.
For this design, thicker yarn will make the twelve long petals substantially larger.
Use a 4.5–5 mm hook and expect the finished square to exceed 20 cm.
Do not attempt to force an Aran square down to the DK dimensions through tight blocking.
Making a Blanket from the Squares
For a baby blanket, make 20 squares and arrange them in a 4 × 5 grid.
At 20 cm per blocked square, the unbordered field measures approximately 80 × 100 cm before joining contraction.
For a larger throw, make 35 squares in a 5 × 7 arrangement.
That produces a central field close to 100 × 140 cm.
Rotate the squares by 90 degrees in alternating positions if the corner flowers create a directional appearance.
Joining the Flower Granny Squares
A flat join keeps the attention on the openwork.
Place two blocked squares with right sides together.
Using cream yarn, whipstitch through corresponding outer loops.
Match the corners first.
Next, match the side midpoint.
Continue sewing from one corner to the other without stretching the lace.
Open the joined squares and check that the seam lies flat.
Repeat horizontally before joining complete rows vertically.
Optional Crochet Join
Place two squares wrong sides together.
Join cream yarn at one corner.
Single crochet through corresponding stitches of both squares.
Continue across.
This produces a visible raised seam.
The method works well for blankets but adds more structure than a sewn join.
Use the same method throughout the entire project so spacing between squares remains consistent.
Using the Square for a Crochet Bag
Open lace needs additional support when the square becomes a bag panel.
Make two identical floral squares.
Block both to exactly the same dimensions.
Join three sides.
Add a dense single-crochet band around the opening.
Install a fabric lining behind the lace before attaching handles.
The lining prevents keys and other small objects from passing through the large chain arches.
Using the Square for a Cushion
Four squares can form the front of a larger cushion.
Join them in a 2 × 2 arrangement.
Add two or three rounds of cream single crochet around the outer perimeter.
Use a solid crochet or fabric panel for the back.
A contrasting pink fabric behind the openwork makes the cream arches more visible.
For a subtler result, use cream fabric behind both the pink flower and lace.
Fixing a Cupped Center
If the 24-stitch center forms a bowl, the working tension is too tight or the hook is too small.
Lay the center flat before R5.
If the edge lifts more than approximately 5 mm, remake the final increase round with looser stitches.
Do not rely on the twelve petals to flatten a cupped disc.
They add outward tension unevenly and can make alternate petals twist.
Fixing Twisted Petals
A long petal can rotate when its chain arch is tight.
Check that the ch-6 foundation lies flat before working into it.
Insert all petal stitches from the same side of the chain space.
After finishing the petal, pull gently from base to tip.
If the petal still turns over, remake its foundation chain with slightly larger loops.
Blocking can correct mild rotation but not a fully twisted chain arch.
Fixing Rounded Corners
The square requires a clear direction change at each corner.
If the corners look rounded, increase the corner chain space from ch 3 to ch 4.
Do not add extra stitches across every side.
Additional side stitches increase circumference and may create waves.
Change only the corner spacing first, block the square, and then reassess its shape.
Keeping All Four Corner Flowers Consistent
Make the four small flowers consecutively rather than at different stages of the project.
Use the same hook.
Count 12 center stitches for each flower.
Measure the first completed motif.
The remaining three should finish within approximately 3–4 mm of that diameter.
Attach all four only after the main square has been blocked. Sewing them before blocking can pull individual corners inward.
Yarn Tail Management
This square contains several color changes, so tail management matters.
Leave approximately 12–15 cm at normal color changes.
For corner flowers, leave 25 cm because the tail can double as sewing yarn.
Weave tails through dense flower centers rather than through long open chain arches.
Change direction at least once while weaving.
Trim only after the square has been blocked and inspected.
7 Technical Tips
- The twelve petals are uneven: Mark all 12 ch-6 foundation spaces before filling the first one. Missing a space shifts every remaining petal and prevents the flower from dividing cleanly into four groups of three.
- The central flower cups upward: Check the 6-12-18-24 increase sequence before R5. A tight or incomplete 24-stitch round cannot lie flat under twelve long petals.
- The cream arches pull the square inward: Measure a relaxed ch-7 arch before repeating it around the motif. Tight chain tension can reduce each arch by more than 1 cm and distort all four sides.
- The petal points twist: Insert every stitch into the same ch-6 space without twisting the chain before beginning. A rotated foundation arch produces a petal that remains twisted even after blocking.
- The square finishes with rounded corners: Pin each corner to a 90-degree angle and compare both diagonal measurements. If the corner still contracts, increase only its chain space rather than adding stitches across the side.
- The small flowers distort the lace: Sew them through the center and lower petal bases only. Attaching the full five-petal perimeter can shorten the openwork underneath and pull the corner inward.
- Joined squares vary in size: Block every motif to the same 20 cm measurement before sewing. A difference of 5 mm per square becomes 2.5 cm across a row of five blocks.
Care and Finishing
Follow the care instructions for the selected cotton yarn.
Support joined projects when wet because open chain spaces can stretch under water weight.
Reshape the twelve central petals while the square is damp.
Check all four corners against the original blocked measurement.
Do not press a hot iron directly onto the raised pink petal outlines.
For storage, stack individual squares flat with the petals facing upward. Completed blankets should be folded loosely so the same flower centers are not repeatedly compressed.
Conclusion
The twelve-petal center controls every later section of this square, so count the petal foundations before building the cream lace. Keep the rear chain arches relaxed, establish four corners after every third petal group, and block the main square before sewing on the smaller flowers. A 3.5 mm hook with DK cotton targets a 20 cm block while preserving the open spaces visible around the central bloom. Crochet one complete test motif before calculating a blanket quantity. Save this pink flower granny square crochet pattern to Pinterest or share the finished square on Instagram with #PinkLaceFlowerSquare. For this specific design, would you keep all twelve center petals pink or alternate blush and dusty rose?









