Introduction
Pink basket blocks have to reverse at identical intervals or the blanket stops looking like oversized woven strips. This pink chunky basket weave crochet blanket pattern uses super-bulky yarn, a 9 mm hook, and alternating front-post and back-post double crochet. The target size is approximately 127 × 145 cm at an intermediate skill level. One solid color also removes yarn changes from the main field.
The Design: What Makes This Pink Basket Weave Blanket Different
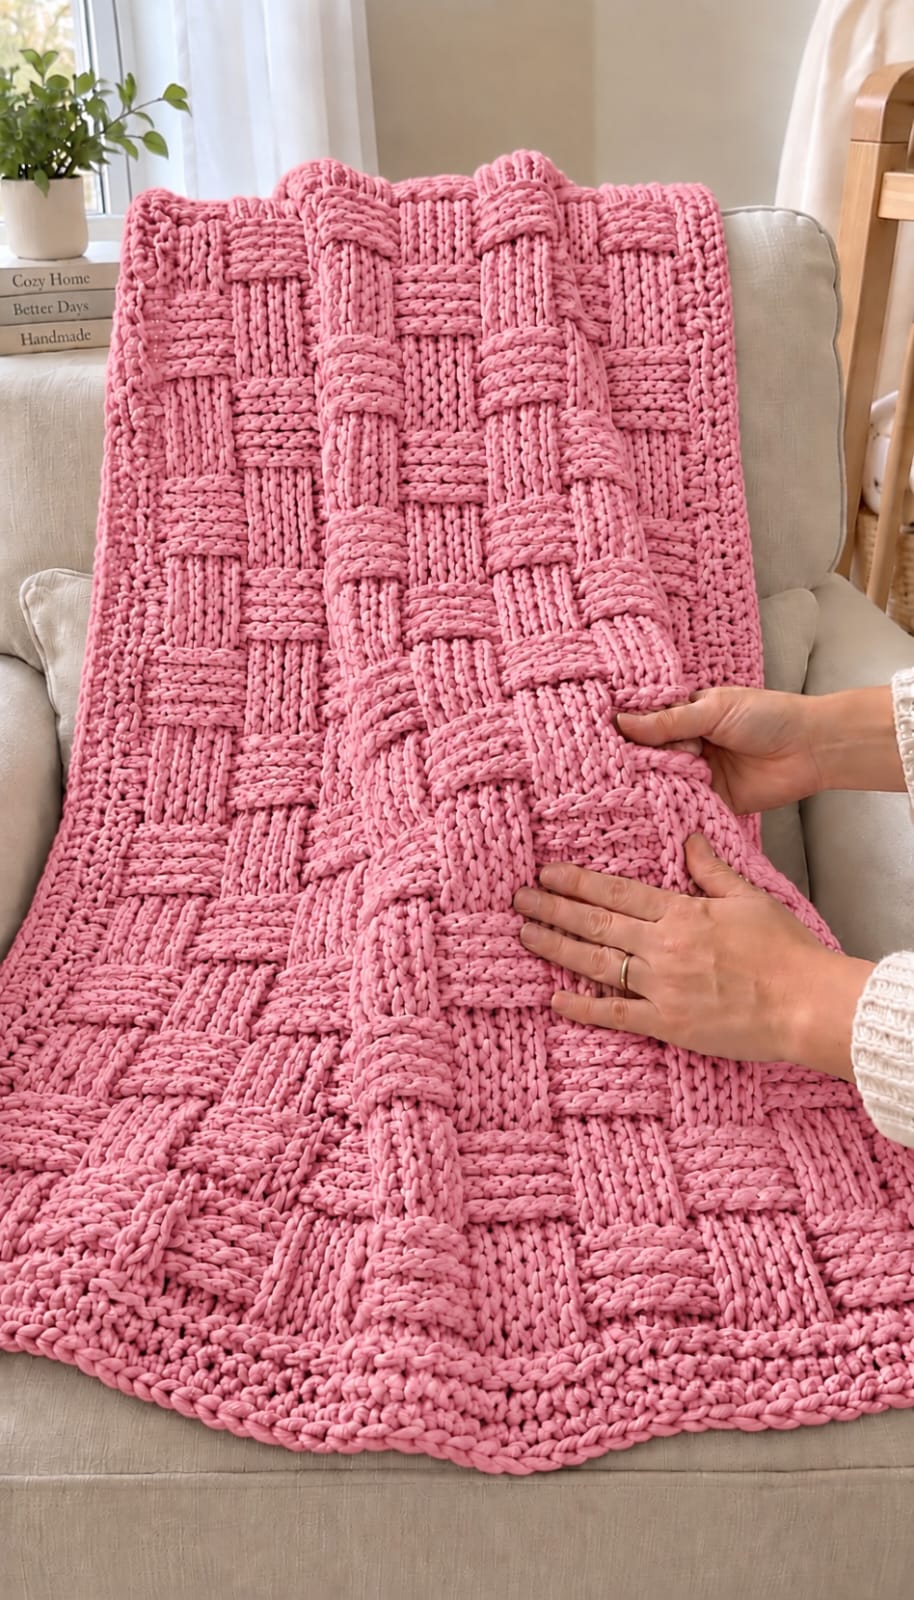
The photographed throw uses unusually broad blocks rather than a fine basketweave texture. Six post stitches form each half of a 12-stitch repeat, producing wide vertical ribs beside horizontal-looking sections. Reversing those groups creates the apparent over-under construction without making separate strips. The dusty rose color also helps the relief remain readable because highlights fall across the raised posts while deeper pink shadows form between them.
Published super-bulky basketweave blankets confirm that this construction works well with large hooks: one Yarnspirations design specifies super-bulky yarn, a 9 mm hook, 8 stitches and 5 rows per 10 cm, and 1,573–1,609 m of yarn. A common basket weave crochet blanket error is shifting one post-stitch group during a reversal. The stitch count may remain correct, but the woven grid develops a visible break.
Project Info at a Glance
| Skill Level | Time | Finished Size | Hook | Best For |
|---|---|---|---|---|
| Intermediate | Approx. 12–18 hours | Approx. 127 × 145 cm | 9 mm | Sofa throw, bed layer, large lap blanket |
The size and yarn benchmark come from a published Yarnspirations super-bulky Basket Weave Crochet Blanket, which measures approximately 50 × 57 inches and uses a 9 mm hook. Another published chunky basketweave design measures 55 × 45 inches with an 8 mm hook and super-bulky yarn.
Materials and Tools
Yarn
- Dusty pink / rose pink — super bulky #6 — approximately 1,573–1,609 m (1,720–1,760 yd)
- Yarn weight benchmark — approximately 2,400 g when using eight 300 g balls comparable to Bernat Blanket Tweeds
- Border reserve — keep approximately 150–200 m untouched until the central field is complete
Yarn weight in grams changes substantially between super-bulky fiber constructions. Purchase by required yardage or meterage first, then use ball weight as a secondary check.
Tools
- 9 mm crochet hook
- 10 mm crochet hook — optional for the starting chain
- Large tapestry needle
- Locking stitch markers
- Scissors
- Tape measure
Abbreviations
- ch — chain
- sc — single crochet
- hdc — half double crochet
- dc — double crochet
- FPdc — front post double crochet
- BPdc — back post double crochet
- sl st — slip stitch
- st/sts — stitch/stitches
An invisible decrease is not used because the blanket remains a constant-width rectangle and contains no shaped decrease rounds.
Gauge
Target approximately 8 stitches × 5 rows = 10 × 10 cm in basketweave fabric. This gauge is documented for a published super-bulky basket-weave blanket using a 9 mm hook.
Block proportions matter as much as raw gauge. Six stitches at 8 stitches per 10 cm measure approximately 7.5 cm wide. At 5 rows per 10 cm, four rows measure about 8 cm high. For that reason, begin with four-row direction sections and adjust only after measuring a swatch.
Pattern — Step by Step
Use US crochet terminology. The blanket is worked flat. Turning chains do not count as stitches.
Foundation
The main field contains 98 stitches.
1 edge stitch + (12 stitches × 8 repeats) + 1 edge stitch = 98 stitches.
Ch 101.
Row 1: Dc in fourth chain from hook and in every chain across. The three skipped chains do not count as a stitch. (98 dc)
Count Row 1 before beginning the post stitches.
An alternative foundation is 98 foundation double crochets. This can reduce the tight lower edge sometimes produced by super-bulky starting chains.
Basket Weave Section A
Row 2
Ch 2, turn.
Dc in first stitch.
*FPdc around each of the next 6 stitches, BPdc around each of the next 6 stitches.*
Repeat from * to * eight times.
Dc in final stitch. (98 sts)
Row 3
Ch 2, turn.
Dc in first stitch.
*FPdc around next 6 stitches, BPdc around next 6 stitches.*
Repeat eight times.
Dc in final stitch. (98 sts)
Row 4
Repeat Row 3. (98 sts)
Row 5
Repeat Row 3. (98 sts)
Measure one raised block now. The width of six post stitches should be close to the height of Rows 2–5.
Basket Weave Section B
Row 6
Ch 2, turn.
Dc in first stitch.
*BPdc around each of the next 6 stitches, FPdc around each of the next 6 stitches.*
Repeat eight times.
Dc in final stitch. (98 sts)
Row 7
Repeat Row 6. (98 sts)
Row 8
Repeat Row 6. (98 sts)
Row 9
Repeat Row 6. (98 sts)
The first complete basketweave cycle is now established.
Continue the Blanket Body
Rows 10–13: Repeat Section A. (98)
Rows 14–17: Repeat Section B. (98)
Rows 18–21: Repeat Section A. (98)
Rows 22–25: Repeat Section B. (98)
Continue alternating four-row A and B sections until the central field measures approximately 137–140 cm.
Finish only after a complete four-row section.
If your swatch shows that five rows produce blocks closer to square, use five rows per section throughout the entire project. Do not alternate between four- and five-row sections within the same blanket.
Final Body Row
Ch 1, turn.
Hdc in every stitch across. (98 hdc)
Do not fasten off.
This plain row stabilizes the upper edge before the perimeter is worked.
How the Basket Weave Texture Works
The blanket is one continuous piece of crochet. No strips are woven together.
A front-post double crochet wraps around the vertical post of the stitch below from the front. This pushes the new stitch toward the viewer.
A back-post double crochet wraps around the same structure from behind. It recedes into the fabric.
Six stitches worked in one direction form a broad textured panel. The neighboring six stitches move in the opposite direction.
After four rows, the groups reverse. Raised sections become recessed sections and recessed sections project forward.
That repeated change produces the large woven-block illusion visible across the pink blanket.
Front Post Double Crochet
Yarn over.
Insert the hook from front to back beside the next stitch post.
Bring the hook around the post and back toward the front.
Yarn over and draw up a loop.
Yarn over and pull through two loops.
Yarn over again and pull through the remaining two loops.
The stitch should sit forward from the surrounding fabric.
Back Post Double Crochet
Yarn over.
Insert the hook from the back of the fabric toward the front beside the next stitch post.
Pass the hook around the post and return it toward the back.
Draw up a loop.
Complete the double crochet normally.
Keep BPdc loop height consistent with FPdc loop height. Unequal tension changes the dimensions of alternating blocks.
Measuring the Pink Basket Blocks
Measure after the first complete Section A.
At the published 8-stitch gauge, six stitches occupy approximately 7.5 cm.
If four rows measure approximately 7.5–8 cm high, keep the four-row section.
If four rows measure only 6 cm, add a fifth row to every section.
If four rows exceed 9 cm, consider three-row sections or adjust hook size.
The goal is a block that reads approximately square when the blanket is resting flat.
Pink Blanket Border
The reference has a substantial matching frame that contains the raised field without adding another color.
Border Round 1
Ch 1.
Sc across the upper edge.
Work 3 sc in the first corner.
Sc evenly down the long side.
Begin with approximately two stitches for every three row ends, then adjust according to the actual row height.
Work 3 sc in the next corner.
Sc across the foundation edge.
Work 3 sc in the third corner.
Sc evenly along the remaining side.
Work 3 sc in the final corner and join.
Border Round 2
Ch 2.
Hdc in every stitch around.
Work 3 hdc in the center corner stitch.
Repeat at all four corners.
Join.
Border Round 3
Ch 1.
Sc around.
Work 3 sc in each corner.
Join.
Border Round 4
Ch 2.
Hdc around.
Work 3 hdc in each corner.
Join.
Final Corded Edge
Ch 1.
Work reverse single crochet around the entire perimeter.
Keep the reverse-sc loops relaxed so the outer edge does not contract.
Join and fasten off, leaving a 20 cm tail.
Assembly
- Complete the 98-stitch foundation row and recount it before working any front-post or back-post stitches.
- Place a marker after every 12-stitch repeat during the first textured row so all eight basket units remain separated.
- Work the first four-row Section A and measure one six-stitch block before committing to the full blanket.
- Reverse all post groups together for Section B, keeping the ordinary edge double crochet at both sides.
- Continue complete four-row sections until the central pink field reaches approximately 137–140 cm.
- Work the final 98-stitch half-double-crochet row and lay the field flat to check the upper and lower widths.
- Add the first border round and correct its side stitch spacing immediately if the perimeter begins to wave.
- Complete the remaining matching pink border rounds only after the first round rests flat.
- Finish the outside edge with relaxed reverse single crochet and inspect all four corners for contraction.
- Weave each yarn tail through at least 8–10 cm of matching dense stitches before trimming the excess.
The completed throw should show an uninterrupted field of broad pink basket blocks surrounded by a stable matching perimeter.
7 Technical Tips
- The basket blocks shift sideways: Mark every 12-stitch repeat during the first textured row. One misplaced six-stitch group can break the woven grid while leaving the overall 98-stitch count unchanged.
- The foundation edge is several centimeters narrower: Make the starting chain with a hook approximately 1 mm larger than the working hook. A tight super-bulky chain cannot expand to match the width of the post-stitch fabric.
- The blocks look tall instead of square: Measure six post stitches against the height of one complete direction section. At an 8-stitch and 5-row gauge, four rows should be close to the 7.5 cm width of six stitches.
- The blanket gradually loses width: Count all 98 stitches at every direction reversal. The ordinary edge dc is easy to miss beside a thick post-stitch group.
- The woven relief looks flat: Insert the hook fully around each stitch post instead of through its top loops. Working ordinary double crochet in error removes the projecting and recessed structure.
- The border begins ruffling: reduce the number of single crochets placed along the long sides before continuing. Extra stitches in Border Round 1 become increasingly visible after additional rounds are added.
- The blanket develops a bump at a yarn join: change skeins near an outside edge and leave 15–20 cm tails. Thick knots hidden inside the center of a raised block can remain visible from the front.
Choosing the Right Pink Yarn
The reference is closest to a medium dusty rose or muted bubblegum pink rather than neon pink.
Useful shade descriptions include dusty rose, rose pink, blush, peony, antique pink, and soft berry.
A solid shade gives the basketweave its clearest geometry.
Variegated yarn can interrupt the light-and-shadow pattern because a color change may occur halfway across a six-stitch block.
Choose a relatively smooth category 6 yarn. The individual vertical posts are clearly visible in the reference, so heavily fuzzy yarn will produce a softer, less defined result.
Verified Yarn and Hook Benchmarks
Published basketweave blankets provide a useful range for planning this project.
The Yarnspirations Basket Weave Crochet Blanket specifies Bernat Blanket Tweeds, super bulky yarn, a 9 mm hook, 1,720–1,760 yards, and a gauge of 8 stitches × 5 rows per 4 inches.
A separate Chunky Basketweave Blanket by Michele Webb uses Bernat Blanket, an 8 mm hook, 1,460–1,540 yards, and 75 ounces of yarn for a 55 × 45 inch throw.
Sirdar’s Basketweave Blanket uses super-bulky yarn with an 11.5 mm hook and lists approximately 1,230 yards for a 42 × 59 inch blanket.
These published examples show why swatching is required when substituting super-bulky yarn. The category covers a substantial range of strand diameters.
Why Basketweave Crochet Uses More Yarn
Post stitches travel farther than ordinary double crochet.
The hook passes around the vertical body of the stitch below instead of simply entering the top loops.
Every raised block therefore consumes additional yarn.
A dense matching border increases the total again.
Do not estimate yarn requirements by comparing this throw with a plain double-crochet blanket of the same dimensions.
Keep the final 150–200 m reserved until the central field has reached its planned length. If the remaining yarn looks insufficient, stop after the previous complete basket section rather than sacrificing the border.
How to Make the Blanket Wider
The body is resized in complete 12-stitch repeats.
The standard field uses eight repeats:
1 + (8 × 12) + 1 = 98 stitches.
For seven repeats:
1 + (7 × 12) + 1 = 86 stitches.
For nine repeats:
1 + (9 × 12) + 1 = 110 stitches.
For ten repeats:
1 + (10 × 12) + 1 = 122 stitches.
When using the same chain method as the main instructions, add three chains to the desired Row 1 stitch count.
Lap Blanket Version
Use six basket repeats.
1 + (6 × 12) + 1 = 74 stitches.
Ch 77.
Dc in the fourth chain from the hook and across. (74 dc)
Continue with the same six-FPdc/six-BPdc structure between the two edge stitches.
Work until the field measures approximately 100–110 cm long.
Add the same border or reduce it to three rounds for a narrower frame.
Large Sofa Throw Version
Use ten repeats for a substantially wider blanket.
The central field contains 122 stitches.
Ch 125 for the standard double-crochet foundation.
Work the same four-row reversal sections.
Measure the actual field after several cycles before calculating final yarn requirements.
The larger size will require more than the 1,720–1,760 yd benchmark used for the standard throw.
How to Change the Blanket Length
Length adjustments should happen only after a complete direction section.
For this version, one section contains four textured rows.
Adding Section A alone changes the visual sequence at the final edge. For the cleanest symmetry, add both an A section and a B section when substantial extra length is required.
Measure the blanket flat rather than while it hangs from the hook.
Super-bulky fabric stretches under its own weight, which can make a vertical measurement longer than the resting dimension.
Making Square Basket Blocks
Do not assume that every yarn needs the same number of rows per block.
A common basketweave blanket using four-stitch groups reverses after two rows, while other patterns use larger blocks and longer row sections.
Your yarn determines the correct proportion.
Measure the width of six post stitches.
Next, measure the height of three, four, and five rows.
Select the row count that most closely matches the six-stitch width.
Record that number and repeat it throughout the entire blanket.
Keeping the Side Edges Straight
One ordinary double crochet begins and ends every textured row.
Those stitches form the two structural side columns.
Place a marker in each edge stitch if the thick post groups make them difficult to identify.
The turning chain does not count as a stitch in this pattern.
Work the first dc into the first actual stitch and the last dc into the final stitch.
Accidentally working into the turning chain creates increases, while skipping the edge dc creates decreases.
Managing the Weight of the Blanket
A super-bulky basketweave throw can become heavy before the final rows are reached.
Keep the completed fabric supported on your lap, a sofa, or a table.
Do not allow its full weight to hang from the active row.
That downward force can increase loop height and change the gauge in the upper half of the blanket.
Rotate the project on a flat surface whenever possible.
Measure at the top, center, and bottom before beginning the border.
Changing Skeins
Plan a new skein near one of the two plain edge stitches.
On the final yarn-over of the old strand, complete the stitch using the new yarn.
Leave both tails approximately 15–20 cm.
Continue the row.
After several additional rows, weave the tails separately through dense matching stitches.
Avoid large knots in the middle of a raised six-stitch block because super-bulky yarn makes them difficult to conceal.
Fixing a Reversed Block
A single block worked in the wrong post direction interrupts the woven illusion immediately.
Inspect the first row after every reversal.
If Section B should begin with six BPdc but the group has been worked as FPdc, correct it before adding another row.
Later post stitches wrap around those incorrect stitches and reinforce the mistake.
Unraveling one row is considerably easier than attempting to disguise a reversed block after several complete sections.
Border Tension
The first border round determines whether the completed frame lies flat.
After Round 1, place the blanket on a large flat surface.
If the sides ripple outward, remove some side stitches.
If the perimeter pulls inward, add stitches or relax the working tension.
Correct the first round before continuing.
A four-round border cannot compensate for an incorrect foundation circumference.
Care and Finishing
Follow the washing and drying instructions printed on the selected yarn label.
Check washing-machine capacity before washing a large polyester blanket because wet fabric becomes substantially heavier.
Support the blanket when moving it while wet.
Reshape it into a rectangle and allow the basket blocks to return to their natural relief.
Do not press the post stitches flat.
Before storage, confirm that the blanket is completely dry. Fold it loosely so the same raised blocks are not compressed under heavy objects for long periods.
Conclusion
The large woven effect depends on repeat accuracy rather than complicated shaping. Start with the 98-stitch field, mark every 12-stitch unit, and measure the first six-stitch block before extending the blanket. Four-row direction sections suit the published 8-stitch × 5-row super-bulky gauge more closely than an arbitrary fixed height, but the swatch remains the final test. Reserve border yarn early and correct any shifted post group immediately. Your next step is a two-repeat pink swatch. Save this pink chunky basket weave crochet blanket pattern to Pinterest or share the finished throw on Instagram with #PinkBasketWeaveBlanket. Would you keep this dusty pink or make the same oversized blocks in pale blush?









