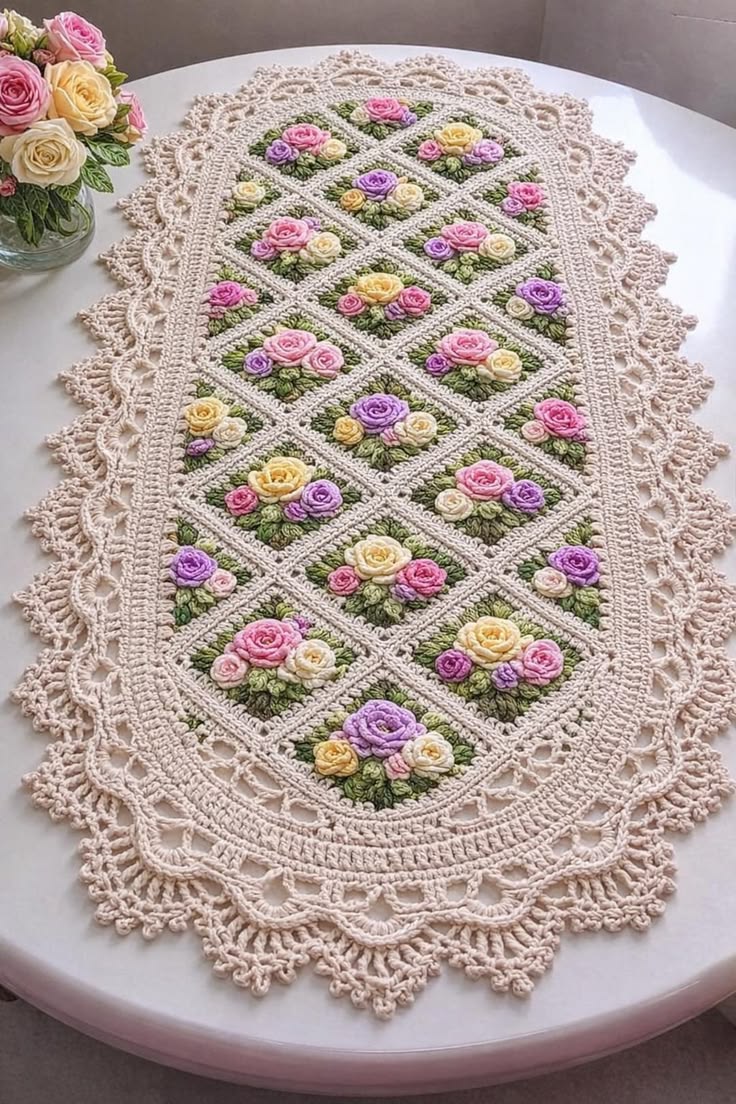
A rose that rises several centimeters above a table changes the engineering of the runner beneath it. This crochet rose table runner uses dimensional flowers, green foliage, framed motifs and an open lace perimeter inspired by the photographed piece. Cotton yarn and a 2.5–3.5 mm hook suit the construction; final dimensions depend on motif count. The project is intermediate-level and works particularly well for covering a long dining-table center without hiding the tabletop completely.
The Design: What Makes This Rose Runner Different
The photographed runner relies on three separate layers: a structural ivory ground, a darker foliage field and dimensional flowers. Keeping those functions separate matters. If heavy roses are attached directly to loose lace, their weight can pull the surrounding stitches out of shape.
A second decision concerns repetition. Rather than crocheting one enormous floral panel, a practical 3D crochet rose table runner can be built from individual motifs and joined into a controlled grid. That gives the maker opportunities to correct dimensions before the border is added.
Finally, the wide perimeter acts as a visual and structural transition between the dense crochet rose motifs and the table surface. A frequent error is adding the final lace before blocking the joined center. Any distortion in the core is then multiplied around the perimeter.
Project Info at a Glance
| Skill Level | Time | Finished Size | Hook | Best For |
|---|---|---|---|---|
| Intermediate | Multi-session project | Custom; motif-count dependent | 2.5–3.5 mm | Dining tables, sideboards and display tables |
Published rose table runners vary substantially in size. Comparable projects range from approximately 48.3 × 17.8 cm to 132 × 28 cm. The dimensions of this version can be changed by increasing or reducing the number of floral motifs before the outer border is worked.
Materials and Tools
Yarn
The exact fiber and yarn weight used in the photographed runner cannot be identified reliably from the image alone. For a similar result, use one consistent cotton or cotton-blend yarn line throughout the project.
- Ivory — sport or light DK cotton — approximately 250–400 g
- Sage or olive green — same yarn weight — approximately 80–150 g
- Pink or blush — same yarn weight — approximately 30–60 g
- Lavender or purple — same yarn weight — approximately 20–40 g
- Pale yellow — same yarn weight — approximately 20–40 g
- Cream or white — same yarn weight — approximately 20–40 g
These quantities are working estimates for a photo-inspired version rather than measurements taken from the original runner. Make one complete floral panel before purchasing large quantities if exact yarn consumption is important.
Tools
- 2.5–3.5 mm crochet hook
- Yarn needle
- Stitch markers
- Sharp scissors
- Blocking mats
- Rust-resistant blocking pins
- Measuring tape
Abbreviations
- MR — magic ring
- ch — chain
- sc — single crochet
- hdc — half double crochet
- dc — double crochet
- tr — treble crochet
- sl st — slip stitch
- sp — space
- st/sts — stitch/stitches
- rep — repeat
- FO — fasten off
- picot — decorative chain loop anchored with a slip stitch
An invisible decrease is an amigurumi technique and is not required for this flat floral table runner.
3D Crochet Rose Table Runner Pattern
This is an original photo-inspired construction rather than a transcription of a commercially published pattern. Maintain the same yarn, hook and tension across all motifs so the individual sections join evenly.
Floral Ground Motif
Yarn: sage or olive green.
Create one motif for each floral compartment required. A shorter table runner can use approximately 12–16 motifs, while a longer centerpiece can contain substantially more.
Round 1: Make an MR. Ch 3, 2 dc, ch 2; repeat three more times. Join with a sl st.
Round 2: Sl st to the first corner. Ch 3, dc in corner, ch 2, 2 dc in the same corner. Work 2 dc across each side and repeat the corner construction in every ch-2 space.
Round 3: Continue the established square expansion. Place (2 dc, ch 2, 2 dc) in every corner and work dc stitches evenly across each side.
Round 4: Continue in the established pattern until the motif measures approximately 8–10 cm square.
Fasten off and weave in the tail.
Every ground motif should finish with identical blocked dimensions. Small variations become much more noticeable once multiple squares are joined into the central panel.
Ivory Frame
Yarn: ivory.
Join the ivory yarn at any corner of the completed green square.
Round 1: Ch 1 and sc evenly around the motif, placing (sc, ch 2, sc) in each corner.
Round 2: Ch 3 and dc around, working (dc, ch 2, dc) into each corner.
Round 3: Work sc evenly around once more when a heavier raised divider is wanted.
Fasten off and weave in the ends.
Measure every framed motif before joining. Keep the difference between finished squares below approximately 5 mm.
Large 3D Crochet Rose
Yarn: pink, yellow, cream or purple.
Row 1: Ch 41.
Row 2: Beginning in the second chain from the hook, sc across. (40)
Row 3: Ch 3. Work 4 dc into the first suitable stitch or space, then sl st into the next. Repeat the petal sequence across the strip.
Fasten off, leaving approximately 25 cm of yarn for sewing.
Roll the crocheted strip from one end to create the rose. Keep the first few turns compact to establish a defined center. Gradually loosen the outer turns so the petals spread away from the center.
Thread the long tail onto a yarn needle. Sew through the bottom edges of every rolled layer several times. The stitches should hold the spiral firmly without flattening the outer petals.
Small Crochet Rose
Yarn: contrasting pink, lavender, yellow or cream.
Row 1: Ch 25.
Row 2: Beginning in the second chain from the hook, sc across. (24)
Row 3: Work repeating shells of 3–4 dc separated by slip stitches across the strip.
Fasten off, leaving approximately 20 cm for sewing.
Roll the strip into a compact spiral. Stitch across the underside in several directions so the flower remains secure.
The small roses should remain visibly smaller than the primary flower. This difference creates the layered floral clusters seen across the table runner.
Crochet Rose Leaves
Yarn: sage or olive green.
Row 1: Ch 9.
Beginning in the second chain from the hook, work:
sc, hdc, dc, dc, dc, hdc, sc
Work 3 sc at the tip.
Continue down the opposite side of the foundation chain, reversing the stitch sequence to create the second half of the leaf.
Join with a sl st.
Fasten off, leaving approximately 15 cm for sewing.
Make approximately 3–6 leaves for each floral cluster. Vary their angles during assembly instead of positioning every leaf symmetrically.
Small Foliage Bud
Yarn: olive green.
Round 1: 6 sc in MR. (6)
Round 2: (sc, ch 3, sl st in the same st) ×6.
Fasten off.
Use these small pieces to fill exposed green areas between the roses and larger leaves. Keep the foliage relatively flat so it does not compete with the dimensional flowers.
Building Each Floral Cluster
Place one large rose slightly away from the exact center of a completed green-and-ivory motif. Position one or two smaller roses beside it.
Arrange three leaves beneath and around the main rose. Additional leaves and foliage buds can fill visible spaces between the flowers.
Pin every component before sewing.
Alternate the dominant flower color from one motif to another. Pink can lead one cluster, purple the next, followed by yellow or cream. Smaller flowers should use contrasting shades.
Sew the flowers primarily through the green ground. Avoid pulling the attachment yarn across the raised ivory frame.
Joining the Floral Motifs
Block all completed motifs to identical measurements before assembly.
Arrange the panels on a large flat surface. Test several layouts before sewing because flower placement affects the overall balance of the runner.
Join neighboring motifs using ivory yarn and mattress stitch or a controlled slip-stitch seam.
Check the long edges after completing each new row of motifs. Both sides should remain equal in length.
If one edge begins to grow faster than the other, correct the alignment immediately. Do not rely on the final border to hide an uneven central section.
Inner Border
Yarn: ivory.
Join the yarn to the assembled floral center.
Round 1: Work sc evenly around the complete piece.
Add stitches gradually around the short ends to begin forming the rounded silhouette.
Round 2: Work dc evenly around.
Round 3: Work sc around.
Spread increases across each curved end instead of stacking them directly above one another. Distributed increases create a smoother oval.
Openwork Lace Border
Yarn: ivory.
Round 1: Ch 5, skip approximately 2–3 sts and sc into the next stitch. Repeat around.
Adjust the spacing near the end of the round so the chain arches are distributed evenly.
Round 2: Sl st into the first arch. Work 5–7 dc into each selected chain space and anchor between the groups with sc.
Place the runner flat after completing the round.
If the lace develops pronounced waves, the border contains excessive stitch density. If the perimeter pulls upward or cups, increase the number of stitches or reduce the distance between anchor points.
Large Scalloped Border
Yarn: ivory.
The broad scallops create the architectural outer edge visible in the floral reference.
Work the following shell into an appropriate chain arch:
2 dc, 3 tr, 2 dc
Anchor the shell with sc in the neighboring arch.
Repeat around the runner.
The curved ends may require additional shells compared with the straight sides. Distribute those additions across the curve rather than concentrating them in one location.
Picot Finish
Yarn: ivory.
Join the yarn at the top of a scallop.
Work sc, ch 3, sl st into the first chain, sc to create a small picot.
Continue across the shell tops, keeping the spacing consistent.
The dense picot edge adds the final textured outline around the runner and works particularly well with the dimensional roses in the central panel.
Fasten off. Weave the tail through the reverse of the border in several directions.
Assembly
- Block all green floral ground motifs to identical measurements.
- Add the ivory frame to every motif and measure each square again.
- Arrange and join the framed motifs into the required table-runner length.
- Crochet the large roses in pink, purple, yellow and cream.
- Make the smaller contrasting roses for the secondary flowers.
- Crochet enough green leaves to position at least three around every primary rose.
- Pin each complete floral arrangement to its panel before making permanent attachment stitches.
- Sew the flowers and leaves firmly to the green ground while keeping attachment stitches away from the ivory framing where practical.
- Crochet the inner border, openwork arches, scalloped shells and picot perimeter around the assembled floral center.
- Wet-block the finished runner to the required dimensions and leave it completely flat until dry.
The completed runner should remain flat against the table while the roses project clearly above the green floral ground.
7 Technical Tips for a Better Crochet Rose Table Runner
- Mark every motif corner. Missing a corner increase can skew the square, and the error becomes increasingly visible after several motifs are joined.
- Control the rose center. Keep the first two turns compact but avoid compressing the entire flower into a hard mound; the outer petals need room to spread.
- Keep motif dimensions within approximately 5 mm. Larger differences produce uneven ivory grid lines and can distort the finished central panel.
- Pin every flower before sewing. Moving a large rose only 1–2 cm can determine whether the ivory divider remains visible or becomes hidden beneath the petals.
- Inspect the lace after every completed round. Waves indicate excessive stitch density, while a border that curls upward needs more increases or closer anchor spacing.
- Keep attachment stitches inside the green sections. Pulling flower-sewing yarn across the ivory frame makes the raised geometric structure less distinct.
- Weave border tails for at least 4–5 cm. Change direction more than once because short, straight tails can work loose during washing and repeated blocking.
Finishing and Blocking
Blocking is particularly important for a runner that combines dense flowers with open lace. The two structures react differently to tension, and blocking establishes the final relationship between them.
Place the completed runner on blocking mats. Shape the central motif grid first, checking that both long sides remain parallel. Continue outward to the inner border.
Pin the curved ends symmetrically. Next, open each large scallop to approximately the same width and position the picots individually where necessary.
Do not stretch the lace merely to increase the overall dimensions. Excessive tension can make the central motifs narrow while producing an oversized perimeter.
Allow the runner to dry completely before removing the pins.
Adjusting the Table Runner Size
The modular construction makes length adjustment possible before the outer border is added.
For a small coffee table or sideboard, use fewer floral panels. A dining-table centerpiece can contain additional rows of motifs while retaining the same border construction.
Measure the intended table first. Then make and block one complete framed motif. Divide the desired central length by the finished motif measurement to estimate the required number of panels.
Remember that the ivory inner rounds and lace border increase both the finished width and length. Do not make the floral center equal to the full target dimensions.
For yarn calculations, complete one representative panel with its roses and leaves and weigh it on a digital scale. Multiply that weight by the number of planned panels, then add the estimated quantity required for joining and the ivory border.
Conclusion
A dimensional floral runner depends on controlled repetition: matching ground motifs, stable joins, proportional roses and a lace border that remains flat. Make one complete sample panel first, including the large rose, secondary flowers and leaves, then weigh it before producing the remaining motifs. That provides a practical yarn estimate while allowing flower size and color placement to be corrected early. Save this crochet rose table runner pattern to Pinterest and share the finished project on Instagram with #3DRoseTableRunner. Before adding the outer lace, photograph the blocked floral center for comparison. Which arrangement suits this design better: one dominant rose in each panel or three smaller roses grouped together?









