Introduction
A pumpkin-shaped container has one structural conflict: the ribs need to pull inward while the top opening must stay circular. This crochet pumpkin basket pattern solves that with a firm 60-stitch base, raised vertical ribs, a reinforced open rim, a brown loop handle, and a dark-green leaf. Worked in worsted or Aran yarn with a 5 mm hook, the finished basket measures approximately 20 cm wide and 14 cm high.
The Design: What Makes This Pumpkin Basket Different
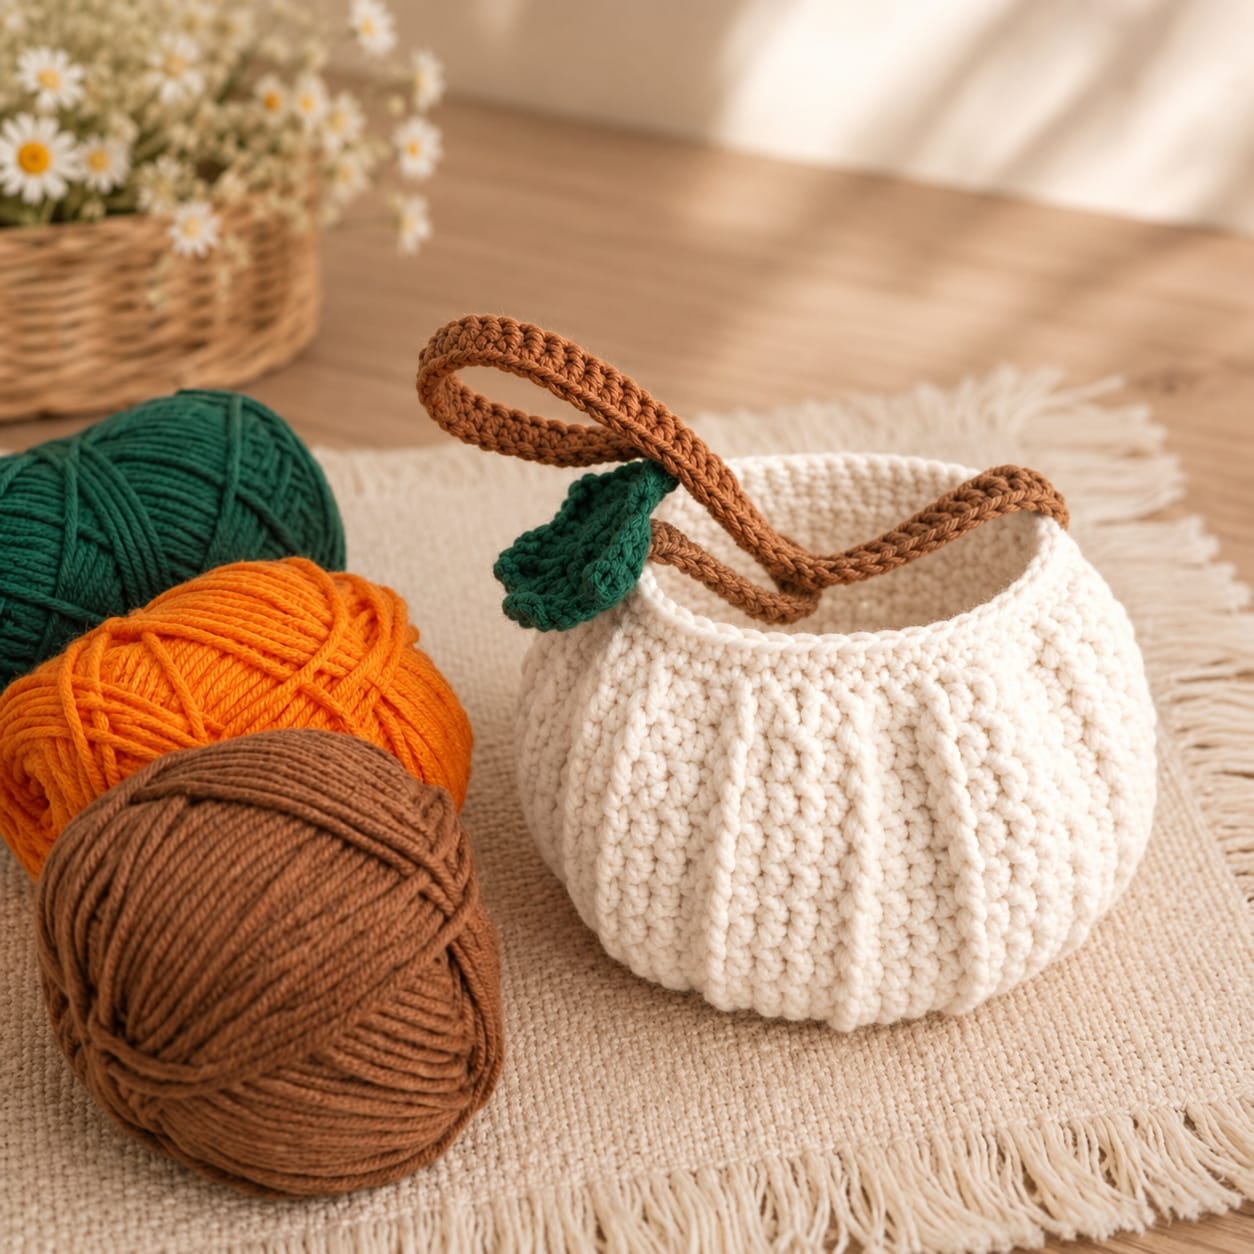
The photographed basket is functional first and pumpkin-shaped second. Its base remains broad and comparatively flat, while the walls bulge outward before returning toward an open circular rim. Raised vertical lines divide the cream surface into pumpkin-like sections without closing the container. The long brown strap replaces a conventional pumpkin stem and provides a practical carrying loop, while one dark-green leaf establishes the botanical detail.
Published pumpkin basket crochet designs vary widely in construction. Examples range from 20 cm baskets made with sport yarn to structured super-bulky versions around 21 cm in diameter. This version targets the middle of that range with a dense #4 yarn fabric. A common maker error is reducing too aggressively near the rim. That produces a narrow neck, making the finished crochet pumpkin storage basket less useful.
Project Info at a Glance
| Skill Level | Estimated Time | Finished Size | Hook | Best For |
|---|---|---|---|---|
| Intermediate | 4–6 hours | Approx. 20 cm wide × 14 cm high | 5 mm body / 4 mm details | Fall storage, candy, small gifts, seasonal decor |
The target size is consistent with published pumpkin-basket benchmarks. Existing patterns include a 20 cm wide × 12 cm high sport-weight basket, a 21 cm diameter super-bulky version, and cotton-cord baskets measuring approximately 20 × 20 × 13 cm.
Materials and Tools
Yarn
- Warm cream / natural white — worsted or Aran #4 — approximately 140–170 g
- Cinnamon brown — worsted or Aran #4 — approximately 25–35 g
- Forest green — worsted or Aran #4 — approximately 10–15 g
Choose cotton, a cotton-acrylic blend, or another firmly spun yarn for the cream body. A basket needs more structural resistance than a stuffed pumpkin, so very soft or fuzzy yarn can make the walls collapse inward.
Tools
- 5 mm crochet hook for the basket
- 4 mm crochet hook for the handle and leaf
- Large tapestry needle
- Locking stitch marker
- Eight additional stitch markers
- Scissors
- Tape measure
- Optional plastic canvas circle for additional base stiffness
Abbreviations
- MR — magic ring
- ch — chain
- sc — single crochet
- hdc — half double crochet
- dc — double crochet
- inc — two single crochets in one stitch
- dec — invisible decrease
- sl st — slip stitch
- BLO — back loop only
- FLO — front loop only
- FPsc — front post single crochet
- st/sts — stitch/stitches
An invisible decrease is made through the front loops of two consecutive stitches before completing one single crochet, reducing the visible bump produced by an ordinary decrease.
Gauge and Construction
A practical target is approximately 15–17 sc × 16–18 rounds = 10 cm in firm single crochet. Exact gauge is less important than wall stability.
The fabric should stand when the lower portion of the basket is placed on a table. If a swatch collapses under its own weight, move down 0.5 mm in hook size or choose a firmer yarn.
The basket is worked from the bottom upward in continuous rounds. Surface or post-stitch ridges are then added to strengthen the pumpkin appearance.
Pattern — Step by Step
Basket Base
Yarn: warm cream.
R1: 6 sc in MR (6)
R2: inc ×6 (12)
R3: (1 sc, inc) ×6 (18)
R4: (2 sc, inc) ×6 (24)
R5: (3 sc, inc) ×6 (30)
R6: (4 sc, inc) ×6 (36)
R7: (5 sc, inc) ×6 (42)
R8: (6 sc, inc) ×6 (48)
R9: (7 sc, inc) ×6 (54)
R10: (8 sc, inc) ×6 (60)
Lay the base on a table. It should remain nearly flat. A slight cup is acceptable because the following rounds deliberately turn upward.
Turning Round
R11: BLO sc around (60)
Working through the back loops creates a hinge between the base and the side wall.
If using an optional plastic canvas insert, cut it slightly smaller than the completed base and place it inside after several wall rounds have been completed.
Lower Pumpkin Walls
R12: sc around (60)
R13: sc around (60)
R14: sc around (60)
R15: sc around (60)
R16: sc around (60)
These straight rounds establish the lower wall before the pumpkin begins to widen.
Widening the Pumpkin Body
R17: (9 sc, inc) ×6 (66)
R18: sc around (66)
R19: sc around (66)
R20: sc around (66)
R21: sc around (66)
R22: sc around (66)
The additional six stitches create a modest outward bulge. Do not increase repeatedly as you would for a flat circle; the objective is a rounded wall, not a wider base.
Upper Pumpkin Walls
R23: (9 sc, dec) ×6 (60)
R24: sc around (60)
R25: sc around (60)
R26: sc around (60)
R27: sc around (60)
The opening now returns to approximately the same stitch count as the base circumference.
Do not decrease below 60 stitches for this size. A more aggressive reduction creates a pumpkin neck and limits access to the basket interior.
Reinforced Rim
R28: BLO sc around (60)
R29: sc around (60)
R30: reverse sc around (60)
Fasten off and weave the tail through the interior wall.
The BLO round provides a fold line, while the final reverse-single-crochet round creates the thick corded edge visible around the opening.
Creating the Pumpkin Ribs
The reference contains pronounced vertical ribs from the lower edge to the rim. Adding them after the main body is complete gives better control over spacing.
Mark approximately eight equally spaced vertical lines around the basket.
Start at the lower turning round.
Join cream yarn and work surface slip stitches vertically toward the rim, following one column of stitches.
Keep the slip stitches loose. Tight surface crochet can shorten the wall and pull the rim downward.
Fasten off at the upper edge.
Repeat for the remaining marked lines.
For a more raised rib, work a second line of surface slip stitches immediately beside the first. The photographed basket has broad ridges rather than thin decorative lines, so paired ridges can produce a closer visual match.
Alternative Raised-Rib Method
If you prefer to create the ribs while crocheting the wall, replace selected stitches with front-post single crochet.
Divide the 60-stitch wall into approximately equal sections and maintain the post stitches in the same vertical positions.
This method reduces finishing work but requires more attention during the widening and decreasing rounds.
Surface crochet is easier to reposition. If one groove is visually uneven, it can be removed without unraveling the complete basket wall.
Brown Crochet Handle
Yarn: cinnamon brown.
The reference uses a long narrow loop rather than two conventional basket handles.
Ch 61.
Row 1: Starting in the second chain, sc across (60)
Row 2: ch 1, turn, sc across (60)
Row 3: ch 1, turn, sc across (60)
Fasten off, leaving approximately 40 cm for attachment.
The finished strap should measure approximately 35–40 cm, depending on yarn and tension.
For a rounder cord, fold the strip lengthwise and whipstitch the long edges together. Keep the seam facing downward when the handle is attached.
Reinforced Handle Option
A functional basket handle should resist stretching.
Before closing the strip, cut a piece of matching cotton cord approximately 3–4 cm shorter than the crocheted handle.
Lay the cord inside the folded strip.
Whipstitch the long edges together around it.
Do not use wire if the basket will be handled by children. Cotton cord provides reinforcement without creating a rigid internal point.
Green Pumpkin Leaf
Yarn: forest green.
Ch 11.
Starting in the second chain from the hook:
Row 1: sl st, sc, hdc, dc, dc, 2 dc, dc, hdc, sc, 3 sc in final chain.
Continue along the opposite side of the foundation chain:
Row 1 continued: sc, hdc, dc, 2 dc, dc, dc, hdc, sc, sl st.
Fasten off, leaving a 25 cm tail.
The completed leaf should be approximately 7–9 cm long.
Leaf Vein
Join green yarn at the base of the leaf.
Surface slip stitch along the central foundation chain toward the tip.
Fasten off at the leaf point.
This raised central line gives the dark-green leaf additional structure and helps it hold the folded shape visible in the photograph.
Positioning the Handle
The brown strap crosses the opening diagonally rather than forming a centered semicircular handle.
Pin one end to the back-left area of the rim.
Curve the strap upward to create a loop approximately 12–15 cm high.
Bring the second end toward the opposite rear section.
Check that the opening remains accessible.
The strap should not pull the rim inward when lifted gently.
Sew each end across approximately 4–5 rim stitches. Pass through the reinforced upper rounds several times instead of anchoring the handle to one stitch.
Attaching the Green Leaf
Position the leaf beside one handle attachment point.
Place approximately the lower 2 cm of the leaf against the cream rim.
Sew through the leaf base, basket rim, and brown handle attachment area.
Leave the outer half of the leaf unattached.
Fold the free section slightly along its central vein. This produces the three-dimensional leaf profile shown in the reference.
Assembly
- Place the completed cream basket on a flat surface and confirm that the 60-stitch base sits without rocking.
- Mark eight approximately equal positions around the body for the raised pumpkin ribs.
- Work each surface-crochet rib from the lower turning round toward the upper rim, keeping the tension consistent.
- Check the opening after every two ribs and loosen any surface stitches that pull the rim downward.
- Finish the brown handle and reinforce it internally with cotton cord if the basket will carry more than lightweight decor.
- Pin the handle ends to opposite rear sections of the rim across approximately four or five stitches per attachment point.
- Sew each handle end through multiple rounds of the cream basket wall rather than attaching only to the final edging round.
- Position the dark-green leaf beside one handle base and secure only its lower 2 cm.
- Shape the basket by pressing outward from the inside between each raised rib while keeping the base flat.
- Weave all remaining tails through at least 5 cm of matching stitches and test the empty basket by lifting it gently from the handle.
The finished container should have a broad cream pumpkin body, an open reinforced rim, pronounced vertical ribs, one long brown loop handle, and a dimensional dark-green leaf.
7 Technical Tips
- The base forms a bowl before the wall begins: Check the circle after R10 and confirm that 60 stitches lie nearly flat. Severe cupping at this stage indicates tension that is too tight for the selected hook.
- The basket walls collapse inward: Move down approximately 0.5 mm in hook size or switch to firmer cotton-rich yarn. A storage basket needs denser fabric than a stuffed decorative pumpkin.
- The pumpkin ribs shorten the basket: Keep surface slip stitches loose enough to move vertically with the wall. A tight rib can reduce one side’s height by more than 1 cm and distort the rim.
- The opening becomes too narrow: Stop the upper shaping at 60 stitches. Reducing below the base circumference creates a neck and makes the basket harder to fill.
- The handle stretches when lifted: Reinforce the 35–40 cm crocheted strip with cotton cord or use a dense three-row construction. A single chain strap can lengthen substantially under repeated loading.
- The handle pulls one section of the rim upward: Spread each attachment across at least four or five stitches. Concentrating the load on one or two stitches can distort the circular opening.
- The leaf lies flat against the basket: Sew only the lower 15–20 mm of the leaf. Leaving the remaining length unattached allows the central vein to hold a natural raised fold.
Why This Pumpkin Is Worked as a Basket
A stuffed pumpkin and a pumpkin basket require different shaping. Stuffed forms can be pulled inward aggressively because there is no functional opening to preserve.
A container must remain accessible.
This design therefore uses only a modest increase from 60 to 66 stitches at the widest point, followed by a return to 60 stitches near the top. That change produces a visible pumpkin bulge without closing the rim.
The vertical surface ribs provide most of the pumpkin definition. They alter the appearance of the body without requiring extreme decreases.
This construction also makes the basket easier to resize. Increase the flat base first, then keep the wall proportions similar.
How to Make the Basket More Structured
Cotton-rich yarn is the first structural choice. It has less elastic rebound than many soft acrylic yarns and generally creates firmer walls.
Hook size is the second factor. If the recommended 5 mm hook produces loose fabric, test a 4.5 mm hook.
A plastic canvas base can also be inserted inside the basket. Cut the circle approximately 5–10 mm smaller than the interior base so its edges do not push through the crochet fabric.
For additional wall support, cut a flexible plastic canvas strip to fit around the lower interior. Cover the insert with fabric if the basket will store delicate objects.
Do not add heavy reinforcement unless necessary. The photographed basket retains a soft handmade profile rather than the perfectly rigid shape of a manufactured container.
How to Resize the Pumpkin Basket
The circular base controls most of the finished diameter.
For a smaller basket, stop increasing at 48 stitches. Work the lower walls at 48 stitches, increase once to 54 around the widest point, then return to 48 near the rim.
For a medium version, stop at 54 stitches, widen to 60, and finish the opening at 54.
The photographed size uses a 60-stitch base, widens to 66, and returns to 60.
For a larger basket, continue the base to 66 or 72 stitches. Keep the increases evenly distributed so the circle remains flat.
Always make the handle proportional to the finished diameter rather than automatically using the 60-chain version.
Small Pumpkin Basket Version
Use the following simplified count sequence for a smaller container:
R1: 6 sc in MR (6)
R2: inc ×6 (12)
R3: (1 sc, inc) ×6 (18)
R4: (2 sc, inc) ×6 (24)
R5: (3 sc, inc) ×6 (30)
R6: (4 sc, inc) ×6 (36)
R7: (5 sc, inc) ×6 (42)
R8: (6 sc, inc) ×6 (48)
R9: BLO sc around (48)
R10–R14: sc around (48)
R15: (7 sc, inc) ×6 (54)
R16–R19: sc around (54)
R20: (7 sc, dec) ×6 (48)
R21–R24: sc around (48)
Finish with two reinforced rim rounds.
A smaller basket works well for wrapped candy, stitch markers, keys, or a compact fall centerpiece.
Choosing Yarn Colors
The photographed combination uses three restrained colors: warm cream, medium brown, and dark forest green.
Cream keeps the pumpkin shape visible outside the conventional orange palette. Brown identifies the long handle as a stem-like structural element, while green makes the leaf immediately recognizable.
For a more traditional version, replace cream with pumpkin orange while keeping the brown and green details.
Sage, rust, mustard, terracotta, or muted gold can also work for the body.
If making several baskets together, use the same brown handle across the set. A repeated detail connects different pumpkin colors visually.
Why Cotton Yarn Works Well
Cotton is particularly useful for crochet containers because the stitches hold their shape under moderate pressure.
A tightly crocheted cotton wall can stand without stuffing. It also produces clear vertical ribs and a clean upper rim.
Pure cotton can become heavy in a large basket, so a cotton-acrylic blend is a practical alternative.
Published pumpkin-basket designs also use cotton rope and T-shirt yarn when greater structure is required. One 21 cm pumpkin basket pattern specifies 5 mm cotton cord, while other designs use super-bulky cotton-based yarn for firm walls.
For the finer stitch definition in the photograph, standard worsted or Aran yarn provides a closer visual scale than thick macramé cord.
Using Super-Bulky Yarn Instead
The same concept can be adapted to category 6 yarn, but the stitch counts should not be copied directly.
Published super-bulky pumpkin baskets around 20–25 cm wide commonly use hooks from approximately 8–10 mm. At that gauge, substantially fewer stitches are required to reach the same diameter.
Make a flat circular base first and stop increasing when it reaches the required measurement.
Then turn upward in BLO and work the wall.
Super-bulky yarn creates a faster project and stronger structure, but the resulting ribs will be broader than those visible in the reference.
Making a Strong Crochet Handle
The handle is the highest-stress component because the complete weight of the basket transfers through two relatively small attachment areas.
A three-row strip is more stable than a simple chain.
Folding the strip lengthwise produces a rounder profile and doubles the amount of crochet material resisting stretch.
Internal cotton cord can increase stability again.
Attachment matters equally. Sew through several rim stitches and at least two wall rounds.
If the basket is intended only as stationary fall decor, the reinforcement can be omitted. If it will carry candy, yarn, or other objects, use the reinforced version.
Making the Pumpkin Ribs More Visible
The cream body has low color contrast, so texture must define the pumpkin sections.
One line of surface slip stitches produces a narrow raised ridge.
Two parallel lines create a broader rib closer to the photograph.
Another option is to work one row of surface single crochet over the vertical line. This produces more height but also adds stiffness.
Mark all eight positions before beginning. If the final space is noticeably narrower than the others, reposition the markers before adding any permanent surface crochet.
Do not tighten the ribs to sculpt the basket as though it were stuffed. The empty interior provides nothing to resist the tension, so strong pulling will collapse the wall.
Keeping the Rim Round
The upper opening is one of the most important structural areas.
Check the diameter immediately after the decrease from 66 to 60 stitches.
Work several straight rounds before beginning the reinforced edge. These rounds allow the opening to settle into a circular shape.
The BLO round creates a subtle hinge, and the following full-stitch round adds thickness.
Reverse single crochet can then finish the edge with a corded appearance.
If the rim waves outward, the tension is too loose or the stitch count is too high. If it folds inward, move up a hook size for the final round.
What to Put in the Finished Basket
The open pumpkin shape can hold lightweight household and seasonal items.
Use it for wrapped candy, individually packaged treats, yarn scraps, small crochet supplies, artificial autumn leaves, fabric napkins, or lightweight gift items.
A smaller version can function as a desk container for stitch markers and notions.
Do not use an unlined crochet basket for loose food. Yarn fibers and stitch openings make the surface unsuitable as direct food-contact storage.
Keep the basket away from open flames and hot surfaces. The finished object is textile decor even when photographed alongside candles or other fall accessories.
Care and Storage
Follow the washing instructions for the selected yarn.
Hand washing is preferable when the basket contains a plastic canvas insert or reinforced handle core.
Reshape the body while damp. Press outward from inside each pumpkin section and restore the circular rim before drying.
Dry the basket upright on a flat surface.
For seasonal storage, fill the interior loosely with tissue paper or clean fabric. This prevents the sides from becoming flattened while packed away.
Lay the handle inside the opening rather than folding it sharply. A permanent crease in the reinforced brown strap can be difficult to remove later.
Conclusion
The open rim is the measurement to protect throughout this pumpkin construction. Build the cream base to 60 stitches, widen the body only slightly, and return to the original circumference before reinforcing the top. Add the eight ribs without pulling them tight enough to collapse the empty walls, then spread the brown handle attachment across several stitches on each side. Finish with the dark-green leaf after checking that the basket stands flat. Save this crochet pumpkin basket pattern to Pinterest or share the completed project on Instagram with #WhitePumpkinBasket. For this specific design, would you keep the long brown loop handle or replace it with two shorter side handles?









