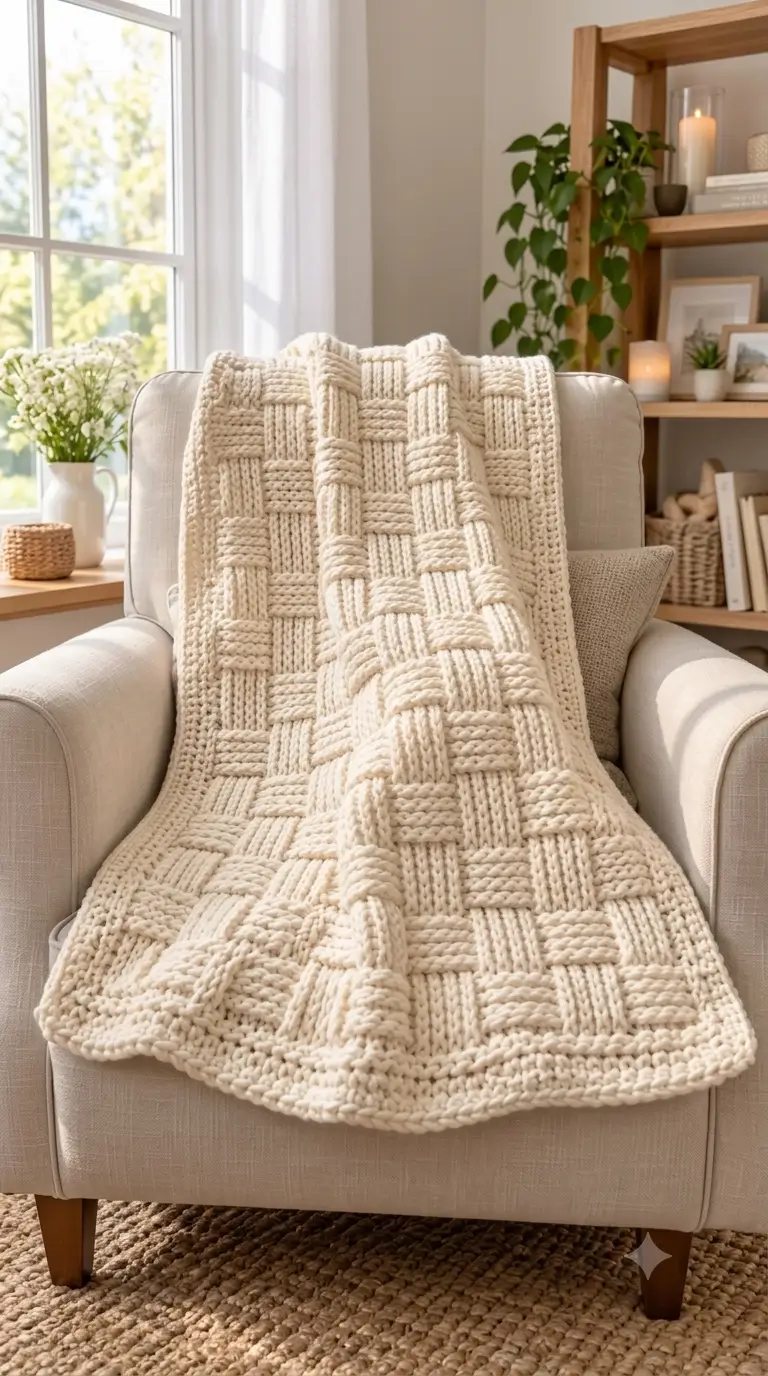
A basketweave blanket depends on alternating raised blocks rather than color changes to create its grid. This chunky basketweave crochet blanket pattern uses a single cream yarn and strongly textured sections to reproduce the structured look shown in the reference. The finished design works as a substantial throw, with a broad border controlling the edges and helping the rectangular fabric hold its shape.
The Design: What Makes This Basketweave Blanket Different
The main feature is the oversized woven-block effect. Instead of relying on multiple yarn colors, neighboring sections change stitch direction and surface texture. This creates the appearance of strips passing over and under one another.
The blocks need consistent dimensions. Even a small difference in row height can gradually push the grid out of alignment, particularly across a large throw. The second structural feature is the wide border, which visually contains the basketweave field and provides additional stability around the perimeter.
A common mistake with a chunky basketweave crochet blanket is changing tension between textured sections. Keep the working tension consistent and measure several completed blocks before continuing across the full width.
Project Info at a Glance
| Skill Level | Time | Finished Size | Yarn | Best For |
|---|---|---|---|---|
| Intermediate | Multi-session project | Adjustable | Chunky cream yarn | Throw blanket |
Materials and Tools
Yarn
- Natural cream / ivory yarn — chunky or bulky weight — quantity depends on finished blanket dimensions.
Tools
- Crochet hook appropriate for the selected yarn
- Large yarn needle
- Locking stitch markers
- Scissors
- Tape measure
Abbreviations
- ch — chain
- sc — single crochet
- dc — double crochet
- FPdc — front post double crochet
- BPdc — back post double crochet
- sl st — slip stitch
- st/sts — stitch/stitches
Before You Begin
Make a test swatch before calculating the full foundation chain. The basketweave effect depends on complete stitch groups, so the foundation must accommodate the selected block repeat plus any edge stitches required by the pattern.
Measure the swatch without stretching it. If the fabric feels excessively rigid, move to a larger hook. If the raised columns have poor definition or the fabric opens excessively between stitches, test a smaller hook.
Basketweave Stitch Construction
The woven appearance is produced by alternating groups of front post and back post stitches. Front post stitches bring a section toward the viewer. Back post stitches push the neighboring section behind it.
After several rows, the sequence is reversed. A section that previously projected forward moves visually backward, while the neighboring section comes forward. Repeating this change across the blanket creates the characteristic basket grid.
Foundation
Chain the number of stitches required for the desired blanket width while maintaining the chosen basketweave repeat. Add the necessary turning chains according to the stitch system being used.
Work the foundation row evenly. Count the stitches before beginning the textured section because an incorrect foundation count can shift every subsequent basketweave block.
First Basketweave Section
Work the first group of stitches as front post double crochet stitches around the posts of the previous row. Work the neighboring group as back post double crochet stitches.
Continue alternating these groups across the row.
Repeat the same orientation for enough rows to create a clearly defined rectangular block. Keep the number of rows identical throughout the blanket so every block reaches approximately the same height.
Reverse the Blocks
At the beginning of the next block section, reverse the post-stitch orientation.
Work back post double crochet over the groups that previously used front post double crochet. Work front post double crochet over the previous back post groups.
This reversal produces the visual over-and-under transition.
Continue the Main Blanket
Repeat the two block orientations until the blanket reaches the required length.
Check the width every few sections. Chunky yarn can amplify small tension changes, and a difference of only a few millimeters per block can become noticeable across the complete throw.
Also place the work on a flat surface periodically. The long edges should remain approximately parallel rather than gradually moving inward or outward.
Adding the Border
The reference blanket uses a substantial border that separates the textured center from the outer edge. A similar border can be created after completing the main basketweave panel.
Border Round 1
Work single crochet evenly around all four sides. Place additional stitches at each corner so the fabric can turn without pulling.
Along the row ends, distribute stitches consistently rather than automatically placing one stitch into every visible gap. The correct spacing depends on the height of the stitches used in the main blanket.
Border Round 2
Continue in single crochet or another compact textured stitch. Maintain the corner increases established during the first round.
Additional Border Rounds
Repeat the border until it reaches the desired width. The photographed blanket has a visibly wide frame, so several rounds will reproduce the proportions more closely than a narrow one- or two-round edging.
Check the corners after each round. Too few corner stitches pull the blanket inward; too many produce rippling.
Finishing
Fasten off after completing the final border round. Leave enough yarn to weave the end securely through several stitches.
Thread each yarn tail onto a large yarn needle and weave it through the dense areas of the fabric. Change direction at least once before trimming the remaining yarn.
Lay the blanket flat and adjust the corners and edges to their intended dimensions. Follow the yarn manufacturer’s washing and drying instructions rather than applying a universal blocking method, since fiber content determines how the finished fabric responds to moisture and heat.
7 Technical Tips for a Cleaner Basketweave Blanket
- Mark every block transition. A misplaced transition can shift the woven pattern by an entire stitch group. Place a marker at the first stitch whenever the front-post/back-post sequence reverses.
- Measure block height. Check several blocks with a tape measure instead of judging them only by row count. Changes in tension can make equal row counts produce unequal rectangles.
- Watch the side edges. Accidentally adding or dropping an edge stitch causes the blanket to widen or narrow. Count the complete row at regular intervals.
- Control chunky-yarn tension. Excessive tension makes post stitches difficult to enter and produces an unnecessarily rigid blanket. The hook should pass around each post without forcing the yarn.
- Check the reversal row. The most visible pattern error occurs when a front-post group is not changed to a back-post group at the scheduled transition. Inspect each completed reversal row before working the next one.
- Distribute border stitches evenly. Excess stitches create a ruffled perimeter, while insufficient stitches pull the center inward. Lay each completed border round flat before adding another.
- Secure yarn tails inside dense sections. A short tail can work loose from bulky stitches. Leave a generous weaving length and change direction inside the fabric before trimming it.
Adjusting the Blanket Size
The dimensions can be changed by increasing or decreasing the number of complete basketweave repeats. Do not add an arbitrary number of foundation stitches, because incomplete groups interrupt the alternating block structure.
For a wider blanket, add complete horizontal repeats. For additional length, continue working complete vertical block sections before beginning the border.
A baby blanket, lap blanket, sofa throw, or larger bed blanket can therefore use the same construction principle. Yarn requirements increase substantially with both dimensions, particularly when bulky yarn and deeply raised post stitches are used.
Choosing Yarn for Strong Stitch Definition
A solid-color yarn makes the directional texture easier to see because there are no frequent color changes competing with the raised blocks. Cream, ivory, beige, gray, and other relatively uniform shades work particularly well for this construction.
Yarn with a stable twist also helps the post stitches remain distinct. Highly fuzzy fibers can soften the boundaries between adjacent blocks and reduce the apparent depth of the basketweave pattern.
Buy enough yarn from the same dye lot when possible. A large single-color blanket can make even modest shade differences visible across neighboring sections.
Conclusion
Complete a measured swatch before committing yarn to the full blanket, then calculate the width using complete basketweave repeats. Keep each block section consistent, check the reversal rows carefully, and add the border only after the central panel lies flat. These controls matter more as the blanket becomes larger because small differences accumulate across dozens of rows. Save the finished chunky basketweave crochet blanket pattern to Pinterest or share your completed version on Instagram with #ChunkyBasketweaveBlanket. Before choosing the final dimensions, decide one structural detail: do you want the raised basket blocks to be square like the reference, or longer and more rectangular?









