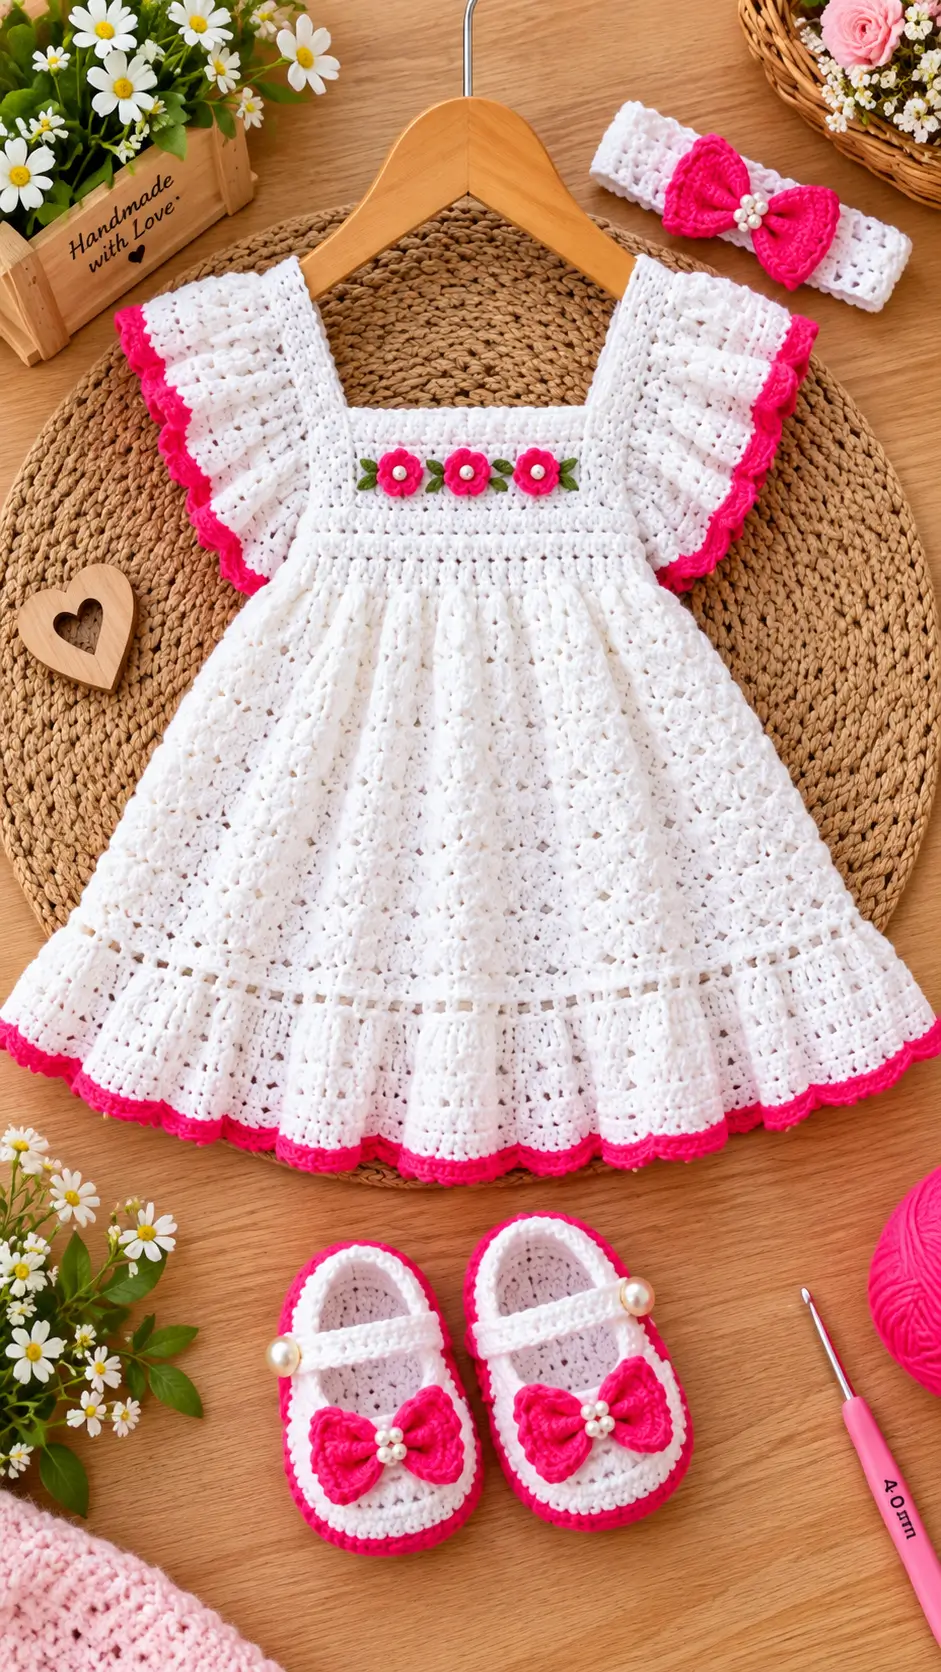
Three pink flowers across a square white bodice dictate the proportions of this entire dress. This crochet baby dress pattern reconstructs the photographed design with sport-weight yarn, a 4 mm hook and a 6–12-month target size of about 48 cm around the chest and 38 cm long. The skill level is intermediate. A matching headband and shoes turn one garment construction into a coordinated three-piece photo outfit.
The Design: What Makes This Floral Dress Different
The square neckline needs a relatively firm bodice because the three flower appliqués form a horizontal focal strip; excessive stretch would make that strip sag. Below it, the skirt gains substantial width immediately rather than expanding gradually, producing the photographed flare without making the upper body oversized.
The crochet baby dress with ruffle sleeves also needs controlled sleeve density. Too few stitches create ordinary cap sleeves, while too many produce heavy folds at the armhole.
A second decision concerns the hem. The white lace section ends in a narrow fuchsia scallop rather than another deep white ruffle, so the contrast remains visible without shortening the apparent skirt. This structure also separates the design from a basic white crochet baby dress. A frequent mistake is adding the sleeve ruffles before checking both armholes for equal stitch counts; even a two-stitch difference becomes obvious after the contrasting border is added.
Project Info at a Glance
| Skill Level | Time | Finished Size | Hook | Best For |
|---|---|---|---|---|
| Intermediate | 10–14 hours estimated | 48 cm chest × 38 cm long | 4 mm | 6–12 months |
The dimensions and hook size are based on a published 6–12-month crochet baby dress reference. Working time is an estimate and will vary with gauge and crochet speed.
Materials and Tools
Yarn
- White — sport/baby/category 2 yarn — approximately 285 m for the dress, plus additional yarn for the matching accessories.
- Fuchsia pink — compatible yarn weight — approximately 15–25 g estimated for the hem, sleeve borders, flowers and bows.
- Leaf green — compatible yarn weight — approximately 5–10 g estimated for the leaves.
DK or light-worsted yarn can also work, but changing yarn weight changes the finished measurements. Make a gauge sample before beginning if substituting yarn.
Tools
- 4 mm crochet hook
- Yarn needle
- Scissors
- Stitch markers
- Measuring tape
- Washable blocking pins
- Optional buttons for shoe straps
- Polyester sewing thread for decorative attachment
For an infant garment, avoid loosely attached pearl beads or similar small decorations. Crochet or embroider the flower and bow centers when the outfit will be worn rather than used only as a supervised photography prop.
Abbreviations
- ch — chain
- sc — single crochet
- hdc — half double crochet
- dc — double crochet
- sl st — slip stitch
- st/sts — stitch/stitches
- sp — space
- inc — increase
- dc2tog — two double crochets worked together
Invisible decrease is mainly an amigurumi technique and is not required for the dress body; use dc2tog where the garment shaping requires a reduction.
Crochet Baby Dress Pattern — Step by Step
Pattern note: This is an original image-inspired reconstruction rather than a transcription of another designer’s pattern. Garment sizing is controlled by gauge and finished measurements.
Front Bodice
Yarn: White
Row 1: Ch 42. Dc in fourth ch from hook and across (40).
Row 2: Ch 3, turn, dc across (40).
Row 3: Begin armhole shaping. Sl st across the first 4 sts. Ch 2, work the required decrease, dc across and shape the opposite edge to finish with 32 sts.
Row 4: Ch 2, dc2tog, dc across, dc2tog at opposite edge (30).
Rows 5–12: Ch 3, turn, dc across (30).
Shape the Square Neckline
Row 13: Work 8 sts for the first shoulder section and leave the center neckline unworked.
Rows 14–16: Continue the shoulder section evenly.
Fasten off.
Join white yarn at the opposite shoulder and repeat Rows 13–16 symmetrically.
Back Bodice
Yarn: White
Row 1: Ch 42. Dc in fourth ch from hook and across (40).
Row 2: Ch 3, turn, dc across (40).
Row 3: Shape the armholes to 32 sts.
Row 4: Reduce once at each edge (30).
Rows 5–10: Dc evenly (30).
Split the upper back into two sections if a small back opening is required. Work both shoulder sections until the back height matches the front.
Seam the shoulders first, then close the bodice side seams.
Lace Skirt
Yarn: White
Join white yarn around the complete lower edge of the assembled bodice.
Round 1: Ch 4, dc in the same attachment point, skip 1 st; repeat [dc, ch 1, dc], skip 1 around. Join with sl st.
Round 2: Sl st into the first ch-1 sp, ch 3, 2 dc in the same sp. Work 3 dc into every ch-1 sp. Join.
Round 3: Move to the center dc of the first 3-dc group. Work [dc, ch 1, dc] in that center stitch. Repeat in the center dc of every group. Join.
Rounds 4–23: Alternate Rounds 2 and 3 while measuring the complete dress from the shoulder.
Continue until the garment approaches the target finished length of approximately 38 cm from shoulder to hem. Do not depend only on the round number because differences in yarn and gauge affect skirt depth.
Wide Lower Lace Band
Yarn: White
Round 1: Ch 3, dc evenly around.
Round 2: Repeat [dc, ch 1, skip 1] around.
Round 3: Dc into every dc and ch-1 sp.
Round 4: Ch 3, 2 dc in the same base, skip 2; repeat 3-dc groups around.
Round 5: Dc evenly around.
Round 6: Repeat the mesh round.
Round 7: Dc evenly around.
Measure the complete dress before adding the contrasting border. Add or remove one plain round when necessary to reach the target length.
Pink Scalloped Hem
Yarn: Fuchsia pink
Round 1: Join pink and sc evenly around.
Round 2: Skip 1 st, 5 dc in next st, skip 1 st, sl st in next. Repeat around.
Adjust the final repeat by no more than one stitch if necessary. Fasten off and weave the pink tail through pink stitches.
Flutter Sleeves — Make 2
Yarn: White and fuchsia pink
Round 1: Join white at the lower armhole. Sc evenly around and record the exact stitch count.
Round 2: Ch 3, work 2 dc in each st around.
Round 3: Repeat [dc, 2 dc in next st] around.
Round 4: Dc evenly around.
Change to fuchsia pink.
Round 5: Sc evenly around.
Round 6: Work compact scallops around the edge using [sl st, skip 1, 5 dc in next st, skip 1].
Fasten off. Make the second sleeve with exactly the same foundation stitch count.
Flower Appliqués — Make 3
Yarn: Fuchsia pink
Round 1: Ch 2. Work 10 hdc into the second ch from the hook and join (10).
Round 2: In alternating stitches work [sl st, ch 2, 2 dc, ch 2, sl st] to create five petals.
Fasten off and leave approximately 20 cm of yarn for sewing.
Use an embroidered or crocheted center instead of a detachable bead when making the garment for infant wear.
Green Leaves — Make 6
Yarn: Leaf green
Ch 5.
Sl st in second ch from hook, sc in next ch, hdc in next ch and 3 hdc in final ch.
Rotate the work and crochet along the opposite side with hdc, sc and sl st.
Fasten off with a sewing tail.
Position one leaf on each side of each pink flower.
Matching Crochet Headband
Headband
Yarn: White
Make the foundation chain according to the intended baby’s actual head circumference, allowing modest negative ease.
Row 1: Ch to the required measurement.
Row 2: Hdc across.
Rows 3–4: Hdc across.
Fasten off and securely seam the short ends.
Check the completed circumference before adding the bow. Age labels alone are not accurate enough for headband sizing.
Pink Headband Bow
Yarn: Fuchsia pink
Ch 15.
Rows 1–6: Sc across (14).
Fasten off. Wrap matching yarn around the center several times to create the two bow loops.
Sew the bow firmly to the headband through several independent stitches.
Matching Crochet Mary Jane Baby Shoes
Shoe Soles — Make 2
Yarn: Fuchsia pink
Ch 12.
Round 1: Work 2 hdc in the second ch from the hook, hdc across, 5 hdc in the last ch, then continue along the opposite side of the foundation chain. Hdc across and work 3 hdc into the final base.
Round 2: Increase around the toe and heel curves while working single hdc stitches along both straight sides.
Round 3: Repeat the curve increases as needed until the sole lies flat.
Compare both soles before continuing. They must have equal stitch counts and equal finished lengths.
Shoe Uppers — Make 2
Yarn: White
Join white through the back loops around the sole.
Round 1: Sc around.
Round 2: Hdc around.
Round 3: Hdc around while beginning decreases across the toe.
Round 4: Continue toe decreases until a shallow Mary Jane-style opening is formed.
Round 5: Sc evenly around the opening.
Fasten off.
Shoe Straps — Make 2
Yarn: White
Join yarn at one side of the shoe opening.
Chain enough stitches to cross the instep without pulling the shoe sides inward.
Sl st back along the chain.
Secure the free end to the opposite side for a fixed decorative strap.
Pink Shoe Bows — Make 2
Yarn: Fuchsia pink
Ch 11.
Rows 1–5: Sc across (10).
Fasten off. Cinch the rectangle at the center with pink yarn and sew one bow directly to each shoe upper.
For infant wear, an embroidered white center can reproduce the photographed contrast without adding loose pearl embellishments.
Assembly
- Block the front and back bodice sections to matching dimensions before seaming.
- Join the shoulder seams and check that both armholes have equal measurements.
- Close the bodice side seams and attach the lace skirt around the complete lower edge.
- Finish the skirt to approximately 38 cm total shoulder-to-hem length and add the pink scalloped border.
- Count both armholes and construct matching white flutter sleeves with fuchsia borders.
- Pin the three pink flowers across the chest with the middle flower positioned on the bodice centerline.
- Position two green leaves around each flower and sew every appliqué through several bodice stitches.
- Seam the headband, attach its pink bow and weave the tails into matching-color stitches.
- Finish both shoes, compare their sole lengths, attach the straps and sew one pink bow to each toe.
- Inspect every seam and decorative attachment before trimming the remaining yarn tails.
The completed project consists of a white-and-fuchsia crochet baby dress, matching bow headband and Mary Jane-style shoes based on the construction details visible in the reference photograph.
7 Technical Tips for a Cleaner Finish
- Prevent mismatched armholes: Mark the first stitch and count each complete armhole before starting the ruffles. A two-stitch difference can produce visibly different sleeve volumes.
- Watch for skirt puckering: The first skirt round must distribute the flare evenly around the waist. If the waist begins to cup upward after several centimeters, remove the affected rounds and redistribute the attachment points.
- Measure the complete length: Measure from the shoulder instead of measuring only the skirt. For this 6–12-month reference size, the target finished length is approximately 38 cm.
- Control flower alignment: Pin all three flowers before sewing any of them permanently. Position the center flower on the bodice centerline, then count stitches outward to place the other two symmetrically.
- Correct overloaded sleeve ruffles: Dense overlapping folds indicate too many increases. Reduce the increase frequency instead of trying to flatten excessive fabric during blocking.
- Check shoe soles after every round: Place each sole on a flat surface. A sole that curves upward needs fewer increases, while rippling around the edge indicates excessive increases.
- Secure infant decorations: Do not hold an appliqué or bow with a single thread pass. Stitch through several independent crochet points and replace detachable pearl centers with embroidered or crocheted details when the outfit is intended for infant wear.
Final Measurements and Finishing
Check the bodice width and the 38 cm shoulder-to-hem target before weaving the final skirt tail. Length corrections are easier before the contrasting scalloped edge is attached.
Next, place the finished dress flat with the headband above one shoulder and both shoes aligned below the hem. Record the yarn used, gauge and actual finished measurements with your project notes so the construction can be adjusted for another size.
Save the finished crochet baby dress pattern to Pinterest and share your completed set on Instagram with #PinkFlowerBabyDress. Which feature would you modify first: the three-flower chest panel or the depth of the fuchsia-edged flutter sleeves?









