Introduction
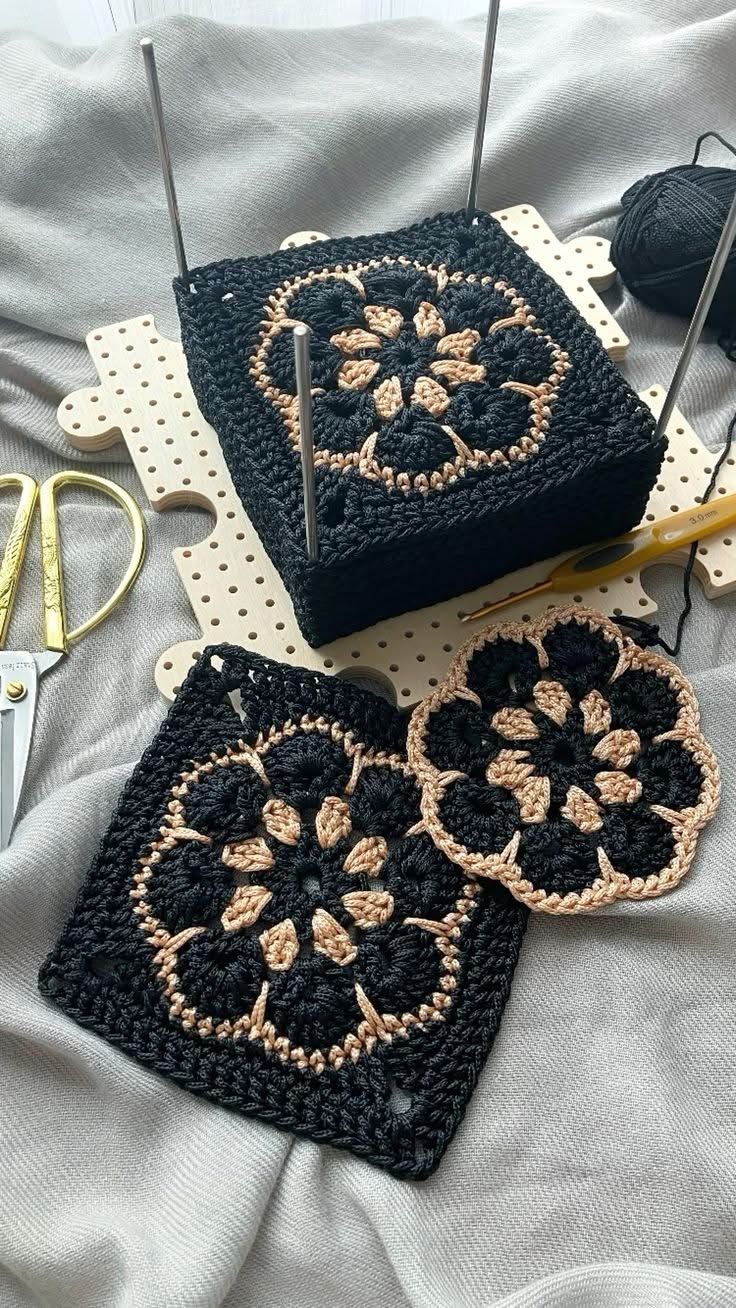
Eight black petal clusters and eight narrow gold buds give this square its radial geometry before the corners even exist. This black and gold floral granny square crochet pattern builds a dimensional flower first, converts the circular motif into a square, then adds a dense black frame. Use DK or light-worsted yarn with a 3–3.5 mm hook for an approximately 16–18 cm motif. The finished squares work for bags, cushions, blankets, and joined decorative panels.
The Design: What Makes This Floral Square Different
The photographed motif is constructed around alternating shapes rather than one continuous flower color. Eight broad black petal clusters form the dominant ring, while narrow champagne-gold elements occupy the spaces between them. Small gold accents near the center repeat that contrast and keep the dark flower readable.
A narrow gold outline separates the circular flower from the black background. The outer rounds then perform a second job: they convert the radial floral crochet motif into a stable four-corner square.
The finished fabric is comparatively dense. That makes the black granny square crochet pattern suitable for structured projects such as the bag construction visible in the reference. A frequent mistake is adding corner increases too early. The center then loses its circular outline and the black petals become distorted before the squaring rounds begin.
Project Info at a Glance
| Skill Level | Estimated Time | Finished Size | Hook | Best For |
|---|---|---|---|---|
| Intermediate | 2–3 hours | Approx. 16–18 cm square | 3–3.5 mm | Bags, cushions, blankets, decorative panels |
The final measurement depends on yarn diameter and blocking. Make one complete motif before calculating quantities for a multi-square project because dimensional cluster stitches consume more yarn than a plain granny-square fabric of the same dimensions.
Materials and Tools
Yarn
- Black — DK/light-worsted weight — approximately 35–45 g per square
- Champagne gold or beige — DK/light-worsted weight — approximately 10–15 g per square
Use smooth, firmly twisted yarn if matching the photograph is the priority. The motif depends on clear separation between the black clusters and narrow gold details. Fuzzy yarn can obscure those boundaries.
Tools
- 3–3.5 mm crochet hook
- Tapestry needle
- Scissors
- Locking stitch markers
- Blocking mat and pins
- Optional square blocking board
Abbreviations
- MR — magic ring
- ch — chain
- sl st — slip stitch
- sc — single crochet
- hdc — half double crochet
- dc — double crochet
- tr — treble crochet
- dc-cl — double-crochet cluster
- puff — puff stitch
- sp — space
- st/sts — stitch/stitches
When closing a cluster, keep the final pull-through moderately loose. Tight cluster tops make the dimensional black petals contract and can distort the circular flower.
Pattern — Step by Step
Use US crochet terminology. The construction begins with a circular flower and remains round through the petal section. The final rounds introduce four corners and convert the motif into a square.
Black Flower Center
Yarn: black.
R1: 6 sc in MR (6)
R2: inc ×6 (12)
R3: (1 sc, inc) ×6 (18)
Join with sl st.
The 18-stitch center provides enough attachment points for the alternating black and gold details without creating a large open hole.
Gold Inner Buds
Change to champagne gold.
Work eight narrow accents around the black center.
Bud: Ch 3, 2 dc-cl into the selected attachment position, ch 2, sl st at the base.
Move evenly around the center and repeat until 8 gold buds have been formed.
Space the buds as evenly as the 18-stitch foundation permits. Small spacing adjustments can be made because the next black round will conceal the attachment points.
Fasten off.
Black Petal Foundation
Rejoin black behind the gold buds.
Create eight chain spaces around the flower.
R4: *Ch 4, skip the gold bud attachment area, sl st into the next suitable black foundation position.* Repeat around until 8 chain spaces have been formed.
Join with sl st.
Check that all eight spaces are comparable in size before continuing.
Large Black Petals — Make 8
Work into the first ch-4 space:
Petal: sc, hdc, 3 dc, 2 tr, 3 dc, hdc, sc.
Sl st into the anchoring point between spaces.
Repeat the petal sequence into each of the remaining seven ch-4 spaces.
The flower now has eight broad black petals.
Keep the treble stitches tall enough to create a rounded outer petal edge. Tight treble stitches make the petals appear triangular.
Creating the Raised Black Petal Texture
The reference has thick petal groups with visible surface depth rather than flat fan stitches.
For additional relief, work a second partial layer over each petal.
Join black yarn near the base of the first petal.
Work surface slip stitches upward through the center of the petal.
At the widest point, work:
ch 2, 3 dc-cl, ch 2, sl st.
Return toward the base with loose surface slip stitches.
Repeat across all eight petals.
This secondary texture should sit on the surface. Do not pull the slip stitches tightly enough to shorten the petal.
Gold Separating Stitches
Yarn: champagne gold.
The photograph shows narrow gold lines between the black petal sections.
Join gold yarn in the valley between two black petals.
Ch 5.
Lay the chain over the valley toward the outer edge.
Sl st into the outer attachment position.
Work back toward the center with slip stitches along the chain.
Fasten or carry the yarn discreetly to the next valley.
Repeat until all eight petal divisions have a narrow gold accent.
Gold Circular Outline
Continue with champagne gold.
The completed flower needs one continuous round before the square corners are introduced.
R5: Sc evenly around the outside of the flower, placing stitches into the outer edges of the eight black petals.
Distribute approximately the same number of stitches over every petal.
Join with sl st.
The gold outline should form a smooth circle. If it becomes wavy, remove excess stitches rather than attempting to correct the problem in the squaring round.
Black Transition Round
Change to black.
R6: Ch 1, sc in each stitch around.
Join with sl st.
Count the completed round and divide it into four equal sections. Place a marker at the four points that will become the square corners.
Converting the Flower into a Square
The circular motif is squared by varying stitch height near each corner.
Begin at one marked corner.
Across each quarter section, work progressively taller stitches as you approach the corner and shorter stitches as you leave it.
A practical side sequence is:
sc, hdc, dc, dc, tr
At the marked corner work:
(2 tr, ch 2, 2 tr)
Then reverse the stitch-height sequence:
tr, dc, dc, hdc, sc
Continue with sc as required across the flatter center portion of the side.
Repeat the same construction at all four corners.
Join with sl st.
Lay the motif flat. Four distinct corners should now be visible while the gold-outlined flower remains circular.
First Black Square Round
Continue with black.
R8: Ch 2. Hdc in every stitch across each side.
At each ch-2 corner space work:
(2 hdc, ch 2, 2 hdc).
Join with sl st.
Count the stitches on all four sides. They must match before additional border rounds are added.
Textured Black Frame
The reference uses a substantial black frame rather than stopping immediately after the motif becomes square.
R9: Ch 1. Sc in each stitch around.
At each corner work:
(sc, ch 2, sc).
Join with sl st.
R10: Ch 2. Hdc in each stitch around.
At each corner work:
(2 hdc, ch 2, 2 hdc).
Join with sl st.
R11: Ch 1. Sc in each stitch around.
At each corner work:
(sc, ch 2, sc).
Join with sl st.
Optional Raised Outer Border
For the heavier edge visible on the bag panels in the photograph, add one additional textured round.
R12: Work reverse single crochet around the entire perimeter.
At each corner, work two reverse single crochets with slightly relaxed tension.
Join carefully and fasten off.
The resulting corded edge gives the square enough visual weight for bag construction while retaining the dark monochromatic frame.
Optional Open Corner Detail
Some of the photographed loose squares show small open spaces near the outer corners.
To reproduce that detail, replace the center three stitches near each corner on R10 with:
ch 3, skip 3 sts.
On the following round, work three stitches into the ch-3 space.
This creates a small decorative opening without changing the overall dimensions substantially.
Use the same modification at all four corners.
Assembly and Finishing
- Lay the circular flower flat and count all eight black petals before beginning the gold outline.
- Check that the eight gold inner buds remain visible between the black petal bases rather than being trapped behind them.
- Position each gold separating line in the valley between neighboring petals and keep all eight approximately equal in length.
- Complete the gold circular outline and correct any rippling before introducing the four square corners.
- Mark four equally spaced corner positions and verify them by folding the circular motif into quarters.
- Complete the first black squaring round, then compare the stitch count on all four sides.
- Add the remaining black border rounds without changing the established corner positions.
- Weave black yarn tails through black stitches and gold tails through gold or hidden reverse-side stitches.
- Block the outer square to approximately 16–18 cm without pinning or flattening the raised flower petals.
- Allow the square to dry completely, then lift and reshape the black petal clusters before joining it to another motif.
The completed motif should have eight dimensional black petals, eight narrow champagne-gold center accents, gold divisions between the petals, a circular gold outline, and a dense black square frame.
7 Technical Tips
- Black petals merge into one dark circle: Keep approximately 5–8 mm of visible separation at each petal valley. Closing those spaces completely removes the eight-part floral structure.
- Gold buds disappear under the petals: Position each bud so approximately half its length remains visible after the black petal layer is completed. A bud buried more than two-thirds beneath a petal will contribute little visible contrast.
- Gold outline ripples: Reduce the number of sc placed over each petal. Even one extra stitch per petal adds eight excess stitches to the circular perimeter.
- Square corners become rounded: Mark all four corner spaces and work the complete increase into each one. Missing a ch-2 corner or one treble increase pulls that corner inward.
- Black stitches are difficult to count: Use light-colored markers at all four corners and move them after every round. Dark markers can disappear against the black frame.
- Square becomes larger on one side: Count each side immediately after the first squaring round. A difference of more than one stitch should be corrected before adding the dense outer frame.
- Flower becomes flat during blocking: Pin only the outer border and keep all pins at least 10 mm away from the raised petals. Pressure across the center can permanently reduce the dimensional cluster texture.
Why the Flower Is Made Before the Square
The reference depends on a circular floral center surrounded by a geometric frame. Beginning with a conventional square and adding petals afterward would produce a different relationship between the flower and the corners.
Keeping the early rounds circular allows the eight petals to remain evenly spaced around one center.
The gold outline then creates a clear boundary around that radial structure.
Only after the flower is complete are four points selected for corners.
Taller stitches near those four positions fill the diagonal distance between a circle and a square. Subsequent rounds can then use ordinary corner increases.
This sequence keeps the floral center visually independent from the black frame.
How to Keep Eight Petals Even
Eight-part symmetry is easier to maintain when the attachment spaces are marked before the petals are made.
Divide the flower visually into quarters first.
Mark positions at approximately 12, 3, 6, and 9 o’clock.
Add another marker midway between every pair.
The result is eight evenly spaced reference points.
Compare petal width after the first four petals have been completed. If one consumes noticeably more foundation space, correct it before making the remaining four.
Do not depend entirely on stitch counts when attaching dimensional elements. Cluster thickness can change the apparent spacing even when the underlying counts are mathematically equal.
Creating Strong Gold Contrast
The secondary color in the reference is closer to champagne, tan, or muted metallic beige than bright yellow.
Choose a shade light enough to remain visible against black but restrained enough to keep the dark palette dominant.
Mercerized cotton can add a slight sheen without requiring metallic thread.
If using actual metallic yarn, combine it with a softer matching strand. Many metallic yarns are too rigid for the entire petal accent when used alone.
Another option is warm beige cotton with a subtle luster.
Use the same secondary color for the center buds, petal divisions, and circular outline. Repetition ties the three details together.
Choosing Yarn for a Bag
A square intended for a bag requires more structure than one intended for a blanket.
Cotton, mercerized cotton, or a firm cotton blend is a practical choice. These fibers give the black frame enough resistance to hold a rectangular bag shape.
Use the smaller end of the recommended hook range when the swatch feels loose.
A 3 mm hook with DK cotton can create a comparatively dense panel. A 3.5 mm hook provides more flexibility.
Make two squares with identical hook size, yarn, and tension before beginning assembly.
If one panel differs from the other by more than approximately 5 mm after blocking, correct the smaller motif with an additional border round rather than stretching it aggressively.
Turning Two Squares into a Crochet Bag
The photograph shows the motif being used as a structured square bag panel.
Make two identical floral squares.
Block both to the same dimensions.
Place them with wrong sides together.
Join three sides using black slip stitches or single crochet.
Leave the top edge open.
For greater depth, crochet a separate black side-and-bottom gusset approximately 4–6 cm wide and join it between the panels.
Add a zipper, magnetic closure, or lining only after the crochet shell has been measured.
A fabric lining helps prevent keys, pens, and other small objects from catching in the dimensional flower stitches.
Simple Bag Gusset
Yarn: black.
Measure the combined length of one side, the bottom, and the second side of a completed square.
Ch enough stitches to produce a strip approximately 4–6 cm wide.
Row 1: Sc in the second chain from the hook and across.
Rows 2 onward: Ch 1, turn, sc across.
Continue until the strip matches the required three-edge measurement.
Fasten off.
Pin the strip around three sides of the first panel, then join with black sc.
Attach the second panel to the opposite edge of the gusset.
Keep the flower facing outward on both sides.
Adding Bag Handles
For short crochet handles, use black yarn and a smaller hook than the main square if necessary.
Ch 45–55 depending on the required handle length.
Row 1: Sc in the second chain from the hook and across.
Rows 2–4: Ch 1, turn, sc across.
Fasten off with long attachment tails.
Make a second handle.
Position each handle symmetrically along the top edge of its panel.
Sew every handle end across approximately 3–4 cm of the upper border rather than anchoring it through one stitch.
Reinforce the attachment from the inside before adding a lining.
Using the Motif for a Blanket
The same square can be repeated for a dramatic black-and-gold blanket.
Make and block every square to one standard measurement before joining.
A 16 cm square arranged in a 5 × 7 layout produces a motif field of approximately 80 × 112 cm before joining seams and an external border.
A 6 × 8 arrangement creates approximately 96 × 128 cm before finishing.
Because the flower is dimensional, consider alternating floral motifs with simpler black squares. That reduces total weight and creates negative space between the raised centers.
Use black joining yarn to keep the seams visually integrated with the outer frame.
Joining Multiple Squares
Slip-stitch joining creates a visible ridge and suits the heavily textured design.
For a flatter seam, place two squares right sides together and work through corresponding edge loops.
Mattress stitch is another option when the project requires an almost invisible connection.
Whichever method is selected, match corner to corner first.
Then place markers at the midpoint of each side.
Join between those reference points without stretching either square.
If the stitch counts differ, correct the mismatch before joining rather than skipping stitches randomly along one panel.
Making the Motif Smaller
Switch to fingering or sport-weight yarn with an approximately 2.5–3 mm hook.
Keep the eight-petal geometry but reduce the height of the large petals.
Replace the two treble stitches in each petal with double crochet.
Use shorter gold dividing chains, reducing ch 5 to approximately ch 3 or ch 4.
Stop the black frame after the motif reaches the required dimensions.
Make one test square before committing to a complete set because small changes in cluster tension can alter the final measurement.
Making the Square Larger
Continue adding black rounds after the main border.
For an hdc round, work one hdc into each side stitch and:
(2 hdc, ch 2, 2 hdc) in every corner.
For an sc round, use:
(sc, ch 2, sc) in each corner.
Alternate the two round types until the required measurement is reached.
A narrow gold round can be inserted after every three or four black rounds if additional contrast is required.
Keep the final round black when the squares will be joined with black yarn.
Blocking the Finished Square
Dimensional motifs require selective blocking.
Pin all four outer corners first.
Measure diagonally from corner to corner. Both diagonal measurements should be approximately equal.
Add pins along each side until the border is straight.
Do not pin the black flower petals.
If wet blocking, lift each petal and reshape the gold accents before the motif dries.
The center should remain dimensional while the outer frame becomes flat and square.
Allow the yarn to dry completely before removing the pins.
Care and Shape Maintenance
Follow the washing instructions for the chosen yarn fiber.
For bags, spot cleaning is often preferable because hardware and lining may have different care requirements from the crochet panel.
Blanket motifs can usually be washed according to the yarn label, but avoid heavy compression while drying.
Reshape the black petals after washing.
Check the narrow gold dividing stitches for snags before storing the project.
When stacking unused motifs, avoid placing heavy objects directly over the dimensional flower centers.
Conclusion
The eight black petals must remain circular even though the finished object is square. Build and check the radial flower first, add the champagne-gold divisions, then mark four equally spaced corners before beginning the black frame. For bag panels, use firm yarn and block both motifs to the same measurement before joining; for blankets, complete every square to one standard border count. Make one test motif and record its finished dimensions and yarn use before starting multiples. Save this black and gold floral granny square crochet pattern to Pinterest or share the finished project on Instagram with #BlackGoldFloralSquare. Would you use this motif for the structured bag shown in the reference or repeat it across a blanket?









