Introduction
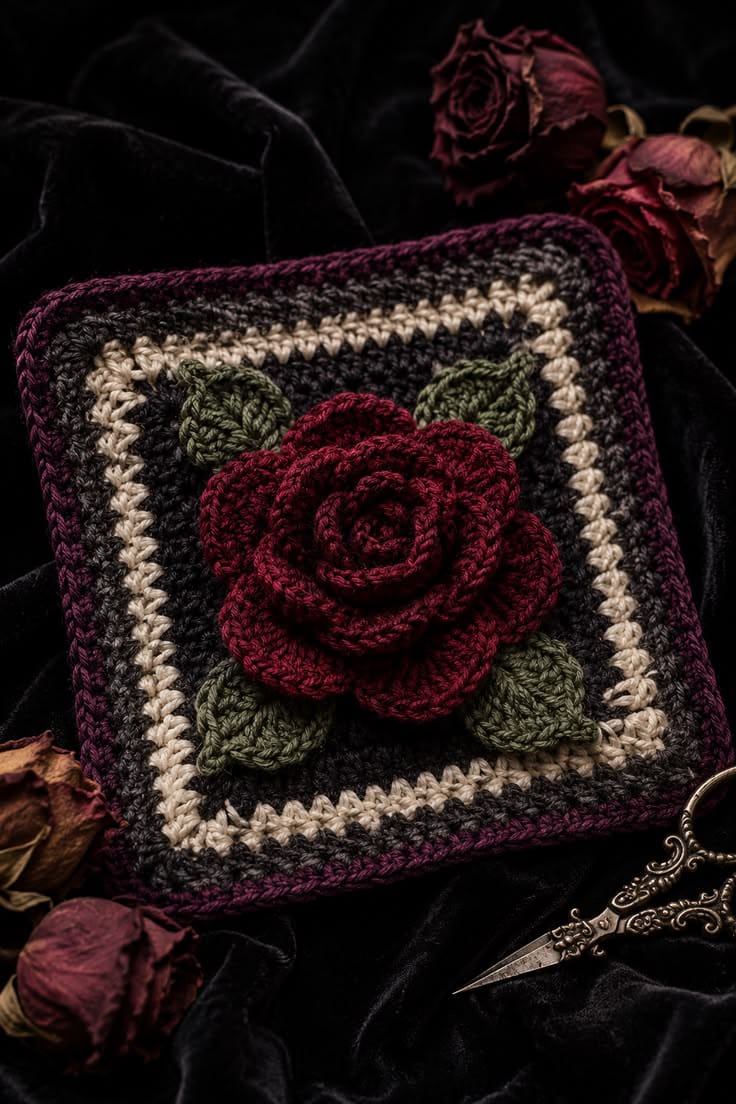
A burgundy rose needs separate petal levels or its dark center disappears into one dense circle. This 3D rose granny square crochet pattern builds a raised wine-red flower over four olive leaves, then frames it with charcoal, antique cream, and plum rounds. Aran-weight yarn and a 5 mm hook produce a substantial decorative square of approximately 15–17 cm. The motif suits cushion fronts, bags, wall panels, and joined blankets.
The Design: What Makes This Gothic Rose Square Different
The reference relies on depth before color. Small curled petals create the rose center, medium petals establish the spiral, and broad outer petals project beyond the background. Four olive leaves then separate the burgundy flower from the nearly black square.
The border uses three dark-value zones instead of a conventional bright granny-square palette. Charcoal provides the main field, antique cream creates a narrow visual break, and deep plum finishes the perimeter. This makes the gothic crochet granny square readable without reducing the dramatic contrast.
Published 3D rose granny squares use yarns from fingering through Aran weight and hooks from about 2.5 to 5 mm. One Aran-weight 3D rose design specifies a 5 mm hook, while a fingering-weight rose square measures about 10 × 10 cm with a 3 mm hook. The common construction error is attaching every petal to the same round, which flattens the layered crochet rose square.
Project Info at a Glance
| Skill Level | Estimated Time | Finished Size | Hook | Best For |
|---|---|---|---|---|
| Intermediate | 2–3 hours | Approx. 15–17 cm square | 5 mm | Cushions, bags, blankets, wall panels |
The 15–17 cm target is appropriate for an Aran-weight interpretation of the photographed motif. Published rose squares vary considerably: a fingering-weight example measures approximately 10 cm square with a 3 mm hook, while another published rose granny square measures approximately 8 inches with a 4.5 mm hook.
Materials and Tools
Yarn
- Deep burgundy — Aran/worsted weight — approximately 25–30 g
- Olive green — Aran/worsted weight — approximately 8–10 g
- Charcoal black — Aran/worsted weight — approximately 20–25 g
- Antique cream — Aran/worsted weight — approximately 6–8 g
- Deep plum — Aran/worsted weight — approximately 6–8 g
Published Aran-weight 3D rose squares use acrylic yarn successfully, while other designs use cotton. A smooth, firmly twisted yarn is particularly useful here because the dark colors need clear stitch boundaries.
Tools
- 5 mm crochet hook
- Tapestry needle
- Scissors
- Locking stitch markers
- Blocking pins and mat
Abbreviations
- MR — magic ring
- ch — chain
- sl st — slip stitch
- sc — single crochet
- hdc — half double crochet
- dc — double crochet
- tr — treble crochet
- inc — two stitches in one stitch
- BLO — back loop only
- FLO — front loop only
- st/sts — stitch/stitches
- sp — space
Keep decreases invisible whenever shaping a dense component by working through the front loops of the two target stitches before completing the stitch.
Pattern — Step by Step
Use US crochet terminology. The flower, leaves, central background, and border are constructed as separate visual layers. The instructions below are an original photograph-inspired construction rather than a transcription of a published rose-square pattern.
Rose Foundation
Yarn: deep burgundy.
R1: 6 sc in MR (6)
R2: inc ×6 (12)
R3: (1 sc, inc) ×6 (18)
Sl st to the next stitch and fasten off.
This small flat circle acts as the hidden foundation beneath the dimensional petals. Do not make it larger. A wide foundation spreads the inner rose too far apart.
Inner Rose Petals
Yarn: deep burgundy.
Join yarn to a front loop near the center of the foundation.
Petal 1: Ch 2, 3 dc in the same attachment area, ch 2, sl st at the base.
Petal 2: Move approximately two stitches around the foundation. Ch 2, 4 dc, ch 2, sl st.
Petal 3: Repeat Petal 2.
Petal 4: Repeat Petal 2.
Arrange the four petals so their edges overlap slightly in one direction.
Fasten off and weave the tail into the back of the flower.
Middle Rose Petals
Continue in burgundy.
Join yarn behind the first petal layer using unused loops from the foundation.
Petal 1: Ch 2, hdc, 5 dc, hdc into the working attachment space, ch 2, sl st.
Move to the next attachment point.
Petals 2–6: Repeat the same sequence around the flower.
Make six middle petals in total.
Pull each petal slightly forward after completing it so the layer does not become trapped beneath the inner petals.
Large Outer Rose Petals
The outer petals provide most of the diameter visible in the photograph.
Join burgundy yarn behind the middle layer.
Outer Petal: Ch 2, hdc, dc, 3 tr, 2 dc, hdc, ch 2, sl st into the same attachment area.
Move to the next attachment point.
Repeat until eight outer petals surround the flower.
Fasten off, leaving a 20 cm tail.
The rose should now measure approximately 9–11 cm across, depending on yarn and tension.
Shaping the Rose Spiral
The reference does not have three perfectly concentric flat flower rings. Its petals overlap in a spiral.
Use the remaining burgundy tail to tack selected inner petals into position.
Fold the first inner petal slightly inward.
Bring the second petal partially over the first.
Continue in the same direction around the center.
Make only one or two small stitches through the base of each petal. Do not sew across the upper petal edges.
The middle petals should remain less tightly curled. Outer petals remain the most open.
Olive Leaves — Make 4
Yarn: olive green.
Ch 10.
Beginning in the second chain from the hook:
Side 1: sl st, sc, hdc, dc, 2 tr, dc, hdc, sc.
Work 3 sc into the final chain to turn around the tip.
Continue down the opposite side of the foundation chain:
Side 2: sc, hdc, dc, 2 tr, dc, hdc, sc, sl st.
Fasten off, leaving a 20 cm tail.
The finished leaf should measure approximately 6–7 cm long.
Leaf Center Vein
For the pronounced center line visible in the reference, join olive yarn at the base of a leaf.
Work surface slip stitches along the original foundation chain toward the tip.
Fasten off at the pointed end.
Repeat for all four leaves.
Keep the surface slip stitches loose enough that the leaves remain flat.
Charcoal Center Square
Yarn: charcoal black.
The dark square is worked separately so the dimensional flower can sit cleanly on top without being compressed by later rounds.
R1: 6 sc in MR (6)
R2: inc ×6 (12)
R3: (1 sc, inc) ×6 (18)
R4: (2 sc, inc) ×6 (24)
The circle now needs to transition into four corners.
Squaring Round
R5: Ch 3, work dc evenly around while creating four corners at equal intervals.
At each corner work:
(2 dc, ch 2, 2 dc) into the same corner position.
Distribute the remaining stitches evenly along the four sides.
Join with sl st.
Check that all four sides contain the same number of stitches before continuing.
Charcoal Expansion Round
R6: Ch 2. Hdc in each stitch across each side.
At every ch-2 corner space work:
(2 hdc, ch 2, 2 hdc).
Join with sl st.
The square should lie flat without pulling diagonally toward the corners.
Attaching the Leaves
Place the four olive leaves diagonally around the center of the charcoal square.
Position one toward each corner.
Allow approximately half of each leaf to remain visible after the rose is placed on top.
Using the olive tails, sew only the central vein and lower 1–2 cm of each leaf to the square.
Leave the outer edges free.
This partial attachment preserves the dimensional appearance seen in the reference.
Attaching the 3D Rose
Center the burgundy rose over the leaf bases.
The flower should cover the inner ends of all four leaves while leaving the pointed sections visible diagonally.
Pin the flower at four opposing positions.
Using burgundy yarn, sew through the hidden foundation and the charcoal background.
Make attachment stitches around the central foundation rather than around the outer petals.
Do not flatten the large petals against the square.
After attachment, lift each petal with your fingers and restore the layered spiral.
Antique Cream Frame
Yarn: antique cream.
Join in any corner of the charcoal square.
R7: Ch 2. Hdc in each stitch across the first side.
At the corner work:
(2 hdc, ch 2, 2 hdc).
Repeat around all four sides.
Join with sl st.
The cream band should remain relatively narrow. Its purpose is to separate the dark center from the charcoal and plum outer frame.
Second Charcoal Border
Change to charcoal black.
R8: Ch 1. Sc in each stitch across.
At each corner space work:
(sc, ch 2, sc).
Continue around and join with sl st.
R9: Ch 2. Hdc in each stitch across.
At each corner work:
(2 hdc, ch 2, 2 hdc).
Join with sl st.
Deep Plum Outer Border
Yarn: deep plum.
The reference uses a narrow wine-purple line around the perimeter rather than a broad contrasting border.
R10: Ch 1. Sc evenly around the square.
At each corner work:
(sc, ch 2, sc).
Join with sl st.
R11: Sl st loosely in each stitch around, working 2 sl st into each corner space.
Fasten off, leaving a 20 cm tail.
Weave the tail through the charcoal side of the work so it does not show against the cream round.
Optional Textured Charcoal Field
The background in the reference is not visually smooth. Slight stitch variation gives the dark field more depth.
To reproduce that effect, alternate ordinary hdc with selected BLO hdc while expanding the charcoal square.
Another option is to work one round in alternating sc and hdc.
Do not add strong bobbles or raised post stitches directly behind the rose. Extra height beneath the flower can push its center forward excessively and prevent the finished motif from lying flat around the border.
Assembly
- Block the charcoal square lightly before attaching any dimensional components so all four corners measure equally.
- Place one olive leaf diagonally toward each corner with the four leaf bases meeting near the center.
- Sew each leaf along its center vein while leaving the outer edges unattached.
- Position the burgundy rose directly over the four leaf bases and check that comparable amounts of green remain visible.
- Attach the rose through its hidden foundation rather than sewing through the outer petal edges.
- Shape the inner petals into a compact spiral and keep the medium layer slightly more open.
- Spread the eight outer petals so the flower remains approximately centered relative to all four sides.
- Check the antique cream frame for equal stitch counts before completing the charcoal outer rounds.
- Work the plum perimeter loosely enough that the corners remain flat instead of curling toward the front.
- Weave all tails into matching colors, then reshape the leaves and petals after the final blocking of the flat border.
The completed motif should have one layered burgundy rose, four diagonal olive leaves, a charcoal field, narrow antique-cream frame, dark secondary border, and plum perimeter.
7 Technical Tips
- The rose center looks like a flat disk: Overlap the four inner petals by approximately one-third of their width. Sewing every petal completely open removes the spiral structure that identifies the flower as a rose.
- Outer petals curl underneath: Attach the rose only through its hidden foundation. Sewing within 10–15 mm of an outer petal edge prevents that petal from projecting away from the square.
- Leaves disappear behind the flower: Position each leaf so at least 3–4 cm remains visible beyond the burgundy petals. A shorter exposed section reads as an accidental green edge rather than a complete leaf.
- Square develops rounded corners: Keep a ch-2 corner space at every corner and place the complete corner increase into that space. Missing even one corner increase causes the surrounding sides to pull diagonally inward.
- Cream border becomes wavy: Work only one stitch into each side stitch between corner increases. Adding unplanned stitches to compensate for tight tension creates excess perimeter length.
- Dark stitches are difficult to identify: Place a bright marker in every corner before starting the charcoal rounds. Black and plum yarn can obscure the ch-2 spaces, particularly under warm indoor lighting.
- The completed square will not lie flat: Block the background and border without pressing the rose. Compressing the 3D flower during blocking can permanently reduce the separation between its three petal levels.
How the Three-Layer Rose Gets Its Shape
A convincing crochet rose requires more than increasing petal size. Each layer also needs a different degree of openness.
The inner four petals should be compact and strongly overlapped. Their purpose is to hide the central foundation and imitate the tightly wrapped petals near the center of a rose.
The six middle petals create the transition. They are larger but still overlap enough that the viewer cannot see directly through to the charcoal background.
The eight outer petals are broad and comparatively open. These petals establish the flower’s final diameter and create most of the visible shadows.
If all three layers use identical tension and positioning, the result becomes three concentric rings. Shape the flower after attachment to preserve the irregular spiral appearance.
Choosing Colors for the Gothic Palette
The photograph depends on controlled dark values rather than pure black everywhere. Burgundy, charcoal, olive, cream, and plum each perform a different job.
Choose a burgundy with enough red content to remain distinguishable from the charcoal background. A flower that is nearly black can disappear into the square under low lighting.
Muted olive provides contrast without introducing a bright botanical green. Antique cream creates the strongest value difference and should therefore remain a narrow band.
Deep plum works well for the final edge because it relates to the burgundy rose without matching it exactly.
For an even darker version, replace the cream with taupe. For stronger contrast, use natural ivory while leaving the other four colors unchanged.
Choosing Yarn and Hook Size
Published 3D rose granny squares demonstrate that the motif can be made across several yarn weights. A 2026 Aran-weight design uses Red Heart Super Saver with a 5 mm hook. Another rose-square tutorial uses fingering-weight cotton with a 3 mm hook and produces an approximately 10 × 10 cm square.
Fingering yarn creates finer petals but requires more stitches to reach the visual scale shown in the photograph.
Aran or worsted yarn makes the individual petal layers substantial with fewer stitches. A 5 mm hook is therefore a useful starting point for this version.
If the petals become floppy, test a 4.5 mm hook. If they are rigid and difficult to curve, return to 5 mm or loosen the working tension.
Making a Smaller Rose Square
Use DK yarn with a 3.5–4 mm hook to reduce the motif without rewriting every component.
Keep the same three flower layers but shorten each leaf foundation from 10 chains to approximately 8 chains.
Stop the background after enough rounds have been completed to clear the outer petals by approximately 1.5–2 cm on every side.
Add the cream, charcoal, and plum border sequence after that point.
Make a single test square before producing a full blanket quantity. Dimensional motifs can vary more in finished measurement than plain granny squares because petal tension affects both height and apparent diameter.
Making a Larger Decorative Square
For a cushion front or wall panel, continue adding square rounds after R11.
Maintain the established corner structure:
(2 hdc, ch 2, 2 hdc) for hdc rounds or (sc, ch 2, sc) for sc rounds.
Alternate charcoal and plum if the outer frame needs to remain dark.
Add another antique-cream line only if a second high-contrast band fits the project.
Measure each side after every two rounds. A difference greater than approximately 1 cm between sides indicates a missed stitch or corner increase.
Using the Square for a Cushion
A single enlarged motif can form the center of a gothic floral cushion.
Continue the border until the square matches the intended cushion dimensions. Make a flat back panel in charcoal using sc or hdc.
Join three sides, insert the cushion form, then close the fourth side or add a removable closure.
Keep the 3D rose on the front only. Repeating dimensional flowers on the back makes the cushion unstable against a chair or sofa.
For a frequently used cushion, tack the outer petals at one additional hidden point near their bases. This reduces snagging while preserving most of their raised profile.
Using Multiple Squares in a Blanket
Dimensional rose squares create a heavy blanket when every motif contains a full three-layer flower.
One practical layout alternates rose squares with plain charcoal or cream granny squares. This reduces yarn use and creates visual space between the flowers.
Block all flat square backgrounds to the same measurement before joining.
Do not judge size from the rose itself. Measure from border edge to border edge.
Slip-stitch joining produces a visible raised seam, while mattress-style joining creates a flatter connection.
Keep all flowers facing the same direction if the leaves have a clear orientation. Alternatively, rotate neighboring squares by 90 degrees for a less formal arrangement.
How Much Yarn Is Needed for Multiple Squares?
Yarn consumption depends heavily on the final gauge, but the burgundy flower will normally consume more yarn than any other single color within one motif.
For this Aran-weight version, begin by weighing each yarn ball before making the first square.
After completing and trimming the motif, weigh the remaining yarn.
Multiply the measured consumption by the number of required squares, then add approximately 10 percent for tension variation, joining, and finishing.
This method is more reliable than estimating from a flat granny square because the raised rose contains several layers of stitches occupying the same surface area.
Blocking a 3D Flower Granny Square
Block the geometric border, not the flower.
Place the completed square on a blocking mat and pin all four corners to the target measurement.
Add pins along the sides if necessary to keep them straight.
Keep the burgundy petals and olive leaves free of pins.
If wet blocking, reshape the rose with your fingers before the yarn dries. Separate the petal layers and lift the leaf tips away from the charcoal field.
Never place a heavy towel, book, or pressing surface directly over the flower. Flattening defeats the construction responsible for the three-dimensional effect.
Care and Storage
Follow the care instructions supplied with the selected yarn. Cotton, acrylic, and wool-blend Aran yarns require different temperatures and drying methods.
Place small dimensional projects flat during storage rather than stacking heavy objects over the rose.
For a blanket, fold along spaces between motifs when possible. Repeatedly creasing directly through a rose can alter the outer petal shape.
After washing, reshape each flower before drying. The inner petals should remain compact, while the outer petals can be spread outward again.
Trim only genuinely loose fibers. Do not cut the small attachment strands visible behind the rose or leaves, since those stitches hold the dimensional components to the square.
Conclusion
The rose is successful when its three petal levels remain visually separate from the charcoal field. Build the compact burgundy center first, open the middle layer slightly, and leave the eight outer petals free enough to cast visible shadows. Position all four olive leaves before attaching the flower, then use the narrow cream band to separate the dark center from the plum perimeter. Make and block one test motif before calculating a larger project. Save this 3D rose granny square crochet pattern to Pinterest or share the finished square on Instagram with #GothicRoseGrannySquare. For this exact palette, would you keep the antique-cream border or replace it with muted gold?









