Introduction
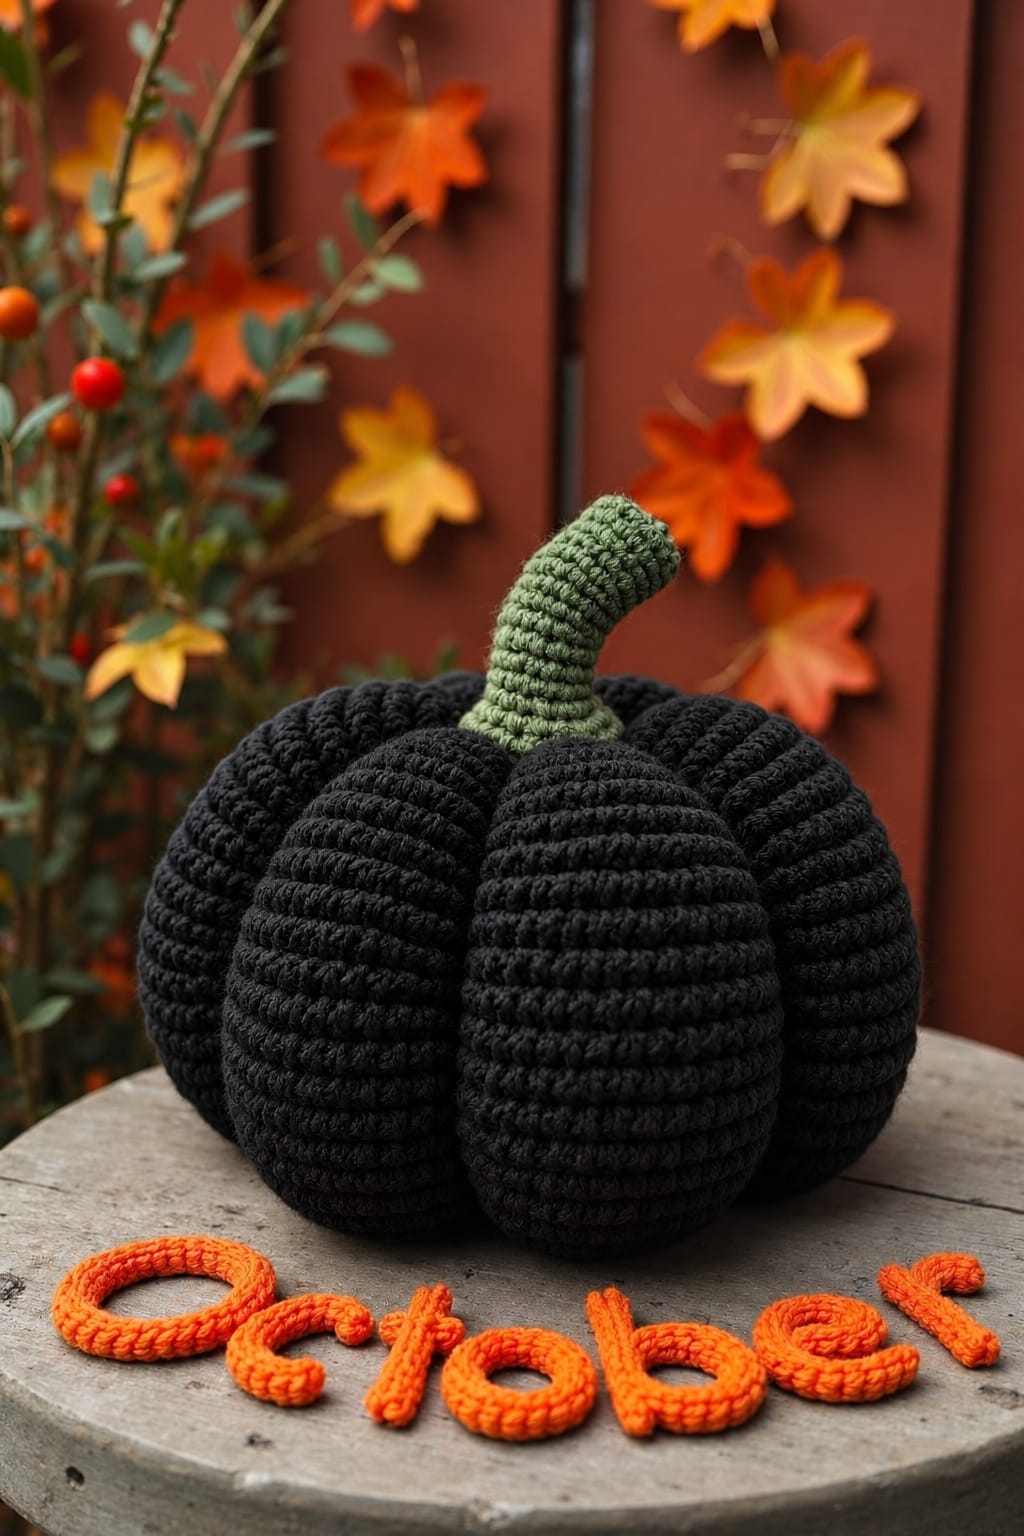
Black yarn hides ordinary shaping, so this pumpkin needs deep ribs to keep its silhouette readable. This black crochet pumpkin pattern creates a large stuffed pumpkin with eight pronounced sections, a curved olive-green stem, and dense horizontal stitch texture. Use worsted or Aran yarn with a 4 mm hook for a target diameter of approximately 20–23 cm. The finished piece is designed as freestanding October and Halloween decor.
The Design: What Makes This Black Pumpkin Different
The reference combines three structural features: a low rounded body, eight deep vertical channels, and a disproportionately long curved stem. Each decision affects the finished silhouette. The broad body prevents the pumpkin from becoming spherical, while external sculpting compresses the surface into clearly separated lobes.
Black yarn creates an additional problem. Shadows between ordinary crochet stitches are difficult to read, so a ribbed crochet pumpkin needs stronger physical relief than a lighter-colored version. The shaping strands therefore pass repeatedly through the center and around the exterior.
The olive stem provides the only color contrast and remains narrow enough to expose the recessed crown. A common mistake with a Halloween crochet pumpkin is overstuffing. Excess fiberfill prevents the sculpting strands from sinking into the body, leaving a black sphere with shallow lines instead of defined pumpkin segments.
Project Info at a Glance
| Skill Level | Estimated Time | Finished Size | Hook | Best For |
|---|---|---|---|---|
| Intermediate | 4–6 hours | Approx. 20–23 cm wide | 4 mm | Halloween displays, shelves, tables, autumn decor |
The dimensions above are a photograph-based target rather than a measurement taken from the physical object. Yarn thickness, stuffing density, hook size, and sculpting tension can change the finished diameter substantially.
Materials and Tools
Yarn
- Black — worsted/Aran weight — approximately 180–230 g
- Olive green — worsted/Aran weight — approximately 20–30 g
- Black shaping yarn — reserve approximately 8–10 m from the main yarn
A firm cotton, cotton-acrylic blend, or tightly spun acrylic gives the ribs clearer edges than a heavily fuzzy yarn. The shaping strand should match the body color so it disappears into the grooves.
Tools
- 4 mm crochet hook
- Polyester fiberfill
- Long tapestry or doll needle
- Locking stitch marker
- Scissors
- Eight temporary stitch markers — useful for ridge placement
No safety eyes are required. The photographed pumpkin has no facial features, leaves, vines, or other attached decorations.
Abbreviations
- MR — magic ring
- sc — single crochet
- inc — two single crochets in one stitch
- dec — invisible decrease
- sl st — slip stitch
- ch — chain
- BLO — back loop only
- st/sts — stitch/stitches
An invisible decrease is worked through the front loops of the next two stitches before completing one single crochet; this reduces the horizontal bump produced by a conventional decrease.
Pattern — Step by Step
Use US crochet terminology. Work the pumpkin body in a continuous spiral and move the stitch marker after every round.
Black Pumpkin Body
Yarn: black.
R1: 6 sc in MR (6)
R2: inc ×6 (12)
R3: (1 sc, inc) ×6 (18)
R4: (2 sc, inc) ×6 (24)
R5: (3 sc, inc) ×6 (30)
R6: (4 sc, inc) ×6 (36)
R7: (5 sc, inc) ×6 (42)
The 42-stitch plateau creates a large pumpkin body. Check the diameter before continuing because heavier Aran yarn may already produce a wider base than the target.
R8: sc around (42)
R9: sc around (42)
R10: sc around (42)
R11: sc around (42)
R12: sc around (42)
R13: sc around (42)
R14: sc around (42)
R15: sc around (42)
R16: sc around (42)
The center should remain relatively broad. Do not add extra straight rounds unless a taller pumpkin is specifically required.
R17: (5 sc, dec) ×6 (36)
R18: (4 sc, dec) ×6 (30)
R19: (3 sc, dec) ×6 (24)
Begin stuffing. Place small pieces of fiberfill against the outer wall first rather than packing one large piece into the center.
R20: (2 sc, dec) ×6 (18)
Add more stuffing. Keep the circumference firm while leaving the vertical center slightly compressible.
R21: (1 sc, dec) ×6 (12)
Finish stuffing before the opening becomes smaller.
R22: dec ×6 (6)
Fasten off, leaving a 25 cm tail. Thread the tail through the front loops of the remaining six stitches and close the opening.
Shaping the Eight Pumpkin Ribs
The deep channels visible in the reference are stronger than ordinary crochet shaping can produce. Sculpt the stuffed body after closing it.
Cut approximately 120–150 cm of black yarn and thread it through a long tapestry needle.
Insert the needle through the top center and bring it out through the bottom center.
Carry the yarn vertically around the outside of the pumpkin and insert the needle into the top center again.
Pass through the body and exit at the bottom.
Pull until the external strand sinks approximately 8–12 mm into the stuffed surface.
This forms the first groove.
Create the second groove directly opposite the first.
Add two more grooves at approximately 90-degree angles, dividing the pumpkin into four sections.
Place another shaping strand midway between each existing groove.
The completed pumpkin now has eight segments.
Inspect the pumpkin from directly above before tightening the strands fully. Adjust any section that is substantially wider or narrower than its neighbors.
Creating the Recessed Pumpkin Crown
The stem in the reference emerges from a visibly lowered center rather than sitting on top of a round sphere.
After completing the eight ribs, pass the shaping yarn through the vertical center again.
Pull the top and bottom toward one another by approximately 1–2 cm.
Secure the shaping strand inside one of the black grooves.
This compression makes the pumpkin wider relative to its height and creates the recessed area required for the green stem.
Do not continue pulling after the lobes begin flattening. The body should retain rounded sections between the channels.
Curved Green Stem
Yarn: olive green.
The photographed stem is long, narrow, and curved toward one side.
R1: 6 sc in MR (6)
R2: sc around in BLO (6)
R3: sc around (6)
R4: sc around (6)
R5: sc around (6)
R6: sc around (6)
R7: sc around (6)
R8: sc around (6)
R9: 2 sl st, 4 sc (6)
R10: 2 sl st, 4 sc (6)
R11: sc around (6)
R12: 2 sl st, 4 sc (6)
R13: sc around (6)
Using shorter slip stitches repeatedly on one side causes the stem to bend gradually rather than making a sharp angle.
Fasten off, leaving approximately 35 cm for attachment.
Do not stuff the stem firmly. Insert only a thin strand of fiberfill if the yarn is too soft to hold its shape.
Stem Base
Yarn: olive green.
The reference includes a small green transition at the base of the stem.
R1: 6 sc in MR (6)
R2: inc ×6 (12)
Fasten off, leaving a 25 cm sewing tail.
Place this small disc beneath the stem. It covers the central black closure and gives the narrow stem a broader attachment point.
Optional Surface Texture
The photographed black lobes show strong horizontal ridges. A standard single-crochet body will create a subtler texture.
For more pronounced horizontal lines, work selected straight rounds in BLO. For example, work R9, R11, R13, and R15 through the back loops only.
The unused front loops create raised horizontal lines around the body.
Do not work every round in BLO unless a heavily ridged surface is desired. Too many raised lines can compete visually with the eight vertical pumpkin grooves.
Assembly
- Place the stuffed black pumpkin on a flat surface and identify the exact top and bottom centers.
- Create the first black shaping groove from top to bottom and pull only until the strand begins to indent the surface.
- Add the opposite groove, then two perpendicular grooves to establish four equal sections.
- Add four additional grooves between the first four, producing eight approximately equal lobes.
- Compress the top and bottom centers by 1–2 cm to create the broad, low pumpkin profile.
- Position the 12-stitch green stem-base disc over the recessed crown and secure it around its outer edge.
- Center the narrow curved stem on the green base with the bend pointing slightly away from the front.
- Sew through all six stem-base stitches and several black body stitches so the stem cannot pivot at one attachment point.
- Adjust the stuffing inside each lobe with your fingers until the eight sections remain rounded and comparable in width.
- Set the pumpkin upright and check that the bottom remains stable before weaving all remaining tails through at least 5 cm of matching stitches.
The completed pumpkin should have eight deep black lobes, a compressed crown, a stable lower surface, and one long curved olive-green stem.
7 Technical Tips
- Black stitches become difficult to count: Move a bright locking marker after every round. A one-stitch error during the 42-stitch plateau shifts the later decrease sequence and can make one side visibly fuller.
- The pumpkin looks like a ball: Compress the top and bottom centers by approximately 1–2 cm after sculpting. Without vertical compression, the eight grooves alone may not create the broad silhouette shown in the reference.
- Ridges remain shallow: Leave enough central flexibility for each shaping strand to sink roughly 8–12 mm into the surface. Excessive stuffing blocks the yarn from forming deep channels.
- One segment becomes too narrow: Establish all eight grooves with moderate tension before tightening any one strand completely. A fully tightened first groove can steal width from the final section.
- Stem remains completely straight: Replace two single crochets with two slip stitches on the same side during selected rounds. The shorter stitches contract one edge and create the controlled curve.
- Stem falls sideways: Sew around the complete six-stitch base and through the 12-stitch green support disc. Attaching only two opposite points creates a hinge under the tall stem.
- Stuffing becomes visible through black stitches: Move down 0.5 mm in hook size before continuing the body. White fiberfill is particularly noticeable through gaps in black crochet fabric.
How to Make Deep Pumpkin Grooves
The shaping process works by redistributing the stuffing rather than merely placing decorative yarn on the surface.
Keep the center of the body slightly softer than the outer circumference. When the shaping needle passes through that center, the yarn can compress the pumpkin vertically and radially.
Start with four grooves arranged like a cross when viewed from above. Add another groove halfway between each pair.
This sequence is more accurate than attempting to judge all eight positions individually from the beginning.
Once every groove is present, tighten opposite sections in pairs. Pull one groove slightly, rotate the pumpkin 180 degrees, and tighten the opposite strand by a comparable amount.
Continue around the body until all eight channels have similar depth.
Why Black Yarn Changes the Pattern
Black yarn absorbs much of the visible shadow that normally separates crochet stitches. Fine texture can therefore disappear from a moderate viewing distance.
Large-scale shaping compensates for that problem. Deep grooves create physical changes in the pumpkin silhouette rather than depending only on visible stitch detail.
Lighting also matters while crocheting. Work with directional light and use a pale surface beneath the project when counting black stitches.
Bright locking markers are useful during the increase and decrease rounds. Dark markers can disappear against the fabric and make the beginning of a spiral difficult to locate.
A smooth black yarn produces clearer ridges than heavily fuzzy fibers. If matching the photograph is the priority, choose stitch definition over halo.
Choosing Yarn for the Black Pumpkin
Worsted or Aran yarn produces a structured decorative pumpkin without the extreme scale of super-bulky yarn.
A cotton blend gives the body firm lobes and keeps the stem comparatively rigid. Acrylic reduces weight and may make a large decorative pumpkin easier to store.
If the yarn is particularly thin for its category, hold two strands together and increase the hook size after making a swatch. Do not automatically follow the 4 mm recommendation when doubling yarn.
The green stem should have similar firmness to the body. A very soft green yarn can collapse even when the black pumpkin itself remains stable.
For the photographed palette, choose olive, moss, or muted sage rather than a bright lime green.
Making a Smaller Black Pumpkin
For a smaller version, stop the increase sequence at 30 stitches.
R1: 6 sc in MR (6)
R2: inc ×6 (12)
R3: (1 sc, inc) ×6 (18)
R4: (2 sc, inc) ×6 (24)
R5: (3 sc, inc) ×6 (30)
R6–R11: sc around (30)
R12: (3 sc, dec) ×6 (24)
R13: (2 sc, dec) ×6 (18)
R14: (1 sc, dec) ×6 (12)
R15: dec ×6 (6)
Stuff before the final two rounds.
Use six external grooves for a compact pumpkin or retain eight if the yarn is fine enough to support narrower lobes.
Shorten the green stem by approximately three rounds so its proportions remain consistent with the smaller body.
Making a Larger Black Pumpkin
For a larger centerpiece, increase beyond the 42-stitch round.
Next Increase Round: (6 sc, inc) ×6 (48)
Next Increase Round: (7 sc, inc) ×6 (54)
Work the center without increases until the body reaches the required height, then reverse the shaping in six-stitch increments.
From 54 stitches, decrease to 48, 42, 36, 30, 24, 18, 12, and finally 6.
Larger pumpkins require substantially more stuffing and longer sculpting strands. Cut the shaping yarn generously rather than joining another strand halfway through one groove.
Maintain eight segments unless the diameter becomes large enough to support ten or twelve evenly spaced lobes.
How Firmly Should the Pumpkin Be Stuffed?
The outer surface should resist light finger pressure, but the center must remain compressible.
Add fiberfill in small pieces. Push each piece toward the sides rather than packing the center first.
Check the fabric frequently. If white stuffing becomes visible between black stitches, the problem may be excessive stuffing rather than insufficient crochet tension.
Before closing R22, press one finger into the top center. It should sink slightly without leaving a permanent hollow.
That flexibility gives the sculpting yarn enough room to create the recessed crown and deep exterior channels.
How to Keep the Pumpkin Standing Upright
The lower center must remain flatter than the surrounding lobes. A completely spherical base makes the pumpkin roll toward its heaviest segment.
During stuffing, place less fiberfill directly against the bottom center. Concentrate more around the lower outer circumference.
After sculpting, set the pumpkin down before securing the final shaping knot.
If it leans, massage the stuffing toward the opposite side and slightly flatten the bottom with your palm.
The tall green stem adds weight above the center, so a stable base matters more here than it would on a pumpkin with a short stalk.
Creating the Curved Stem
The stem should bend gradually. Folding a straight stuffed tube after construction produces a sharp crease rather than the organic curve visible in the reference.
Short stitches create the bend during crochet.
Work two slip stitches on the same side in selected rounds while maintaining single crochet on the opposite side. Because slip stitches have less height, that side contracts.
Repeat the asymmetry every few rounds instead of in every round. Too many consecutive slip-stitch sections can fold the stem almost horizontally.
Before attachment, rotate the finished stem and choose the side that displays the curve most clearly from the intended front of the pumpkin.
Using the Pumpkin for October Decor
The black-and-green palette gives the pumpkin a stronger Halloween association than a conventional orange version while keeping the object recognizable without facial features.
For a grouped arrangement, make one 42-stitch pumpkin, one 36-stitch version, and one 30-stitch version. Keep the same black yarn across all three so the stitch scale remains consistent.
Green stems can vary slightly in length and curvature. That variation changes the silhouette without requiring additional accessories.
Place the finished pumpkins on stable indoor surfaces. The fiberfill construction is decorative and should remain away from candles, fireplaces, hot bulbs, and other heat sources.
Conclusion
The black body needs deeper sculpting than a light-colored pumpkin because much of the ordinary stitch definition disappears into the dark surface. Build the body to 42 stitches, keep the central stuffing slightly flexible, and establish all eight grooves before tightening them to full depth. The curved olive stem should be attached through its complete base so its height does not pull it sideways. Make one pumpkin first and record the finished diameter before resizing a coordinated set. Save this black crochet pumpkin pattern to Pinterest or share the finished October display on Instagram with #BlackCrochetPumpkin. For this design, would you keep the olive stem or switch it to dark brown?









