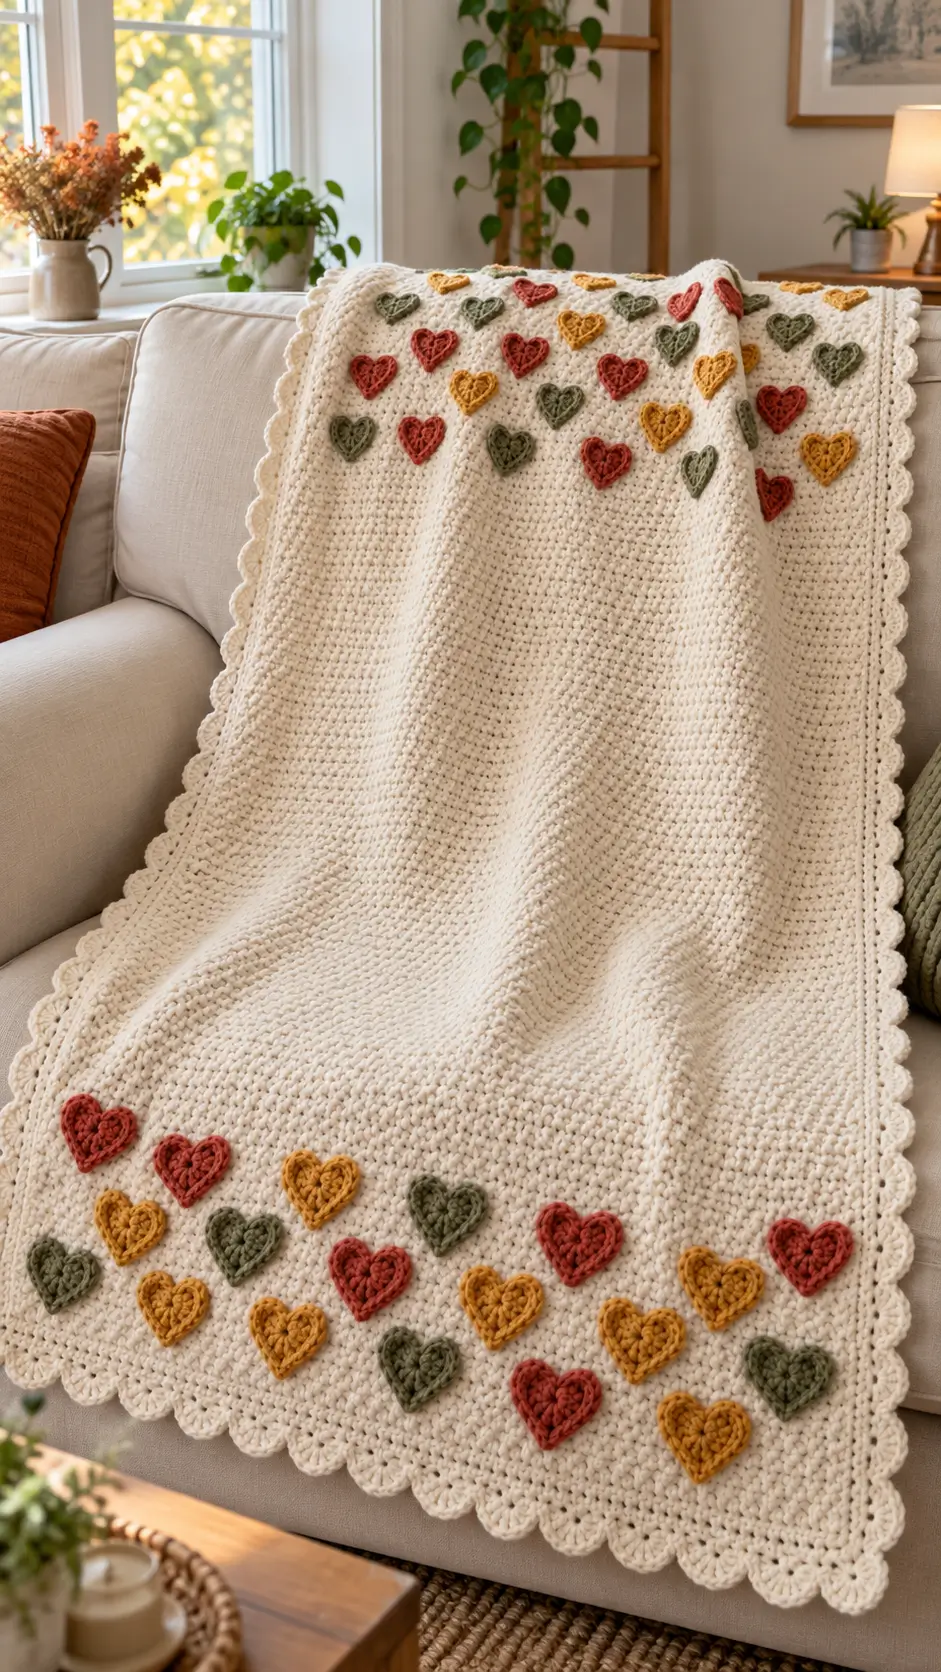
A heart needs two clean upper lobes and one centered point; this blanket repeats that geometry without turning the entire fabric into a heart stitch. This crochet heart blanket pattern uses worsted yarn, a 5 mm hook and separate rust, mustard and olive appliqués over a cream base. The construction suits an advanced beginner. Make it at throw scale when you need a decorative blanket with a largely uninterrupted center.
The Design: What Makes This Heart Blanket Different
The photographed blanket separates decoration from structure. Instead of changing color throughout hundreds of blanket stitches, the maker builds a neutral rectangular field and adds hearts afterward. That decision keeps the center visually open and lets each appliqué be positioned before sewing.
A second structural choice is the uneven heart distribution. Most motifs occupy bands near the short ends rather than forming a rigid all-over grid. This gives the heart appliqué crochet blanket its defining layout. Finally, the cream scalloped border repeats the rounded upper profile of the hearts without adding another accent color.
A common mistake in a colorful heart crochet blanket is attaching every motif immediately after crocheting it. Pin the entire arrangement first. Small differences in spacing become conspicuous once several rows of hearts are installed.
Project Info at a Glance
| Skill Level | Time | Finished Size | Hook | Best For |
|---|---|---|---|---|
| Advanced beginner | 20–30 hours | Custom throw; approx. 119 × 152 cm | 5 mm | Sofa throw / decorative blanket |
The finished dimensions can be adjusted to suit the intended sofa, chair or bed. A 5 mm hook with category 4 yarn provides a practical starting combination for this construction.
Materials and Tools
Yarn
Use category 4 yarn throughout so the blanket base and appliqués have compatible stitch density.
- Cream/ivory — worsted/category 4 — approximately 700–1,000 g for a throw-sized base.
- Rust/terracotta — worsted/category 4 — approximately 50–100 g for heart appliqués.
- Mustard/ochre — worsted/category 4 — approximately 50–100 g.
- Olive/sage — worsted/category 4 — approximately 50–100 g.
Yarn consumption depends on gauge, stitch density and finished dimensions. Purchase extra cream yarn when enlarging the blanket because the border also uses the main color.
Tools
- 5 mm crochet hook
- Tapestry needle
- Locking stitch markers
- Scissors
- Tape measure
- Blocking pins
- Washable blocking surface
Abbreviations
- ch — chain
- sc — single crochet
- hdc — half double crochet
- dc — double crochet
- sl st — slip stitch
- st/sts — stitch/stitches
- sp — space
- RS — right side
- WS — wrong side
- rep — repeat
An invisible decrease is an amigurumi shaping method and is not required for this flat blanket construction.
Crochet Heart Blanket Pattern — Step by Step
This is a photo-inspired construction. Make a gauge swatch with your selected yarn before committing to the full foundation length.
Blanket Body
Yarn: cream — worsted/category 4.
For a practical throw, target approximately 100–120 cm wide and 140–155 cm long. Adjust the foundation chain according to your measured gauge.
Foundation: Chain until the unstretched foundation measures the intended blanket width.
Row 1: Hdc in 2nd ch from hook and in each ch across. Ch 1, turn.
Row 2: Hdc in each st across. Ch 1, turn.
Rows 3 onward: Repeat Row 2 until the rectangle reaches the required length.
Measure the width after several rows. Two category 4 yarns can produce different measurements even when worked with the same hook.
Continue without increases or decreases. Count periodically across the row to catch missing edge stitches before they create tapered sides.
Fasten off after completing the final row.
Border Foundation
Yarn: cream.
Join the cream yarn at any corner.
Round 1: Ch 1. Sc evenly around the complete perimeter, placing 3 sc in each corner. When working along row ends, distribute the stitches consistently so the fabric remains flat. Join with sl st.
Round 2: Ch 1. Sc in each st around, placing 3 sc in each corner. Join with sl st.
The two plain rounds stabilize the rectangle before the decorative shells are added. Lay the blanket flat after Round 2. Rippling indicates excess stitches, while an edge that pulls inward indicates too few.
Scalloped Crochet Border
Yarn: cream.
Round 3: Sl st to a suitable starting stitch. Skip 1 st, work 5 dc in next st, skip 1 st, sl st in next st.
Repeat the sequence around the blanket.
Adjust the spacing by one stitch near a corner when required so a shell sits neatly around each corner rather than forcing the exact repeat into an incompatible stitch count.
Round 4 — optional: Work loose sl sts around the edge when a slightly firmer outer finish is required.
Fasten off and weave the yarn tail through several direction changes on the wrong side.
Small Crochet Heart Appliqué
Make multiple hearts using rust, mustard and olive yarn.
Round 1: Make a magic ring. Ch 2, 3 dc, 3 hdc, ch 1, dc, ch 1, 3 hdc, 3 dc, ch 2, sl st into the magic ring.
Pull the ring closed firmly.
The central dc creates the lower point, while the groups of taller stitches form the two rounded lobes.
Fasten off. Leave approximately 25 cm of yarn for sewing the heart to the blanket.
Medium Crochet Heart Appliqué
Use the same three accent colors.
Round 1: Ch 4. Work 11 dc into the 4th ch from the hook. Join with sl st.
Round 2: Ch 2, 2 dc in each of the next 2 sts, hdc in each of the next 2 sts, sc in next st, work (hdc, dc, hdc) in next st to form the lower point, sc in next st, hdc in each of the next 2 sts, 2 dc in each of the next 2 sts. Join and form the upper indentation with a tight sl st.
Fasten off with a 25 cm sewing tail.
Block the motif before attaching it. Align the lower point with the center indentation and set both upper lobes to approximately equal dimensions.
Rust Heart Appliqués
Yarn: rust/terracotta.
Make approximately one-third of the total heart motifs in rust. The photographed layout distributes the rust hearts between the other colors rather than collecting them into a single block.
Do not cut off the sewing tails after completing the hearts. Those tails can be used to attach each motif with fewer knots on the back of the blanket.
Mustard Heart Appliqués
Yarn: mustard/ochre.
Make approximately one-third of the total hearts in mustard. Alternate them between the rust and olive motifs rather than forming obvious vertical columns.
Leave approximately 25 cm of yarn after each motif for sewing.
Olive Heart Appliqués
Yarn: olive/sage.
Make the remaining third of the motifs in olive. Use the green hearts to separate neighboring warm-colored motifs where the rust and mustard would otherwise dominate one section.
Fasten off each heart with a long sewing tail.
Planning the Top Heart Band
Lay the finished blanket completely flat with the right side facing upward.
Place the first band of hearts approximately 8–12 cm from the scalloped edge. Stagger the next motifs rather than positioning every heart on the same horizontal line.
Maintain approximately 2–4 cm between neighboring appliqué edges. Check spacing from the lower points as well as from the upper lobes.
Pin every heart into position before sewing the first one.
Planning the Bottom Heart Band
Repeat the layout process at the opposite short end of the blanket. Do not create an exact mirror image of the first arrangement.
The photographed blanket uses irregular placement, with the hearts concentrated toward the two ends and a large undecorated section through the middle.
Stand back from the complete pinned layout before attaching anything. An unintended diagonal line or oversized gap is much easier to correct while the motifs are still pinned.
Attaching the Crochet Hearts
Thread the 25 cm tail of the first heart onto a tapestry needle.
Bring the needle through the blanket immediately beside the outer edge of the motif. Catch the underside or back loop of the heart’s edge and return the needle through the blanket.
Continue around the complete perimeter using small, evenly spaced stitches.
Keep the sewing yarn flat. Pulling the thread too tightly compresses the blanket beneath the heart and produces visible puckering.
On the wrong side, weave the tail through approximately 5 cm of neighboring stitches. Change direction and weave another 3–5 cm before trimming.
Repeat for every appliqué.
Assembly
- Block the cream blanket body to its intended rectangular measurements before attaching any decoration.
- Add the plain cream border rounds and check the rectangle for cupping or rippling.
- Crochet the scalloped outer border and lay the complete blanket flat again.
- Make all rust, mustard and olive heart appliqués before sewing any individual motif.
- Block the hearts so the lower point follows a clear centerline and both upper lobes have similar dimensions.
- Pin the first heart group near one short edge, maintaining approximately 2–4 cm between neighboring appliqués.
- Arrange the second group near the opposite short edge while keeping the central section largely undecorated.
- Check the complete arrangement for accidental rows, excessive gaps and color clusters before sewing.
- Sew each heart around its perimeter without pulling tightly enough to pucker the cream blanket.
- Weave every yarn tail into the wrong side, remove the pins and measure the finished blanket.
The finished construction consists of one neutral rectangular field, three colors of flat crochet hearts and a continuous cream scalloped border.
7 Technical Tips for a Cleaner Heart Blanket
- Mark long border counts. Place a stitch marker every 25 stitches while establishing the border. A repeated counting error can move a corner shell several centimeters from its intended position.
- Correct border ruffling immediately. Waves along an otherwise flat edge indicate too many border stitches or shells. Remove the affected section rather than attempting to correct a structural excess during blocking.
- Control appliqué sewing tension. Puckering around a finished heart means its sewing thread is restricting the blanket beneath it. Attachment stitches should hold the motif flat without compressing the base fabric.
- Measure heart symmetry. Compare the distance from the center indentation to each outside lobe before sewing. A difference greater than approximately 5 mm becomes noticeable when multiple motifs are placed together.
- Pin the complete arrangement. A spacing error of only 2 cm repeated across five motifs can shift the final heart by 10 cm. Finish the entire layout before attaching the first piece.
- Check every corner shell. A corner that cups upward needs a spacing adjustment in the border repeat. Do not force a poorly positioned shell flat by stretching the finished corner.
- Weave tails in two directions. Carry each attachment tail approximately 5 cm through the wrong side, reverse direction, then travel another 3–5 cm. Short tails woven through only a few stitches are more likely to loosen during washing.
Adjusting the Blanket Size
The rectangular construction makes the dimensions easy to modify. Instead of copying a foundation-chain number from a different yarn, crochet a gauge swatch first.
Measure how many stitches fit within 10 cm. Multiply that figure by the required blanket width in centimeters and divide by 10. Use the result as the approximate working stitch count, then account for the turning chain used by the selected stitch.
For length, continue the main body rows until the rectangle reaches the target measurement. Remember that the border adds additional width and length.
If you increase the blanket substantially, increase the number of hearts as well. Keeping the original number on a much wider throw produces oversized empty gaps between motifs.
Choosing the Heart Placement
The layout is as important as the individual motif construction. The source image avoids an all-over repeat. Hearts appear primarily near the short ends, leaving a broad cream section through the center.
Start with the largest or darkest motifs. Place them across both decorated zones, then use mustard and smaller hearts to fill the remaining spaces.
Avoid making every gap identical. Controlled variation produces the scattered arrangement visible in the photographed blanket, while consistent margins around the outer edges keep that irregularity from looking accidental.
Before sewing, take a photograph directly above the blanket. A photograph makes uneven color clusters and unintended lines easier to detect than viewing the large piece from close range.
Blocking and Finishing
Check the yarn label before washing or steaming because fiber content determines the appropriate blocking method.
For wet blocking, shape the blanket to the required dimensions on a suitable surface. Measure both long sides, both short sides and both diagonals.
The two diagonals should be close to equal. A significant difference indicates that the rectangle has skewed.
Shape the scallops individually while the border is damp. Keep their depth consistent around the perimeter instead of stretching individual shells farther than their neighbors.
Allow the blanket to dry completely in position before removing the pins.
Conclusion
Finish the blanket by measuring both diagonals; matching diagonals confirm that the rectangular base has not skewed significantly during edging or appliqué attachment. Next, record the final dimensions, yarn quantity and number of hearts so a second crochet heart blanket pattern can be reproduced without recalculating the layout. Photograph the full blanket flat before folding it for Pinterest, then share a closer image on Instagram with #ColorFieldHeartBlanket so the appliqué spacing remains visible. For another version, change one design variable at a time: would you keep the photographed rust, mustard and olive palette, or replace one of those three heart colors while retaining the cream field?









