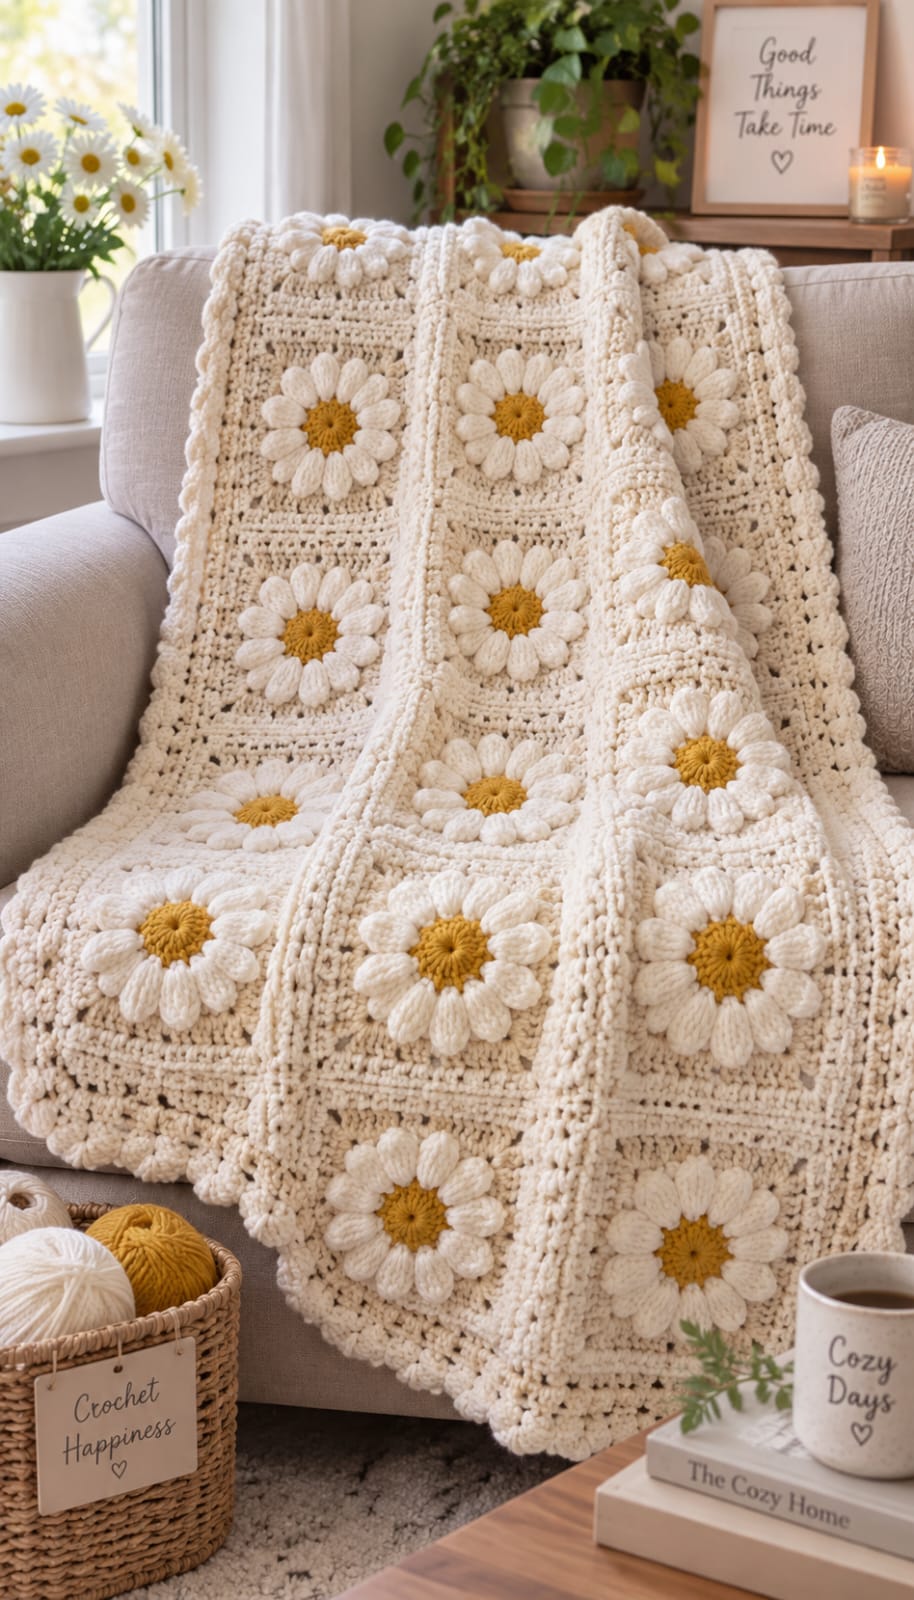
Twelve raised cream petals around each mustard center have to remain distinct even though the flower and square background use nearly the same color. This raised daisy granny square blanket crochet pattern solves that problem with dimensional petal clusters, structured cream background rounds, raised joining seams, and a substantial textured border. Using worsted or Aran yarn with a 5.0 mm hook, the image-inspired finished throw measures approximately 110 × 150 cm.
What Makes This Daisy Blanket Different
Color is deliberately restrained. Mustard appears only in the flower centers, while cream covers the petals, square backgrounds, joining seams, and border. Because those surrounding areas share one color family, stitch height and relief have to separate the flower from the square.
The second defining feature is scale. These are not small flat daisies surrounded by several contrasting granny rounds. Each 3D daisy crochet blanket motif uses approximately 12 substantial petals and expands to about 17 cm after blocking. A raised seam then outlines every motif.
The border repeats that dimensional treatment with several structural rounds followed by bobble or scallop details. One frequent problem with a textured granny square blanket is aggressive blocking. Flattening the petal clusters removes the depth that distinguishes the flower from its cream background.
Project Information
| Skill Level | Construction | Finished Size | Motif Size | Hook |
|---|---|---|---|---|
| Intermediate | 48 modular flower squares | Approx. 110 × 145–150 cm | Approx. 17 cm | 5.0 mm; optional 5.5 mm for joining |
The suggested layout is 6 squares across × 8 squares long, giving 48 motifs. Finished dimensions depend on yarn thickness, cluster height, joining method, and border width, so measurements should be calculated from a blocked test square.
Materials and Tools
Yarn
- Warm ivory or cream — worsted/Aran yarn — main color for petals, square backgrounds, joining, and border.
- Mustard gold — matching worsted/Aran yarn — flower centers.
- Estimated total yarn — approximately 2,400–3,000 g for the image-inspired throw, depending on yarn density and final dimensions.
Cream requires the large majority of the yarn. Make and weigh one complete blocked motif before purchasing the full quantity because thick petal clusters consume considerably more yarn than flat flower stitches.
Tools
- 5.0 mm crochet hook
- Optional 5.5 mm crochet hook for joining and border rounds
- Tapestry needle
- Scissors
- Locking stitch markers
- Blocking mats
- Rust-resistant blocking pins
- Tape measure
Abbreviations
- MR — magic ring
- ch — chain
- sc — single crochet
- hdc — half double crochet
- dc — double crochet
- tr — treble crochet
- sl st — slip stitch
- st/sts — stitch/stitches
- sp — space
- ch-sp — chain space
- tr4tog — four treble crochets closed together
- FPsc — front post single crochet
A cluster is completed by leaving the final loop of each partial stitch on the hook, then pulling the working yarn through all remaining loops together.
Raised Daisy Granny Square Pattern
Make 48 squares for the suggested 6 × 8 throw. The flower begins in mustard. Twelve cream petals are added next, followed by cream rounds that convert the circular flower into a square.
Mustard Daisy Center
Use mustard-gold yarn and the 5.0 mm hook.
Round 1: Make an MR. Ch 3 and work 11 dc into the ring. Join with sl st to the top of the beginning ch-3. (12 dc)
Pull the magic ring firmly closed.
Round 2: Ch 3, dc in the same stitch, then work 2 dc in each stitch around. Join with sl st. (24 dc)
Fasten off mustard yarn and weave the tail through several matching stitches.
Raised Cream Petals
Change to warm ivory or cream.
The goal is 12 substantial petals. Each petal uses two center stitches, so the 24-stitch mustard center divides evenly into 12 positions.
Petal Round
Join cream yarn in any mustard stitch.
Petal 1: Ch 3. Work tr4tog across the current stitch and the next stitch, distributing the partial trebles evenly between those two stitches. Ch 3. Sl st at the base of the cluster.
Move to the next pair of mustard stitches.
Repeat the same petal construction around.
Total: 12 cream petals.
Join at the base of the first petal.
Do not pull the clusters flat. The petals should project above the mustard center and later cream background.
Fuller Petal Option
The photographed flowers have broad, padded-looking petals. A fuller version can be made by increasing each cluster from four partial trebles to five.
For each petal, work tr5tog across its two assigned center stitches.
Close all loops together, ch 3, and anchor the petal at its base.
Test one flower before making all 48 motifs. Larger clusters increase the finished diameter and yarn requirement.
Preparing the Flower for Squaring
Lay the flower on a flat surface and count the petals.
There must be exactly 12 petals.
Divide them into four groups of three.
Place a stitch marker after petals 3, 6, 9, and 12.
Those four positions become the square corners.
This three-petals-per-side relationship is the main geometry behind the motif. Changing the petal count without recalculating the corners will distort the square.
First Cream Background Round
Continue with cream yarn.
Work behind the raised petals so the background sits beneath the flower rather than covering it.
Join cream yarn in the space immediately after one marked group of three petals.
At the first corner position work:
(3 dc, ch 2, 3 dc)
Work 3 dc into the next available space behind the petals.
Work another 3 dc into the following available space.
At the next marked corner work:
(3 dc, ch 2, 3 dc)
Repeat around all four sides.
Join with sl st.
Check that each side contains the same number of groups before continuing.
Second Cream Square Round
Sl st to the first corner space.
Work:
(3 dc, ch 2, 3 dc)
into the corner.
Work 3 dc into each available side space.
At every subsequent corner work:
(3 dc, ch 2, 3 dc)
Repeat around the complete motif and join with sl st.
The square should now have four recognizable sides while the flower remains raised in the center.
Third Cream Square Round
Continue in cream.
At each corner work:
(3 dc, ch 2, 3 dc)
Work 3 dc into each space across every side.
Join with sl st.
Measure the motif without stretching it.
If the square is approaching 15–16 cm, continue to the dense finishing round. If it remains substantially smaller, add another expansion round using the same corner construction.
Dense Motif Finishing Round
Ch 1.
Work one sc into every stitch across the first side.
At the corner ch-2 space work:
(sc, ch 2, sc)
Continue around all four sides.
Join with sl st.
Fasten off, leaving approximately 20 cm of yarn for weaving.
The finished unblocked motif should be close to the required size and should lie reasonably flat around the raised flower.
Making 48 Matching Daisy Squares
Use the first completed motif as a gauge sample.
Block it to approximately 17 × 17 cm.
Record its finished weight.
Measure the mustard center diameter, the flower diameter, and the complete square.
Use those measurements as quality-control points while making the remaining motifs.
Complete all 48 centers first if batch working is preferred. Follow with all petal rounds, then all cream background rounds. This method reduces repeated color changes between individual squares.
Keeping All 12 Petals Consistent
The petals should remain similar in width and height around every flower.
Keep the tr4tog loops at a consistent height. One unusually loose partial treble can make a single petal extend several millimeters beyond its neighbors.
After completing each flower, count 12 petals before starting the background.
Check the flower from directly above. Every petal should radiate outward from the mustard center rather than twisting sideways.
If one petal folds beneath another, correct it before adding the cream square rounds.
Blocking the Individual Squares
Block every motif before joining.
Place one square on a blocking mat and pin the four corners to approximately 17 × 17 cm.
Measure both diagonals. They should be nearly equal.
Add pins along the cream edges where required.
Do not pin through the center of the raised petals.
The square background should become flat while the flower retains its dimensional surface.
Allow each motif to dry completely before removing it from the mat.
Blanket Layout
Arrange the blocked squares in 6 columns × 8 rows.
This uses 48 motifs.
At approximately 17 cm per motif, the unjoined arrangement measures close to 102 × 136 cm.
Joining and the substantial outer border increase those dimensions.
Place all squares with their beginning and ending points oriented consistently. This makes small variations in the cream rounds less noticeable across the completed blanket.
Raised Cream Joining Method
The reference blanket has visible cream lines separating the motifs. A raised single-crochet join produces a similar structural grid.
Place two squares with wrong sides together.
Using cream yarn and the 5.0 or 5.5 mm hook, join through corresponding outer stitches.
Work one sc through both squares at each matched position.
Continue from corner to corner.
Join all horizontal pairs first.
Then work the vertical seams across the blanket.
Keep the joining tension slightly relaxed so the seams do not shorten the square edges.
Alternative Flat Join
For a less pronounced grid, place two motifs with right sides together.
Slip stitch through the corresponding back loops.
Continue evenly across the side.
Open the joined squares and check that the seam lies flat.
The flat method uses less yarn and produces a softer surface, but it does not reproduce the raised framework visible in the image as closely as the single-crochet join.
Joining the Complete Blanket
Begin by joining the six squares in each row.
Make eight completed horizontal strips.
Lay the strips in their planned order.
Join strip 1 to strip 2 along the complete width.
Continue until all eight rows form one blanket panel.
At every four-square intersection, check that the corners meet without an open hole.
If the seam is too tight, change to the 5.5 mm hook for joining rather than stretching the motif edges.
Preparing the Blanket Border
Before starting the decorative border, work one structural round around the complete blanket.
Join cream yarn at any corner.
Work sc evenly along each edge.
Place approximately one sc for every established edge stitch or equivalent row end.
At each corner work:
(sc, ch 2, sc)
Join with sl st.
Count the stitches on opposite sides. Matching counts make later openwork and bobble rounds easier to distribute.
Border Round 2
Ch 2.
Work hdc in each stitch around.
At every corner ch-2 space work:
(2 hdc, ch 2, 2 hdc)
Join with sl st.
This round creates a dense foundation beneath the decorative edge.
Border Round 3: Openwork
Ch 1.
Sc in the first stitch.
Ch 2, skip 1 stitch, sc in the next stitch.
Repeat across the side.
At each corner work:
(sc, ch 3, sc)
Continue around all four sides.
Adjust the final repeat near each corner by skipping zero or two stitches when necessary to keep the pattern centered.
Border Round 4: Filling the Openwork
Sl st into the first ch-2 space.
Work 3 hdc into each ch-2 space around.
At every corner ch-3 space work:
(3 hdc, ch 2, 3 hdc)
Join with sl st.
This round thickens the border while retaining a small amount of open texture.
Bobble Border Round
The outer edge in the reference has repeated raised details. A compact bobble sequence creates that dimensional finish.
Ch 1 and sc in the first stitch.
Work a bobble in the next selected stitch:
Yarn over, insert hook, pull up a loop, yarn over and pull through two loops.
Repeat this partial dc sequence four more times in the same stitch.
Yarn over and pull through all remaining loops.
Ch 1 to close the bobble.
Work 2–3 sc between bobbles.
Repeat around.
At the corners, position one bobble close to each side of the corner rather than forcing a large bobble directly into the turning point.
Optional Scalloped Final Edge
For a softer outer silhouette, add scallops after the bobble round.
Join cream yarn in an appropriate space.
Skip approximately two stitches.
Work 5 dc into the next stitch or space.
Skip approximately two stitches and sl st into the next position.
Repeat around.
Adjust the spacing slightly before each corner so a complete scallop sits symmetrically on both sides.
Fasten off and weave the final tail into the dense border rounds.
Assembly
- Crochet 48 mustard centers, each with the same stitch count and diameter.
- Add exactly 12 raised cream petals to every mustard center.
- Divide each flower into four groups of three petals and mark the four corner positions.
- Add the cream background rounds and expand every motif to the same square construction.
- Finish each motif with a dense cream edge and block all squares to approximately 17 × 17 cm.
- Arrange the motifs in 6 columns × 8 rows with all flowers facing the same direction.
- Join the squares with raised cream seams, completing the horizontal joins before crossing them with vertical seams.
- Work a dense structural round around the complete blanket before beginning decorative border stitches.
- Add the openwork, textured, and bobble border rounds, followed by optional scallops.
- Weave every remaining tail through matching cream stitches, reshape the border, and measure the finished blanket on a flat surface.
The finished throw should present a regular field of raised cream daisies with mustard centers, visible cream seam lines, and a substantial dimensional border.
7 Technical Tips for a Raised Daisy Blanket
- Flowers losing their 12-petal symmetry: Count all 12 petals before starting the cream background. One missing cluster shifts the corner positions and makes the flower appear off-center inside the square.
- Petals disappearing into the background: Keep each cream cluster raised approximately 8–15 mm above the background rather than flattening it during blocking. The flower and background share nearly the same color, so relief supplies the visual separation.
- Squares finishing at different dimensions: Block every motif to approximately 17 cm. Differences greater than about 5 mm accumulate across six motifs and can distort an entire blanket row.
- Raised joins pulling the blanket inward: Compare the seam length with the blocked square edge after joining the first pair. If the seam shortens the edge by more than approximately 5 mm, loosen the tension or move from a 5.0 to 5.5 mm hook.
- Four-square intersections forming holes: Anchor the joining yarn through all corresponding corner positions at each crossing. A gap larger than approximately 1 cm becomes conspicuous against the dense cream construction.
- Bobble border beginning to ripple: Space raised bobbles with approximately 2–3 sc between them. Placing a bobble in every stitch introduces too much fabric around the outer circumference.
- Blanket corners curling after the border: Give every corner enough additional stitches or chain space to turn through 90 degrees. Check each corner after every border round rather than waiting until all decorative rounds are complete.
Controlling the Cream-on-Cream Flower Texture
The flower depends on shadows created by raised stitches because the petals and background use the same cream family.
Petal clusters therefore need more height than the surrounding square stitches. Treble-based clusters provide that difference without requiring a separate petal to be sewn onto each motif.
Keep the background stitches comparatively flat. If the cream square rounds become highly textured, they compete with the petals and reduce the clarity of the daisy silhouette.
The mustard center supplies the focal contrast. A muted gold works particularly well because it remains distinct without covering a large percentage of the blanket.
Keeping the Daisy Centers Consistent
Measure several mustard centers before adding petals.
If the first center is noticeably larger than later centers, check hook tension before continuing.
The 24-stitch outer center round should remain flat. A center that cups upward can push the petals toward the front excessively, while a rippled center makes the flower difficult to square.
Weave the mustard tails before joining the blanket. Access to the center becomes more restricted after the thick cream petals and background rounds are complete.
Managing the Raised Petals During Joining
Keep all petals on the right side of the blanket while motifs are being joined.
Before joining two edges, fold any nearby petals toward the center of their respective squares.
This prevents the hook from catching a petal while working the seam.
After completing each row of joins, return the flowers to their natural position.
Do not sew individual petals to the background unless a particular cluster refuses to remain oriented correctly. Free petals preserve more of the three-dimensional surface.
Changing the Blanket Size
Blanket dimensions can be changed by adding or removing complete motif rows.
With 17 cm squares, a five-square width begins around 85 cm before seams and border. Six squares begin around 102 cm, while seven begin around 119 cm.
For length, seven rows begin around 119 cm, eight rows around 136 cm, and nine rows around 153 cm before border additions.
Use the actual blocked motif measurement for final calculations. A square measuring 16.5 cm instead of 17 cm changes a six-square row by 3 cm before the joining width is considered.
Making a Smaller Daisy Throw
A smaller lap blanket can use a 5 × 6 layout for 30 motifs.
At a 17 cm motif size, the center measures approximately 85 × 102 cm before joining and border rounds.
Use the same flower, joining, and border construction.
Do not reduce the number of petals merely because the blanket is smaller. Changing the number of motifs preserves the established square geometry and keeps the daisies consistent across projects.
Making a Larger Bed Blanket
A larger blanket can use a 7 × 10 or 8 × 10 motif arrangement.
Calculate the required cream yarn from the weight of one finished square plus a separate allowance for joining and border rounds.
A larger blanket places more weight on every seam. Raised sc joins should therefore be worked consistently through matching edge stitches rather than through chain spaces alone.
Lay the project flat after every few completed joining rows to check for diagonal distortion.
Estimating Yarn from a Test Motif
A weighed test square gives a more reliable yarn estimate than a generic blanket total.
Weigh the mustard yarn before making one center and again afterward.
Repeat the process for the cream yarn used in the petals and square background.
Multiply those amounts by 48 for the suggested throw.
Add a separate cream allowance for joining and the wide border, then add approximately 10–15 percent for tails, gauge variation, repairs, and swatching.
Purchase enough yarn from the same dye lot when consistent cream color is important.
Choosing Yarn for Dimensional Petals
Worsted or Aran yarn gives the petals enough body to remain raised without making each motif excessively heavy.
A smooth plied yarn displays the cluster definition clearly. Very fuzzy fibers soften the edges between adjacent petals.
Cotton blends create crisp stitch definition but can increase the total weight of a large throw. Acrylic or wool-blend yarns generally produce a lighter finished blanket at comparable thickness.
Whatever fiber is selected, use the same cream yarn for petals and backgrounds if the monochrome flower effect is the goal.
Adjusting the Mustard Center Color
The mustard center can be changed without altering the stitch structure.
Ochre creates a muted botanical appearance. Golden yellow increases contrast, while camel produces a more neutral result.
For the closest image-inspired palette, choose a warm mustard that is visibly darker than the cream but not extremely bright.
Make several centers from the same dye lot before beginning the petals. Small color differences are more noticeable because mustard is the only contrasting shade across the blanket.
Border Width and Final Proportions
The photographed blanket uses a visually substantial edge. A single sc round would appear too narrow beside the large raised motifs.
Plan approximately 4–7 cm of finished border width for a throw near the image-inspired dimensions.
The dense foundation rounds stabilize the joined panel. Openwork provides a lighter transition, and bobbles or scallops add the final raised detail.
Stop adding rounds if the border begins dominating the outer row of daisies. The flowers should remain the largest repeating feature.
Final Blanket Blocking
After joining and finishing the border, lay the blanket on a clean flat surface.
Shape the four outer corners first.
Align the raised joining seams into straight horizontal and vertical lines.
Adjust the border so opposite sides have matching dimensions.
Do not stretch the center of the daisies.
Lift any petals that became compressed during assembly and arrange them radially around each mustard center.
Allow the blanket to dry according to the care requirements of the selected yarn.
Finishing the Raised Daisy Granny Square Blanket
Inspect all 48 flowers after the final shaping and lift any cream petal that remains trapped beneath a joining seam or neighboring cluster. Check the mustard centers for loose tails, confirm that the raised seam grid remains aligned, and measure the border at several points so its width stays consistent. The image-inspired target is approximately 110 × 145–150 cm, although the blocked motif size remains the controlling measurement.
This raised daisy granny square blanket crochet pattern can be resized by changing the number of 17 cm motifs while retaining the same flower, seam, and border construction. Record the weight of one finished square before planning another blanket. Share the completed throw on Pinterest or Instagram with #RaisedDaisyGrannyBlanket. Would you keep every daisy center mustard, or alternate mustard and muted gold across the 6 × 8 layout?









