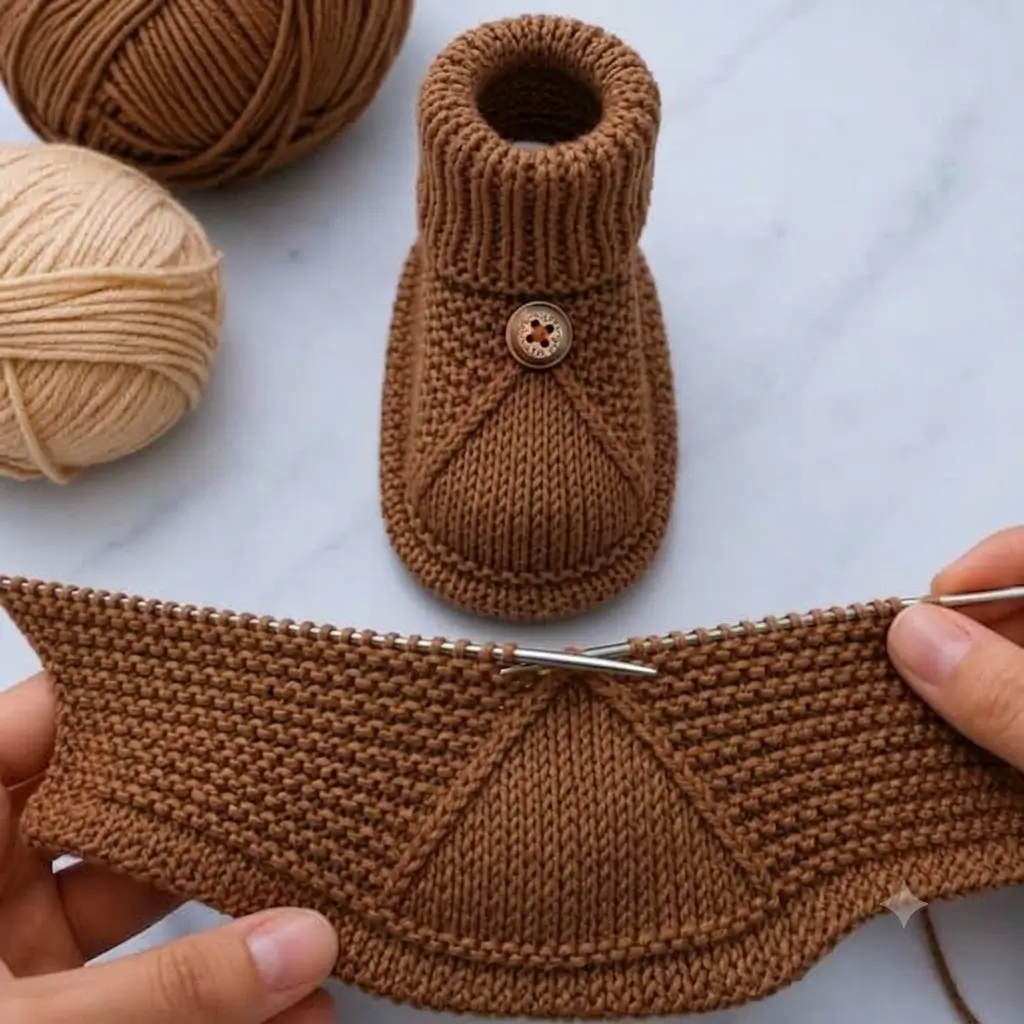
A tall ribbed ankle cuff changes the entire construction of these knitted baby booties. This knitted baby booties pattern combines a structured garter-stitch upper, smooth stockinette instep, shaped sole, and decorative button. Using medium-weight yarn and approximately 3.5–4.5 mm knitting needles, the finished bootie can measure about 10 cm from heel to toe, depending on gauge. The construction is suitable for knitters familiar with basic increases, decreases, ribbing, and seaming.
The Design: What Makes These Baby Booties Different
The most distinctive feature is the tall ribbed cuff. Instead of ending the upper immediately above the ankle, the ribbing extends upward and can be folded to create a thicker, more structured opening. The broad garter-stitch section below it helps the bootie retain its shape while allowing the central stockinette panel to remain visually defined.
The instep is another important structural decision. Keeping this section in stockinette creates a clear center panel while the surrounding garter stitch controls stretching. The rounded lower edge then transitions into the sole.
A common mistake when making a baby booties knitting pattern of this type is allowing the instep to become too wide. That changes the proportions of the toe and can make the finished bootie look flat rather than rounded. Maintaining consistent tension across the transition points is particularly important.
Project Info at a Glance
| Skill Level | Time | Finished Size | Needles | Best For |
|---|---|---|---|---|
| Intermediate beginner | 2–4 hours per pair | Approx. 10 cm heel to toe | 3.5–4.5 mm | Newborn and baby footwear |
Materials and Tools
Yarn
- Caramel brown — medium/worsted-weight yarn — approximately 25–40 g for a small pair
A smooth yarn with clearly defined stitches works particularly well for this construction. The photograph shows strong stitch definition across both the garter and stockinette sections.
Tools
- 3.5–4.5 mm knitting needles
- Tapestry needle for sewing and finishing
- Stitch markers
- Scissors
- Decorative buttons — one per bootie
- Measuring tape
Choose the exact needle size according to the yarn and required gauge. A dense fabric is preferable because excessively loose knitting can cause the bootie to lose its shape.
Knitting Abbreviations
- CO — cast on
- K — knit
- P — purl
- K2tog — knit two stitches together
- SSK — slip, slip, knit
- M1 — make one stitch
- RS — right side
- WS — wrong side
- BO — bind off
- St/Sts — stitch/stitches
When decreases are paired on opposite sides of the instep, use mirrored decreases where possible so the shaping remains visually balanced.
Knitted Baby Booties Pattern — Step by Step
Important: The photograph provides visual construction information but does not contain the designer’s original written instructions. The following construction is an original photo-inspired approach rather than a transcription of an unidentified pattern. Check the bootie against the required finished measurements while working.
Sole and Lower Section
Yarn: caramel brown.
Cast on 25 stitches.
Row 1: Knit all stitches.
Row 2: K1, M1, K11, M1, K1, M1, K11, M1, K1. (29 sts)
Row 3: Knit all stitches.
Row 4: K2, M1, K11, M1, K3, M1, K11, M1, K2. (33 sts)
Rows 5–8: Knit all stitches. (33 sts)
The increase points form the rounded toe and heel. Keep the increases positioned symmetrically around the center so the sole does not twist.
Garter-Stitch Upper
Continue with the same yarn.
Rows 9–14: Knit all stitches. (33 sts)
These rows create the textured garter-stitch wall visible around the lower portion of the photographed bootie. Do not pull the first and last stitches excessively tight because these edges will later be used during finishing.
Stockinette Instep
The central stockinette section creates the smooth triangular or shield-shaped panel visible at the front of the bootie.
Identify the center 9 stitches and place markers around them.
Row 15: Knit to the first marker, work the center stitches in stockinette positioning, then knit the remaining stitches.
Row 16: Knit the garter sections and purl the center stockinette stitches.
Continue maintaining garter stitch on both sides while working the center panel in stockinette.
On subsequent right-side shaping rows, decrease one stitch immediately beside each edge of the center panel. Work the corresponding wrong-side rows without additional decreases unless needed to maintain the selected size.
Continue until the upper draws inward sufficiently to form a rounded toe rather than a flat front.
The exact number of shaping rows depends on gauge. Stop when the front proportions match the intended foot length rather than adding decreases after the toe has already reached the required width.
Ankle Section
After completing the instep shaping, work across all remaining stitches in garter stitch for approximately 4–6 rows.
This short transition separates the shaped foot from the ribbed cuff. It also provides a stable base for the decorative button.
Check the opening before beginning the ribbing. It should be large enough for the intended baby’s foot without producing a loose ankle.
Ribbed Cuff
Continue in caramel brown.
Row 1: *K1, P1* across the row.
Row 2: Work stitches as they appear.
Repeat these two rows until the ribbed section measures approximately 4–5 cm, or until the cuff reaches the proportions shown in the reference photograph.
The cuff is deliberately taller than the ankle section. This allows the ribbing to stand upright or fold slightly depending on the final fit.
Bind off loosely in ribbing. A tight bind-off can prevent the cuff from stretching over the foot.
Sole Finishing
Fold the knitted piece so the shaping aligns symmetrically.
Using a tapestry needle and matching yarn, seam the sole carefully from heel toward toe. Keep the seam flat. A bulky ridge underneath the foot is undesirable, particularly when the booties are intended for an infant.
Return to the heel and close the back seam through the garter and ribbed sections.
Match corresponding rows on both sides while sewing. Misaligned ribbing is particularly visible at the back of a tall cuff.
Decorative Button
The photographed bootie has one button positioned centrally below the ribbed cuff.
Thread a tapestry or sewing needle with strong matching thread. Position the button at the center front, directly above the upper point of the stockinette instep.
Sew through every buttonhole several times before securing the thread on the inside.
Important: A decorative button can become a small detachable component. For items intended for babies, attachment security must be considered carefully. Omitting the button and embroidering a decorative detail instead removes that detachable component.
Assembly and Finishing
- Lay the finished knitted piece flat and identify the center of the sole.
- Fold the work so the heel edges meet evenly.
- Join the sole seam using matching yarn and a tapestry needle.
- Continue the seam upward along the back of the bootie.
- Align every ribbing column before closing the cuff seam.
- Turn the bootie to the correct side and flatten the seams with your fingers.
- Shape the stockinette instep so its center line sits directly over the sole.
- Position the decorative button centrally below the cuff, or omit it for a button-free version.
- Weave all yarn tails through several neighboring stitches before trimming.
- Measure heel-to-toe length and compare both booties before finishing the pair.
The completed pair should have matching toe depth, cuff height, instep position, and overall length.
7 Technical Tips for Better Knitted Baby Booties
- Mark the center stitch. Losing the true center can shift the stockinette instep sideways by several stitches. Keep a marker at the center or immediately beside the central panel throughout the shaping stage.
- Check the 10 cm target before finishing. A difference of even 1 cm is substantial on a newborn-sized bootie. Measure from the back of the heel to the furthest point of the toe with the fabric resting flat.
- Do not over-tighten the sole seam. Excessive seam tension pulls the sole into a curved ridge. Match the sewing tension to the knitted fabric rather than cinching every stitch.
- Control the stockinette edges. Loose stitches where stockinette meets garter stitch can produce visible holes. Keep the first stitch after each texture transition at the same tension as the surrounding stitches.
- Match the cuff height. A 5 mm difference between cuffs is immediately visible when the pair is placed together. Count ribbing rows instead of relying only on visual measurement.
- Pin the button before sewing. A button positioned even 5–8 mm away from the center line can make the instep appear asymmetric. Align it with the center of the stockinette panel before attaching it permanently.
- Weave tails away from the footbed. Thick woven ends under the sole create unnecessary bulk. Route yarn tails through side, heel, or upper stitches whenever the construction permits.
Adjusting the Size
The finished dimensions depend on yarn weight, needle diameter, gauge, cast-on count, and the number of rows worked through the sole and upper.
For a smaller bootie, reducing needle size while retaining a suitable yarn can produce a denser and slightly smaller fabric. For a larger size, simply increasing the needle diameter is not always the best method because the fabric may become too loose.
A more controlled approach is to calculate the required stitch count from gauge. Knit a swatch using the selected yarn and needles, measure the stitches per 10 cm, and calculate the cast-on and shaping dimensions from that figure.
Make the first bootie completely before starting the second. Record the number of rows used for the sole, upper, instep, ankle transition, and cuff. Those figures provide a repeatable specification for the matching bootie.
Choosing Yarn for Baby Booties
Medium-weight yarn creates the defined garter ridges and prominent ribbing visible in the reference design. Smooth yarn also makes it easier to monitor shaping because individual stitches remain clearly visible.
Washability should be considered when choosing yarn for baby footwear. Check the manufacturer’s care instructions before knitting, particularly if the finished booties are intended for regular use.
The yarn also affects final dimensions. Two yarns labeled with the same general weight can produce noticeably different gauges. Make a gauge sample when exact sizing matters rather than assuming every medium-weight yarn will produce the same 10 cm bootie.
How to Keep Both Booties the Same Size
Pairs expose small differences that would go unnoticed in a single knitted item. Row counts are therefore more reliable than estimating length by eye.
Record the cast-on count, every increase row, number of plain garter rows, number of instep shaping rows, ankle rows, and total cuff rows from the first bootie. Repeat those numbers exactly for the second.
Tension matters as well. If the second bootie is knitted several days later with noticeably tighter tension, identical stitch counts can still produce different dimensions.
Place both pieces together before closing the final seams. Compare sole length, toe width, heel depth, ankle opening, and cuff height. Correcting a discrepancy before seaming is considerably easier than altering a completely assembled bootie.
Button Placement and Baby-Safe Finishing
The button in the reference image functions primarily as a visual focal point. It sits at the center front where the garter-stitch upper meets the tall ribbed cuff.
If a button is used, sew it through stable knitted fabric rather than attaching it to a single loose stitch. Check the attachment from both sides and keep the thread ends inaccessible.
For a design without detachable decoration, replace the button with an embroidered circle, small knitted motif, or contrasting stitched detail. The central placement can remain the same, preserving the visual proportions without using a separate button.
After finishing, inspect the entire bootie for loose yarn tails, open seams, protruding knots, or poorly secured decoration.
Conclusion
The defining construction of this knitted baby booties pattern is the contrast between the textured garter upper, smooth central stockinette instep, and tall ribbed cuff. Work the first bootie to the required heel-to-toe measurement, then record every row count before knitting its pair. Pay particular attention to center alignment, cuff height, sole-seam tension, and any attached decoration. Once the pair is finished, photograph the booties from the front and side to document the shaping. The finished project can also be shared on Pinterest or Instagram with #GarterCuffBabyBooties. For this specific design, would you keep the central button or replace it with an embroidered detail?









