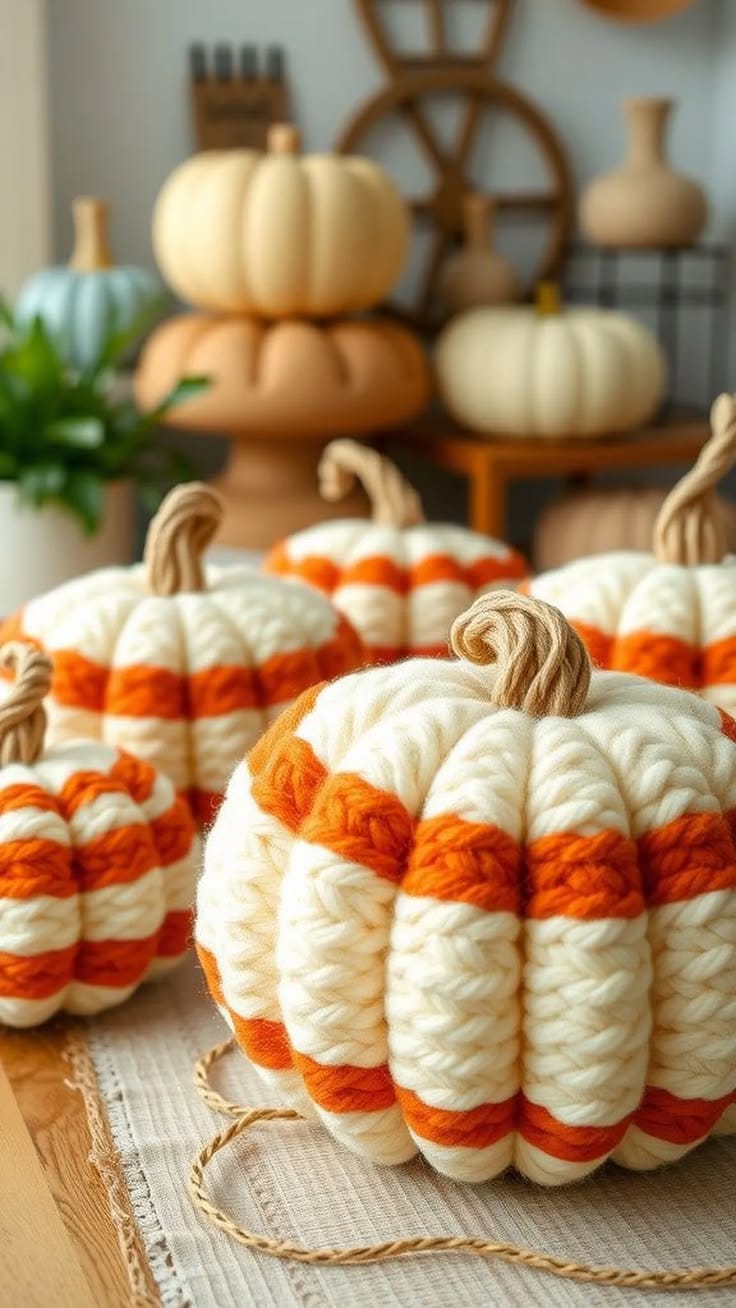
Two orange bands crossing deep vertical ribs give this pumpkin a structure that ordinary striped designs do not have. This white and orange striped crochet pumpkin pattern combines a cream-dominant stuffed body, narrow orange color bands, eight sculpted sections, and a curved tan stem. Bulky yarn and a 6.0 mm hook produce a substantial fall decoration measuring approximately 18–22 cm wide and 15–18 cm high including the stem.
What Makes This Striped Crochet Pumpkin Different
The stripes and ribs travel in opposite directions. Orange rounds circle horizontally around the body, while post-stuffing sculpting creates deep vertical channels from top to bottom. That intersection is the defining feature of the design.
The cream sections are deliberately wider than the orange bands. Keeping orange to two narrow zones prevents the colorwork from overpowering the segmented pumpkin shape. A 42-stitch maximum circumference gives the body enough width for a low, rounded profile.
The stem adds another structural contrast. Rather than using a short upright stalk, the design finishes with a narrow tan stem that curves near the tip. One common mistake with a chunky crochet pumpkin is excessive stuffing. When the body becomes rigid, the sculpting yarn cannot pull deeply enough between the eight lobes, leaving a striped ball instead of a pumpkin.
Project Information
| Skill Level | Construction | Finished Size | Hook | Yarn |
|---|---|---|---|---|
| Intermediate beginner | Continuous rounds + sculpting | Approx. 18–22 cm wide × 15–18 cm high | 6.0 mm | Bulky / Category 5 |
The final height includes the stem. Yarn thickness, hook size, stuffing density, and sculpting tension can change the finished measurements even when the stitch counts remain identical.
Materials and Tools
Yarn
- Warm ivory or cream — bulky/category 5 — approximately 80–100 g for the main body.
- Pumpkin orange — bulky/category 5 — approximately 20–30 g for the horizontal stripes.
- Tan or light brown — bulky/category 5 — approximately 10 g for the curved stem.
- Warm ivory — additional long strand for sculpting the pumpkin sections.
Choose cream and orange yarns from the same yarn family when possible. Different yarn thicknesses can change the circumference at each color transition even though the round maintains the same stitch count.
Tools
- 6.0 mm crochet hook
- Polyester fiberfill stuffing
- Long tapestry needle
- Scissors
- Locking stitch marker
- Tape measure
No safety eyes, embroidery, wire, or separate facial features are required.
Abbreviations
- MR — magic ring
- sc — single crochet
- inc — increase
- dec — decrease
- sl st — slip stitch
- ch — chain
- BLO — back loop only
- st/sts — stitch/stitches
For an invisible decrease, insert the hook through the front loops of the next two stitches, yarn over and pull through both front loops, then complete the single crochet.
White and Orange Striped Crochet Pumpkin Pattern
The body is worked in a continuous spiral from the bottom upward. Place a locking stitch marker in the first stitch of every round and move it upward as the work progresses.
Pumpkin Body
Begin with warm ivory bulky yarn.
R1: 6 sc in MR. (6)
R2: Inc ×6. (12)
R3: (sc, inc) ×6. (18)
R4: (2 sc, inc) ×6. (24)
R5: (3 sc, inc) ×6. (30)
R6: (4 sc, inc) ×6. (36)
R7: (5 sc, inc) ×6. (42)
The body has now reached its 42-stitch maximum circumference.
R8: Sc around. (42)
R9: Sc around. (42)
Change to pumpkin orange at the end of R9.
R10: Sc around in orange. (42)
R11: Sc around in orange. (42)
Change back to warm ivory.
R12: Sc around. (42)
R13: Sc around. (42)
R14: Sc around. (42)
R15: Sc around. (42)
R16: Sc around. (42)
R17: Sc around. (42)
Change to pumpkin orange.
R18: Sc around in orange. (42)
R19: Sc around in orange. (42)
Change back to warm ivory.
R20: Sc around. (42)
R21: Sc around. (42)
R22: Sc around. (42)
The two orange bands should now circle the complete pumpkin with a broad cream section between them.
Shaping the Upper Pumpkin
Continue with warm ivory.
R23: (5 sc, dec) ×6. (36)
R24: (4 sc, dec) ×6. (30)
R25: (3 sc, dec) ×6. (24)
Begin stuffing at this stage.
R26: (2 sc, dec) ×6. (18)
Add more stuffing around the outer walls.
R27: (sc, dec) ×6. (12)
Finish stuffing before the opening becomes smaller.
R28: Dec ×6. (6)
Fasten off, leaving approximately 40 cm of yarn.
Thread the tail through the front loops of the remaining six stitches and pull the opening closed. Secure the yarn but leave the center accessible for attaching the stem.
Stuffing the Pumpkin
Add fiberfill in small pieces. Begin by filling the outer circumference, then add stuffing toward the center.
The body should be firm enough to retain its shape but still compress under moderate hand pressure. Deep sculpted ribs cannot be formed effectively through an overfilled center.
Check the orange stripes while stuffing. Both bands should remain approximately horizontal around the complete circumference. If one section rises sharply, redistribute the fiberfill before closing the body.
A slight flattening at the top and bottom is desirable. The finished form should be wider than it is tall.
Creating Eight Sculpted Pumpkin Sections
Cut approximately 2–2.5 m of strong cream yarn. Use a long tapestry needle capable of passing through the stuffed body.
Insert the needle through the bottom center and bring it out through the top center.
Run the yarn down the outside of the pumpkin and return the needle through the bottom center.
Pull gradually until a visible vertical channel forms.
Move approximately one-eighth of the way around the circumference and repeat.
Continue until the pumpkin contains approximately eight evenly spaced lobes.
Each sculpting strand should cross both orange bands without shifting them vertically. Pull with enough tension to create a channel approximately 1–2 cm deep on the largest version.
After completing the eighth section, compare the spacing from above. Adjust individual strands before securing the sculpting yarn at the bottom center.
Deepening the Pumpkin Ribs
If the first sculpting pass produces shallow divisions, repeat each channel once rather than pulling the original strand excessively tight.
Pass the needle from bottom to top, follow the existing channel down the outside, and return through the center.
Repeating a channel distributes the pressure across two yarn strands.
Do not tighten until the orange stripe disappears into the groove. Both orange bands should remain visible across the raised portions and continue through the channels.
Curved Tan Crochet Stem
Use tan or light-brown bulky yarn.
The stem is worked in continuous rounds.
R1: 6 sc in MR. (6)
R2: Sc around. (6)
R3: Sc around. (6)
R4: Sc around. (6)
R5: Sc around. (6)
R6: Sc around. (6)
R7: Sc around. (6)
R8: Sc around. (6)
R9: Sc around. (6)
For a longer stem, add another two or three rounds of 6 sc.
Stem Base
R10: Inc ×6. (12)
R11: Sc around. (12)
Fasten off, leaving approximately 35 cm for attachment.
The widened base covers the small closing area at the top of the pumpkin.
Creating the Curved Stem Shape
The reference stem bends rather than standing as a straight cylinder. Create that shape during attachment instead of inserting wire.
Flatten the stem slightly between the fingers.
Curve the upper third toward one side.
Thread a separate strand of tan yarn through the inside of the stem and make two small tightening passes along the inside of the intended curve.
Pull gently until the stem bends.
Secure the yarn inside the lower stem.
A modest curve is sufficient. Excess tension folds the stem sharply instead of creating the gradual hook-like profile.
Optional Twisted Stem Texture
For a more pronounced twisted appearance, add surface slip stitches after completing the stem.
Join tan yarn near the stem base.
Work loose surface slip stitches diagonally around the stem, moving upward in a spiral.
Space the spiral approximately 5–8 mm apart.
Fasten off near the tip and bury the yarn inside the stem.
Keep the surface stitches relaxed so the stem remains flexible enough to curve.
Attaching the Stem
Position the stem over the top center.
Check the pumpkin from the front before sewing. The curved tip should lean slightly toward one side rather than directly toward the viewer.
Use the long tan tail to sew around the 12-stitch stem base.
Pass each stitch through the pumpkin fabric close to the gathered center.
After one complete attachment round, pass the needle through the base again at several opposite points.
This second set of stitches stabilizes the taller stem.
Bury the remaining yarn inside the pumpkin.
Assembly
- Crochet the pumpkin body from the bottom upward, increasing from 6 to 42 stitches before beginning the straight body rounds.
- Work the first two-round orange band at R10–11 and return to cream without changing the stitch count.
- Complete the broad cream middle section, then add the second orange band at R18–19.
- Decrease the upper body in six-stitch increments while adding fiberfill around the outer circumference.
- Close the final six stitches and redistribute the stuffing until the body is wider than it is tall.
- Use a long cream strand to divide the body into approximately eight vertical sections.
- Check that both orange stripes remain level after sculpting and adjust any channel that pulls one band upward.
- Crochet the tan stem, widen its base to 12 stitches, and shape the upper section into a gradual curve.
- Sew the stem securely over the top center and reinforce the attachment from opposite sides.
- Reshape all eight lobes by hand, bury the remaining yarn tails, and place the pumpkin on a flat surface to check its balance.
The completed pumpkin should have a low rounded body, approximately eight pronounced cream lobes, two narrow orange bands, and one curved neutral stem.
7 Technical Tips for a Striped Crochet Pumpkin
- Orange bands developing a visible step: Make each color change immediately before completing the final pull-through of the previous stitch. A poorly placed change can create a vertical jump greater than 5 mm where the stripe begins and ends.
- Pumpkin becoming too tall: Check the body proportions before closing R28. The width should remain greater than the body height; excessive stuffing through the center can add 2–3 cm of unwanted vertical height.
- Ribs remaining shallow: Keep the body compressible enough for sculpting strands to sink approximately 1–2 cm into the surface. If the strands remain on top of the stitches, remove a small amount of stuffing before final closure.
- Lobes becoming different widths: Mark the body into eight equal sections before tightening the sculpting yarn. Estimating every channel independently often produces two narrow sections beside one oversized lobe.
- Orange stripe disappearing inside channels: Tighten each sculpting strand gradually and compare it with the previous channel. A groove deeper than approximately 2 cm can hide too much of the orange band.
- Stem falling sideways: Sew through the complete 12-stitch base and reinforce at four opposite positions. Attaching only the outermost edge leaves the tall stem free to pivot at the center.
- Stuffing visible through bulky stitches: Add fiberfill in pieces approximately 3–4 cm across rather than forcing one dense mass into the body. Concentrated stuffing pressure can enlarge individual stitch gaps.
Keeping the Orange Stripes Level
Color changes occur while the pumpkin still has a constant 42-stitch circumference. This is deliberate. Placing the orange rounds inside the increase or decrease sections would cause the bands to angle toward the top or bottom.
Check the first orange band after completing R11. It should circle the body without a change in width. Repeat the same check after R19.
The spiral construction creates a small jog at each color transition. Position the transition toward the back of the finished pumpkin before beginning the sculpting process.
When placing the eight vertical channels, avoid putting the deepest channel directly through the color-change jog. Positioning the jog slightly inside a lobe makes it less prominent.
Adjusting the Pumpkin Size
The pattern can be reduced by stopping the increase sequence earlier. A medium pumpkin can stop at 36 stitches, while a smaller version can stop at 30 stitches.
Reduce the number of straight rounds proportionally. A 30-stitch pumpkin does not need the same vertical distance between orange bands as the 42-stitch version.
For a larger pumpkin, heavier yarn is preferable to adding excessive rounds. The sculpting strands need to travel through the complete stuffed body, and an extremely large dense pumpkin becomes difficult to shape with a standard tapestry needle.
Keep the number of sculpted sections proportional to the circumference. Six channels can work for a smaller pumpkin, while eight provide the broad segmented appearance of the foreground design.
Making a Small Matching Pumpkin
A smaller version can use a 30-stitch plateau.
Increase from 6 to 30 stitches:
R1: 6 sc in MR. (6)
R2: Inc ×6. (12)
R3: (sc, inc) ×6. (18)
R4: (2 sc, inc) ×6. (24)
R5: (3 sc, inc) ×6. (30)
Work two cream rounds, one or two orange rounds, three cream rounds, a second orange section, and two final cream rounds before decreasing.
Reverse the increase sequence to close the pumpkin.
Use approximately six sculpting channels rather than eight if the smaller circumference becomes crowded.
Choosing Yarn for the Striped Pumpkin
Bulky yarn gives the raised lobes enough visual weight to match the reference. A smooth or lightly twisted yarn displays both the orange color bands and the vertical sculpting channels clearly.
Warm ivory creates a softer contrast than bright white. Pair it with saturated pumpkin orange for distinct stripes and use tan, camel, or light brown for the stem.
Keep all three yarns close to the same thickness. A substantially thinner orange yarn creates an indentation around the circumference even before sculpting.
If substituting super-bulky yarn, increase the hook size according to the yarn label and expect the finished dimensions to grow. Reduce the number of straight plateau rounds if the body becomes too tall.
Controlling Stuffing Firmness
The stuffing should support the crochet without fighting the sculpting strands. Fill the outer edges first and rotate the pumpkin as additional fiberfill is inserted.
Press the top and bottom centers toward each other before closing. This establishes the low profile before the eight channels are tightened.
After the first four sculpting passes, stop and check the shape. The body should already show four broad divisions. Add the remaining channels only after confirming that the stuffing is distributed evenly.
If one lobe appears flat, move fiberfill toward that section through the remaining top opening before final closure. Correcting stuffing distribution after all eight channels are secured is considerably more difficult.
Making a Coordinated Pumpkin Set
Use the same cream and orange yarns for several sizes to create a consistent group. Vary the plateau between 30, 36, and 42 stitches while retaining the horizontal stripe placement.
The number and width of orange bands can also change. One small pumpkin may use two single-round bands, while the largest version uses two-round bands.
Keep the tan stem color consistent across the set. Varying stem height and curvature creates enough distinction without introducing another yarn color.
Arrange the completed pumpkins with the stripe transitions facing away from the primary viewing direction.
Finishing the White and Orange Crochet Pumpkin
Check all eight sculpting channels after attaching the stem and adjust any section that has become noticeably wider than its neighbors. Both orange bands should remain visible around the complete circumference, while the cream areas form the dominant surface. Reinforce the stem if its base moves when the pumpkin is lifted, then bury every remaining yarn tail through several centimeters of stuffing.
This white and orange striped crochet pumpkin pattern can be repeated at 30-, 36-, and 42-stitch sizes to create a coordinated fall display. Record the stripe rounds and final measurements for each version before changing yarn weight. Share the finished pumpkins on Pinterest or Instagram with #StripedCrochetPumpkin. Would you keep both orange bands the same width, or make the lower stripe wider on your next pumpkin?









