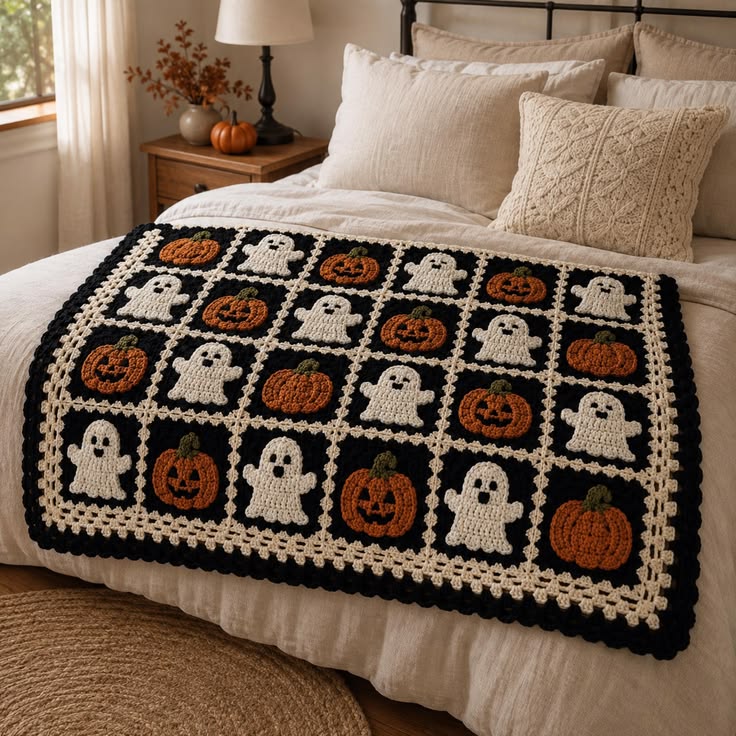
A ghost needs enough white space around its waving arms to remain readable against a black crochet square. This Halloween ghost and pumpkin granny square blanket uses dimensional cream ghosts and orange pumpkins over matching black backgrounds, followed by contrasting cream joins and a black scalloped edge. Worked primarily in worsted-weight yarn, the design uses approximately 15 cm squares and a modular construction suitable for resizing.
What Makes This Halloween Crochet Blanket Different
The blanket uses only two recognizable Halloween motifs: ghosts and pumpkins. Restricting the design to these shapes creates a controlled checkerboard rhythm instead of filling every square with a different seasonal icon. Black background squares provide enough contrast for cream ghosts, burnt-orange pumpkins, olive stems, and small facial details.
Both motifs sit above the background rather than being formed entirely through color changes. That choice gives the Halloween crochet blanket visible dimension while allowing every black foundation square to follow the same measurements.
The cream joining system is another structural feature. Instead of hiding the seams, contrasting stitches divide the black squares into a visible grid and continue into the openwork perimeter. A common failure with a ghost granny square pattern is making the appliqué too wide. The ghost should leave a consistent black margin around its arms and lower edge.
Project Information
| Skill Level | Construction | Square Size | Hooks | Yarn |
|---|---|---|---|---|
| Intermediate | Squares + appliqués + joined border | Approx. 15 cm blocked | 5.0 mm / 4.0 mm | Worsted weight |
Use the 5.0 mm hook for the black background squares and main blanket construction. The 4.0 mm hook produces firmer ghost and pumpkin appliqués with better-defined edges. Adjust hook size when necessary to reach the 15 cm square target.
Materials and Tools
Yarn
- Black — worsted weight — background squares, ghost faces, jack-o’-lantern details, and outer scalloped border.
- Warm cream — worsted weight — ghost appliqués, joining seams, and openwork border.
- Burnt orange — worsted weight — pumpkin appliqués.
- Dark olive green — worsted weight — pumpkin stems.
Black and cream require the largest quantities because every square uses a black background and the cream yarn appears across the complete joining grid and border. The orange requirement depends on the ratio of pumpkin squares to ghost squares. Olive green and black facial details require comparatively small amounts.
Tools
- 5.0 mm crochet hook for blanket squares and joining
- 4.0 mm crochet hook for appliqués
- Tapestry needle
- Scissors
- Locking stitch markers
- Blocking mats
- Rust-resistant blocking pins
- Tape measure
Abbreviations
- MR — magic ring
- ch — chain
- sc — single crochet
- hdc — half double crochet
- dc — double crochet
- tr — treble crochet
- inc — increase
- dec — decrease
- sl st — slip stitch
- st/sts — stitch/stitches
- ch-sp — chain space
- RS — right side
- WS — wrong side
When a decrease is required in a solid section, work through the front loops of the next two stitches before completing the single crochet. This keeps the reduction less prominent on the right side.
Halloween Ghost and Pumpkin Granny Square Blanket Pattern
Make every black background square first. Block them to one measurement, then crochet the ghost and pumpkin appliqués separately. Attaching the motifs before joining gives access to the back of each square and makes placement easier to control.
Black Background Granny Square
Use black worsted-weight yarn and the 5.0 mm hook.
Round 1
Make an MR.
Ch 3, work 2 dc into the ring, ch 2.
Work (3 dc, ch 2) three more times.
Sl st to the top of the beginning ch-3.
You now have four 3-dc groups and four corner spaces.
Round 2
Sl st into the first corner space.
Ch 3, 2 dc, ch 2, 3 dc in the same corner.
Ch 1.
In each remaining corner work (3 dc, ch 2, 3 dc), with ch 1 between corners.
Sl st to join.
Round 3
Sl st into the corner.
Work (3 dc, ch 2, 3 dc) in the corner.
Ch 1, 3 dc in the next side space, ch 1.
Repeat around, working (3 dc, ch 2, 3 dc) in every corner.
Sl st to join.
Round 4
Continue the established granny-square sequence.
Work 3 dc into each side space, ch 1 between groups, and (3 dc, ch 2, 3 dc) in each corner.
Sl st to join.
Round 5
Repeat Round 4, adding one additional 3-dc group along each side.
Sl st to join.
Round 6
Repeat the established pattern until the square approaches the target measurement.
Fasten off.
Block each square to approximately 15 × 15 cm. Add one additional expansion round to every square if your yarn and tension produce a substantially smaller motif.
Cream Crochet Ghost Appliqué
Use warm cream worsted-weight yarn and the 4.0 mm hook.
The ghost is worked from the rounded head downward. The body widens for the arms before narrowing slightly toward the lower scalloped edge.
Ghost Head
R1: 6 sc in MR. (6)
R2: Inc ×6. (12)
R3: (sc, inc) ×6. (18)
R4: (2 sc, inc) ×6. (24)
Do not close the piece into a stuffed shape. The ghost remains flat.
Ghost Body
Work across approximately half of the final head round rather than continuing around the complete circle.
Row 1: Ch 1, sc across 13 sts. Turn. (13)
Row 2: Ch 1, inc, sc across to final st, inc. Turn. (15)
Row 3: Ch 1, sc across. Turn. (15)
Row 4: Ch 1, sc across. Turn. (15)
Row 5: Ch 1, dec, sc across to final 2 sts, dec. Turn. (13)
Rows 6–8: Ch 1, sc across. Turn. (13)
Ghost Lower Edge
Ch 1.
Work (sc, 3 dc, sc) across three evenly spaced sections along the bottom edge to create three rounded points.
Fasten off, leaving approximately 30 cm for attachment.
Ghost Arms
The arms are small extensions positioned near the upper sides of the body.
Left Arm
Join cream yarn approximately two rows below the head.
Ch 6.
Beginning in the second ch from hook, work:
sc, hdc, dc, hdc, sc.
Sl st into the ghost body and fasten off.
Right Arm
Repeat on the opposite side.
Angle one arm slightly upward and the other outward if you want the irregular waving silhouette visible in the reference design.
Ghost Face
Use a small amount of black yarn.
Place the eyes across the upper half of the rounded head.
For each eye, make two or three short embroidery passes over the same location. Keep each eye approximately 5–7 mm wide.
Leave approximately 1–1.5 cm between the eyes.
For the mouth, make one short vertical or oval-shaped black detail below the midpoint between the eyes.
Secure all black yarn ends on the wrong side of the ghost before attaching it to the square.
Orange Crochet Pumpkin Appliqué
Use burnt-orange worsted-weight yarn and the 4.0 mm hook.
The pumpkin is worked as a flat oval with shaped side edges. Surface stitches can be added afterward to emphasize the ribs.
Pumpkin Body
R1: 6 sc in MR. (6)
R2: Inc ×6. (12)
R3: (sc, inc) ×6. (18)
R4: (2 sc, inc) ×6. (24)
R5: (3 sc, inc) ×6. (30)
The resulting circle provides a controlled stitch foundation.
Oval Shaping Round
Work shorter stitches at the top and bottom and taller stitches along the sides.
Begin with sc across the first section, transition through hdc to dc along the side, return through hdc to sc across the bottom, then repeat the sequence on the opposite side.
Keep the finished pumpkin approximately 9–10 cm wide × 7–8 cm tall.
Sl st to join and fasten off, leaving a long sewing tail.
Pumpkin Ribbing
Cut a length of matching burnt-orange yarn.
Thread the tapestry needle and bring the yarn from the back near the top center.
Make one long surface stitch toward the lower center.
Repeat on both sides of the first line, following the natural curve of the pumpkin.
Three to five visible divisions are sufficient for a pumpkin of this size.
Do not pull the surface stitches tightly enough to fold the appliqué.
Olive Pumpkin Stem
Use dark olive-green worsted-weight yarn.
Ch 5.
Beginning in the second chain from the hook, sc in each chain. (4 sts)
Ch 1 and turn.
Sc across. (4)
Fasten off, leaving a sewing tail.
Position the stem behind the upper center of the pumpkin and sew its lower edge to the wrong side of the orange appliqué.
Optional Jack-o’-Lantern Face
Some pumpkin squares can remain plain while others receive black facial details. Mixing both versions prevents the blanket from becoming visually repetitive.
Use black yarn and a tapestry needle.
Make two small triangular or angled eyes approximately 8–10 mm wide.
Place the mouth below them using several short horizontal and diagonal stitches.
Keep all facial details inside the central pumpkin ribs. Black stitches extending onto the outer orange edge can disappear once the motif is positioned against the black background square.
Attaching the Ghosts to the Black Squares
Place one cream ghost in the center of a blocked black square.
Leave approximately equal black space above the head and below the lower scallops.
Pin the head, both arms, and lower body before sewing.
Using the cream tail, sew around the outside edge with small whip stitches.
Pass the needle through the upper loops of the black square rather than through the complete thickness whenever possible. This keeps the sewing stitches less visible on the back.
Secure the arms separately so their tips do not curl after washing.
Attaching the Pumpkins
Center one pumpkin on a blocked black square.
Position the stem vertically or at a slight angle.
Pin the upper, lower, left, and right edges before sewing.
Whip stitch around the orange perimeter with matching yarn.
Attach the olive stem separately.
Keep the ribbing free from attachment stitches so the surface texture remains visible.
Planning the Blanket Layout
Arrange all completed squares on a flat surface before joining.
Alternate ghost and pumpkin motifs across each row. Offset the next row so a ghost generally sits above or below a pumpkin rather than another ghost.
If using both plain pumpkins and jack-o’-lanterns, distribute the facial versions across the entire blanket. Avoid placing several carved faces in one corner.
The photographed construction is well suited to a grid approximately 6 squares wide. Increase the number of rows for additional length.
At a blocked square size of approximately 15 cm, a 6 × 8 arrangement produces a center around 90 × 120 cm before joining and border adjustments.
Photograph the layout before moving the squares.
Cream Openwork Joining
Use warm cream yarn and the 5.0 mm hook.
The cream seams should remain visible between the black squares rather than disappearing into the background.
Place two squares with corresponding edges aligned.
Join cream yarn at the first corner.
Work one sc through matching edge positions.
Ch 1.
Skip a small section of the edge and work the next sc through both squares.
Continue across, creating regularly spaced cream joining points.
At the next corner, secure the join without pulling the square edges together.
Join complete horizontal rows first, then work the vertical seams.
At intersections where four squares meet, keep the cream stitches loose enough for the intersection to remain flat.
Alternative Flat Joining Method
For a denser grid, use a flat slip-stitch seam.
Place two squares side by side with right sides facing upward.
Insert the hook through corresponding loops on both square edges.
Pull cream yarn through both loops and the loop already on the hook.
Continue across the complete edge.
This produces a narrow cream line and less open space than the lattice-style joining method.
Foundation Border
After all squares are joined, work around the complete blanket in cream.
Border Round 1
Join cream yarn at any outer corner.
Ch 1.
Sc evenly around the blanket.
At each corner work (sc, ch 2, sc).
When crossing a joining seam, place stitches around the seam rather than pulling it toward the border.
Sl st to the first sc.
Border Round 2
Ch 3.
Dc in each stitch around.
At each corner ch-2 space work (2 dc, ch 2, 2 dc).
Sl st to the beginning ch-3.
Cream Lattice Border
Border Round 3
Ch 1 and sc in the first stitch.
Ch 3, skip 2 sts, sc in the next st.
Repeat along each side.
At every corner work a ch-5 space.
Sl st to the first sc.
Border Round 4
Sl st into the first ch-3 space.
Ch 1.
Work 3 sc into each ch-3 space.
At each corner ch-5 space work (3 sc, ch 2, 3 sc).
Continue around and join.
Border Round 5
Repeat the openwork sequence:
Sc, ch 3, skip 2 sts.
Continue around the blanket.
Work a ch-5 space at each corner.
Join and fasten off cream.
Black Scalloped Outer Edge
Change to black worsted-weight yarn.
Join black yarn in any cream ch-3 space.
Work 5 dc into the first open space.
Sc into the next open space.
Work 5 dc into the following space.
Continue alternating a 5-dc shell and one sc around the perimeter.
At the corners, use a larger shell of 7 dc when necessary to turn the edge without cupping.
Sl st to the first stitch and fasten off.
Assembly
- Crochet enough identical black background squares for the selected blanket dimensions and block every square to approximately 15 cm.
- Make the required cream ghost appliqués, including arms, lower scallops, eyes, and mouths.
- Make the burnt-orange pumpkin appliqués, add olive stems, and embroider black jack-o’-lantern faces on selected motifs.
- Center and pin every appliqué to a black square before sewing around its perimeter.
- Arrange the completed ghost and pumpkin squares in an alternating grid and photograph the final placement.
- Join the squares with cream yarn, completing the horizontal seams before crossing them with vertical joins.
- Inspect each four-square intersection and correct any seam that pulls the surrounding corners inward.
- Work the cream foundation and lattice border around the complete assembled blanket.
- Add the black scalloped outer edge, increasing shell size at the corners only when required for a flat turn.
- Weave all tails through several centimeters of matching stitches, block the blanket to square the grid, and reshape every appliqué while drying.
The finished blanket should display a regular black grid, alternating dimensional Halloween motifs, visible cream seams, an openwork cream border, and a continuous black scalloped edge.
7 Technical Tips for Halloween Granny Squares
- Ghost disappearing into the joining border: Leave at least 1.5–2 cm of black background between the appliqué and square edge. A ghost that fills the complete square loses its silhouette once cream joining stitches surround it.
- Ghost head becoming angular: Keep all six increases evenly distributed through the circular head rounds. Moving two increases beside each other creates a visible corner above the face.
- Pumpkin curling after attachment: Block each orange appliqué flat before sewing. If its outer edge rises more than approximately 5 mm, correct the tension before attaching it to the square.
- Black squares finishing at different sizes: Block every background to approximately 15 × 15 cm. A difference greater than 5 mm can create a crooked cream seam across a complete row.
- Joining intersections becoming bulky: Avoid fastening four separate yarn tails at the same crossing. Carry one joining strand through the intersection when possible and weave neighboring tails in different directions.
- Cream lattice border ruffling: Maintain the same ch-3, skip-2 spacing along straight sides. Adding extra chain spaces to compensate for a stitch-count mismatch creates visible excess fabric.
- Black scallops cupping at corners: Increase a corner shell from 5 dc to 7 dc when the edge pulls inward. Do not enlarge every shell, because that produces a ruffled perimeter instead.
Changing the Blanket Size
The modular grid makes size changes practical. With approximately 15 cm squares, six motifs across produce a center close to 90 cm before the joining width and border are included.
For a lap blanket, use fewer rows while retaining the alternating ghost-and-pumpkin arrangement. A larger throw can use additional complete rows. Bed-size versions require considerably more black and cream because those colors appear in every square and seam.
Calculate the center dimensions before beginning the border. Multiply the blocked square measurement by the planned number of motifs, then add an allowance for the visible joining grid and perimeter.
Keep the final border proportional to the blanket. A small project may need only one cream openwork round and the black scallops, while a larger throw can support the full lattice treatment.
Planning the Ghost and Pumpkin Ratio
An equal number of ghosts and pumpkins produces the clearest checkerboard when the total square count is even. Odd row lengths require a little more planning because alternating motifs switch position from one row to the next.
Lay out the first row beginning with a ghost. Start the second row with a pumpkin. Continue alternating those starting motifs throughout the blanket.
Plain pumpkins can be mixed with jack-o’-lantern faces. Keep the orange body identical so both versions remain part of the same visual system.
The cream ghosts should use consistent facial placement. Small variations in mouth shape can add character, but changing eye spacing dramatically from square to square makes the blanket look less controlled.
Choosing Yarn Colors
Near-black or true black creates the strongest background contrast. Warm ivory is preferable to stark optic white when the intended palette includes burnt orange and olive because all four colors then share a slightly muted autumn character.
Choose a pumpkin orange with enough contrast against black to keep the ribbing visible. Rust, burnt orange, copper, and deep terracotta all work with the same construction.
Dark olive provides a quieter stem than bright green. Only a small amount is required, so leftover worsted yarn can be sufficient if its thickness matches the pumpkin yarn.
Keep the joining yarn the same cream used for the ghosts. Repeating that color across motifs, seams, and border connects the separate parts of the design.
Blocking the Completed Blanket
Block the black squares before appliqué attachment and perform a second light blocking after assembly. The first stage controls motif dimensions; the second aligns the cream grid.
Lay the completed blanket flat and begin with the four outer corners. Align the long sides without stretching the black scallops.
Next, correct the internal grid. The cream seams should cross at approximately right angles, and each black square should retain its original proportions.
Shape the ghost arms and lower scallops by hand. Flatten the pumpkins lightly while leaving the embroidered or surface-worked ribs visible.
Allow the blanket to dry completely before folding it.
Finishing the Halloween Blanket
Inspect every ghost arm, pumpkin stem, and jack-o’-lantern facial stitch after blocking because these small details receive more movement than the flat background squares. Reinforce any loose appliqué edge with matching yarn, then check that the cream lattice lies flat against the black scalloped perimeter. Record the final square count and blocked dimensions before making a second size.
This Halloween ghost and pumpkin granny square blanket can be expanded by adding complete alternating rows without changing the individual motifs. Photograph the blanket flat so the checkerboard layout and cream joining grid remain visible, then share the finished version on Pinterest or Instagram with #GhostPumpkinGrannyBlanket. Would you give every orange pumpkin a jack-o’-lantern face, or leave some pumpkins plain?









