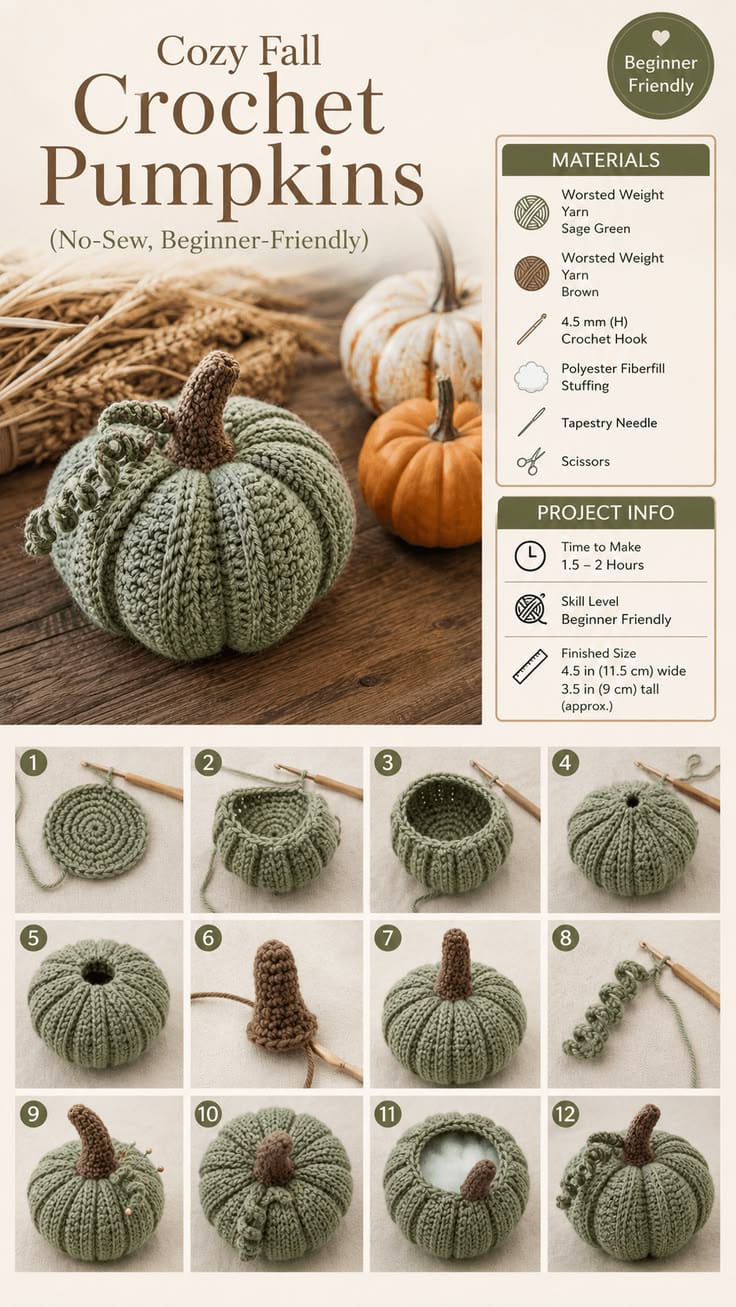
A sage pumpkin needs pronounced vertical ribs or its muted green body can read as a simple stuffed ball. This sage green crochet pumpkin pattern uses worsted-weight yarn, a 4.5 mm hook, a ribbed body, tall brown stem, and tightly curled green vine. The finished pumpkin measures approximately 11.5 cm wide × 9 cm tall and is designed as a compact beginner-friendly fall decoration.
What Makes This Crochet Pumpkin Different
The body is built around strong vertical texture rather than a smooth amigurumi surface. Back-loop stitches create repeated raised columns, and the stuffed form compresses those columns into recognizable pumpkin ribs. This construction also produces a low, rounded profile instead of an elongated sphere.
The second structural feature is the stem. A narrow brown crochet tube rises from the center opening and curves slightly rather than sitting flat against the body. Its height balances the broad pumpkin base.
A separate spiral tendril adds the final identifying detail. Closely packed stitches force the vine to curl naturally beside the stem. One common mistake with a ribbed crochet pumpkin is overstuffing. Too much fiberfill stretches the ribbing until the channels become shallow and the pumpkin turns nearly spherical.
Project Information
| Skill Level | Time | Finished Size | Hook | Yarn |
|---|---|---|---|---|
| Beginner friendly | Approx. 1.5–2 hours | 11.5 cm wide × 9 cm tall | 4.5 mm (H) | Worsted weight |
Materials and Tools
Yarn
- Sage green — worsted-weight yarn — pumpkin body and curly vine.
- Medium brown — worsted-weight yarn — crochet stem.
The exact yarn quantity depends on tension and fiber density. A partial skein of sage yarn is sufficient for a pumpkin of this scale, while the stem requires only a small quantity of brown. Keep both colors at the same yarn weight so the stem remains proportional to the body.
Tools
- 4.5 mm (H) crochet hook
- Polyester fiberfill stuffing
- Tapestry needle
- Scissors
- Stitch markers
- Measuring tape
No safety eyes, embroidery, or facial features are required for this design.
Abbreviations
- MR — magic ring
- ch — chain
- sc — single crochet
- hdc — half double crochet
- inc — increase
- dec — decrease
- sl st — slip stitch
- st/sts — stitch/stitches
- BLO — back loop only
For an invisible decrease in round-based sections, insert the hook through the front loops of the next two stitches, yarn over, draw through both front loops, then complete the single crochet.
Sage Green Crochet Pumpkin Pattern
The body is worked as a ribbed rectangle and converted into a stuffed pumpkin. This method places the raised crochet rows vertically after assembly and produces the deep channels visible in the finished piece.
Ribbed Pumpkin Body
Yarn: sage green worsted weight.
Foundation: Ch 21.
Row 1: Beginning in the second ch from the hook, hdc across. Turn. (20 sts)
Row 2: Ch 1, hdc BLO across. Turn. (20 sts)
Rows 3–30: Repeat Row 2. (20 sts)
Do not fasten off immediately. Fold the rectangle so the foundation edge and final row meet.
The raised ribs should run from one open end of the tube to the other. If they run around the circumference instead, the rectangle has been folded in the wrong direction.
Joining the Pumpkin Body
Place the foundation edge beside Row 30.
Slip stitch through corresponding loops along both edges to form a tube. Keep the seam tension similar to the surrounding crochet. A tight seam creates one narrow rib that remains visible after stuffing.
Fasten off, leaving approximately 50 cm of yarn for closing the first end.
Closing the Bottom
Thread the long sage tail onto a tapestry needle.
Run the needle in and out around the complete open edge, placing one gathering stitch through the end of each rib.
Pull the yarn gradually until the opening closes.
Pass the needle across the center opening several times to reinforce the closure. Knot securely on the inside and bury the tail in the body.
Turn the tube so the seam and knots are inside.
Stuffing the Pumpkin
Add polyester fiberfill in small pieces rather than inserting one large mass.
Fill the lower circumference first, then distribute stuffing around the sides. Keep the center slightly less dense so the top can be drawn inward later.
The body should remain compressible under finger pressure. If the raised BLO channels begin spreading apart, remove a small amount of stuffing.
Continue until the pumpkin is evenly rounded and approximately 11.5 cm wide.
Closing the Top
Cut approximately 60 cm of sage yarn and thread it onto the tapestry needle.
Run gathering stitches around the remaining open edge.
Pull the opening inward but leave a small central space for positioning the stem.
Before knotting, press down gently on the center of the pumpkin. This reduces the height and creates the characteristic flattened profile.
Secure the gathering yarn and leave the tail available for additional shaping.
Shaping the Pumpkin
The BLO construction creates natural ribs, but additional shaping improves the distinction between the top, sides, and bottom.
Insert a long threaded tapestry needle through the bottom center and bring it out through the top center.
Pull until the centers move slightly toward one another.
Return the needle through the pumpkin from top to bottom and pull again.
Repeat this central pass two or three times.
The pumpkin should become slightly flatter without collapsing. Stop when the finished height is close to 9 cm including the intended stem position.
Secure the yarn at the bottom and bury the remaining tail inside the stuffing.
Brown Crochet Stem
Yarn: medium brown worsted weight.
The stem is worked in continuous rounds. Place a stitch marker in the first stitch of each round.
R1: 6 sc in MR. (6)
R2: Sc around. (6)
R3: Sc around. (6)
R4: Sc around. (6)
R5: Sc around. (6)
R6: Sc around. (6)
R7: Sc around. (6)
R8: Sc around. (6)
For a slightly curved stem, work the stitches on one side with marginally tighter tension during the final two rounds. Do not add decreases, because narrowing the stitch count can make the stem tip too pointed.
Fasten off, leaving approximately 25 cm for attachment.
Optional Stem Base
If the stem needs a wider attachment point, continue before fastening off:
R9: Inc ×6. (12)
R10: Sc around. (12)
Fasten off and leave a 25 cm sewing tail.
The wider base can sit over the gathered top opening and conceal the closing stitches.
Curly Crochet Vine
Yarn: sage green worsted weight.
Ch 24.
Beginning in the second ch from the hook, work 3 sc in each chain across.
The concentration of three stitches in every chain forces the strip into a spiral.
Fasten off, leaving approximately 20 cm for attachment.
If the spiral looks uneven, rotate it gently with the fingers rather than pulling it lengthwise. Stretching can remove part of the curl.
Longer Curly Vine Option
For a vine that extends farther down one side of the pumpkin, ch 30 instead of 24.
Work 3 sc in each chain as before.
A longer vine adds more visual weight, so attach it close to the stem and allow only the final curls to rest against the pumpkin ribs.
Assembly
- Finish the sage ribbed body and close the bottom gathering stitches securely.
- Add fiberfill in small sections until the body reaches approximately 11.5 cm wide without stretching the ribbing flat.
- Gather the top opening and shape the body into a low rounded pumpkin.
- Pass shaping yarn between the top and bottom centers until the finished body has the required flattened profile.
- Position the brown stem directly over the top opening and check that it stands close to vertical.
- Sew around the stem base using small stitches through the pumpkin fabric rather than through the raised outer ribs.
- Angle the upper section of the stem slightly while sewing if a curved profile is preferred.
- Position the sage spiral vine beside the stem and attach only its upper end.
- Bury all yarn tails through at least 3 cm of stuffing before trimming excess yarn.
- Reshape the ribs with the fingers and place the pumpkin on a flat surface to check its final balance.
The completed pumpkin should measure approximately 11.5 cm wide × 9 cm tall, with vertical sage ribbing, a narrow brown stem, and a free-hanging spiral vine.
7 Technical Tips for a Ribbed Crochet Pumpkin
- Ribs becoming shallow: Work every body row after Row 1 through the back loop only. Accidentally crocheting through both loops creates a smooth band that interrupts the vertical ribbing.
- Body becoming too tall: Check the width of the 20-stitch rectangle before completing all 30 rows. The rectangle width controls much of the eventual pumpkin height, while the number of rows primarily controls circumference.
- Seam forming a tight groove: Match the joining tension to the final BLO row. A seam pulled more than approximately 5 mm shorter than the opposite folded edge can distort the stuffed body.
- Stuffing showing between stitches: Insert fiberfill in pieces approximately 2–3 cm across. Large compacted pieces push against individual ribs and can open gaps between stitches.
- Pumpkin becoming spherical: Pull the top and bottom centers toward each other after stuffing. The central shaping pass should create a visible depression without compressing the height by more than approximately 1–2 cm.
- Stem leaning excessively: Pin or hold the stem at approximately 90 degrees to the top surface while making the first attachment stitches. Correcting its angle after the entire circumference is sewn usually twists the pumpkin fabric.
- Vine losing its curl: Work 3 sc into every foundation chain and avoid stretching the finished spiral during attachment. Sew only the first 1–2 cm near the stem so the remaining coils stay free.
Changing the Pumpkin Size
The ribbed rectangle makes size adjustments practical. For a wider pumpkin, add more BLO rows before joining the rectangle. Increasing from 30 to 34 or 36 rows creates additional circumference while retaining approximately the same height.
For a taller pumpkin, increase the foundation chain and add stitches to every row. Keep the body proportions in mind: increasing both dimensions equally can create a ball rather than a squat pumpkin.
A smaller version can begin with fewer foundation chains and fewer rows. Use a hook appropriate for the selected yarn rather than reducing hook size aggressively, since excessively tight stitches make gathering the top and bottom more difficult.
Controlling the Ribbed Texture
The visual structure depends on consistent back-loop crochet. Each row leaves an unused front loop that forms a ridge on the surface. Once the rectangle is turned into a tube, those ridges run vertically.
Count the rows rather than estimating the circumference by eye. Missing or adding several rows changes the spacing around the complete pumpkin and can move the joining seam into a more visible position.
Keep the turning chain consistent at both edges. Loose turning chains create an irregular opening that becomes difficult to gather evenly.
Choosing Sage and Brown Yarn
A muted sage green creates a different result from a traditional orange fall pumpkin while retaining the recognizable shape. Medium brown gives the stem enough contrast without competing with the ribbed body.
For a more neutral version, replace sage with oatmeal, cream, taupe, or muted olive. Rust, mustard, and deep terracotta can be used when a stronger autumn palette is required.
Keep the stem darker than the body. When the two values are too similar, the stem visually merges into the gathered center and the pumpkin loses definition.
Stuffing and Final Shaping
Stuffing determines how clearly the ribbing remains visible. Begin at the outer walls and distribute small pieces around the complete circumference before filling the center.
Check the pumpkin from above. The ribs should radiate evenly from the central opening. If one side bulges, move stuffing away from that section before closing the top completely.
Next, inspect the pumpkin at table level. The bottom should sit flat enough to prevent rolling, while the top should have a shallow depression around the stem.
Do not add more stuffing after the ribs reach their intended depth. A firmer body is not automatically a better-shaped pumpkin; excess pressure can erase the texture created by the BLO rows.
Finishing the Sage Green Crochet Pumpkin
Check the bottom closure first and reinforce it if the gathering stitches remain visible. Rotate the pumpkin while adjusting the ribs, then confirm that the brown stem covers the top opening and the sage vine hangs without pulling the stem sideways. The target dimensions are approximately 11.5 cm wide × 9 cm tall.
This sage green crochet pumpkin pattern can be repeated in rust, cream, mustard, or muted orange while keeping the same ribbed construction. Make one reference pumpkin before changing the rectangle dimensions for a coordinated set. Save the finished project to Pinterest or share it on Instagram with #SageGreenCrochetPumpkin.
Would you keep the long curly vine on your sage pumpkin, or make the stem the only top detail?









