Introduction
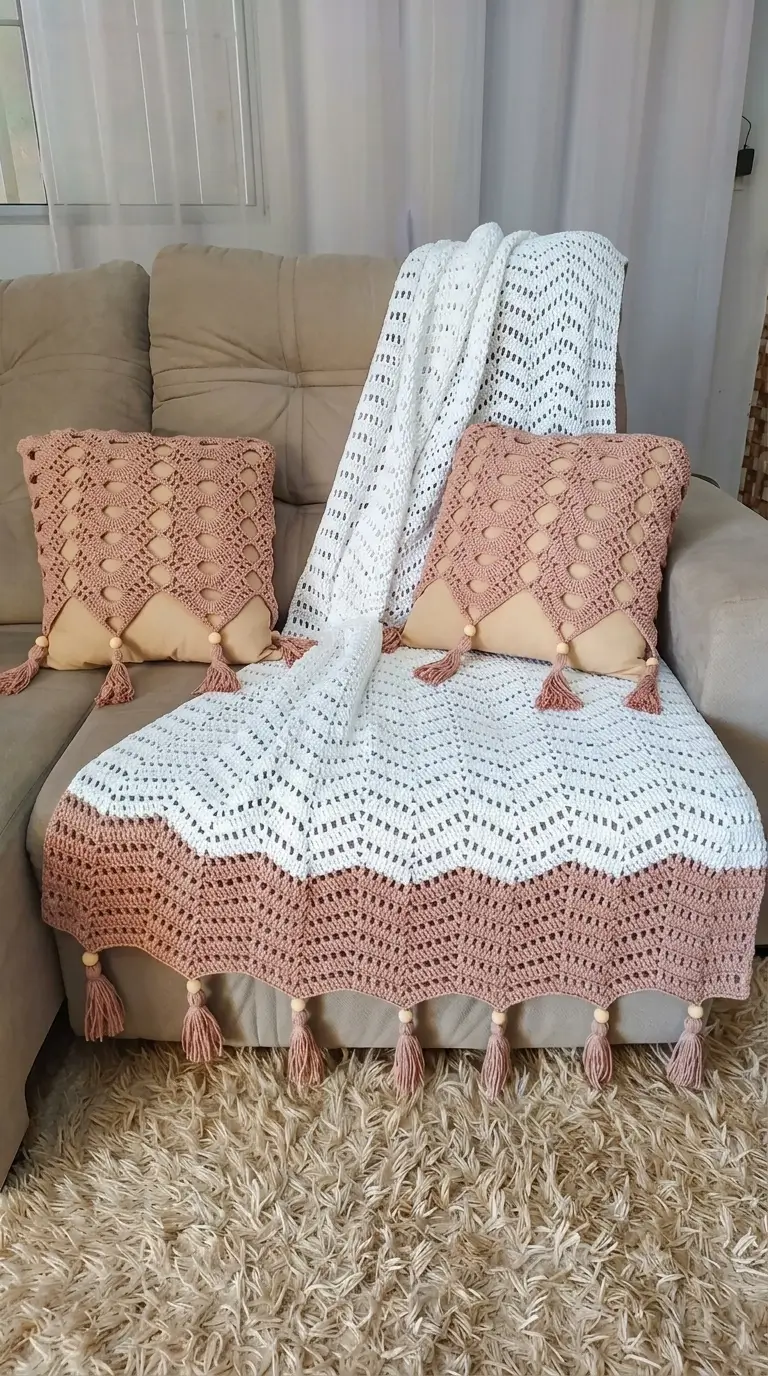
A chevron blanket fails visually when one missing stitch pushes every following peak sideways. This chevron crochet blanket pattern uses controlled increases, valleys and open spaces to produce the white-and-dusty-rose geometry shown in the reference. Plan for worsted yarn, a 5 mm hook and an intermediate skill level; a reference throw size is 114 × 141 cm. The repeated motif also makes width adjustments predictable.
The Design: What Makes This Chevron Throw Different
The photographed blanket combines three structural decisions rather than relying on color stripes alone. First, open chain spaces interrupt the solid crochet and make the V-shaped geometry visible across the white field. Second, dusty rose is concentrated near the lower edge instead of being alternated throughout, giving the throw a clearly defined border zone. Third, tassels are attached at selected downward points, so the decoration continues the underlying zigzag rather than fighting it.
This makes the project closer to a boho crochet blanket than a conventional striped ripple afghan. The same geometry also works as a crochet chevron throw when fewer repeats are used.
The common failure is losing a stitch beside a valley. One displaced decrease changes the alignment of every peak above it, which is why repeat counting matters more than total row speed.
Project Info at a Glance
| Skill Level | Time | Finished Size | Hook | Best For |
|---|---|---|---|---|
| Intermediate | Multi-session project | 114 × 141 cm reference size | 5 mm | Sofa throw / decorative blanket |
The size and hook above are reference specifications from a documented worsted-weight chevron blanket rather than measurements taken directly from the supplied photograph.
Materials and Tools
Yarn
For a photo-inspired version, use worsted-weight yarn while choosing the color distribution according to the reference image. A comparable documented chevron blanket uses approximately 1,200 g of worsted cotton in total.
- White / ivory yarn — worsted weight — approximately 750–850 g.
- Dusty rose / muted blush yarn — worsted weight — approximately 300–400 g, including decorative finishing.
- Tassel reserve — keep approximately 75–100 g of the dusty rose yarn aside before completing the blanket body.
The color-specific quantities are working estimates for this photo-inspired version. They are not measurements taken from the original photographed blanket.
Tools
- 5 mm crochet hook
- Worsted-weight yarn
- Tapestry needle
- Locking stitch markers
- Sharp scissors
- Measuring tape
- Blocking mats and rust-resistant pins
- Natural wooden beads with holes large enough for the tassel cords
- Optional smaller crochet hook for pulling yarn through the beads
Safety note: Wooden beads are decorative components. Omit detachable beads when making a blanket intended for unsupervised use by a baby or small child.
Abbreviations
- ch — chain
- sc — single crochet
- dc — double crochet
- dc2tog — double crochet two together
- sl st — slip stitch
- st / sts — stitch / stitches
- sp — space
- ch-sp — chain space
- rep — repeat
- RS — right side
- WS — wrong side
An invisible decrease is primarily an amigurumi technique and is not required for this flat chevron construction; paired double-crochet decreases or skipped stitches are more appropriate for forming blanket valleys.
Chevron Crochet Blanket Pattern – Step by Step
This project is worked flat in rows, not in a continuous spiral.
The foundation below uses a photo-inspired openwork chevron structure. Before committing to the full throw, crochet at least one complete repeat as a gauge swatch. Chevron width changes noticeably according to yarn, hook size and individual tension.
Gauge Swatch
Yarn: white, worsted weight. Hook: 5 mm.
Chain enough stitches for two complete chevron motifs plus the required edge stitches.
Work the selected chevron sequence for at least 10 rows. Lay the swatch flat without stretching it, then measure horizontally from one peak to the next.
A useful reference gauge for a worsted-weight chevron blanket is approximately 9.5 cm for one 14-stitch chevron, with approximately 10 rows measuring 14 cm when worked with a 5 mm hook.
Do not force the swatch to match those measurements when using a different openwork sequence. Record the actual repeat width instead, then calculate how many complete motifs are required for the planned blanket width.
Foundation and Chevron Body
Yarn: white / ivory.
A stable chevron is created by balancing the shaping at each peak with the shaping at each valley. That balance prevents the blanket from continually increasing or decreasing in width.
Foundation: Chain the required number of complete repeats until the foundation approaches the planned blanket width, then add the turning chains required by the stitch sequence.
Chevron formulas are pattern-specific. A common documented construction uses a multiple of 18 plus 3, while other chevron patterns use different repeat sizes. For this reason, complete repeats should be added or removed rather than cutting random stitches from the slopes.
Row 1: Work dc groups across the foundation, forming each peak with an increase or chain space and each valley with skipped stitches or a corresponding decrease. Maintain the same number of ordinary dc stitches on both slopes of every V.
Row 2: Ch 3 and turn. Work dc into each dc. At every peak, work the designated peak increase into the peak space. At each valley, repeat the same decrease or skipped-stitch treatment established in Row 1.
Row 3: Repeat Row 2, checking the stitch distribution between every peak and valley.
Row 4: Introduce the first openwork row. Replace selected solid dc groups with evenly spaced ch-1 spaces using dc, ch 1, skip 1 st across the designated portions of each slope.
Row 5: Work dc into each dc and dc into each ch-1 space while maintaining the established peak and valley shaping.
Rows 6–8: Work solid chevron rows.
Row 9: Repeat the openwork treatment from Row 4.
Row 10: Restore the solid dc structure.
Continue repeating the sequence until the white section reaches the planned depth.
The critical rule is balance: the increase at every peak and the reduction at every valley must remain consistent. Place stitch markers in the valleys if needed. One misplaced valley can shift the geometry of every subsequent row.
White Openwork Section
Yarn: white / ivory.
The photographed throw does not use one uninterrupted field of solid stitches. Horizontal openwork bands interrupt the fabric at regular intervals and emphasize the zigzag structure.
Openwork Row A: Maintain all peak and valley shaping. Across the straight slopes, alternate dc, ch 1, skip 1 st where the stitch count permits.
Openwork Row B: Work a dc into each dc and into each ch-1 space. Preserve the same increase at each peak and the same reduction at each valley.
Solid Rows C–E: Work three complete solid chevron rows.
Repeat Rows A–E until the white portion reaches the required length.
Keep the spacing between openwork bands consistent. If one lace band is separated from the next by three solid rows, maintain that interval throughout the section.
Dusty Rose Lower Section
Yarn: dusty rose / muted blush.
Change to the accent color at the end of a completed row. Make the change during the final yarn-over of the last stitch for a cleaner transition.
Rose Row 1: Work the established solid chevron sequence.
Rose Row 2: Repeat the same peak and valley shaping.
Rose Row 3: Work an openwork row while retaining every established peak and valley.
Rose Row 4: Return to solid dc.
Rows 5–8: Continue the chevron repeat.
Row 9: Add another openwork band.
Continue the dusty rose section until it occupies approximately one quarter to one third of the total blanket depth. This proportion is based on the visual structure of the supplied photograph rather than an original written pattern.
Final Chevron Edge
Yarn: dusty rose.
The lower edge should retain the zigzag points instead of being converted automatically into a straight rectangular border.
Final Row: Work one complete solid chevron row.
Check every peak and valley before fastening off. Each final valley should sit directly below the corresponding valley in the preceding rows.
Fasten off and leave approximately a 15 cm yarn tail. Weave the tail through several stitches, reverse direction and weave through another section before trimming.
The finished pointed edge provides natural attachment positions for the decorative tassels.
Dusty Rose Tassels
Make enough tassels to decorate the selected lower chevron points.
The reference photograph combines dusty rose tassels with pale wooden beads. Keeping the tassels aligned with the chevron points continues the geometry beyond the crocheted edge.
Step 1: Cut approximately 14–16 strands of dusty rose yarn for each tassel. Each strand can measure approximately 30–38 cm before folding.
Step 2: Fold the strands together at their midpoint.
Step 3: Cut a separate tying strand approximately 30 cm long and secure the bundle firmly at the center.
Step 4: If beads are being used, thread both ends of the tying strand through one wooden bead.
Step 5: Attach the tassel at a downward-facing chevron point. Tighten the attachment enough to hold the bead against the fabric without pulling the crochet point out of shape.
Step 6: Wrap another strand around the tassel approximately 2–2.5 cm below the bead. Knot securely and bury the loose ends inside the tassel.
Step 7: Trim the bottom of the tassel to an even length.
Repeat the process at evenly spaced chevron points across the lower edge.
Optional Side Tassels
The strongest tassel rhythm in the reference image runs along the visible lower edge. Extra tassels can be added to selected side or corner points, but attaching fringe to every available row can add unnecessary weight and distort the edges.
Cut every tassel using the same rigid template. A piece of cardboard or notebook measuring approximately 15–18 cm long provides consistent strand lengths.
Optional Coordinating Cushion Cover
The photograph also includes two dusty rose crochet cushion covers. Their stitch pattern appears more elaborate than the blanket’s chevron structure, so the cushion should be treated as a coordinating project rather than as another section of the blanket pattern.
For a coordinated version, make a 40 × 40 cm cushion cover using the same dusty rose yarn. Repeat an openwork chevron panel across the front to connect the cushion visually with the throw.
Make two square panels, or crochet one long rectangle that folds around the cushion pad. Join the side seams with mattress stitch or slip stitches.
If the cushion cover needs to be removable, overlap the back panels to create an envelope-style opening instead of sewing all four edges permanently closed.
Optional Straight Border
The photographed blanket has a pointed lower edge. Adding a rectangular border changes that silhouette substantially.
If a straight edge is required, fill each valley before working around the perimeter. Progressively increase stitch height toward the deepest part of each V, then reverse the sequence as the stitches approach the next peak.
Once the valleys are sufficiently filled, work one round of sc around the blanket.
Place 3 sc in each true corner to prevent the border from pulling inward.
Skip this finishing method when the pointed, tasselled edge shown in the reference is the desired result.
Assembly and Finishing
- Lay the finished blanket on a flat surface and check that the central chevron line has not shifted sideways.
- Weave white yarn tails into white sections and dusty rose tails into matching rose sections.
- Block the white field to the target measurements without pulling individual peaks out of alignment.
- Block the dusty rose section so its valleys remain vertically aligned with those in the white field.
- Mark every planned tassel position before attaching the first tassel.
- Cut all tassel bundles with the same cardboard or notebook template.
- Thread the optional wooden beads onto the tassel attachment cords.
- Attach the center tassel first, then work outward symmetrically toward the corners.
- Trim the tassels only after the blanket is lying or hanging naturally and their lengths have been compared.
- Check every knot, bead and woven yarn tail before putting the blanket into regular use.
The completed blanket should retain continuous chevron alignment from the white upper field through the dusty rose section and into the placement of the lower tassels.
7 Technical Tips for a Cleaner Chevron Blanket
- Mark every valley. A missed valley reduction can shift the next peak by one or more stitches. The error becomes increasingly visible as additional rows are worked.
- Count between shaping points. Verify the stitch number on every slope rather than repeatedly counting the entire blanket. This isolates an error within one chevron repeat.
- Measure tassel spacing before attachment. Random fringe positions can make a mathematically regular edge appear asymmetric. Mark every intended attachment point before fixing the first tassel.
- Keep finished tassel lengths within approximately 5 mm of one another. Trim the fringe while the blanket hangs naturally. Cutting while the yarn is stretched can produce uneven ends later.
- Place a stitch marker at both outer edges. Accidentally dropping a turning-chain stitch progressively narrows the blanket even when the central chevrons remain correctly formed.
- Pin the peaks before stretching the valleys during blocking. Pulling a valley downward first can enlarge nearby chain spaces and create inconsistent V angles.
- Control the openwork chain tension. Chains that are much tighter than the dc stitches pull the slopes inward, while excessively loose chains create oversized holes and weaken the zigzag definition.
Conclusion
Measure one complete chevron before calculating the final foundation because repeat width controls the finished blanket more reliably than copying a chain count intended for another yarn. After establishing the white field, mark the color-change row so the dusty rose section stays proportional, then reserve enough accent yarn for the tassels. This chevron crochet blanket pattern can be resized by adding or removing complete repeats rather than altering individual slopes. Pin your finished version to Pinterest and share it on Instagram with #BohoChevronBlanket. Before attaching the final fringe, compare the lower edge with your planned finish: will you use wooden beads between the crochet points and tassels, or leave the dusty rose fringe unadorned?









