Introduction
A windowpane square fails visually when one opening is narrower than the next. This windowpane granny square blanket solves that problem by building a measured open grid before adding a firm outer frame. Use worsted-weight yarn, a 5 mm hook, and blocked motifs around 13–14 cm for an intermediate-level throw. Modular construction also makes damaged squares easier to replace than sections of a one-piece blanket.
The Design: What Makes This Windowpane Square Different
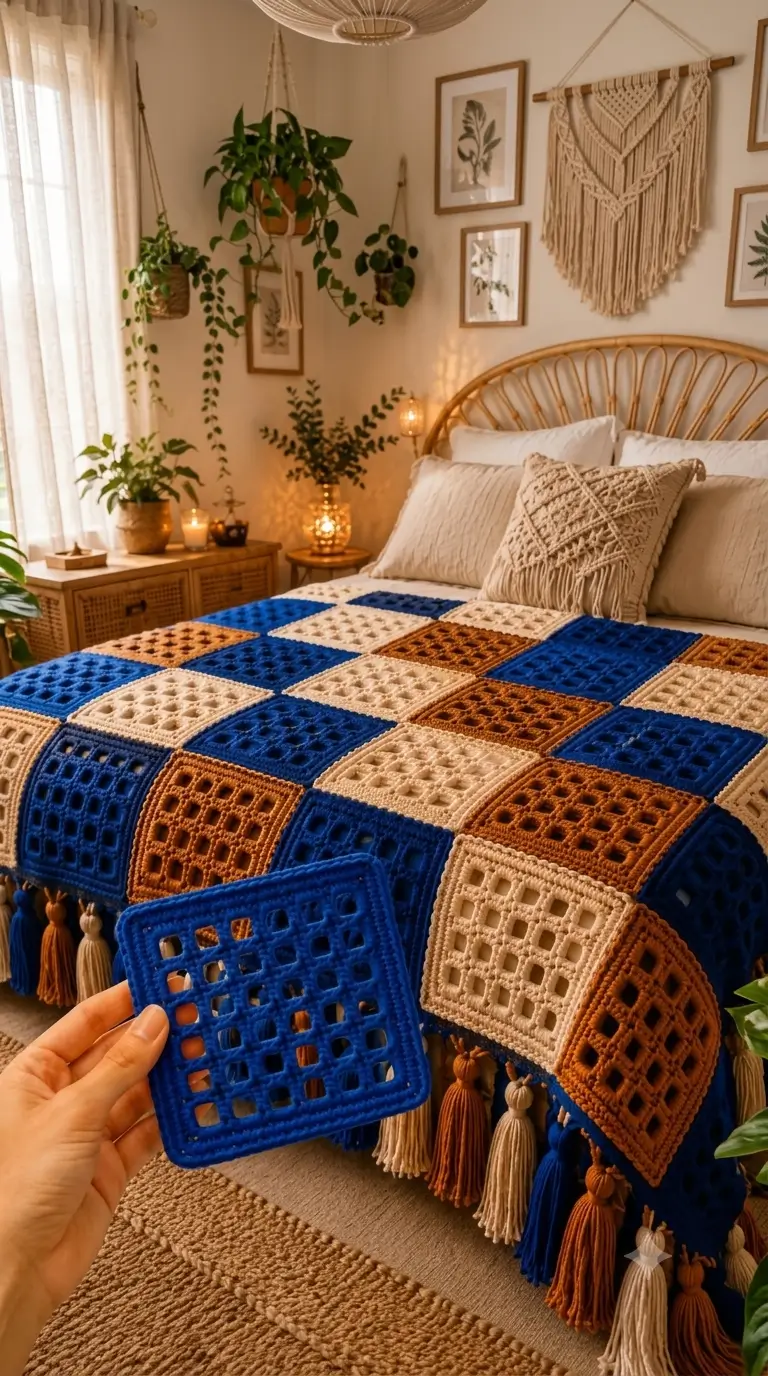
The photograph depends on geometry rather than traditional granny clusters. Large openings form the visual center, while denser crochet around the perimeter gives every motif enough structure for seaming. That contrast matters: an entirely mesh-based square can stretch at the joins and produce uneven gaps.
A second decision is monochrome construction. Each openwork crochet square stays blue, cream, or caramel rather than changing color within the motif, so the checkerboard arrangement supplies the color movement. Third, a relatively firm border gives the crochet square blanket clear seam lines.
The common failure is joining motifs before blocking them. A 5 mm difference repeated across seven squares becomes 35 mm across one row. The maker sees individual squares; the finished blanket exposes the accumulated error.
Project Info at a Glance
| Skill Level | Time | Finished Size | Hook | Best For |
|---|---|---|---|---|
| Intermediate | 25–35 hours | Approx. 96 × 127 cm | 5.0 mm | Throw / bed accent |
The 96 × 127 cm measurement is a practical target for this version. Individual motifs should finish at approximately 13–14 cm after blocking. Final dimensions depend on yarn, tension, joining method, motif count, and border width.
Materials and Tools
Yarn
Use #4 worsted-weight yarn with consistent fiber content and meterage across all three colors.
- Royal blue — worsted/#4 — approximately 600–750 g — choose a smooth acrylic or wool-blend yarn with clear stitch definition.
- Cream/ivory — worsted/#4 — approximately 350–500 g — use the same yarn line as the blue.
- Caramel/cognac — worsted/#4 — approximately 350–500 g — match fiber content and meterage to the other colors.
These quantities are project estimates because individual crochet tension and final blanket dimensions affect yarn consumption. Buy by meterage rather than skein count when substituting yarn.
Tools
- 5.0 mm crochet hook
- Tapestry needle
- Scissors
- Locking stitch markers
- Rust-resistant blocking pins
- Blocking mats
- Tape measure
- Tassel maker or cardboard template — optional
Abbreviations
- ch — chain
- sc — single crochet
- dc — double crochet
- sl st — slip stitch
- sp — space
- st/sts — stitch/stitches
- RS — right side
- WS — wrong side
- rep — repeat
Gauge and Square Planning
Make one complete square before calculating the blanket.
The target measurement is approximately 13–14 cm after blocking. Do not stretch an undersized motif aggressively to reach this measurement. Change the hook size instead.
If one finished square plus its seam occupies approximately 14 cm, seven columns measure about 98 cm before a substantial outer border. Nine rows produce approximately 126 cm. That gives a practical 7 × 9 layout containing 63 squares.
A useful starting distribution is 27 blue, 18 cream, and 18 caramel motifs. The color positions can then be adjusted before joining to prevent large same-color clusters.
Windowpane Granny Square Pattern
Use one solid color per square. Work with a 5 mm hook. The pattern uses a filet-style open grid surrounded by a stabilizing border.
Open-Grid Windowpane Square
Foundation: Ch 27.
Row 1: Dc in 6th ch from hook, *ch 2, skip 2 ch, dc in next ch* across. Turn.
Row 2: Ch 5, *dc in next dc, ch 2* across, ending with dc in turning chain. Turn.
Rows 3–9: Repeat Row 2.
Measure the mesh before adding the border. The individual openings should appear square rather than forming tall rectangles.
Do not fasten off.
Structural Border
The denser perimeter stabilizes the open grid and provides a consistent edge for joining.
Border Round 1: Ch 1. Work sc evenly around all four sides, placing 3 sc into each corner. Join with sl st.
Count the stitches on opposite sides. Top and bottom should match, while left and right should also contain equal stitch totals.
Border Round 2: Ch 1, sc in each st around, working 3 sc in the center corner stitch at each corner. Join with sl st.
Border Round 3: Repeat Border Round 2.
Fasten off, leaving approximately a 20 cm tail when the squares will be whipstitched together.
Block the finished motif to approximately 13–14 cm. Crochet tension varies, so adjust the hook size if the motif consistently finishes outside the target measurement.
Blue Squares
Make approximately 27 blue squares for the proposed 7 × 9 arrangement.
Use royal or cobalt blue throughout each motif. Do not switch colors within individual squares. Keeping each motif monochrome creates the strong geometric color blocking visible in this blanket style.
Block every blue square to the same dimensions as the original test motif.
Cream Squares
Make approximately 18 cream squares.
Choose cream or ivory rather than a stark white when reproducing the warm three-color palette. Check the motif dimensions after adding the first border round.
Light-colored yarn exposes inconsistent spacing clearly, so compare the grid openings before fastening off.
Caramel Squares
Make approximately 18 caramel squares.
A medium caramel, cognac, or warm brown creates the third section of the palette. Match its yarn weight and approximate meterage to the blue and cream yarns.
If the brown motifs consistently finish larger than the blue squares, change the hook size or tension rather than forcing them smaller during joining.
Joining the Squares
Arrange all 63 blocked motifs on a flat surface in seven columns and nine rows before making the first seam.
A controlled irregular arrangement works particularly well with this palette. Blue remains the dominant color, while cream and caramel interrupt large sections of blue.
Take a photograph of the complete arrangement before moving any motifs.
For a flat visible seam, hold two squares with wrong sides together and work slip stitches through corresponding outer loops. Keep the working yarn underneath the motifs.
You can also whipstitch the squares with a tapestry needle. Match each border stitch on the first square with the corresponding stitch on the second.
Complete the horizontal joins first. Rotate the panel and work the vertical joins afterward.
Measure the blanket after every second joined row. Bowing or puckering usually means the joining seam is being worked more tightly than the square edges.
Outer Blanket Border
Join blue yarn at one corner of the assembled blanket.
Round 1: Ch 1, sc evenly around the complete blanket, working 3 sc at each corner. Avoid adding unnecessary stitches where four square corners meet.
Round 2: Ch 1, sc in every st around, working 3 sc in each corner.
Round 3: Repeat Round 2.
Round 4: Sl st loosely in each st around for a defined finishing edge. If the slip-stitch round causes the blanket edge to contract, replace it with another round of sc.
Fasten off and weave the yarn tail through at least 10 cm of stitches, changing direction before trimming.
How to Make the Tassels
Cut 20–24 cm yarn strands using blue, cream, and caramel.
For each tassel, group approximately 20–24 strands. Fold the bundle in half around a separate tie strand.
Bind the neck approximately 2 cm below the top. Tighten securely, then trim the lower ends so the completed tassel measures approximately 9–10 cm.
Attach the tassels along the lower and side edges at regular intervals. Spacing them approximately 12–15 cm apart creates a defined border without making the edge excessively heavy.
Alternate blue, cream, and caramel tassels or coordinate each tassel with the nearest square.
Assembly
- Block the first test square to a final 13–14 cm target.
- Make the remaining blue, cream, and caramel squares to the same blocked dimensions.
- Measure every motif before joining and separate any square more than 3 mm outside the target.
- Arrange the 63 proposed squares in seven columns and nine rows.
- Photograph the complete color arrangement before moving the motifs.
- Join individual squares into horizontal strips without stretching their borders.
- Connect the completed strips and check the blanket diagonals for squareness.
- Crochet the outer border with identical corner increases at all four corners.
- Make and attach 9–10 cm tassels at evenly measured intervals.
- Weave in the remaining ends and block the complete blanket to its planned dimensions.
The finished blanket should lie flat with consistent square openings, straight joining lines, and four square corners.
7 Technical Tips for Cleaner Squares
- Mark every row edge. A missed final dc makes one side of the grid one cell shorter. Place a locking marker in the first and last stitch until the square is complete.
- Reject a square more than 3 mm off target after blocking. Small differences multiply across a seven-square row. Correct the hook size or tension before producing another batch.
- Control the border stitch distribution. Too many sc along one mesh edge creates ruffling, while too few stitches make the square cup inward. Opposite sides need matching stitch totals.
- Measure the openings as well as the complete square. A 15 mm grid opening beside a 20 mm opening produces visible distortion even when the outside dimensions are correct.
- Pin all four corners first. Pinning random edge points before establishing the corners can distort the grid diagonally. Set the square dimensions first, then place additional pins along each side.
- Keep the joining seam at neutral tension. A seam even 5 mm shorter than the square edge can pull several motifs inward. Lay each completed strip flat before joining another row.
- Weave tails in different directions. A short straight yarn tail can migrate through an open-grid fabric. Weave at least 10 cm and reverse direction once before cutting the excess.
Planning the Three-Color Layout
Blue functions as the dominant color in this blanket. That should determine the order in which the layout is planned.
For 63 motifs, start with approximately 27 blue, 18 cream, and 18 caramel squares. Position the blue motifs first and spread them throughout the complete rectangle.
Add the cream squares next. Their lighter value creates the strongest contrast against the deep blue.
Position the caramel motifs last. Brown occupies a middle visual value between cream and cobalt, so it works well as a transition color.
Take a grayscale photograph of the arrangement before joining. Removing the color temporarily makes uneven dark and light areas easier to detect. If one quadrant looks substantially darker, move two or three blue squares instead of rearranging the entire blanket.
How Much Yarn Do You Need?
Exact yarn consumption depends on the finished square measurement, yarn construction, tension, joining technique, border depth, and number of tassels.
The most reliable method is to make one complete blocked motif and weigh it with a digital kitchen scale.
For example, if one square weighs 20 g and the blanket contains 63 squares:
20 g × 63 = 1,260 g
That figure covers the motifs only. Additional yarn is required for joining, the outer border, tassels, swatching, and normal variation between squares.
Allow approximately 10–15% additional yarn. Buying the main color from the same dye lot also reduces visible color differences between batches.
How to Resize the Blanket
Modular construction makes this windowpane granny square blanket easy to resize mathematically.
Measure one blocked motif including the approximate seam allowance. Multiply that number by the desired number of columns for width and rows for length. Add the outer border afterward.
With 14 cm modules, approximate dimensions before the final border are:
- 6 × 8 squares: approximately 84 × 112 cm
- 7 × 9 squares: approximately 98 × 126 cm
- 8 × 10 squares: approximately 112 × 140 cm
- 10 × 12 squares: approximately 140 × 168 cm
The 7 × 9 arrangement works well when the goal is a medium throw. Add or remove complete rows and columns rather than changing individual motif dimensions after several squares have already been made.
Why Blocking Matters With Openwork Crochet
Dense crochet can disguise small differences in tension. An open grid cannot.
Every chain space creates a visible horizontal measurement, while the tall stitches control vertical spacing. Changes in tension therefore alter both the outside dimensions and the proportions of the individual windows.
Block the test square before calculating the final number of motifs. Record its dimensions and use those measurements for every subsequent square.
Apply the same blocking method to all three colors. If different yarn brands or fibers are used, make one test square in each yarn because two products labeled worsted weight can still produce noticeably different dimensions.
Do not join the blanket until all motifs have been measured. Correcting one oversized square takes minutes; correcting distortion after dozens of seams have been completed takes considerably longer.
Conclusion
Block one complete motif before buying yarn for the full project; its finished measurement determines square count, total dimensions, and a more accurate yarn estimate. For the photographed proportions, begin with a 13–14 cm test motif and evaluate a seven-by-nine layout before adding the border and tassels. Save the color-placement photograph so rows do not shift during joining. Pin this windowpane granny square blanket pattern to Pinterest or share the completed three-color layout on Instagram with #WindowpaneGrannySquareBlanket. Which color will dominate your grid: cobalt blue, cream, or caramel?









