Introduction
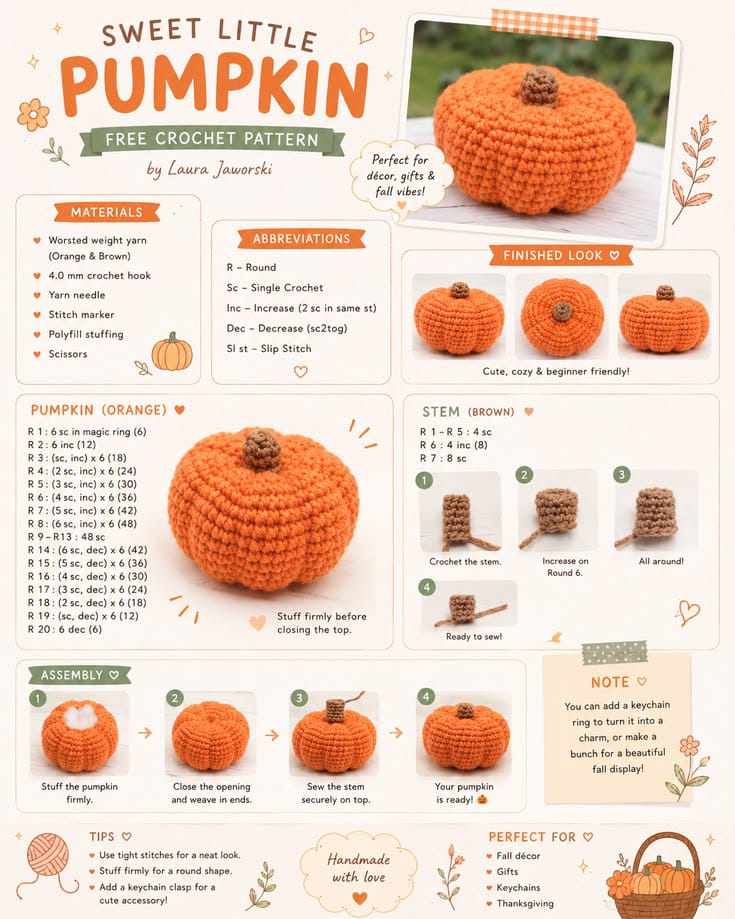
A pumpkin loses its identity fast when the vertical lobes disappear and the body becomes an orange ball. This pumpkin amigurumi crochet pattern fixes that problem with a flattened 36-stitch body, firm stuffing, sculpting passes, worsted-weight yarn, and a 4 mm hook. The finished piece measures roughly 12–13 cm wide and suits advanced beginners. Its compact footprint works particularly well for shelf, table, or Thanksgiving-place-setting décor.
The Design: What Makes This Pumpkin Different
<p>The body needs width before height. Six increase rounds therefore establish a 36-stitch circumference, followed by a deliberately short plateau that keeps the <strong>crochet pumpkin amigurumi</strong> squat rather than egg-shaped.</p>

<p>A second structural decision happens after stuffing. Long yarn passes run from the bottom center to the top center and around the outside, compressing the surface into separate lobes. This external sculpting method produces the characteristic pumpkin channels without requiring complicated crochet stitches.</p>

<p>Finally, the stem stays narrow. A large stem makes a compact pumpkin look top-heavy, while a six-stitch tube maintains the proportions visible in the reference.</p>

<p>The common mistake with a <strong>worsted weight crochet pumpkin</strong> is overstuffing before sculpting. A body packed completely rigid cannot compress into deep channels. Stuff firmly enough to remove dents, but leave enough movement for the shaping thread.</p>
Project Info at a Glance
<table>
  <thead>
    <tr>
      <th>Skill Level</th>
      <th>Time</th>
      <th>Finished Size</th>
      <th>Hook</th>
      <th>Best For</th>
    </tr>
  </thead>
  <tbody>
    <tr>
      <td>Advanced beginner</td>
      <td>2–3 hours</td>
      <td>Approx. 12–13 cm wide × 9–10 cm high</td>
      <td>4.0 mm</td>
      <td>Fall tabletop and shelf décor</td>
    </tr>
  </tbody>
</table>

<p>Finished dimensions remain approximate because personal tension and stuffing density directly affect the result.</p>
Materials and Tools
<h3>Yarn</h3>
<ul>
  <li><strong>Pumpkin orange</strong> — worsted/Aran weight — approximately 30–40 g.</li>
  <li><strong>Medium brown</strong> — worsted/Aran weight — approximately 5 g for the stem.</li>
</ul>

<h3>Tools</h3>
<ul>
  <li><strong>4.0 mm crochet hook</strong></li>
  <li><strong>Polyester fiberfill</strong></li>
  <li><strong>Yarn needle</strong>, preferably long enough to pass through the stuffed pumpkin</li>
  <li><strong>Locking stitch marker</strong></li>
  <li><strong>Straight pins</strong></li>
  <li><strong>Scissors</strong></li>
  <li><strong>Optional strong orange cotton thread</strong> for deeper sculpting channels</li>
</ul>

<p>No safety eyes are required because this pumpkin has no face.</p>
Abbreviations
<ul>
  <li><strong>MR</strong> — magic ring</li>
  <li><strong>sc</strong> — single crochet</li>
  <li><strong>inc</strong> — increase; work 2 sc in one stitch</li>
  <li><strong>dec</strong> — decrease</li>
  <li><strong>sl st</strong> — slip stitch</li>
  <li><strong>ch</strong> — chain</li>
  <li><strong>BLO</strong> — back loop only</li>
  <li><strong>st/sts</strong> — stitch/stitches</li>
  <li><strong>R/Rnd</strong> — round</li>
</ul>

<p>For an invisible decrease, insert the hook through the front loops of the next two stitches, yarn over, pull through both front loops, then complete the single crochet.</p>
Pattern — Step by Step
<p>Work the pumpkin in a continuous spiral unless a section states otherwise. Mark the first stitch of every round.</p>

<p>The design contains two primary crocheted components: the pumpkin body and brown stem. The vertical pumpkin ribs are formed after stuffing by sculpting the finished body.</p>

<h3>Pumpkin Body — Make 1</h3>

<p><em>Yarn: pumpkin orange. Work continuously in a spiral.</em></p>

<p>
  <strong>R1:</strong> 6 sc in MR (6)<br>
  <strong>R2:</strong> inc ×6 (12)<br>
  <strong>R3:</strong> (sc, inc) ×6 (18)<br>
  <strong>R4:</strong> (2 sc, inc) ×6 (24)<br>
  <strong>R5:</strong> (3 sc, inc) ×6 (30)<br>
  <strong>R6:</strong> (4 sc, inc) ×6 (36)<br>
  <strong>R7:</strong> sc around (36)<br>
  <strong>R8:</strong> sc around (36)<br>
  <strong>R9:</strong> sc around (36)<br>
  <strong>R10:</strong> sc around (36)<br>
  <strong>R11:</strong> sc around (36)<br>
  <strong>R12:</strong> sc around (36)<br>
  <strong>R13:</strong> sc around (36)<br>
  <strong>R14:</strong> (4 sc, dec) ×6 (30)<br>
  <strong>R15:</strong> (3 sc, dec) ×6 (24)
</p>

<p><em>Begin stuffing. Concentrate fiberfill around the outer wall while leaving the center slightly more compressible.</em></p>

<p>
  <strong>R16:</strong> (2 sc, dec) ×6 (18)<br>
  <strong>R17:</strong> (sc, dec) ×6 (12)
</p>

<p><em>Add the final stuffing before the opening becomes too narrow. The pumpkin should be firm but still compress slightly under thumb pressure.</em></p>

<p><strong>R18:</strong> dec ×6 (6)</p>

<p>Fasten off, leaving a <strong>90–100 cm tail</strong> if the same strand will be used to form the pumpkin channels. Close the remaining six stitches with a yarn needle.</p>

<h3>Pumpkin Ribs and Sculpting Channels</h3>

<p><em>Use the orange body tail or strong matching orange thread.</em></p>

<p><strong>Pass 1:</strong> Insert the needle at the bottom center and push it through the center of the stuffed pumpkin until it exits at the top.</p>

<p><strong>Pass 2:</strong> Carry the strand down the outside surface of the pumpkin and insert the needle through the bottom center again.</p>

<p><strong>Pass 3:</strong> Bring the needle through the center and out through the top again.</p>

<p>Pull the strand until a clear vertical groove appears. The thread should compress the pumpkin without cutting deeply between the crochet stitches.</p>

<p>Rotate the pumpkin approximately <strong>60 degrees</strong> and repeat the process.</p>

<p>Make six evenly spaced sculpting passes to divide the pumpkin into <strong>six primary lobes</strong>. For narrower sections closer to the photographed reference, make eight evenly spaced passes instead.</p>

<p>Check the pumpkin from directly above before securing the thread. The channels should radiate from the stem position toward the bottom center.</p>

<p>Tie off securely on the underside and bury the remaining yarn tail inside the stuffed body.</p>

<h3>Brown Stem — Make 1</h3>

<p><em>Yarn: medium brown.</em></p>

<p>
  <strong>R1:</strong> 6 sc in MR (6)<br>
  <strong>R2:</strong> BLO sc around (6)<br>
  <strong>R3:</strong> sc around (6)<br>
  <strong>R4:</strong> sc around (6)<br>
  <strong>R5:</strong> sc around (6)<br>
  <strong>R6:</strong> sc around (6)
</p>

<p><em>Do not pack the stem densely. A very small amount of fiberfill is enough to prevent the tube from collapsing.</em></p>

<p>Fasten off and leave a <strong>20 cm sewing tail</strong>.</p>

<p>The BLO round creates a defined transition between the stem base and its side wall. Work through both loops instead if a softer transition is preferred.</p>

<h3>Optional Stem Base Disc</h3>

<p><em>Yarn: medium brown.</em></p>

<p>
  <strong>R1:</strong> 6 sc in MR (6)<br>
  <strong>R2:</strong> inc ×6 (12)
</p>

<p>Sl st into the next stitch and fasten off, leaving a <strong>15 cm tail</strong>.</p>

<p>Place the stem over the center of the disc and sew the two pieces together. Attach the completed stem unit to the center of the pumpkin.</p>

<h3>Optional Hanging Loop</h3>

<p><em>Yarn: brown or orange.</em></p>

<p><strong>Ch 18.</strong></p>

<p>Sl st into the first chain to form a loop. Fasten off, leaving a <strong>15 cm tail</strong>.</p>

<p>The loop can be positioned behind the stem. A metal keyring may then be threaded through it when making a hanging ornament or lightweight bag accessory.</p>
Assembly
<ol>
  <li>Place the completed pumpkin on a flat surface with the closed final round facing upward and check that the body sits without rolling excessively.</li>
  <li>Complete all six or eight sculpting passes before attaching the stem. Each groove should travel from the top center to the bottom center.</li>
  <li>Adjust the lobes by hand so their widths are similar. Redistribute stuffing through the crochet fabric if one section bulges more than the others.</li>
  <li>Center the brown stem directly over the closed top round and pin it vertically before sewing.</li>
  <li>Thread the 20 cm brown tail and sew around the full stem circumference, catching the pumpkin fabric securely.</li>
  <li>Pass the needle through the pumpkin and return close to the stem base before securing the yarn. This places the final tail inside the stuffing.</li>
  <li>If using the optional brown base disc, attach the stem to the disc first and sew the completed unit over the pumpkin's top closure.</li>
  <li>If adding a hanging loop, position both loop ends immediately behind the stem and stitch through the pumpkin fabric several times.</li>
  <li>Bury every remaining tail through at least 3 cm of stuffed fabric, pull lightly, trim, and allow the cut end to retract inside.</li>
  <li>Place the pumpkin on a flat surface and correct the lobe spacing by repositioning the sculpting wraps rather than adding more stuffing.</li>
</ol>

<p>The completed pumpkin should have a low segmented orange body, evenly distributed vertical channels, and a short upright brown stem.</p>
7 Technical Tips for a Better Crochet Pumpkin
<ul>
  <li><strong>Prevent losing the round start:</strong> Move the stitch marker after completing the first stitch of every round. A misplaced marker can shift a decrease sequence by one stitch and distort the final closure.</li>

  <li><strong>Stop the body becoming egg-shaped:</strong> Keep the 36-stitch plateau to <strong>seven rounds, R7–R13</strong>. Extra plain rounds add height without adding width.</li>

  <li><strong>Prevent stuffing from showing:</strong> Add fiberfill in pieces approximately <strong>2–3 cm wide</strong> rather than inserting one large wad. Concentrated lumps can stretch individual stitches and expose white fiber.</li>

  <li><strong>Avoid visible decrease gaps:</strong> Work invisible decreases through the front loops of the next two stitches. Standard decreases can create six visible seams around the narrowing section.</li>

  <li><strong>Stop pumpkin channels disappearing:</strong> Tighten each sculpting wrap until the groove is approximately <strong>5–8 mm deep</strong> around the widest section. Loose wraps leave the body looking spherical.</li>

  <li><strong>Prevent a leaning stem:</strong> Pin the stem at approximately <strong>90 degrees</strong> to the top surface before sewing. Attaching one side too tightly can pull the narrow stem off center.</li>

  <li><strong>Prevent yarn tails from emerging:</strong> Weave each sculpting tail through at least <strong>3 cm</strong> of dense stuffing before trimming. Cutting directly beside the knot can allow the yarn end to work back through the center opening.</li>
</ul>
Finishing the Pumpkin
<p>Check the six sculpting channels before cutting the final orange tail; correcting their spacing is much easier while that strand remains accessible. Then record the yarn, hook, finished width, and stuffing amount used so a second pumpkin can match the first.</p>

<p>This <strong>pumpkin amigurumi crochet pattern</strong> can also be scaled by changing yarn thickness while keeping the stitch sequence unchanged, although the finished dimensions will change. Photograph the completed pumpkin from the front and overhead to show the lobe spacing, then save the project to Pinterest or share it on Instagram with <strong>#WorstedPumpkinAmigurumi</strong>.</p>

<p>For the next version, would six deep lobes or eight narrower ribs better match the pumpkin shape you want?</p>









