Introduction
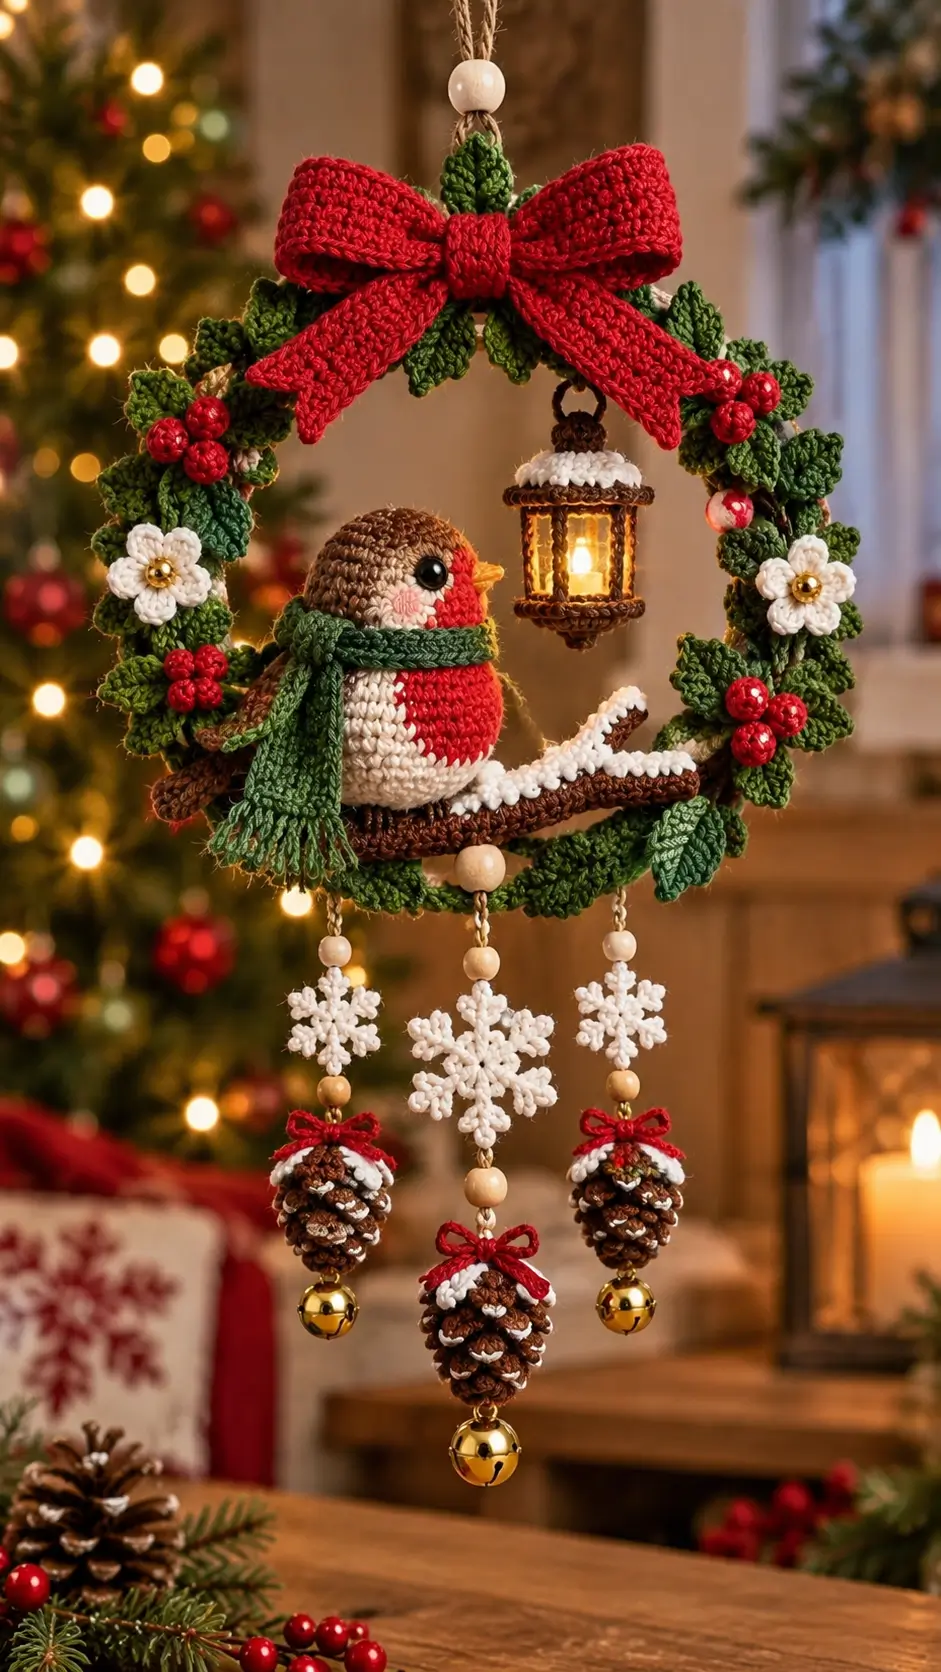
A robin’s red breast has to remain visible even when the bird is wrapped in a scarf and sitting inside a decorated Christmas wreath. This Christmas robin wreath amigurumi pattern uses worsted-weight yarn, a 2.75 mm crochet hook, 9 mm safety eyes, and tightly worked single crochet. The finished robin measures about 11 cm. The project is intermediate level and works as a hanging Christmas ornament rather than a handled toy.
The Design: What Makes This Christmas Robin Different
The robin is built around a rounded 36-stitch body so the cream belly and red breast remain broad enough to read clearly from the front. A separate brown head creates a more defined bird silhouette than a single oval body would provide. The wings sit low on the sides because raising them too close to the eyes makes a small crochet robin look top-heavy. The green scarf is narrow and flat, allowing it to wrap around the neck without hiding the characteristic red chest. This crochet robin Christmas ornament also uses a supported branch inside the wreath so the bird remains upright when the finished decoration is hung. A common mistake in robin amigurumi is making the beak too long; a short triangular beak keeps the head proportion closer to that of a small songbird.
Project Info at a Glance
| Skill Level | Time | Finished Robin Size | Hook | Best For |
|---|---|---|---|---|
| Intermediate | 8–12 hours for complete wreath | Approx. 11 cm | 2.75 mm | Christmas wall or door decoration |
The 11 cm robin size, worsted/aran yarn, 2.75 mm hook, and 9 mm safety eyes are based on published specifications for a similarly proportioned robin amigurumi. Yarn quantities below are working estimates for this wreath design and can vary with tension.
Materials and Tools
Yarn
- Medium brown — worsted/aran weight — approximately 25 g — cotton or cotton-acrylic yarn.
- Cream — worsted/aran weight — approximately 20 g.
- Robin red — worsted/aran weight — approximately 18 g.
- Dark green — worsted/aran weight — approximately 45 g for scarf, foliage, and wreath details.
- Bright red — worsted/aran weight — approximately 35 g for bow and berries.
- White — worsted/aran weight — approximately 30 g for flowers, snow, and snowflakes.
- Dark brown — worsted/aran weight — approximately 30 g for branch, lantern, and pinecones.
- Yellow or mustard — small amount for the beak.
- Black — small amount for optional embroidered details.
Tools
- 2.75 mm crochet hook
- 9 mm black safety eyes
- Polyester fiberfill
- Yarn needle
- Stitch markers
- Scissors
- Dressmaking pins
- 20–22 cm rigid wreath ring or wrapped craft ring
- Wooden beads for hanging details
- Three small bells
- Strong hanging cord
Safety eyes must be installed before the head is stuffed and closed because the locking washer is fitted from inside the crochet fabric. For an ornament intended to be accessible to children under three, embroidered eyes are the safer construction choice.
Abbreviations
- MR — magic ring
- sc — single crochet
- inc — increase, work 2 sc into one stitch
- dec — decrease
- sl st — slip stitch
- ch — chain
- hdc — half double crochet
- dc — double crochet
- BLO — back loop only
For an invisible decrease, insert the hook through the front loops of the next two stitches, yarn over, pull through both front loops, then complete one single crochet.
Pattern — Step by Step
Work the amigurumi pieces in continuous spirals unless a row is specifically marked as joined or turned. Mark the first stitch of every round.
Robin Body
Yarn: cream with red breast worked as a controlled color section. Stitch shaping follows standard six-stitch amigurumi expansion.
R1: 6 sc in MR (6)
R2: inc ×6 (12)
R3: (sc, inc) ×6 (18)
R4: (2 sc, inc) ×6 (24)
R5: (3 sc, inc) ×6 (30)
R6: (4 sc, inc) ×6 (36)
R7: sc around (36)
R8: sc around (36)
R9: sc around (36)
R10: sc around (36)
R11: sc around (36)
R12: sc around (36)
R13: (4 sc, dec) ×6 (30)
R14: sc around (30)
R15: (3 sc, dec) ×6 (24)
R16: sc around (24)
R17: (2 sc, dec) ×6 (18)
Stuff firmly enough to maintain an oval shape but stop before the fabric stretches and exposes filling.
R18: (sc, dec) ×6 (12)
R19: dec ×6 (6)
Fasten off and close the opening. Leave a 20 cm tail if the body will be sewn directly to the branch.
Red Breast Patch
Yarn: robin red.
R1: 6 sc in MR (6)
R2: inc ×6 (12)
R3: (sc, inc) ×6 (18)
R4: (2 sc, inc) ×6 (24)
Fasten off with a 25 cm sewing tail. Flatten the circle slightly into an oval while sewing it to the front of the body. Place the upper edge close to the neck and allow the lower section to cover roughly two-thirds of the visible belly height.
Robin Head
Yarn: medium brown.
R1: 6 sc in MR (6)
R2: inc ×6 (12)
R3: (sc, inc) ×6 (18)
R4: (2 sc, inc) ×6 (24)
R5: (3 sc, inc) ×6 (30)
R6: (4 sc, inc) ×6 (36)
R7: sc around (36)
R8: sc around (36)
R9: sc around (36)
R10: sc around (36)
R11: sc around (36)
R12: (4 sc, dec) ×6 (30)
R13: (3 sc, dec) ×6 (24)
Insert the 9 mm safety eyes between R8 and R9. Leave approximately 7 stitches between the eye posts. Check the position from the front before locking the washers.
R14: (2 sc, dec) ×6 (18)
Stuff the head, concentrating filling around the sides rather than directly behind the eyes.
R15: (sc, dec) ×6 (12)
R16: dec ×6 (6)
Fasten off and close. Leave a 25 cm tail for attaching the head to the body.
Face Patches — Make 2
Yarn: cream.
R1: 6 sc in MR (6)
R2: inc ×6 (12)
Fasten off. Flatten each piece into a small semicircular cheek patch while sewing. Place one beneath each eye so the patches meet the upper edge of the red breast.
Beak
Yarn: mustard yellow.
R1: 6 sc in MR (6)
R2: sc around (6)
R3: (sc, inc) ×3 (9)
Fasten off without stuffing. Flatten the piece into a short triangle and sew it between the cheek patches. The point should project only about 1.5 cm from the face.
Wings — Make 2
Yarn: medium brown.
R1: 6 sc in MR (6)
R2: inc ×6 (12)
R3: (sc, inc) ×6 (18)
R4: sc around (18)
R5: sc around (18)
R6: (sc, dec) ×6 (12)
R7: sc around (12)
R8: (2 sc, dec) ×3 (9)
R9: sc around (9)
Do not stuff. Flatten each wing and crochet through both layers with 4 sc if a closed edge is preferred. Leave a 20 cm tail.
Tail
Yarn: dark brown.
R1: 6 sc in MR (6)
R2: inc ×6 (12)
R3: sc around (12)
R4: sc around (12)
R5: (2 sc, dec) ×3 (9)
R6: sc around (9)
R7: sc around (9)
Flatten without stuffing. Sew the tail at the lower rear of the body, angled slightly downward so it does not push the robin forward on the branch.
Scarf
Yarn: dark green.
Ch 61.
Row 1: Starting in second ch from hook, 60 sc (60).
Row 2: ch 1, turn, 60 sc (60).
Row 3: ch 1, turn, 60 sc (60).
Row 4: ch 1, turn, 60 sc (60).
Fasten off. Cut short strands approximately 5 cm long and knot them along both scarf ends to form fringe. Trim fringe to approximately 2 cm after knotting.
Branch
Yarn: dark brown.
R1: 6 sc in MR (6)
R2: inc ×6 (12)
R3–R32: sc around (12)
Stuff very lightly as the tube grows. Insert a flexible craft stem or similar internal support only when the wreath is intended solely as decoration and will remain inaccessible to small children. For an all-yarn version, use firm stuffing instead.
R33: dec ×6 (6)
Fasten off and close. Curve the branch slightly upward at both ends before attaching it across the lower third of the wreath.
Snow on Branch
Yarn: white.
Ch 45.
Starting in the second chain from the hook, repeat the following sequence across the chain: sl st, sc, hdc, sc. Adjust the final repeat to the branch length.
Fasten off and sew the uneven white strip along the upper surface of the brown branch.
Large Christmas Bow
Yarn: bright red.
Bow loops — make 2:
Ch 31. Join carefully without twisting.
R1: sc around (30)
R2: sc around (30)
R3: sc around (30)
R4: sc around (30)
R5: sc around (30)
R6: sc around (30)
Fasten off. Flatten each loop.
Bow tails — make 2:
Ch 31.
Row 1: 30 sc (30)
Row 2: ch 1, turn, 30 sc (30)
Row 3: ch 1, turn, 30 sc (30)
Row 4: ch 1, turn, 30 sc (30)
Row 5: ch 1, turn, 30 sc (30)
Fasten off. Fold the lower end of each tail into a shallow V or trim the visual line by folding the corners inward before stitching.
Center band:
Ch 13.
Row 1: 12 sc (12)
Row 2: ch 1, turn, 12 sc (12)
Row 3: ch 1, turn, 12 sc (12)
Row 4: ch 1, turn, 12 sc (12)
Wrap the center band tightly around the two loops and both tails. Stitch at the back. Attach the finished bow at the top center of the wreath.
Holly Leaves — Make 14 to 18
Yarn: dark green.
Ch 9.
Starting in the second chain from the hook: sl st, sc, hdc, dc, dc, hdc, sc, sl st. Continue around the opposite side of the foundation chain with the same sequence in reverse.
Fasten off with a sewing tail. Pin leaves at alternating angles before stitching them around the ring.
Red Berries — Make 15
Yarn: red.
R1: 6 sc in MR (6)
R2: sc around (6)
Insert a very small amount of stuffing.
R3: dec ×3 (3)
Fasten off. Group berries in clusters of three and sew them between the holly leaves.
White Flowers — Make 2
Yarn: white.
R1: 5 sc in MR (5).
For each of the five petals, work: sl st into next stitch, ch 3, 2 dc into the same stitch, ch 3, sl st into the same stitch.
Fasten off. Add a small bead or embroidered gold center if desired. Attach one flower to each side of the wreath.
Mini Lantern
Yarn: dark brown, cream, and optional gold thread.
Lantern body:
R1: 6 sc in MR (6)
R2: inc ×6 (12)
R3: BLO sc around (12)
R4–R8: sc around (12)
R9: BLO sc around (12)
R10: dec ×6 (6)
Fasten off. The lantern can be stuffed lightly with yellow yarn or fitted around a non-heating decorative insert made specifically for craft use. Do not place a flame, hot bulb, or heat-producing light inside crochet work.
Lantern roof:
R1: 6 sc in MR (6)
R2: inc ×6 (12)
R3: (sc, inc) ×6 (18)
Fasten off and sew over the lantern body. Add a short crochet chain loop at the top and suspend the lantern from the wreath.
Snowflakes — Make 3
Yarn: white.
R1: 6 sc in MR (6).
For each point: ch 5, sl st in second ch from hook, ch 3, sl st into the same chain, sl st down the remaining chains, then sl st into the next stitch of the center.
Repeat six times. Fasten off and block each snowflake flat before hanging.
Pinecones — Make 3
Yarn: dark brown with white accent.
R1: 6 sc in MR (6)
R2: inc ×6 (12)
R3: sc around (12)
R4: sc around (12)
R5: sc around (12)
R6: (sc, dec) ×4 (8)
R7: sc around (8)
R8: dec ×4 (4)
Fasten off. Embroider short white stitches across alternating rounds to imitate snow caught between the scales. Add a small red bow above each pinecone.
Wreath Cover
Yarn: dark green.
For a rigid ring approximately 20–22 cm in diameter, crochet a long strip wide enough to wrap completely around the ring.
Ch 13.
Row 1: 12 sc (12).
Rows 2 onward: ch 1, turn, 12 sc (12).
Continue until the strip can wrap around the entire circumference without being stretched excessively. Wrap it around the ring and seam the long edges together on the back.
Overlap the beginning and end of the strip by approximately 1 cm and stitch them firmly. Position this join at the top where the large red bow will cover it.
Assembly
- Sew the robin head to the top of the body, checking from the side that the face remains vertical rather than tilting upward.
- Attach the cream face patches below the eyes, then sew the short yellow beak centrally between them.
- Sew the red breast patch over the front of the body if it was not incorporated during body construction.
- Pin the two wings to the body. Their upper edges should begin just below the neck and angle slightly backward.
- Attach the tail at the lower rear, then wrap and secure the green scarf around the neck with one end hanging lower than the other.
- Sew the branch horizontally across the lower third of the wreath and attach the white snow strip along its upper edge.
- Sew the robin to the branch through several body stitches so its weight is distributed across at least 3 cm of the underside.
- Attach the holly leaves, berry clusters, and white flowers around the wreath, keeping the densest decoration on the left and right sides.
- Attach the large red bow at the top, suspend the lantern slightly right of center, then connect the three snowflake-and-pinecone drops along the bottom edge.
- Add the upper hanging cord and wooden bead. Test the wreath vertically and adjust the branch or hanging point until the ornament remains level.
The completed piece should hang with the robin upright, the central branch approximately horizontal, and the three lower ornaments free to move without touching the bird.
7 Technical Tips
- Mark every round. A misplaced round marker can shift the breast patch and wing positions by several stitches. Move the marker after completing the first stitch rather than at an arbitrary point in the round.
- Control stuffing firmness. Stop adding filling when the body holds its oval shape without visible gaps between stitches. Overstuffing a 36-stitch body can stretch the fabric enough to expose white fiberfill.
- Use invisible decreases on exposed surfaces. Standard decreases create horizontal bars that become obvious on the brown head and cream body. Work through front loops only where the pattern decreases from 36 to 30 stitches and below.
- Test the 9 mm eye position before fitting washers. Place both eyes between rounds 8 and 9 with about seven stitches between their posts. A one-stitch difference is visible on a head only 36 stitches in circumference.
- Pin the wings before sewing. If one wing starts even two rounds higher than the other, the robin can look twisted when viewed from the front. Compare the attachment points against the red breast rather than only against the brown back.
- Support the branch at both wreath edges. Sewing only through the center allows the robin’s weight to rotate the branch downward. Stitch at least 2 cm of each branch end firmly to the wrapped wreath.
- Weave hanging tails through several directions. A tail passed through only one row can pull loose under the weight of a pinecone or bell. Change direction at least twice inside the crochet fabric before trimming the yarn.
Construction Notes for the Christmas Wreath
The bird should remain the visual center of the project, so the wreath decorations need controlled spacing. Place the large bow first, then establish the branch position. Those two elements define the vertical axis. Next, pin the lantern. It should hang above the branch without covering the robin’s face.
Berry groups work better as clusters of three than as isolated balls. Arrange them between leaves rather than directly on top of the foliage. The white flowers form two light visual breaks in the green ring, while the red bow links the berry color to the robin’s breast.
The lower hanging elements also affect balance. Position the largest snowflake and pinecone on the center line. The two smaller drops should sit at equal distances to the left and right. If one pinecone is substantially heavier, shorten its cord or reduce its stuffing rather than shifting the central hanger.
For a wall decoration, the back of the wreath needs to remain relatively flat. Keep knots, bulky joins, and yarn ends toward the inner edge of the ring. This prevents the finished Christmas robin wreath from leaning away from the wall.
Choosing Yarn and Gauge
A published robin amigurumi of approximately 11 cm uses worsted/aran yarn with a 2.75 mm hook, which provides a useful scale reference for this design. Another documented robin pattern uses DK yarn and finishes at approximately 8 cm, showing how substantially yarn weight and hook choice can alter the final bird dimensions.
The 2.75 mm hook is intentionally smaller than the hook commonly printed on a worsted-yarn label. Amigurumi fabric needs close stitches so stuffing does not show through the gaps. If your single crochet remains loose enough to reveal filling, reduce the hook by 0.25–0.5 mm rather than pulling each stitch excessively tight.
Changing to DK yarn will reduce the complete robin. Moving to bulky yarn will increase both the finished dimensions and the required eye diameter. Keep the pattern proportions consistent by changing all yarns together rather than using a thicker yarn only for the head or body.
Safety Eye Placement
Nine-millimeter safety eyes suit a small-to-medium robin around 11–12 cm tall. Eye size is measured across the visible front dome, not the rear post. Install both eyes temporarily, inspect their spacing, and only then press the locking washers into position.
Do not attach the washers after stuffing. The backing must be accessible from inside the head and should sit firmly against the crochet fabric. Once a washer is fully engaged, repositioning the eye can damage both the fastener and surrounding stitches.
For this robin, eye placement also controls how much cream cheek area remains visible. If the eyes are positioned too low, the cheek circles crowd the beak and chest. Moving them too high produces an unusually tall forehead. Keeping them around rounds 8–9 gives enough room for all three facial color zones.
Color Placement
The photograph uses four dominant color families: brown for the bird and wood elements, dark green for foliage and scarf, red for the robin breast, berries, and bow, and white for snow and flowers. Repeating the same colors across separate areas keeps a heavily decorated wreath visually organized.
Use one red yarn for the breast and a slightly clearer or brighter red for the bow if both shades are available. The bird remains distinct while still belonging to the same palette. A muted brown works well for the robin, while the branch and pinecones can be worked in a deeper brown to prevent those pieces from blending into the body.
Place cream around the robin’s face and belly instead of pure white. The difference is useful because the actual snow, flowers, and snowflakes stay visibly brighter. This small color separation becomes important in a decoration containing many individual crochet pieces.
Conclusion
Finish the Christmas robin wreath amigurumi by checking three points: the robin must sit vertically, the branch should stay close to horizontal, and the center pinecone drop should align with the top hanging cord. Photograph the completed wreath against a plain background before placing it with other Christmas decorations; the separate crochet details are easier to see that way. Save the finished project to Pinterest or share it on Instagram with #ChristmasRobinWreath. For the next version, record any hook or yarn changes beside the pattern. Which detail would you change first on this robin: the scarf length, the breast shape, or the wing angle?









