Introduction
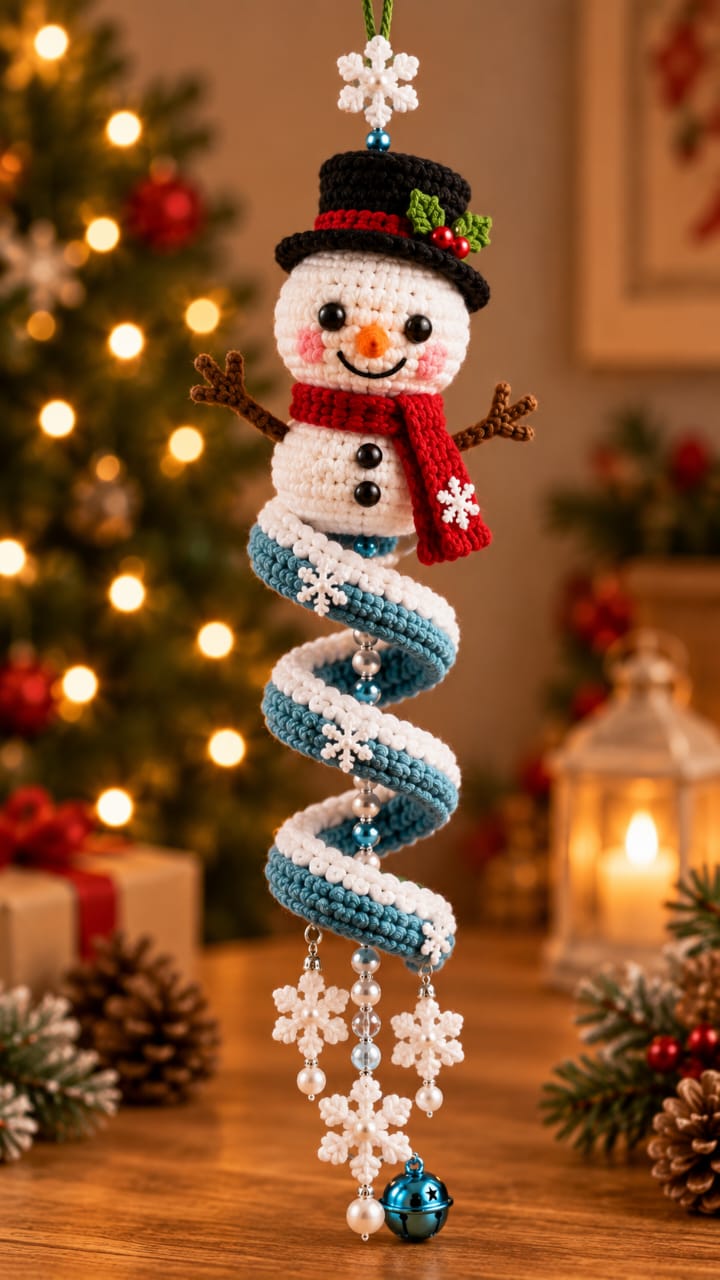
A snowman normally ends with a round base; this one drops into a blue-and-white helix instead. This snowman amigurumi crochet pattern combines a stuffed 15 cm-style topper with a spiral Christmas hanging ornament, top hat, scarf and snowflakes. Use DK yarn, a 3 mm hook and 8 mm eyes at intermediate level. The vertical construction works particularly well where tabletop decorations would occupy needed surface space.
The Design: What Makes This Snowman Different
Three structural choices separate this ornament from a standard crochet snowman. The head reaches a 36-stitch plateau so the face remains rounded without becoming oversized compared with the short torso. A narrower body then concentrates the visual weight above the suspension point rather than along the spiral.
The second decision is the helix. Its job is decorative and mechanical: repeated increases make the strip curl while the center suspension thread prevents it from collapsing sideways. Finally, the top hat and scarf create strong black and red horizontal lines against the white crochet snowman ornament.
A common mistake with a snowman hanging decoration is treating the lower spiral as an ordinary flat strip. Too few increases produce a limp curve; excessive increases create an uncontrolled ruffle instead of a regular helix.
Project Info at a Glance
| Skill Level | Time | Finished Size | Hook | Best For |
|---|---|---|---|---|
| Intermediate | 5–8 hours | Snowman approx. 15 cm; hanging length adjustable | 3.0 mm | Christmas hanging decoration |
Materials and Tools
Yarn
- White — DK/light worsted — approximately 20–25 g for the snowman, plus spiral edging
- Icy blue/teal — DK — approximately 15–25 g for the spiral
- Black — DK — approximately 5–7 g for the top hat and facial embroidery
- Red — DK — approximately 5–7 g for the scarf and hat band
- Brown — DK — small amount for branch arms
- Orange — DK — small amount for carrot nose
- Green — DK — small amount for holly leaves
- Pink — DK — scraps for cheek patches
Tools
- 3.0 mm crochet hook
- 8 mm safety eyes ×2
- Polyester stuffing
- Tapestry needle
- Stitch markers
- Scissors
- Strong hanging thread or cord
- Decorative beads
- Small jingle bell
- Optional craft pearls for the center hanging strand
Safety note: Safety eyes are not suitable for an item intended for a child under three. Embroider the eyes instead.
Abbreviations
- MR — magic ring
- sc — single crochet
- inc — 2 sc in one stitch
- dec — invisible decrease
- sl st — slip stitch
- ch — chain
- hdc — half double crochet
- dc — double crochet
- BLO — back loop only
- FLO — front loop only
For an invisible decrease, insert the hook through the front loops of the next two stitches and complete them as one single crochet.
Pattern — Step by Step
Work the stuffed pieces in continuous spirals unless stated otherwise.
Head
Yarn: white.
R1: 6 sc in MR (6)
R2: inc ×6 (12)
R3: (1 sc, inc) ×6 (18)
R4: (2 sc, inc) ×6 (24)
R5: (3 sc, inc) ×6 (30)
R6: (4 sc, inc) ×6 (36)
R7–R12: 36 sc (36)
Insert the 8 mm safety eyes between R9 and R10, approximately 7 stitches apart.
R13: (4 sc, dec) ×6 (30)
R14: (3 sc, dec) ×6 (24)
R15: (2 sc, dec) ×6 (18)
Stuff the head firmly, concentrating filling around the cheeks rather than directly behind the eyes.
R16: (1 sc, dec) ×6 (12)
R17: dec ×6 (6)
Fasten off and close.
Body
Yarn: white.
R1: 6 sc in MR (6)
R2: inc ×6 (12)
R3: (1 sc, inc) ×6 (18)
R4: (2 sc, inc) ×6 (24)
R5: (3 sc, inc) ×6 (30)
R6: (4 sc, inc) ×6 (36)
R7–R10: 36 sc (36)
R11: (4 sc, dec) ×6 (30)
R12: 30 sc (30)
R13: (3 sc, dec) ×6 (24)
R14: 24 sc (24)
R15: (2 sc, dec) ×6 (18)
Stuff firmly.
R16: (1 sc, dec) ×6 (12)
R17: dec ×6 (6)
Fasten off. Leave a 25 cm sewing tail.
Branch Arms — Make 2
Yarn: brown.
R1: 6 sc in MR (6)
R2–R7: 6 sc (6)
Do not stuff.
For the first branch finger, ch 4 and sl st back along 3 chains.
For the second finger, ch 3 and sl st back along 2 chains.
For the third finger, ch 4 and sl st back along 3 chains.
Sl st into the arm opening.
Fasten off, leaving a 15 cm tail for sewing.
The arms should remain thin. Overstuffed arms look like cylindrical limbs rather than bare snowman branches.
Carrot Nose
Yarn: orange.
R1: 6 sc in MR (6)
R2: 6 sc (6)
R3: (1 sc, inc) ×3 (9)
R4: 9 sc (9)
R5: (2 sc, inc) ×3 (12)
R6: 12 sc (12)
Add only a pinch of stuffing.
Fasten off with a 15 cm tail.
Cheek Patches — Make 2
Yarn: pale pink.
R1: 6 sc in MR (6)
R2: inc ×6 (12)
Fasten off.
For a subtler result, stop after R1 and sew the six-stitch circle flat.
Top Hat
Yarn: black.
Crown
R1: 6 sc in MR (6)
R2: inc ×6 (12)
R3: (1 sc, inc) ×6 (18)
R4: (2 sc, inc) ×6 (24)
R5: (3 sc, inc) ×6 (30)
R6: BLO 30 sc (30)
R7–R11: 30 sc (30)
Brim
R12: FLO (4 sc, inc) ×6 (36)
R13: (5 sc, inc) ×6 (42)
R14: 42 sc (42)
Fasten off.
Wrap a narrow strip of red yarn around the base of the crown and stitch it in place.
Holly Leaves — Make 2
Yarn: green.
Ch 7.
Starting in the second chain from hook:
sl st, sc, hdc, dc, hdc, sc.
Work around the opposite side of the foundation chain:
sc, hdc, dc, hdc, sc, sl st.
Fasten off.
Sew both leaves to the hat band and add two or three red beads or crocheted berries.
Scarf
Yarn: red.
Row 1: ch 61.
Row 2: Starting in second chain, 60 sc (60).
Rows 3–5: ch 1, turn, 60 sc (60).
Fasten off.
The scarf should measure roughly 2–2.5 cm wide with DK yarn. Add a small white snowflake appliqué near one end if you want to match the photographed design more closely.
Crochet Snowflake Appliqué — Make 4–6
Yarn: white.
R1: 6 sc in MR (6).
For each of six points:
ch 4, sl st in second chain, ch 2, sl st in same chain, sl st down remaining chains, sl st into next base stitch.
Repeat six times.
Fasten off.
Block flat before attaching.
Blue-and-White Spiral
Yarn: icy blue and white.
This is the defining component of the hanging ornament.
With blue, ch 81.
Row 1: Work 3 dc in the fourth chain from hook and 3 dc in every remaining chain.
The fabric will immediately begin curling.
Fasten off blue.
Join white along one long outer edge.
Edging Row: ch 1, sc evenly along the complete spiral edge, adding an extra sc around tight curves when required.
Fasten off.
The finished helix should form approximately 3–4 full rotations when hanging freely. Do not block it flat.
Hanging Cord
Use green yarn or strong decorative cord.
Create a hanging loop approximately 8–10 cm long above the hat.
Run the cord down through:
- Snowflake topper
- Bead above the hat
- Center of the hat
- Head
- Body
- Center of the spiral
The central cord carries the weight. Do not expect the crocheted spiral alone to support the bead chain.
Lower Snowflake and Bell Drops
Attach three short strands beneath the final spiral rotation.
Use combinations of:
- White crochet snowflakes
- Pearl beads
- Blue beads
- Silver spacer beads
- One small blue or silver bell
Keep the central strand slightly longer than the two side strands.
A 2–4 cm difference is enough to create the stepped arrangement shown in the design.
Assembly
- Sew the head firmly to the top of the body, centering the seam so the face remains level.
- Position the body buttons vertically down the front before the scarf covers the neck seam.
- Sew the carrot nose between and slightly below the eyes; embroider the curved black smile beneath it.
- Attach the two pink cheek circles beside the mouth without pulling their edges inward.
- Sew the brown branch arms on opposite sides of the body at the upper third.
- Place the top hat slightly low on the forehead and secure it through several crown stitches.
- Add the red scarf around the neck, allowing one end to hang longer than the other.
- Attach the spiral directly below the body and pass the structural hanging cord through its center.
- Add white snowflake appliqués to the blue spiral, then attach the beaded lower snowflake strands.
- Fit the top hanging loop, suspend the ornament and rotate the components until the snowman’s face points forward while the helix hangs vertically.
The finished decoration should carry its weight through the central suspension line rather than through the crocheted accessories.
7 Technical Tips
- Place a marker at every round start. A one-stitch drift across six head rounds can move the nose away from the visual center between the eyes.
- Stop the head at a 36-stitch plateau. Increasing to 42 stitches with the same DK yarn makes the head disproportionately wide for the narrow hanging body.
- Install the 8 mm eyes before R13. Waiting until after the decreases leaves too little internal access to fit the washers securely.
- Stuff the neck to about 80–90% firmness. A soft neck lets the snowman tip forward once the top hat and hanging cord are fitted.
- Check the spiral after the first 20 foundation chains have been worked into. If it does not curl automatically with three double crochets per chain, the working tension is probably too loose.
- Pin both branch arms before sewing. A vertical difference of more than about 5 mm becomes obvious when the snowman hangs against the straight center bead line.
- Run yarn tails through at least 4–5 cm of dense fabric. Short ends around the hat, scarf and spiral can pull out as the decoration twists during storage or handling.
Conclusion
Build the snowman first, then test its balance before attaching the long spiral and bead strands. The critical measurement is not only the 15 cm reference height of the stuffed figure; the center suspension line must also pass through the head, torso and helix without pulling any section sideways. Start by crocheting the head and one 20-chain spiral test so you can check yarn density and curl before cutting larger quantities. Save this snowman amigurumi crochet pattern to Pinterest and share the finished hanging decoration on Instagram with #SpiralSnowmanOrnament. Would you keep the lower spiral icy blue, or change it to traditional Christmas red and green?









