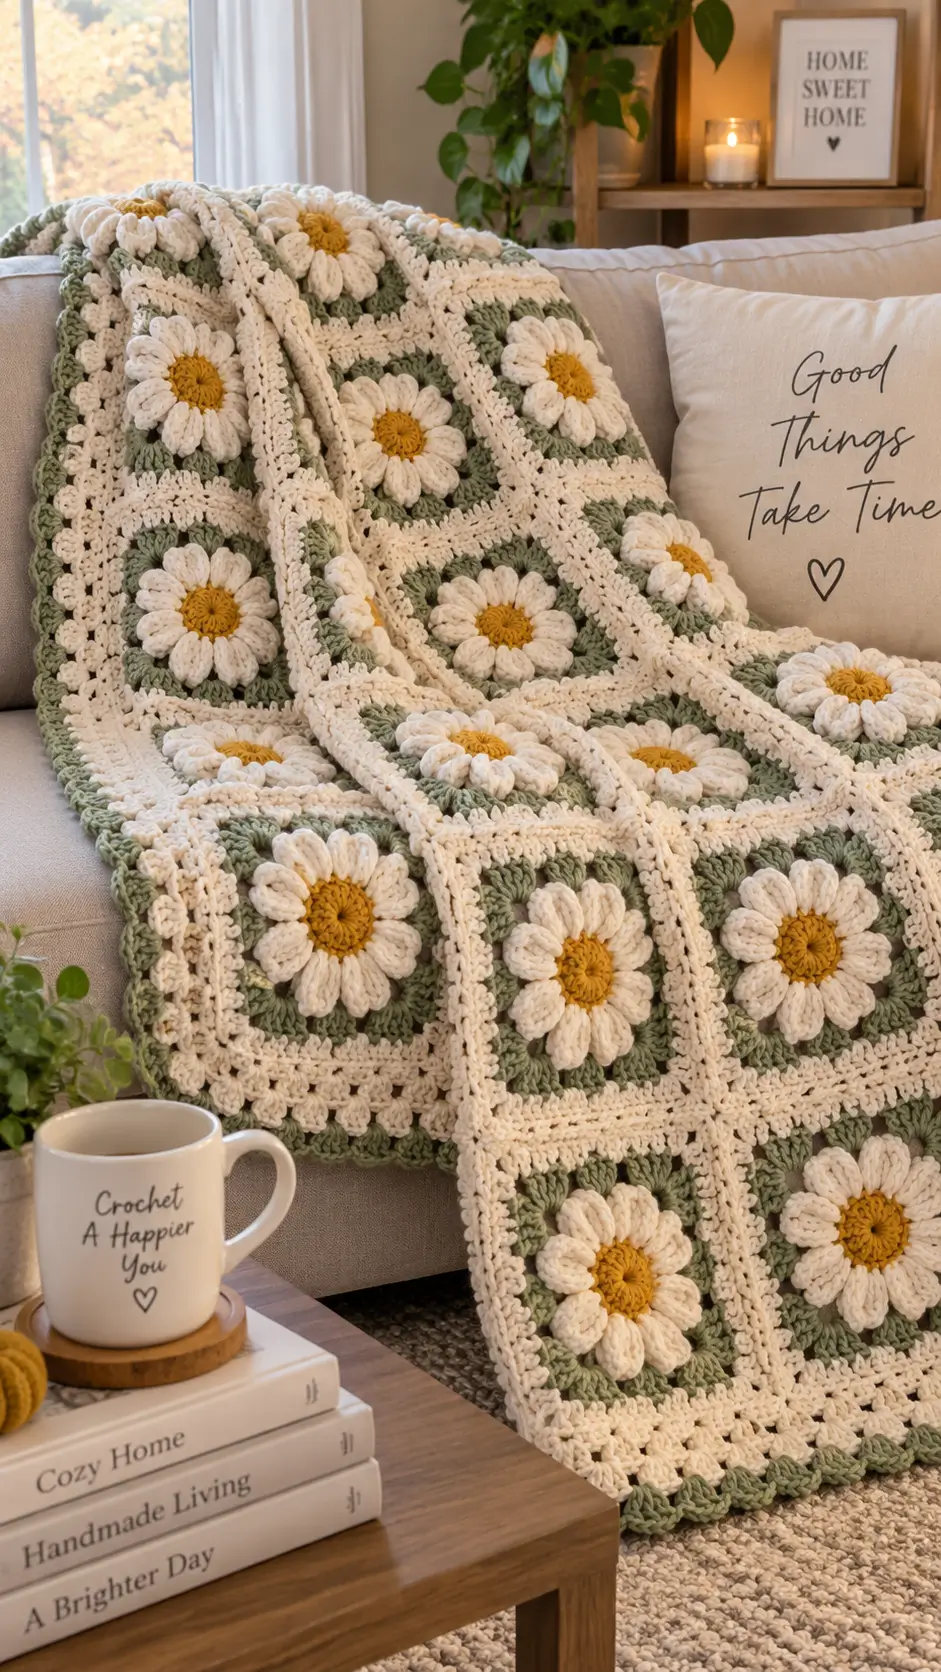
A daisy needs a round center, projecting petals and a square frame competing for the same few centimetres of fabric. This daisy granny square blanket controls those three shapes with raised ivory petals, mustard centers and sage backgrounds. Use worsted yarn, a 5 mm hook and blocked squares near 10–11 cm for an advanced-beginner project. Modular construction also makes individual sections easier to replace than rows in a one-piece throw.
The Design: What Makes This Daisy Blanket Different
The photographed design depends on three structural decisions. First, the petals rise above the green ground instead of sitting flush. That separation keeps each daisy readable after several squares are joined.
Second, a cream frame surrounds each sage motif, creating visible spacing between flowers and preventing green backgrounds from merging into one field.
Third, the outer edge repeats the sage tone, which visually connects the separate modules.
A frequent mistake in a daisy granny square pattern is adding too much yarn to the flower round. Thick petals then force the center to cup upward and the finished square refuses to lie flat. The same problem becomes obvious across a full crochet flower blanket, where tiny differences accumulate row by row. Block every motif to one target measurement before joining.
Project Info at a Glance
| Skill Level | Time | Finished Size | Hook | Best For |
|---|---|---|---|---|
| Advanced beginner/intermediate | Multi-session project | Approx. 81 × 99 cm reference size | 5.0 mm | Baby blanket, lap blanket, decorative throw |
Materials and Tools
Yarn
For the closest visual match, use weight-4 worsted yarn.
- Mustard yellow — worsted / weight 4 — approximately 1–2 g per flower center
- Warm ivory — worsted / weight 4 — approximately 3–5 g per petal section, plus joining and border yarn
- Sage green — worsted / weight 4 — approximately 3–5 g per motif background, plus edging
- Cream joining yarn — worsted / weight 4 — quantity depends on blanket dimensions and joining method
A smooth acrylic, cotton-acrylic blend or washable wool blend works well for keeping the petals defined while maintaining an even square shape.
Tools
- 5.0 mm crochet hook
- Tapestry needle
- Scissors
- Locking stitch markers
- Blocking mats
- Rust-resistant blocking pins
- Tape measure
- Digital kitchen scale, optional
Abbreviations
MR — magic ring
sc — single crochet
hdc — half double crochet
dc — double crochet
tr — treble crochet
ch — chain
sl st — slip stitch
sp — space
st/sts — stitch/stitches
cl — cluster
rep — repeat
FO — fasten off
Invisible decrease is an amigurumi shaping method and is not required for this flat motif construction.
Pattern — Step by Step
Work joined rounds unless a section states otherwise.
Mustard Flower Center — Make One per Square
Yarn: mustard yellow.
R1: MR, ch 2, work 12 dc into ring; sl st to first dc. (12 dc)
Pull the ring closed firmly without distorting the stitches.
R2: ch 1, sc in each stitch around; sl st to first sc. (12 sc)
Fasten off, leaving an 8–10 cm tail.
A 12-stitch center supports a 12-petal flower and distributes the petals evenly around the motif.
Raised Ivory Petals — Make 12
Yarn: warm ivory.
Join ivory in any stitch of the mustard center.
Petal 1: ch 3, work 4 dc in the same stitch, remove hook from working loop, insert hook into first dc, pick up dropped loop and draw through; ch 1.
Repeat the same popcorn-style petal in each remaining center stitch.
Total: 12 petals
Join with sl st at the base of the first petal.
Fasten off.
Do not flatten the petals during blocking. Only the green and cream square structure should be pinned flat.
Sage Squaring Round
Yarn: sage green.
Join yarn in the space between any two petals.
R1: ch 3, 2 dc in same space, ch 1.
Work 3 dc in each of the next two petal spaces, placing ch 1 between groups.
In the fourth space form a corner:
3 dc, ch 2, 3 dc, ch 1
Repeat around, placing two ordinary 3-dc groups between each corner group.
Complete four corners total.
Join with sl st to top of beginning ch-3.
The flower should now appear centered inside a defined square shape.
Sage Expansion Round
R2: sl st to next ch-1 space. Ch 3, 2 dc in same space, ch 1.
Work 3 dc, ch 1 into each side space.
At each corner work:
3 dc, ch 2, 3 dc, ch 1
Repeat around and join.
Check the diagonal from corner to corner. All four diagonals should match within approximately 3 mm before adding the cream frame.
Fasten off sage.
Cream Frame
Yarn: warm cream.
The cream frame creates the light grid visible between the sage flower squares.
R1: Join cream in any corner space. Ch 3, 2 dc, ch 2, 3 dc in the same corner.
Work ch 1, 3 dc in each space across the side.
At the next corner work:
3 dc, ch 2, 3 dc
Repeat on all four sides.
Join.
R2: ch 1, sc evenly around the entire square, placing 3 sc in each corner ch-2 space.
Join with sl st.
Fasten off, leaving a long enough tail for secure weaving.
Blocking Each Square
Block each square to approximately 10.5–11 cm.
Measure:
- Top edge
- Bottom edge
- Left edge
- Right edge
- Both diagonals
The four outside edges should be nearly identical.
A diagonal mismatch greater than about 5 mm often indicates an uneven corner or a missed granny space.
Allow all squares to dry completely before removing the pins.
Blanket Layout
For a compact baby or lap blanket, make approximately 42 motifs and arrange them in a 6 × 7 grid.
For larger sizes, use the following as a planning guide:
- 6 × 7 squares — compact baby or lap blanket
- 8 × 10 squares — larger lap throw
- 10 × 12 squares — substantial couch or bed throw
Exact finished dimensions depend on the blocked square size, joining method and border depth.
Joining the Squares
Yarn: cream.
Arrange every motif with the flowers facing the same direction.
Use a flat slip-stitch join from the front if you want the joining lines to remain visible.
Hold two squares side by side.
Insert the hook through corresponding edge loops from both squares, yarn over and work a slip stitch.
Continue one stitch at a time without pulling the joining yarn tighter than the square edges.
Join complete rows first.
Rotate the work and connect the columns.
The seam should remain flexible. If the joined strip curves toward the seams, the slip stitches are too tight.
Cream Inner Border
Join cream in any corner after all motifs are connected.
R1: ch 1, sc evenly around the blanket. At each outer corner work 3 sc in one corner point.
Join with sl st.
R2: ch 3, dc in each stitch around, working 5 dc into the center corner stitch at each corner.
Join.
R3: ch 1, sc in each stitch around. Work 3 sc into each corner.
Fasten off.
Count the stitches on opposite sides. Matching side counts reduce border rippling.
Textured Sage Outer Border
Yarn: sage green.
Join sage at any corner.
R1: ch 1, sc around, placing 3 sc in each corner.
R2: skip 1 stitch, 5 dc in next stitch, skip 1 stitch, sl st in next stitch.
Repeat around.
At each corner, adjust the spacing so a shell sits directly over the corner point.
If the border begins to ruffle, replace selected 5-dc shells with 4-dc shells.
If the edge pulls inward, reduce the number of skipped stitches in that section.
Assembly
- Crochet every mustard flower center.
- Add all ivory petals and check that each motif has the same petal count.
- Work the sage squaring rounds.
- Add the cream frame to every motif.
- Block every square to the same 10.5–11 cm target.
- Arrange the squares in the planned rectangular grid.
- Join horizontal pairs and rows without stretching the edges.
- Join the vertical seams and check the blanket for twisting.
- Work the cream inner border followed by the sage textured border.
- Weave each yarn tail through several stitches, reverse direction once, trim and make the final measurement.
The finished blanket should lie flat while the daisy petals remain raised above the sage background.
7 Technical Tips
- Mark the first stitch of every joined round. Losing the first stitch shifts the join one position per round and can make the square look twisted.
- Keep the flower center below roughly 3 cm before adding petals. An oversized center pushes the ivory petal ring outward and reduces the available space for the sage background.
- Do not block the petals flat. Compressing the popcorn stitches removes the relief that gives the 3D daisy granny square its defining texture.
- Pin every square to the same 10.5–11 cm measurement. A difference of only 5 mm per motif can become several centimetres across a full blanket row.
- Use the same hook for every motif. Changing from a 5 mm to a 5.5 mm hook can noticeably alter square dimensions and yarn consumption.
- Check seam tension after joining three squares. If the seam is shorter than the unjoined edge, undo it before continuing because tight joins can bow the blanket.
- Weave tails through at least 5 cm of dense fabric and reverse direction once. Short tails can work loose through open granny-square spaces after washing.
Related Patterns
Sunflower Granny Square Blanket — a darker flower center with broad yellow petals for stronger contrast.
[INTERNAL LINK NEEDED: sunflower granny square blanket]
3D Flower Granny Square — a raised floral motif suitable for cushions, bags and blankets.
[INTERNAL LINK NEEDED: 3D flower granny square]
Sage Green Granny Square Throw — tonal green squares with cream joining and no flower motif.
[INTERNAL LINK NEEDED: sage granny square blanket]
Crochet Daisy Granny Square Bag — uses the same modular flower-square construction on a smaller project.
[INTERNAL LINK NEEDED: daisy granny square bag]
Conclusion
Measure one finished motif before buying yarn for the entire blanket. That square provides the best basis for calculating cream, sage and mustard quantities at your own gauge. For the photographed look, keep the flowers dimensional, block the square structure to approximately 10.5–11 cm, then use cream joining lines and a sage outer edge. Make six sample squares first and arrange them together before choosing the final blanket dimensions. Save your finished daisy granny square blanket to Pinterest and share it on Instagram with #SageDaisyGrannyBlanket. Would you keep every square sage green or alternate two muted green shades across the blanket?









