Introduction
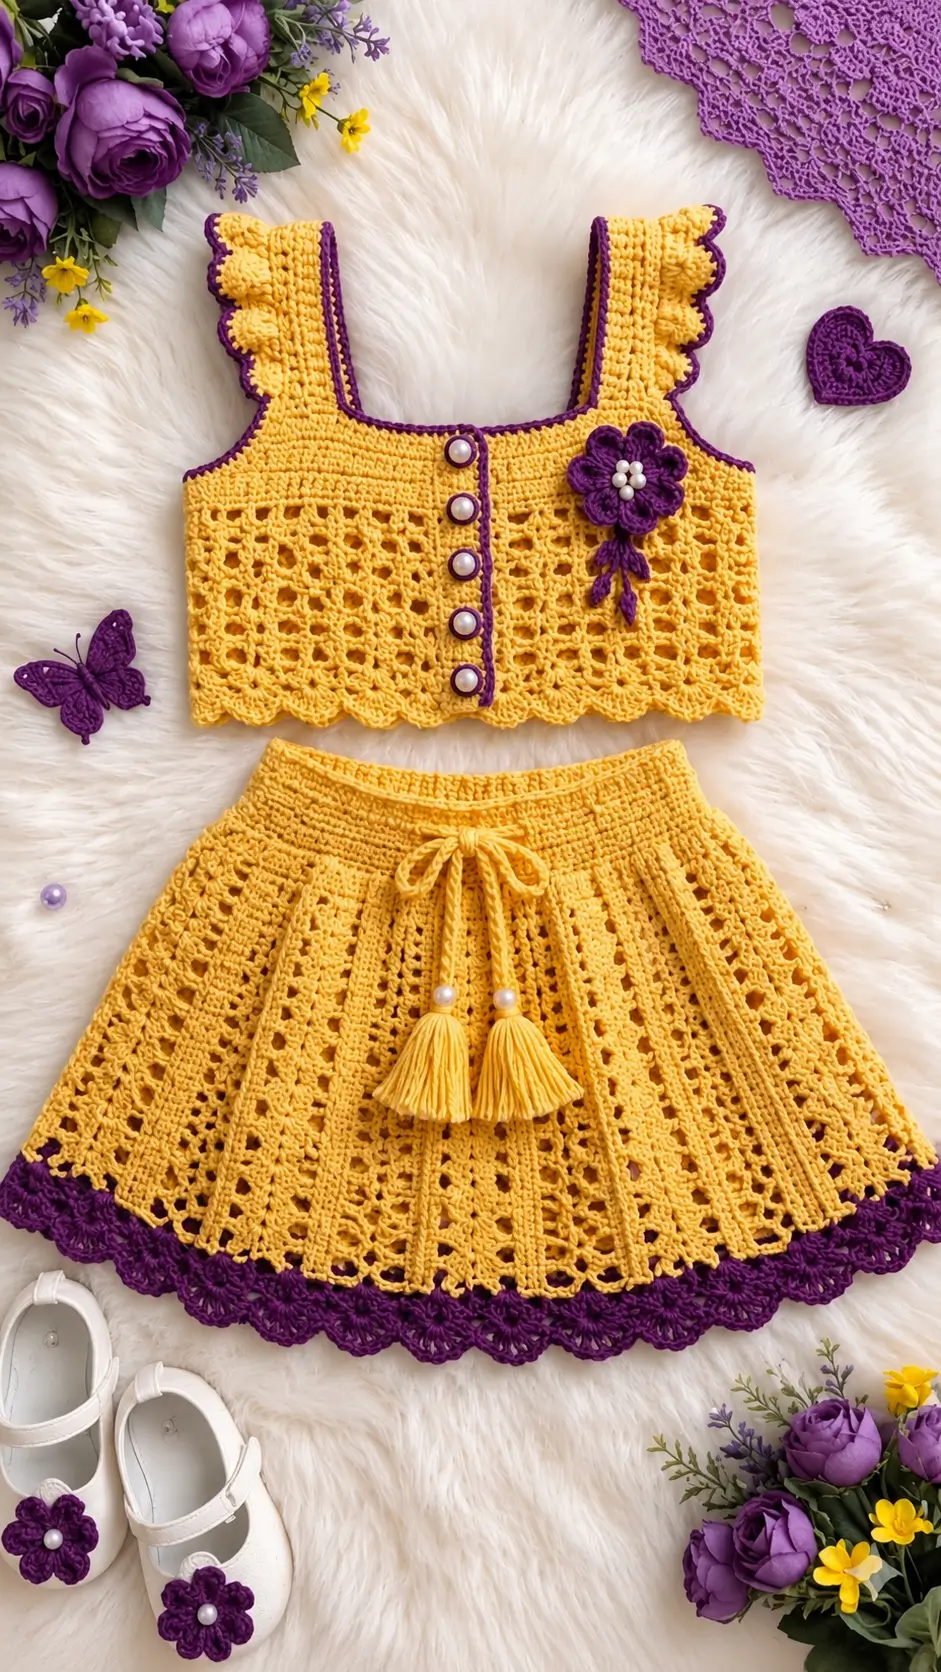
The purple scallops under this mustard skirt determine the construction before the first waistband stitch is made. This girls crochet top and skirt set pattern combines DK yarn, a 3.5 mm hook, fitted upper sections and expanding lace for a child-size outfit around age 4–5. The project suits intermediate crocheters and produces a coordinated set that can also be worn as two separate garments.
The Design: What Makes This Mustard Set Different
Three structural decisions define the photographed outfit. First, the top changes from dense crochet across the chest to open lace below it; the solid section supports the button band while the lower section reduces bulk. Second, broad shoulder straps carry narrow ruffles along their outer edges. That places decoration where it will not distort the square neckline. Third, the skirt gains width below a firm waistband instead of relying on an oversized waist circumference.
The purple border is functional as well as decorative. On the crochet crop top for girls, it sharpens the neckline and button edge. On the crochet lace skirt for a child, the denser scalloped finish adds weight to the lower edge.
A common mistake is adding flare too early. Too many increases directly below the waistband create ridges rather than a controlled A-line shape.
Project Info at a Glance
| Skill Level | Time | Finished Size | Hook | Best For |
|---|---|---|---|---|
| Intermediate | 12–18 hours | Approx. 68 cm top chest; child 4–5 reference size | 3.5 mm | Summer sets, layered outfits, photo garments |
The 68 cm chest reference and 3.5 mm hook are supported by published girls’ DK crochet sizing.
Materials and Tools
Yarn
- Mustard yellow DK cotton or cotton blend — light #3/DK — 350–450 g for the complete set — Lion Brand 24/7 Cotton DK, Paintbox Cotton DK or another yarn that meets gauge.
- Deep purple DK cotton — light #3/DK — approximately 50 g — use for neckline piping, button band, flower, skirt border and optional shoe decoration.
- Pearl white — only required if crocheted bead substitutes are used.
DK is supported by published child top and skirt references, and 3.5 mm is a recurrent hook choice for this garment category.
For context, one published 4–5-year girls’ top calls for 250 g, while a toddler DK skirt uses around 100 g. The broader 350–450 g allowance here accounts for both pieces, lace depth, ruffles and swatching.
Tools
- 3.5 mm crochet hook
- 4 pearl-style buttons, approximately 15 mm
- 5 small pearl beads for the flower center, optional
- 2 larger pearl beads for drawstring ends, optional
- Yarn needle
- Scissors
- Locking stitch markers
- Measuring tape
- Elastic, 15–20 mm wide, optional inside the waistband
- Sewing needle and matching thread for buttons and beads
Buttons and beads on children’s clothing must be attached securely and checked regularly. For very young children, omit loose bead embellishments.
Gauge and Sizing
Target 18 double crochet stitches × 11 rows = approximately 10 × 10 cm after washing and drying the swatch in the same manner planned for the finished garment. This matches a published DK girls’ top gauge and gives a useful starting point for the 68 cm chest reference.
The pattern below is an original, image-derived size 4–5 draft, not a transcription of a commercial pattern.
Measure the intended wearer before beginning. Aim for approximately:
- Chest: 64–68 cm
- Top finished chest: about 68 cm
- Top length from shoulder: 28–31 cm
- Waist: measure directly
- Skirt length: 30–34 cm, depending on desired coverage
The skirt waistband should fit the actual waist rather than copying the chest measurement.
Abbreviations
- ch — chain
- sc — single crochet
- hdc — half double crochet
- dc — double crochet
- tr — treble crochet
- sl st — slip stitch
- st/sts — stitch/stitches
- sp — space
- sk — skip
- BLO — back loop only
- RS — right side
- WS — wrong side
- rep — repeat
When decreasing in dense sections, place the hook through the front loops of the next two stitches for a less bulky decrease line.
Pattern — Step by Step
Top Back
Yarn: mustard yellow. Construction and counts are original calculations based on the image and 68 cm chest target.
Ch 63.
Row 1: Dc in 4th ch from hook and in each ch across. (60 dc)
Row 2: Ch 2, turn, dc in each st across. (60)
Rows 3–9: Repeat Row 2. (60)
The piece should measure roughly 33 cm wide at the target gauge. Two panels together produce approximately 66–68 cm before edging.
Row 10: Sl st across first 4 sts, ch 2, dc across to final 4 sts; leave remaining sts unworked. (52)
Row 11: Ch 2, turn, dc2tog, dc across to final 2 sts, dc2tog. (50)
Row 12: Repeat Row 11. (48)
Rows 13–17: Ch 2, turn, dc across. (48)
Row 18: Ch 2, dc in first 14 sts. Turn, leaving remaining sts unworked. (14)
Rows 19–23: Dc across. (14)
Fasten off.
Rejoin mustard yarn at the opposite edge and repeat Rows 18–23 across the final 14 stitches for the second shoulder.
Leave the center neckline section unworked.
Top Front — Left Side
Ch 34.
Row 1: Dc in 4th ch from hook and across. (31)
Rows 2–9: Ch 2, turn, dc across. (31)
Row 10: From armhole edge, sl st over 4 sts, ch 2, dc across. (27)
Row 11: Ch 2, dc2tog, dc across. (26)
Row 12: Repeat Row 11. (25)
Rows 13–17: Dc across. (25)
Row 18: Work 14 dc from outer shoulder edge. (14)
Rows 19–23: Dc across. (14)
Fasten off.
Top Front — Right Side
Work as for the left front, reversing armhole placement so the shaped edges sit on the outside and the straight edge remains at center front.
Pin both fronts beside the back before seaming. Their center edges should meet with room for the decorative purple button band rather than overlapping heavily.
Lower Lace Bodice
With mustard yarn joined along the lower edge:
Row 1: Ch 1, work sc evenly across the full lower edge. Adjust the total to a multiple of 4.
Row 2: Ch 4, turn, sk 1 st, dc in next st, ch 1 across.
Row 3: Ch 3, turn, dc in dc, ch 1 across.
Row 4: Ch 3, turn, 2 dc in next ch-1 sp, ch 1, sk next dc across.
Row 5: Ch 3, turn, dc in each dc, ch 1 over ch-1 sp across.
Rows 6–10: Alternate Rows 3 and 4.
Stop when the bodice reaches the intended crop length. The pictured set finishes near the natural waist rather than extending over the skirt.
Fasten off.
Shoulder Straps
Make 2.
Ch 9.
Row 1: Hdc in 2nd ch from hook and across. (8)
Rows 2–34: Ch 1, turn, hdc across. (8)
The target length is approximately 19–21 cm before attachment. Modify the number of rows according to shoulder-to-neckline measurement.
Fasten off, leaving a 25 cm sewing tail.
Strap Ruffles
Join mustard yarn along the outer edge of each strap.
Row 1: Work approximately 2 sc into each two-row interval down the strap.
Row 2: Ch 1, turn, work 2 hdc in each st across.
Row 3: Ch 1, turn, sc, 3 dc in next st, sc in next st repeatedly to form shallow scallops.
Fasten off.
The ruffle belongs only on the outside edge. Putting matching increases on both sides can pull the square neckline outward.
Purple Neckline Edging
Join purple at one lower front corner.
Work 1 round or continuous pass of sc up the center edge, around the square neckline and down the opposite center front.
At each inside neckline corner, use sc2tog across the corner stitches if the edging begins to flare. At each outer corner, work 2 sc in one stitch.
Fasten off.
Button Band
With purple yarn, join to the right center-front edge.
Row 1: Sc evenly from lower edge to neckline.
Row 2: Ch 1, turn, sc across.
Fasten off.
On the opposite side, make a mustard or purple buttonhole band.
Row 1: Sc evenly.
Row 2: Mark four button positions at equal intervals. At each marker, ch 2 and skip 2 sts, working sc between openings.
Row 3: Sc across, placing 2 sc into each ch-2 space.
Fasten off.
Test the opening against the actual buttons before sewing them on. A buttonhole only 1–2 mm too large can open during movement.
Crochet Flower
Make 1 in purple.
Round 1: Ch 2, 10 sc in second ch from hook, sl st to first sc. (10)
Round 2: Ch 3, 2 dc in next st, ch 3, sl st in next st five times.
Fasten off.
For a fuller flower, repeat another petal layer behind the first by joining into the back of Round 1.
Sew to the upper right front as shown in the photograph. Add five pearl beads to the center only when the garment is intended for a child old enough for securely attached small embellishments.
Flower Tassel Leaves
Make 3.
Ch 8.
Sl st in second ch, sc in next ch, hdc in next 2 ch, dc in next 2 ch, 3 dc in final ch. Rotate and work back along the opposite side of the foundation chain with matching stitches.
Fasten off and sew beneath the flower.
Skirt Waistband
Measure the child’s waist first.
For the 4–5 reference size, start with a chain that measures approximately 54–56 cm without stretching and that contains a multiple of 6 stitches. A nominal count of 96 chains works only if your gauge produces the target circumference.
Join carefully without twisting.
Round 1: Ch 2, hdc in each ch around. Join.
Round 2: Ch 2, hdc in each st around.
Round 3: Ch 2, hdc BLO in each st around.
Round 4: Hdc in each st.
Round 5: Hdc in next 4 sts, ch 1, sk 1 st, hdc in next st around to create drawstring openings at regular intervals.
Rounds 6–8: Hdc in each st or ch space around.
The waistband should measure approximately 4–5 cm deep.
If elastic is used, crochet an inner casing or sew the elastic to the inside without stretching the crochet fabric out of shape.
Skirt Upper Section
The skirt needs controlled expansion.
Round 9: Ch 3, dc around, increasing 12 sts evenly.
Round 10: Dc in each st.
Round 11: Increase 12 sts evenly.
Round 12: Dc in each st.
Round 13: Increase 12 sts evenly.
If beginning with 96 sts, these rounds produce 108, then 120, then 132 sts.
Check hip clearance now. The skirt must pass over the hip measurement comfortably before the lace section begins.
Lace Skirt Panels
The photograph combines vertical solid ribs with open mesh.
Adjust the stitch count to a multiple of 12 if needed.
Round 1: Ch 3, dc in next 4 sts, ch 2, sk 2, dc in next 4 sts, ch 2, sk 2 around. Join.
Round 2: Ch 3, dc in next 4 dc, ch 2, 2 dc in next ch-2 sp, ch 2, dc in next 4 dc, ch 2 around, modifying the repeat where required to preserve the vertical rib.
Round 3: Work solid dc above solid columns and ch-2 spaces above open sections.
Round 4: In each open section, work dc, ch 2, dc into the central ch-space.
Rounds 5–12: Continue the established vertical columns while adding one additional stitch or ch-space to selected lace sections every second round.
This produces flare without doubling the entire circumference at once.
At the reference size, work until the skirt measures approximately 25–28 cm from the lower edge of the waistband before adding the border.
Mustard Scallop Foundation
Round 1: Sc around, adjusting slightly to a multiple of 6.
Round 2: Sk 2 sts, 5 dc in next st, sk 2 sts, sc in next st around.
Do not fasten off if using mustard for a narrow transition row. Otherwise, finish and join purple.
Purple Scalloped Hem
Join purple at a low point between mustard shells.
Round 1: Sc around, placing enough stitches over each mustard shell to lie flat.
Round 2: Sc in next st, skip 2 sts, 7 dc in next st, skip 2 sts around, adjusting the final repeat discreetly if the circumference does not divide exactly.
Round 3: Sl st or sc along the shell tops for a denser outline.
Fasten off and weave the tail at least 5 cm through the purple border, reverse direction, then weave another 3 cm.
Drawstring
With mustard yarn, make a chain approximately 110–120 cm long.
Sl st back through every chain for a firm cord.
Fasten off.
Thread through the waistband openings. Center the ends before adding tassels.
Tassels
Make 2.
Wrap mustard yarn around a 7 cm card approximately 25–30 times. Tie the top securely, cut the opposite loops, then wrap a separate strand around the tassel neck 8–10 times.
Trim each tassel to approximately 6 cm.
Attach one to each drawstring end. Add the pictured pearl-style bead above the tassel only when appropriate for the intended wearer.
Assembly
- Block the front and back top panels to the target dimensions before joining them.
- Seam the top sides from the lower edge to the armhole using mattress stitch or slip stitch.
- Join the shoulders or attach the separate shoulder straps, checking equal strap length before securing the second end.
- Work the ruffle on the outside edge of each strap and confirm both ruffles face outward.
- Add the purple neckline and center-front edging before positioning buttons.
- Sew all four buttons opposite their buttonholes with strong polyester sewing thread rather than relying on loosely twisted yarn.
- Attach the purple flower to the upper right front and add the three hanging leaves below it.
- Finish the skirt waistband, then thread the drawstring through the eyelet round and center both ends.
- Attach the two tassels and inspect the purple skirt border for twisted or stretched shells.
- Weave every yarn tail through several stitches, reverse direction once, trim, then wash and dry the set according to the yarn label.
The completed set consists of a square-neck lace top and independently fitted flared skirt with coordinated purple trim.
7 Technical Tips
- Mark the skirt-round beginning with a locking marker. Losing the round start by even two stitches can shift the vertical lace columns and make the hem pattern visibly spiral.
- Keep the waistband depth around 4–5 cm. A thick join creates a pressure point and makes the drawstring channel uneven.
- Treat decreases at the armhole as shaping, not decoration. A bulky two-stitch decrease can form a ridge, so use a flatter decrease and keep both front armholes numerically identical.
- Test button placement before cutting thread. Four buttons should sit on one vertical center line; a lateral error of 5 mm is enough to pull the front band diagonally.
- Watch cotton tension through the lace section. If a 10 cm swatch grows more than about 1 cm after washing, recalculate the skirt length before working the border.
- Pin both straps at the same measured length before sewing. A difference of 1 cm between straps can tilt the square neckline and make one ruffle appear larger.
- Weave border tails through at least 5 cm of fabric, reverse direction, then continue for about 3 cm. A single straight weave is more likely to pull free because the scalloped hem moves independently from the body of the skirt.
Why Cotton Works Well for This Construction
The visual character of the photographed set depends on stitch definition. Smooth cotton makes the vertical lace ribs, button band and shell border easier to read than a heavily haloed yarn.
The trade-off is weight. A deeply flared skirt can pull downward after washing, especially when it contains several hundred grams of yarn. That is why gauge must be checked after the swatch has been washed.
A cotton-acrylic blend is another workable choice when lower weight and quicker drying matter more than crisp stitch definition. Whatever fibre is selected, change hook size to match gauge instead of forcing the recommended 3.5 mm hook.
Adjusting the Set for Other Sizes
Do not grade children’s clothing solely by adding the same number of stitches everywhere.
For the top, begin with the actual chest measurement. Add approximately 2–4 cm of wearing room, convert that circumference into stitches using the washed gauge, then divide the total between back and two front pieces.
For example, at 18 dc per 10 cm, a 72 cm finished chest corresponds to about:
72 ÷ 10 × 18 = approximately 130 stitches around the body.
Round that number to one compatible with the construction and button-band placement.
The skirt uses a different measurement. Begin from waist circumference and test hip clearance before continuing the lace. A skirt that fits the waist but cannot pass over the hips requires either elastic, a larger waistband, a placket or another opening.
Length should also be graded separately. Add rows to the solid and lace sections rather than making every shell taller.
Color Placement
The uploaded image uses contrast sparingly. Most of the garment remains mustard; purple appears only where the design benefits from an outline.
- neckline
- center-front band
- flower
- narrow edge details
- final skirt shells
That distribution prevents the contrast shade from breaking the long vertical lines of the skirt.
A second option is cream with navy edging. Another is dusty rose with burgundy. For visual consistency, however, the mustard-and-purple combination is distinctive enough to support a named project such as Mustard Violet Crochet Set.
Conclusion
Check the wearer’s chest, waist and intended skirt length before turning the image-derived counts into a finished garment. The next practical step is a washed 10 cm gauge swatch in the selected mustard yarn; use its actual stitch count to correct the bodice and waistband before crocheting full panels. This girls crochet top and skirt set pattern can then be adjusted without changing the square neckline, ruffled straps, lace flare or purple scalloped border. Save the finished set to Pinterest and share a front-and-back view on Instagram with #MustardVioletCrochetSet. When you make the skirt, will you keep the deep purple shell border from the photograph or work the final scallops in mustard?









