Introduction
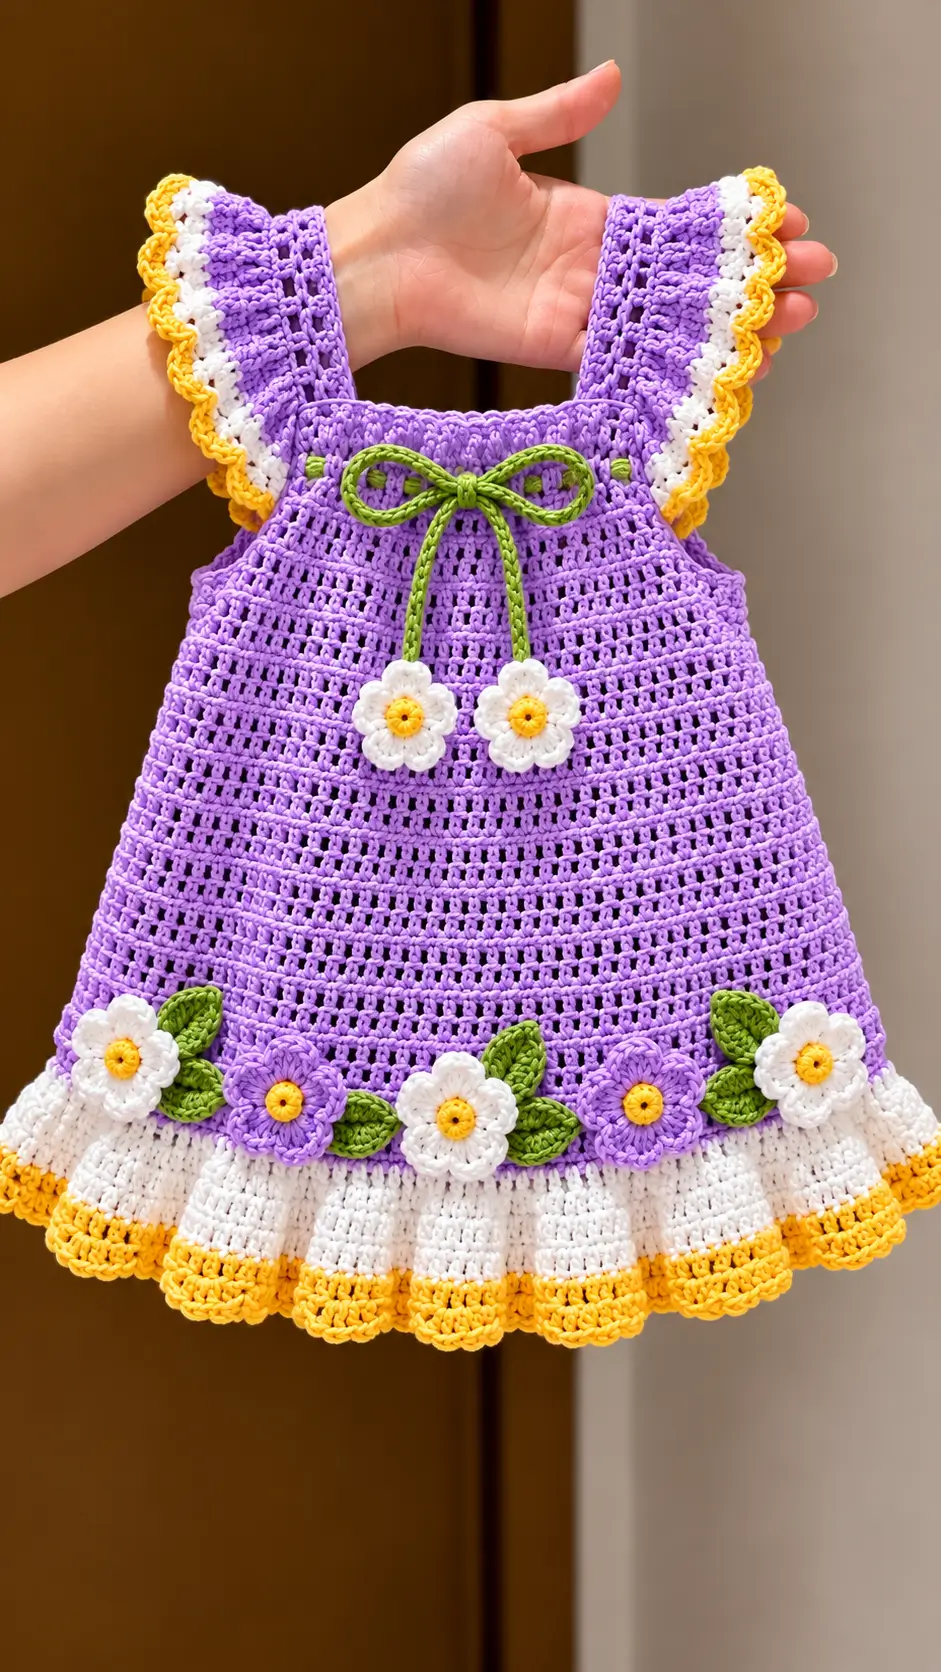
Seven flowers change the engineering of this purple dress: every appliqué adds weight exactly where the open mesh can stretch. This crochet toddler dress with flower appliques uses sport-weight cotton, a 3.5 mm hook and a 2–3-year fit target around 53 cm at the chest. The intermediate project combines a square bodice, A-line mesh skirt, broad ruffled straps and removable-looking floral details that also cover attachment points.
The Design: What Makes This Floral Dress Different
The square upper section acts as a stable anchor for two unusually broad straps. Their width matters because the lower skirt carries seven flowers, several leaves and a double ruffle; narrow tie straps would place more load on a small shoulder area. The skirt then widens in controlled stages rather than flaring in one large increase round, which keeps the openwork pattern vertical.
A white ruffle separates the purple skirt from the yellow scalloped edge. That color break makes the hem read as a defined border instead of another mesh row. The purple crochet toddler dress also uses flower appliqués as structural decoration: the hem motifs sit above the heavier ruffle instead of hanging from it.
One common error in a crochet flower applique dress is sewing every petal down. That can stiffen the skirt and distort the mesh. Attach the flower center and selected inner petal points instead.
Project Info at a Glance
| Skill Level | Time | Finished Size | Hook | Best For |
|---|---|---|---|---|
| Intermediate | 12–20 hours | Target 2–3 years; about 53 cm chest | 3.5 mm | Sleeveless summer pinafore |
The 53 cm chest reference comes from a published 2–3-year crochet lace dress; 3.5 mm is supported by another published 2–3-year sport-weight design.
Pattern note: The instructions below are an original, photo-derived interpretation of the uploaded garment. They are not a transcription of a commercial pattern. Check the child’s actual chest, shoulder-to-waist and shoulder-to-hem measurements before final strap attachment.
Materials and Tools
Yarn
- Lavender purple — sport/fingering cotton — allow 250–300 g — suggested type: mercerized cotton reaching gauge.
- White — same yarn weight — allow 50 g for strap edging, flowers and lower ruffle.
- Golden yellow — same yarn weight — allow 25–50 g for flower centers and scalloped borders.
- Leaf green — same yarn weight — allow 25 g for leaves and front tie.
The purple allowance is a working quantity for this photo-derived version. A comparable 2–3-year sport dress uses about 625 m of yarn.
Tools
- 3.5 mm crochet hook
- Yarn needle
- Locking stitch markers
- Scissors
- Measuring tape
- Rustproof blocking pins
No safety eyes, stuffing or toy hardware are used.
Abbreviations
- MR — magic ring
- ch — chain
- sc — single crochet
- hdc — half double crochet
- dc — double crochet
- tr — treble crochet
- inc — 2 stitches in the same stitch
- sl st — slip stitch
- st/sts — stitch/stitches
- sp — space
- sk — skip
- BLO — back loop only
An invisible decrease is not required in the main garment, but when used in small sculptural crochet pieces it is worked through the front loops of two consecutive stitches to reduce visible bulk.
Gauge and Sizing
Target approximately 20 dc = 10 cm after washing and drying the swatch.
At 20 stitches per 10 cm, 108 stitch positions measure about 54 cm before minor finishing changes. The photo shows a close but not body-hugging bodice, so a target around 53–54 cm is appropriate for the chosen 2–3-year reference size.
If 108 stitches measure more than 55 cm in your yarn, move down a hook size. If they measure under 52 cm, move up a hook size or recalculate before starting the skirt.
Pattern — Step by Step
Bodice
Yarn: purple — original garment construction based on the photographed silhouette.
Ch 109.
R1: Dc in 2nd ch from hook and each ch across. (108)
Join carefully without twisting if you prefer the side seam closed from the start.
R2: Ch 2, dc in each st around. (108)
R3: Ch 2, *dc in next st, ch 1, sk 1* around. (54 dc + 54 ch-1 spaces)
R4: Ch 2, dc in every dc and ch-1 sp. (108)
R5: Dc in each st around. (108)
R6: Repeat R3. (108 positions)
R7: Repeat R4. (108)
R8: Dc in each st. (108)
R9: Repeat R3. (108 positions)
R10: Repeat R4. (108)
R11: Dc in each st. (108)
R12: Repeat R3. (108 positions)
R13: Repeat R4. (108)
R14: Sc in each st. (108)
The bodice should measure roughly 12–14 cm high. Add or remove one solid row if the wearer’s waist-to-underarm measurement requires it.
Fasten off.
Skirt
Yarn: purple — photo-derived A-line shaping.
Attach purple to the lower edge of the bodice foundation.
Rnd 1: Dc evenly around. (108)
Rnd 2: *Dc in next 8 sts, 2 dc in next st* ×12. (120)
Rnd 3: *Dc, ch 1, sk 1* around. (120 positions)
Rnd 4: Dc in every dc and ch-1 sp. (120)
Rnd 5: Increase 12 sts evenly around. (132)
Rnd 6: Repeat eyelet pattern from Rnd 3. (132 positions)
Rnd 7: Dc in every stitch position. (132)
Rnd 8: Dc around. (132)
Rnd 9: Increase 12 sts evenly. (144)
Rnd 10: Eyelet round. (144 positions)
Rnd 11: Dc around. (144)
Rnd 12: Dc around. (144)
Rnd 13: Increase 12 sts evenly. (156)
Rnd 14: Eyelet round. (156 positions)
Rnd 15: Dc around. (156)
Rnd 16: Dc around. (156)
Rnd 17: Increase 12 sts evenly. (168)
Rnd 18: Eyelet round. (168 positions)
Rnd 19: Dc around. (168)
Rnd 20: Eyelet round. (168 positions)
Rnd 21: Dc around. (168)
Rnd 22: Eyelet round. (168 positions)
Rnd 23: Dc around. (168)
Rnd 24: Eyelet round. (168 positions)
Rnd 25: Dc around. (168)
Rnd 26: Sc around. (168)
Measure shoulder-to-hem before adding the ruffle. Shorten or extend by repeating one solid round plus one eyelet round.
Fasten off.
Shoulder Straps — Make 2
Yarn: purple.
Ch 13.
R1: Dc in 2nd ch from hook and across. (12)
R2–22: Ch 2, turn, dc in each st. (12)
Each strap should reach comfortably from the front bodice edge over the shoulder to the corresponding back position. Fit determines the final row count.
Do not fasten off until strap length has been checked.
Strap Ruffle Edging — Make 2
Yarn: white and yellow.
Attach white along the outer long edge of one strap.
R1: Work approximately 2 sc for every 3 row ends, keeping the edge flat.
R2: Ch 3, *2 dc in next st, dc in next st* across.
Change to yellow.
R3: *Sl st in next st, 5 dc in next st, sl st in next st* across, spacing shells evenly.
Repeat on the second strap. The scallops should face outward when the straps are attached.
White Lower Ruffle
Yarn: white.
Join white to Rnd 26 of the skirt.
Rnd 1: Ch 2, *dc in next 2 sts, 2 dc in next st* around. (224)
Rnd 2: Dc in each st. (224)
Rnd 3: *Dc in next 3 sts, 2 dc in next st* around. (280)
Rnd 4: Dc around. (280)
The increasing stitch count forms the gathered band visible in the photograph.
Yellow Scalloped Hem
Yarn: golden yellow.
Rnd 1: Sc evenly around the white ruffle. (280)
Rnd 2: *Sl st in next st, sk 1, 5 dc in next st, sk 1* around, adjusting the final repeat by one stitch if required to close cleanly.
Fasten off and weave the tail through at least 5 cm of neighboring stitches.
Large Daisy Flowers — Make 5
Make three white and two purple to match the hem arrangement.
With yellow:
R1: 6 sc in MR. (6)
R2: 2 sc in each st. (12)
Change to petal color.
R3: *Sl st in next st, ch 3, 3 dc in next st, ch 3, sl st in next st* repeat to form six petals.
Fasten off. Leave a 20 cm sewing tail.
Hanging Daisy Flowers — Make 2
White petals with yellow centers.
Work the same flower pattern as the large daisies, but use a slightly firmer tension or a 3.0 mm hook if the motifs hang too heavily.
Leave a 15 cm tail for attaching each flower to the green cord.
Leaves — Make 8–10
Yarn: green.
Ch 8.
Working along one side of the chain:
Sc in 2nd ch, hdc, dc, tr, dc, hdc, sc.
Work 2 sc in the final chain and continue up the opposite side:
Sc, hdc, dc, tr, dc, hdc, sc.
Sl st to first stitch.
Fasten off with a 15 cm sewing tail.
Green Front Tie
Yarn: green.
Ch approximately 100–120, or enough for a 50–60 cm finished cord.
Sl st back through every chain for a firm rounded tie.
Fasten off. Attach one hanging daisy to each end. Tie the cord in a bow at center front and tack the knot to the bodice with several hidden stitches so the decorative cord does not become a loose removable piece.
Assembly
- Lay the bodice flat and mark its exact center front and center back.
- Position the two front strap ends symmetrically, leaving the square neckline visible between them.
- Stitch each front strap end through several bodice stitches rather than one mesh opening.
- Place the rear strap ends at equal distances from the center back and check that neither strap twists.
- Sew the straps to the back edge, then reinforce each join with a second pass of yarn.
- Center the green bow on the upper front bodice and tack its knot securely.
- Arrange five large flowers along the skirt just above the white ruffle, alternating white and purple as shown.
- Pin leaves behind and between the flowers before sewing; attach each leaf through its center spine rather than around every edge.
- Sew each flower through its yellow center and two or three inner petal points, leaving outer petals free.
- Weave all yarn tails through multiple stitch directions, block the dress to measurement and check every appliqué attachment before wear.
The finished garment now contains the same principal visual elements visible in the reference image: purple openwork, broad ruffled straps, floral hem, green foliage, white lower ruffle and yellow scallops.
7 Technical Tips
- Mesh distortion: Place a stitch marker at the start of every eyelet round; losing one ch-1 space can shift the next increase section by several centimeters. Count the full 108, 120, 132, 144, 156 or 168 stitch positions before moving to the next shaping round.
- Over-wide chest: Measure the bodice circumference after R4 rather than waiting until the skirt is attached. A 2 cm excess at this stage can become more noticeable after cotton relaxes during washing.
- Strap stretch: Do not judge strap length while pulling the crochet taut. Pin each strap at its natural length and aim for equal finished lengths within about 3 mm.
- Heavy flower hem: Sewing every petal to the dress can form rigid patches that pull against the mesh. Secure the center plus only two or three inner petal points on each flower.
- Ruffle cupping: If the white hem flips upward, the increase rate is too low for your gauge. Add approximately one extra stitch every 8–10 stitches on the next white round rather than forcing the fabric flat during blocking.
- Uneven scallops: Pin the yellow hem into four equal quarters before starting its shells. A spacing error of one stitch repeated many times will collect visibly near the final join.
- Loose yarn tails: A 1 cm woven tail can work free from smooth mercerized cotton. Weave each finishing tail for at least 5 cm, change direction once, then trim it.
Conclusion
Block the bodice first, then compare its finished chest measurement with the child’s garment measurement before permanently attaching the straps. That single check controls more of the fit than adding or removing a late skirt round. For the photographed layout, keep the five lower flowers above the white ruffle so their weight remains on the purple fabric rather than on the scalloped border. Save the finished crochet toddler dress with flower appliques to Pinterest and share a front-view photo on Instagram with #PurpleDaisyDress. The next practical step is to crochet and wash a gauge swatch. If you alter the flower placement, would you keep the two purple blossoms near the center or move them toward the outer hem?









