Introduction
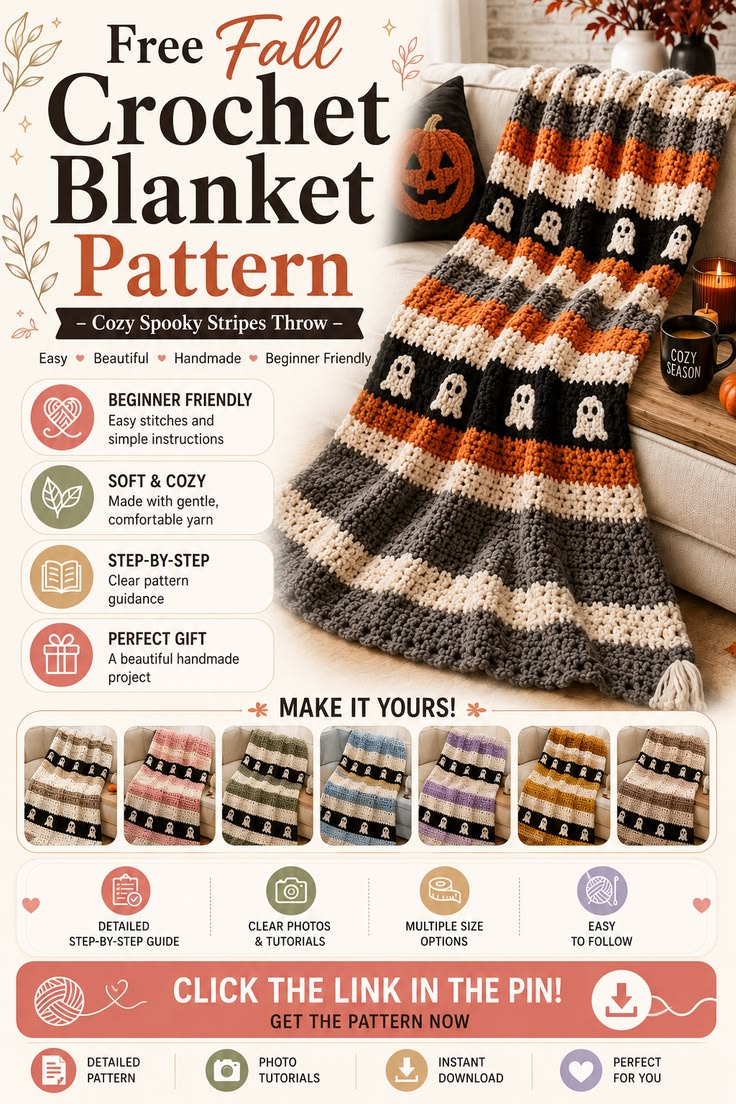
Eight white ghosts interrupt two black stripes on this throw, so motif spacing has to be calculated before the appliqués are sewn down. This fall crochet blanket pattern uses super-bulky yarn, a 9 mm hook and simple half double crochet rows to make an approximately 104 × 142 cm throw. The confident-beginner construction separates the stripe work from the ghost motifs, which keeps color management practical.
The Design: What Makes This Ghost Blanket Different
The photographed blanket uses horizontal structure rather than an all-over Halloween chart. Broad charcoal sections occupy most of the surface, while burnt orange and cream bars divide the throw into repeated fall-color zones. Two black bands carry the white ghosts.
That choice matters. A ghost crochet blanket made with mosaic, filet or C2C techniques requires the motif to be built into the blanket rows. Here, each ghost is crocheted separately and attached afterward. The blanket body remains a standard striped crochet throw, and motif placement can be corrected before sewing.
Charcoal also appears in sections of different heights. This prevents the stripe sequence from feeling mechanical and gives the central ghost band more visual weight.
The usual error is attaching ghosts before checking the blanket width. Four motifs squeezed into one row can buckle the black stripe or create visibly unequal gaps.
Project Info at a Glance
| Skill Level | Time | Finished Size | Hook | Best For |
|---|---|---|---|---|
| Confident beginner | 10–16 hours | Approx. 104 × 142 cm | 9 mm | Sofa throw, fall decor, Halloween blanket |
Materials and Tools
Yarn
Use super-bulky #6 blanket yarn or a yarn that produces a comparable gauge.
- Charcoal gray — approximately 600–700 g
- Black — approximately 350–450 g
- Burnt orange — approximately 300–400 g
- Cream / ivory — approximately 350–450 g
- Off-white for ghosts — approximately 120–180 g
- Black scrap yarn for ghost faces — approximately 10–20 g
Tools
- 9 mm crochet hook
- 8 mm hook, optional for firmer ghost appliqués
- Large tapestry needle
- Scissors
- Locking stitch markers
- Flexible measuring tape
- Blocking mats, optional for motif shaping
Abbreviations
- ch — chain
- sc — single crochet
- hdc — half double crochet
- dc — double crochet
- sl st — slip stitch
- inc — 2 sts in same stitch
- st/sts — stitch/stitches
- RS — right side
- WS — wrong side
Invisible decreases are not required because the blanket is rectangular and the ghost appliqués are worked flat.
Gauge and Finished Size
Aim for approximately:
8–9 hdc × 6–7 rows = 10 cm
in super-bulky yarn with a 9 mm hook.
The target finished size is approximately 104 cm wide × 142 cm long.
For this version, begin with 88 working stitches.
If your swatch gives a wider measurement, reduce the starting chain in multiples of two. If it gives a narrower result, add stitches until the width reaches approximately 100–104 cm before the border.
Width should be checked after the first five rows rather than after the entire blanket has been completed.
Color Plan
Use the following stripe sequence as a structural guide:
Charcoal — broad
Cream — narrow
Orange — medium
Black ghost band — broad
Cream — narrow
Orange — medium
Charcoal — broad
Cream — narrow
Orange — medium
Black ghost band — broad
Orange — medium
Cream — narrow
Charcoal — broad
The photo contains irregular stripe heights, so equalizing every color section would reduce the resemblance.
Change color on the final yarn-over of the final hdc in the previous row.
Cut yarn at each color section rather than carrying unused super-bulky yarn up the side for long distances.
Pattern — Step by Step
Foundation
With charcoal:
Ch 90.
Row 1
Hdc in 3rd ch from hook and in each chain across.
(88 hdc)
Ch 2, turn.
The turning chain does not count as a stitch throughout.
Rows 2–10 — Charcoal
Hdc across.
(88)
Ch 2, turn after each row.
After Row 10, the first broad charcoal section is complete.
Cream Stripe
Rows 11–13
Change to cream.
Hdc across each row.
(88)
Three rows create a narrow pale divider.
First Orange Stripe
Rows 14–18
Change to burnt orange.
Hdc across.
(88)
Five orange rows provide a stronger fall-color band without becoming as deep as the charcoal sections.
First Black Ghost Band
Rows 19–27
Change to black.
Hdc across.
(88)
Nine rows create enough height for approximately 7–8 cm ghost appliqués.
Do not attach the ghosts yet.
Cream Divider
Rows 28–30
Change to cream.
Hdc across.
(88)
Second Orange Stripe
Rows 31–35
Change to orange.
Hdc across.
(88)
Central Charcoal Section
Rows 36–46
Change to charcoal.
Hdc across.
(88)
Eleven rows make the center section slightly deeper than the surrounding color bars.
Cream Stripe
Rows 47–49
Change to cream.
Hdc across.
(88)
Third Orange Stripe
Rows 50–54
Change to burnt orange.
Hdc across.
(88)
Second Black Ghost Band
Rows 55–63
Change to black.
Hdc across.
(88)
Again, leave the band undecorated until the entire rectangle is finished.
Fourth Orange Stripe
Rows 64–68
Change to burnt orange.
Hdc across.
(88)
Final Cream Divider
Rows 69–71
Change to cream.
Hdc across.
(88)
Final Charcoal Section
Rows 72–82
Change to charcoal.
Hdc across.
(88)
Measure the blanket.
If the length remains below approximately 138 cm before the border, continue charcoal rows until the target is reached.
Fasten off.
Straightening the Side Edges
Before adding the border, lay the blanket flat.
Count visible row ends on both long sides.
If one edge curves because some turning chains are loose, the border can absorb minor variation. Large differences should be corrected before continuing.
Place a stitch marker at each corner.
Border
Join charcoal in any corner.
Border Round 1
Ch 1.
Sc evenly around all four sides.
Across the top and bottom, work one sc in each hdc.
Along the long edges, place approximately 2 sc for every 3 row ends, adjusting locally so the edge lies flat.
At each corner work:
sc, ch 1, sc
in the same corner space.
Join with sl st.
Border Round 2
Change to cream if a high-contrast edge is desired.
Sc in each stitch around.
At each corner ch-1 space work:
sc, ch 1, sc.
Join.
Border Round 3
Return to charcoal.
Sc around once more.
Fasten off.
The border should measure approximately 2–3 cm deep.
Ghost Appliqués — Make 8
Use off-white yarn and an 8 mm hook.
Ghost Row 1
Ch 7.
Sc in 2nd ch from hook and across.
(6)
Ch 1, turn.
Row 2
Inc in first st.
Sc in next 4 sts.
Inc in final st.
(8)
Ch 1, turn.
Row 3
Sc across.
(8)
Row 4
Inc, sc 6, inc.
(10)
Rows 5–7
Sc across.
(10)
Row 8
Sc 2.
Hdc 2.
Dc 2.
Hdc 2.
Sc 2.
(10)
This creates a slightly rounded upper body.
Row 9
Sc across.
(10)
Row 10 — Wavy Bottom
Work:
sl st in first st, 3 dc in next st, sl st in next 2 sts, 3 dc in next st, sl st in next 2 sts, 3 dc in next st, sl st in final sts as needed.
The bottom should form three small ghost lobes rather than one straight edge.
Fasten off with a 30 cm sewing tail.
Ghost Face
Use black yarn and a tapestry needle.
For each eye, make a small vertical satin stitch approximately 8–12 mm long.
Space the eyes approximately 1.5–2 cm apart.
For the mouth, make one short vertical or oval stitch centered beneath the eyes.
Do not use plastic safety eyes on an appliqué blanket where sewn yarn details are flatter and easier to launder.
Positioning the Ghosts
Place four ghosts on each black band.
Do not sew immediately.
Measure the usable black-band width between borders.
For an approximately 100 cm interior width, a practical arrangement is:
- approximately 8–10 cm from left edge to first ghost
- 15–18 cm between ghost centers
- approximately 8–10 cm from final ghost to right edge
The exact measurement changes with motif size.
Place all four ghosts first, then compare spacing from several feet away.
The upper and lower ghost rows can be aligned vertically or shifted by half a motif for a less formal arrangement.
Sewing the Ghosts
Thread the long off-white tail.
Sew around the outer edge with small whip stitches.
Catch only the upper portion of the blanket stitches so white yarn does not show strongly on the reverse side.
Add one small anchoring stitch near the center of the ghost body if the appliqué lifts away from the black band.
Do not sew through every internal stitch.
The outer perimeter plus one center anchor is sufficient for a flat motif.
Optional Corner Tassels
Cut 10–14 strands of cream yarn approximately 25 cm long.
Fold the strands in half.
Pull the folded center through a border corner.
Pass all loose ends through the loop and tighten.
Trim to approximately 10–12 cm.
Repeat on all four corners for symmetry, or add one or two only for a more irregular seasonal look.
Assembly
- Lay the finished striped blanket flat and smooth every color band without stretching it.
- Measure both diagonals; a difference greater than approximately 3 cm indicates the rectangle is skewed and should be lightly blocked before appliqué placement.
- Position four white ghosts across the first black band and mark each center with a removable stitch marker.
- Repeat the same spacing process on the second black band before sewing any motif.
- Stitch each ghost around its outer edge using matching off-white yarn and one central anchor stitch.
- Add black yarn eyes and mouth details after the appliqués have been attached so facial stitches do not distort during sewing.
- Work the three-round border around the completed rectangle if it was not added before motif attachment.
- Weave stripe-change tails horizontally into stitches of the matching color for at least 8–10 cm.
- Add optional cream corner tassels and trim all tassels to equal length.
- Wash or block according to the yarn label, spread the blanket flat and confirm that every ghost remains centered within its black stripe.
The completed throw contains broad charcoal fields, orange and cream dividers, two black motif bands and eight repeated white ghosts.
7 Technical Tips
- Shrinking stripe width: Tightening your grip during black or orange sections can make the rectangle narrower midway through the blanket. Measure the width every 10 rows and compare it with the first 100–104 cm target.
- Dropped edge stitches: Missing the final hdc repeatedly produces a diagonal side edge. Place a stitch marker in the first and last stitch of every row if the final stitch is difficult to see in blanket yarn.
- Uneven color changes: Changing yarn after completing the final stitch creates a visible knot at the edge. Pull the new color through during the final yarn-over of the previous row’s last hdc.
- Ghost crowding: Four appliqués cannot simply be placed edge-to-edge across the black stripe. Maintain approximately 15–18 cm between motif centers on a 100 cm interior width, then adjust all four positions together.
- Appliqué buckling: Pulling sewing stitches too tightly gathers the black band beneath the ghost. Lay the blanket flat after every 5–6 whip stitches and release tension if the stripe begins to pucker.
- Blanket-yarn shedding: Repeatedly weaving one short tail back through the same stitches can weaken plush fibers. Leave at least 15 cm tails at color changes and weave them in through several directions.
- Border ruffling: Too many single crochets along the long sides create waves. Begin near 2 sc for every 3 row ends, then adjust only where the border either pulls or flares.
Why Separate Ghost Appliqués Work Here
Separate appliqués change the workflow compared with graph-based or mosaic ghost blankets.
The entire throw can be crocheted as normal horizontal stripes. That reduces the number of active colors in a row and removes the need to follow a large motif chart.
It also allows ghost placement to be changed at the end.
If the blanket finishes wider than expected, the maker can increase the spacing between motifs instead of recalculating a chart.
The trade-off is sewing. Eight appliqués require additional finishing, and each one needs to be attached flat enough that its edges do not curl during washing.
Choosing the Stripe Heights
The color proportions matter more than using identical row counts.
Charcoal occupies the broadest sections because it acts as the neutral background.
Orange should appear often enough to read as the primary seasonal accent but should not dominate the blanket.
Cream separates adjacent dark bands.
Black is reserved mainly for the ghost sections.
A useful visible-color balance is approximately:
40% charcoal gray
20% black
20% burnt orange
20% cream and off-white
The white ghosts sit on top of the black rather than adding to the underlying stripe percentage.
If the blanket is resized vertically, add rows primarily to the charcoal sections. Expanding every stripe equally can make the black ghost bands unnecessarily deep.
Changing the Blanket Width
The half-double-crochet body does not depend on a complicated stitch multiple.
Add or remove foundation chains until the desired width is reached.
Keep the final working stitch count even if four ghosts will be placed across each black band; even widths make spacing calculations easier.
For a lap blanket near 90 cm wide, reduce the body to approximately 74–78 stitches at the same gauge.
For a larger throw near 120 cm wide, increase to approximately 100–104 stitches.
Crochet at least five rows before judging the final measurement.
Foundation chains can contract differently from established half-double-crochet fabric.
Making a Smaller Halloween Lap Blanket
Reduce the blanket to approximately 90 × 120 cm.
Keep three ghosts per black band instead of four.
Shorten the broad charcoal sections by two or three rows each.
The black bands should still remain deep enough to surround the appliqués with at least 2–3 cm of black fabric above and below each white ghost.
Do not simply reduce every row count by the same percentage.
The decorative bands have minimum practical heights dictated by the ghost dimensions.
Making the Blanket Longer
Continue the final charcoal section until the preferred length is reached.
Another option is to repeat:
cream → orange → black ghost band → orange → cream → charcoal
for a substantially longer blanket.
If another black band is added, either make four additional ghosts or leave that band undecorated and treat it as a plain color stripe.
A repeated ghost row should have the same approximate spacing as the first two.
Consistency in motif placement makes the color sequence appear intentional even when stripe heights vary.
Yarn Choice
The reference image has a thick, high-loft appearance, which fits super-bulky blanket yarn.
Acrylic super-bulky yarn can also work.
If worsted #4 yarn is substituted, use a smaller hook and substantially increase both the starting stitch count and row count.
Do not combine super-bulky and worsted yarn in the same body stripes unless several worsted strands are held together to match the established gauge.
Planning the Ghost Faces
The reference ghosts use simple dark faces.
Keep the facial details smaller than the body.
Eyes approximately 8–12 mm tall and a mouth around 8–10 mm create enough contrast without occupying most of a 7–8 cm appliqué.
Position both eyes on the same horizontal line.
Place the mouth about 8–12 mm below the eye line.
Before knotting the face yarn, hold the ghost against the black stripe.
A mouth that looks correctly centered on the table can appear too low once the white motif is surrounded by dark fabric.
Washing and Blocking
Follow the yarn manufacturer’s washing instructions.
For polyester blanket yarn, machine washing may be permitted, but handmade appliqués benefit from lower agitation.
Place the blanket flat after washing and reshape all eight ghosts before drying.
Check that no white edge has folded under itself.
If the border waves, shape it into a rectangle while damp rather than pulling aggressively at individual corners.
Heavy super-bulky blankets can stretch significantly when wet.
Lift the blanket with both hands or support it in a laundry basket rather than carrying the entire wet weight from one corner.
Conclusion
Finish the stripe rectangle before committing to ghost placement. Four motifs need equal breathing room across each black band, and their final positions depend on the actual blanket width rather than the foundation-chain estimate. Keep charcoal as the dominant field, use orange for medium-width fall accents and reserve black for the two motif sections. After the ghosts are sewn down, work the border and check the rectangle flat before trimming the final tails. Save this fall crochet blanket pattern to Pinterest and share the finished ghost bands on Instagram with #SpookyStripeThrow. Would you give all eight ghosts the same face, or vary the mouth shape on each one?









