Introduction
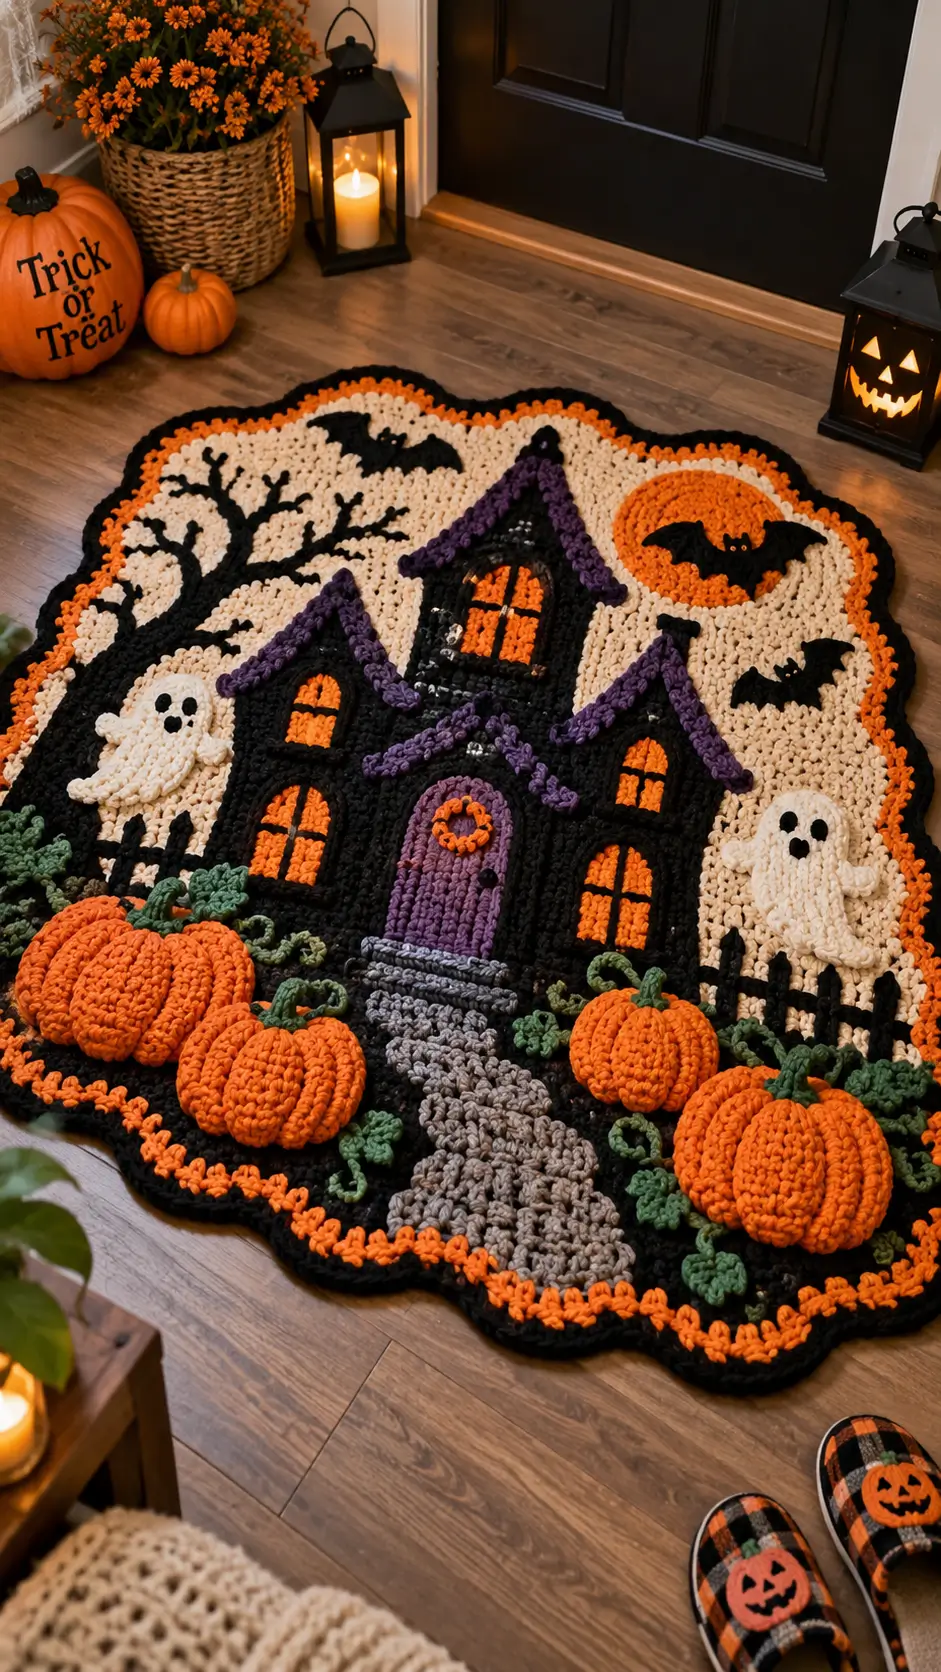
Three crooked roof peaks are what make this haunted house readable before the ghosts or pumpkins enter the scene. This haunted house crochet rug pattern builds those peaks over a thick super-bulky base, then adds dimensional Halloween appliqués. Plan for roughly 119 × 155 cm, an 8 mm hook and intermediate skills. The modular construction also allows damaged foreground pieces to be replaced without rebuilding the whole rug.
The Design: What Makes the Haunted House Different
The house occupies the vertical center rather than sitting along the lower edge. That decision leaves enough cream background around the black silhouette for the roofline, bats and tree to remain distinct. Three separate towers create the asymmetry associated with old Victorian-style haunted houses, while raised purple roof trim separates black architecture from the dark outer border.
Foreground depth comes from overlapping pumpkins and a gray path that widens toward the viewer. A typical Halloween crochet rug pattern can become visually flat when every motif is sewn at the same level, so the pumpkins are ribbed and lightly stuffed before attachment. The crochet haunted house itself stays comparatively flat. A common mistake is enlarging every appliqué equally; that destroys perspective and makes the bats compete with the building.
Project Info at a Glance
| Skill Level | Time | Finished Size | Hook | Best For |
|---|---|---|---|---|
| Intermediate | 25–35 hours | Approx. 119 × 155 cm | 8 mm | Seasonal floor display / large wall hanging |
The size is based on a published 47 × 61 inch haunted-house blanket benchmark. An 8 mm hook with super-bulky yarn is also consistent with published floor-rug construction references.
Materials and Tools
Yarn
Quantities for this photo-derived rug are working estimates because no published pattern exists for the exact photographed design.
- Black — super bulky #6 — approx. 1,200–1,500 g
- Cream — super bulky #6 — approx. 900–1,100 g
- Pumpkin orange — super bulky #6 — approx. 600–800 g
- Deep purple — super bulky #6 — approx. 300–400 g
- Gray — super bulky #6 — approx. 250–350 g
- Sage green — super bulky #6 — approx. 250 g
- White or ivory — super bulky #6 — approx. 200 g
Tools
- 8 mm crochet hook
- Tapestry needle
- Locking stitch markers
- Polyester stuffing for the pumpkins
- Sharp scissors
- Sewing clips or pins
- Non-slip rug underlay for hard flooring
Do not install safety eyes on floor décor. Embroidered or crocheted facial details remove rigid components that can catch underfoot.
Abbreviations
- MR — magic ring
- sc — single crochet
- inc — 2 sc in one stitch
- dec — single crochet decrease
- sl st — slip stitch
- ch — chain
- hdc — half double crochet
- dc — double crochet
- BLO — back loop only
- st/sts — stitch/stitches
For shaped three-dimensional pieces, an invisible decrease is worked through the front loops of the next two stitches before completing one single crochet.
Pattern — Step by Step
This rug is mainly worked in rows. Circular appliqués use rounds. Stitch counts belong to this original photo-derived layout.
Rug Base
Yarn: cream
Ch 97.
Row 1: sc in second ch from hook and across (96).
Rows 2–120: ch 1, turn, sc across (96).
Do not fasten off.
Base Border
Yarn: black and orange
Round 1: Work sc evenly around the full rectangle, placing 3 sc at each corner.
Round 2: black sc around, maintaining 3-stitch corners.
Round 3: change to orange; sc, ch 1, skip 1 around.
Round 4: black sc in every sc and chain space.
For a more irregular silhouette like the photo, work groups of 5 dc into selected border stitches every 8–10 cm, then sl st between shells.
Fasten off. Weave in a 15 cm tail.
Main Haunted House
Yarn: black
Ch 59.
Rows 1–38: ch 1, turn, sc across (58).
Fasten off with a 40 cm sewing tail.
This panel forms the broad lower façade. Pin it centrally before adding towers.
Left Tower
Yarn: black
Ch 25.
Rows 1–28: sc across (24).
Row 29: dec, sc 20, dec (22).
Row 30: dec, sc 18, dec (20).
Continue reducing by 2 stitches per row until 4 sts remain.
Final row: dec ×2 (2).
Fasten off.
Right Tower
Repeat the left tower, but stop the rectangular section after Row 24 before beginning roof reduction. The slight height difference keeps the building asymmetrical.
Center Tower
Yarn: black
Ch 29.
Rows 1–34: sc across (28).
Row 35: dec, sc 24, dec (26).
Continue subtracting 2 stitches per row until 4 remain.
Final row: dec ×2 (2).
Fasten off with a 40 cm tail.
Purple Roof Trim
Yarn: deep purple
For each sloping roof edge, crochet a chain long enough to span the pinned roof line. Beginning in the second chain, work hdc back along the chain. Sew each strip over the black roof edge with the lower half of the strip overlapping the façade.
Make six strips: two per tower.
Door
Yarn: deep purple
Ch 15.
Rows 1–20: sc across (14).
Row 21: dec, sc 10, dec (12).
Row 22: dec, sc 8, dec (10).
Row 23: dec, sc 6, dec (8).
Row 24: dec, sc 4, dec (6).
Fasten off.
Add a small black embroidered doorknob on the right side.
Orange Windows — Make 6
Yarn: orange
Ch 9.
Rows 1–10: sc across (8).
Fasten off, leaving 20 cm for sewing.
With black yarn, embroider one vertical and one horizontal bar across each window. Place two windows on the lower façade and the remainder across the towers.
Gray Path
Yarn: gray
Ch 19.
Row 1: sc across (18).
Row 2: inc, sc 16, inc (20).
Row 3: sc across (20).
Row 4: inc, sc 18, inc (22).
Continue alternating a plain row with an increase row until the strip reaches approximately 65–70 cm and about 42 stitches across the lower edge.
Fasten off. Pin the narrow end immediately below the door and the broad end near the lower border.
Orange Moon
Yarn: orange
R1: 6 sc in MR (6).
R2: inc ×6 (12).
R3: (sc, inc) ×6 (18).
R4: (2 sc, inc) ×6 (24).
R5: (3 sc, inc) ×6 (30).
R6: (4 sc, inc) ×6 (36).
R7: (5 sc, inc) ×6 (42).
Fasten off. Leave 30 cm for sewing.
The moon stays flat rather than being stuffed.
Bats — Make 3
Yarn: black
R1: 6 sc in MR (6).
R2: inc ×6 (12).
R3: sc around (12).
Flatten rather than stuff.
For each wing, ch 11. Work back with sl st, sc, hdc, dc, dc, hdc, sc, sl st. Repeat for the opposite wing.
Fasten off and sew the wings to the flattened body.
Ghosts — Make 2
Yarn: white
Ch 12.
Row 1: sc across (11).
Row 2: inc, sc 9, inc (13).
Rows 3–14: sc across (13).
Row 15: sc 2, 3 dc in next st, sc 3, 3 dc in next, sc 3, 3 dc in next.
Work sc around the outside edge to smooth the sides.
Fasten off.
Embroider two oval black eyes and one vertical oval mouth.
Pumpkins — Make 4
Yarn: orange
R1: 6 sc in MR (6).
R2: inc ×6 (12).
R3: (sc, inc) ×6 (18).
R4: (2 sc, inc) ×6 (24).
R5: (3 sc, inc) ×6 (30).
R6: BLO sc around (30).
R7–10: sc around (30).
R11: (3 sc, dec) ×6 (24).
R12: (2 sc, dec) ×6 (18).
Lightly stuff.
R13: (sc, dec) ×6 (12).
R14: dec ×6 (6).
Fasten off with a 45 cm tail. Pass the tail through the center from top to bottom six times at evenly spaced intervals, pulling gently to create pumpkin ribs.
Pumpkin Stems — Make 4
Yarn: green
Ch 7.
Starting in second chain, sl st 2, sc 2, hdc 2.
Fasten off and sew into the pumpkin center.
Vines
Yarn: green
Ch 18–30 depending on placement. Work 2 sc in every chain to create a coil.
Make 8–10 vines and arrange them between pumpkins.
Leaves — Make 12
Ch 6. Starting in second chain: sl st, sc, hdc, sc, sl st. Work down the opposite side of the chain in reverse order.
Fasten off.
Bare Tree
Yarn: black
Ch 35.
Work sl st back along 8 stitches, ch 9 for the first branch, sl st back, then continue down the trunk. Add four to six branch chains of different lengths while returning toward the base.
Make two or three secondary branch sections and sew them across the cream background to form an angular tree silhouette.
Fence Sections — Make 2
Yarn: black
Ch 40.
Row 1: sc across.
For each upright picket, join yarn at intervals of five stitches, ch 10–14, sl st back to the foundation strip.
Fasten off each picket separately. Position one fence section behind each ghost.
Assembly
- Center the black main house on the cream base and pin every 8–10 cm before sewing around its outer edge.
- Add the left, right and center towers, overlapping the lower façade by 2–3 cm.
- Attach the purple roof strips, purple door and all six orange windows. Embroider the black window crossbars afterward.
- Sew the gray path from the door toward the lower border, keeping the wide end centered between the front pumpkins.
- Position the moon in the upper-right background, then place one bat over its lower half and two bats elsewhere above the house.
- Sew one ghost on each side of the house, leaving enough cream background around the figures to preserve their outlines.
- Add the black tree on the upper-left side and the fence sections behind the lower ghosts.
- Arrange four pumpkins across the foreground: two larger visual masses on the left and two on the right. Stitch the backs firmly while leaving the ribbing dimensional.
- Fill foreground gaps with leaves and spiral vines, keeping foliage away from the walking edge of the rug.
- Weave every tail into at least 8 cm of dense fabric, block the piece flat and place it over a correctly sized non-slip rug pad.
The completed piece contains every major crochet component visible in the photographed Halloween scene.
7 Technical Tips
- Stitch-marker drift: mark both ends of the base every 10 rows. Losing even one edge stitch repeatedly can skew a 155 cm rug several centimeters out of square.
- Overstuffed pumpkins: fill each pumpkin only until the top surface rises roughly 3–4 cm. Excess filling creates hard lumps that make the foreground unstable underfoot.
- Visible decreases: keep invisible decreases on the underside of each pumpkin. Standard two-loop decreases form larger gaps in super-bulky yarn.
- Face placement failure: embroider ghost faces before sewing the ghosts to the base. Position the eyes approximately one-third of the ghost height below the crown.
- Loose super-bulky tension: make a 10 cm swatch before the base. A floor piece that stretches more than roughly 10% sideways can distort around heavy appliqués.
- Appliqué shifting: pin each large house section every 8–10 cm before stitching. Four corner pins are not enough for a 50–70 cm architectural panel.
- Tail migration: weave structural sewing tails in three directions across at least 8 cm of fabric. A short straight tail can work free after repeated folding or floor friction.
Conclusion
A successful haunted house crochet rug pattern depends more on scale and layering than on complicated individual stitches. Build the large cream ground first, secure the black architecture, then work from background motifs toward the raised pumpkins in front. Before cutting the final yarn tail, measure the rug flat and check every appliqué edge for loose sections, especially around the path and foreground. Save the finished layout to Pinterest and share a full overhead photograph on Instagram with #HauntedHouseCrochetRug so the roof and foreground proportions remain visible. For the next version, decide one structural detail first: would you make the center tower taller, or widen the crooked side towers?









