Introduction
An urn-shaped crochet vase has one structural problem a cylindrical cozy avoids: the 42-stitch belly must narrow into a stable neck without forming a puckered shoulder. This crochet flower vase pattern uses DK yarn, a 3 mm hook and a 23 cm reference height. Rated intermediate, it combines shaped single crochet with leaves, hearts and a five-petal flower, making it useful for covering a bottle or rigid vase insert.
The Design: What Makes This Floral Vase Different
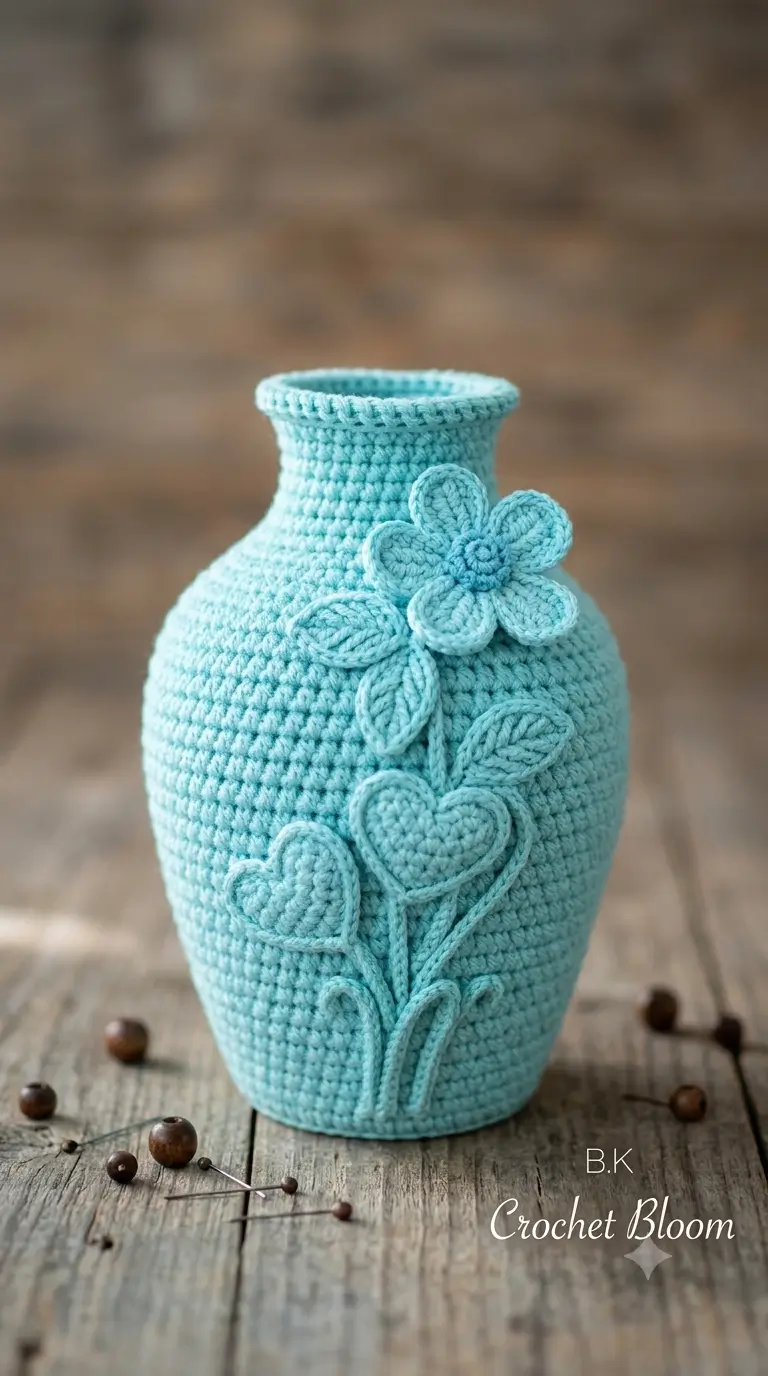
The body reaches 42 stitches before holding that circumference through the lower belly. That plateau produces the rounded urn profile visible in the reference image; reducing too early creates a cone instead. Decreases are then distributed across several rounds so the shoulder moves inward gradually before the neck settles at 24 stitches.
The second structural decision is appliqué rather than colorwork. Separate hearts, leaves and a flower preserve the raised monochrome surface that distinguishes this crochet floral vase from a plain crochet vase cozy. A chain-based leaf worked along both sides of its foundation creates the pointed, symmetrical shape required for the arrangement.
The common mistake is concentrating shoulder decreases in one round. That creates a ledge beneath the neck rather than the continuous curved profile required by this crochet vase cover pattern.
Project Info at a Glance
| Skill Level | Time | Finished Size | Hook | Best For |
|---|---|---|---|---|
| Intermediate | 5–7 hours estimated | Approximately 23 cm | 3.0 mm | Rigid bottle or vase cover |
The finished dimensions depend on gauge and the size of the insert being covered. Measure the selected bottle or vase before beginning if an exact fit is required.
Materials and Tools
Yarn
- Aqua DK cotton or cotton-blend yarn — Category 3 / 8-ply — approximately 130 m for the main structure, plus extra yarn for the decorative motifs.
- Aqua DK yarn for appliqués — approximately 15–25 g — use the same color for the monochrome floral surface.
- Optional matching sewing yarn — useful for reinforcing heavier appliqué sections.
Tools
- 3.0 mm crochet hook
- Rigid bottle or vase insert
- Polyester stuffing, optional and used only in small amounts
- Tapestry needle
- Locking stitch markers
- Pins
- Scissors
No safety eyes are required for this project.
Abbreviations
- MR — magic ring
- sc — single crochet
- inc — 2 sc in one stitch
- dec — single crochet decrease
- sl st — slip stitch
- ch — chain
- hdc — half double crochet
- dc — double crochet
- BLO — back loop only
- st/sts — stitch/stitches
For an invisible decrease, insert the hook through the front loops of the next two stitches, yarn over and complete one single crochet through both loops.
Pattern — Step by Step
Work the main vase in a continuous spiral unless a joined round is specifically stated. Place a stitch marker in the first stitch of every round.
Vase Body
Yarn: aqua DK
R1: 6 sc in MR (6)
R2: inc ×6 (12)
R3: (sc, inc) ×6 (18)
R4: (2 sc, inc) ×6 (24)
R5: (3 sc, inc) ×6 (30)
R6: (4 sc, inc) ×6 (36)
R7: (5 sc, inc) ×6 (42)
R8: BLO sc around (42)
R9–R22: sc around (42)
The BLO round defines the lower edge and helps the base sit flatter against a rigid insert.
R23: (5 sc, dec) ×6 (36)
R24–R26: sc around (36)
R27: (4 sc, dec) ×6 (30)
R28–R30: sc around (30)
R31: (3 sc, dec) ×6 (24)
R32–R40: sc around (24)
Test the cover on its insert before completing the rim. The neck should fit closely without stretching enough to create large spaces between stitches.
R41: BLO sc around (24)
R42: inc ×24 (48)
R43: sc around (48)
Join with a sl st. Fasten off and weave in the tail.
The 42-stitch plateau forms the rounded body. If the cover is too loose or too tight for the selected insert, adjust gauge before changing the stitch counts because additional stitches can alter the shoulder proportions.
Five-Petal Flower — Make 1
Yarn: aqua
R1: 5 sc in MR, sl st to first sc (5).
For each of the five center stitches: sl st into the stitch, ch 5, work 2 sc in the second ch from the hook, hdc in the next ch, dc in the next ch, 5 dc in the final ch. Rotate the work and continue along the opposite side with dc, hdc, 2 sc, then sl st into the same center stitch.
Repeat the petal sequence five times.
Fasten off. Leave a 25 cm tail for sewing.
Position the flower high on the shoulder rather than directly on the widest point of the vase.
Flower Center — Make 1
Yarn: aqua
R1: 6 sc in MR (6)
R2: inc ×6 (12)
R3: sc around (12)
Fasten off. Leave a 20 cm tail. Sew the center over the five petal bases to cover the inner joins.
Large Leaves — Make 3
Yarn: aqua
Ch 12.
Starting in the second ch from the hook: sl st, sc, hdc, dc in the next 5 ch, hdc, sc, 3 sc in the final ch.
Continue along the unused side of the foundation chain: sc, hdc, dc in the next 5 ch, hdc, sc, sl st.
Ch 1. Fasten off. Leave a 20 cm sewing tail.
Pin one leaf diagonally near the upper left of the main stem, one beneath the flower and one toward the right side of the vase.
Small Leaves — Make 2
Yarn: aqua
Ch 9.
Starting in the second ch from the hook: sl st, sc, hdc, dc in the next 3 ch, hdc, 3 sc in the final ch.
Continue down the second side: hdc, dc in the next 3 ch, hdc, sc, sl st.
Fasten off. Leave a 20 cm tail.
Place the smaller leaves lower on the vine so the five-petal flower remains the largest decorative element.
Large Heart — Make 1
Yarn: aqua
R1: In MR work ch 3, 3 dc, 3 hdc, ch 1, dc, ch 1, 3 hdc, 3 dc, ch 3, sl st into MR.
Pull the ring closed.
R2: Work evenly around the outer edge with sc, placing 2 sc around each upper lobe and (sc, ch 1, sc) at the bottom point.
Fasten off. Leave a 25 cm tail.
Pin the large heart beneath the flower with the lower point following the direction of its raised stem.
Small Heart — Make 1
Yarn: aqua
In MR: ch 2, 2 dc, 2 hdc, sc, ch 1, dc, ch 1, sc, 2 hdc, 2 dc, ch 2, sl st into the ring.
Pull the ring closed. Fasten off and leave a 20 cm tail.
Position the small heart toward the lower-left area of the arrangement rather than directly mirroring the larger heart.
Raised Stems — Make 3
Yarn: aqua
Central stem: Ch 25. Starting in the second ch from the hook, sl st in every chain (24).
Side stems: Ch 18. Starting in the second ch from the hook, sl st across (17).
Fasten off and leave approximately 20 cm for sewing.
The cords should remain flat against the vase. They function as raised surface decoration rather than structural supports.
Lower Curved Shoots — Make 2
Yarn: aqua
Ch 16. Starting in the second ch from the hook, sl st across (15).
Fasten off. Leave a 20 cm sewing tail.
Curve each shoot outward from the bottom section of the central stem and pin the complete arrangement before sewing.
Optional Base Insert
A rigid waterproof insert is recommended if the finished vase will hold fresh flowers. Crochet fabric should function as the decorative outer cover rather than the water container.
Select a bottle or vase that fits inside the finished crochet body without stretching the stitches excessively. A close fit also helps the rounded shoulder and narrow neck retain their intended proportions.
Assembly
- Place the completed vase body over the rigid insert and check that the base sits evenly on the work surface.
- Shape the shoulder so the decreases form a continuous curve from the 42-stitch body to the 24-stitch neck.
- Pin the five-petal flower to the upper-right shoulder. Sew around the petal bases while leaving the outer petal edges slightly free.
- Attach the flower center over the inner petal joins and secure the sewing tail on the wrong side.
- Position the large heart beneath the flower and the small heart toward the lower-left section. Sew around their edges without pulling the vase fabric inward.
- Arrange the three large leaves around the upper and middle vine. Rotate their angles to prevent the arrangement from looking mechanically symmetrical.
- Add the two smaller leaves lower on the arrangement and confirm their position before sewing.
- Pin the central raised stem from the lower body toward the flower, then position the shorter stems toward the heart and leaf motifs. Sew through the back ridge of each cord.
- Add the two curved lower shoots, keeping their bottom ends close to the central stem so the vine reads as one connected structure.
- Weave all yarn tails through several wrong-side stitches, trim the ends and place the cover back over the insert. Check that the sewing has not distorted the shoulder.
The completed vase should have a flat base, rounded body, narrow neck, defined rim and asymmetrical raised floral arrangement.
7 Technical Tips
- Control stitch-marker drift. Move the marker at the end of every round. Repeatedly shifting the first stitch by one position can rotate the shoulder decreases and move the neck away from the center.
- Avoid excessive stuffing. Do not pack polyester filling between a rigid insert and the crochet shell. A thick stuffing layer can push the 42-stitch body outward and distort the attached hearts and leaves.
- Use invisible decreases on the shoulder. Work them on R23, R27 and R31. A standard sc2tog can leave larger visible gaps along the most exposed shaping section.
- Check motif placement before sewing. This pattern uses no safety eyes, so the critical placement point is the main flower. Position its center approximately one-third of the way down from the upper rim before attaching the remaining motifs.
- Monitor DK yarn tension. A 3 mm hook should create dense fabric with limited gaps. If the insert can be seen strongly through the stitches, test a smaller hook on a gauge swatch before changing the pattern counts.
- Pin every appliqué at multiple points. Use at least three pins on each large leaf and four around the large heart. A single pin allows a motif to rotate while it is being sewn.
- Secure sewing tails thoroughly. Weave each appliqué tail through at least 3–4 cm of wrong-side stitches. Short tails can loosen when the crochet cover is repeatedly removed from the rigid vase.
Conclusion
Measure the finished vase from its flat base to the upper rim, then record the insert circumference, yarn and hook beside the project notes. Those measurements make a second version easier to reproduce when another yarn changes the gauge. Photograph the front before weaving the final appliqué tails because an off-center neck or disconnected-looking stem can still be corrected at that stage. Save this crochet flower vase pattern to Pinterest and share the finished version on Instagram with #HeartLeafCrochetVase. For the next vase, would you keep the two heart motifs shown here or replace the smaller heart with another pointed leaf?









