Introduction
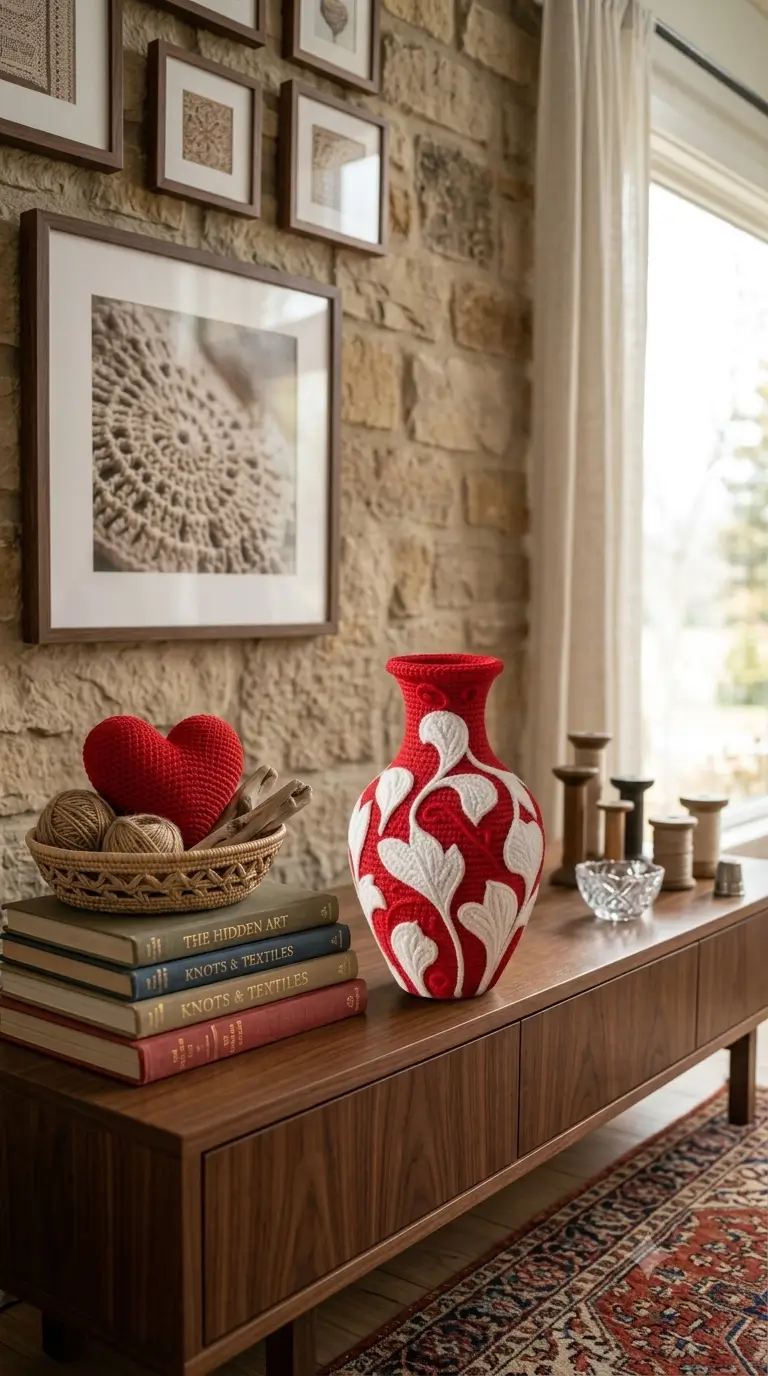
A flared vase lip only works when the narrow neck beneath it can resist the weight of every added stitch. This crochet vase pattern uses Sport-weight yarn, a 3 mm hook and a 36-stitch body plateau to build a medium decorative vessel with white botanical appliqués. Expect an intermediate project of roughly 16–20 cm, depending on gauge. The closed construction works well for shelf display or dried-stem arrangements.
The Design: What Makes This Red Floral Vase Different
Three shaping decisions control this red crochet vase. First, the base expands to 36 stitches before the walls rise, giving the rounded lower body enough footprint to stand without collapsing inward. Second, decreases are distributed through the upper body rather than stacked in one row; that forms a shoulder instead of a sudden funnel. Third, the neck remains narrow for several rounds before the rim expands, because a crochet flower vase needs visible separation between shoulder and mouth.
The white appliqués are made independently and sewn on after the vessel is shaped. That keeps the surface relief crisp and avoids carrying white yarn through the red fabric. A frequent mistake in a floral crochet vase is adding heavy appliqués before checking the neck axis. The maker then corrects decoration while the underlying vessel is already leaning.
Project Info at a Glance
| Skill Level | Time | Finished Size | Hook | Best For |
|---|---|---|---|---|
| Intermediate | 5–7 hours | Approx. 16–20 cm | 3.0 mm | Shelf décor, dried stems, textile display |
The 3 mm hook and Sport-weight yarn pairing is supported by a published vase reference measuring 15.5 cm × 11 cm. Final measurements for this independently drafted version vary with yarn, gauge and stuffing or reinforcement.
Materials and Tools
Yarn
- Deep red — Sport weight — allow about 45–55 g for the body
- White/ivory — Sport weight — allow about 12–18 g for vines and leaves
- Red scrap yarn — Sport weight — about 3–5 g for optional raised scroll motifs
A firm cotton-rich Sport yarn works particularly well because it gives the vessel a dense surface and helps the appliqués stay defined.
Tools
- 3.0 mm crochet hook
- Polyester stuffing for a soft sculptural vessel
- Flexible plastic canvas or rolled craft felt, optional, for stronger walls
- Tapestry needle
- Stitch markers
- Scissors
- Pins
- Cardboard or washable plastic base disc, approximately 7–8 cm
Do not pour water directly into the crochet vessel. For fresh flowers, place a separate watertight container inside.
Abbreviations
- MR — magic ring
- sc — single crochet
- inc — 2 sc in one stitch
- dec — invisible single-crochet decrease
- sl st — slip stitch
- ch — chain
- BLO — back loop only
- hdc — half double crochet
- dc — double crochet
An invisible decrease works through the front loops of the next two stitches before completing one sc, reducing bulk on the visible surface.
Pattern — Step by Step
Work the vase in a continuous spiral unless a joined round is specifically mentioned.
Main Vase Body
Yarn: deep red. Medium 36-stitch plateau.
R1: 6 sc in MR (6)
R2: inc ×6 (12)
R3: (sc, inc) ×6 (18)
R4: (2 sc, inc) ×6 (24)
R5: (3 sc, inc) ×6 (30)
R6: (4 sc, inc) ×6 (36)
R7: BLO sc around (36)
R8: sc around (36)
R9: sc around (36)
R10: sc around (36)
R11: sc around (36)
R12: sc around (36)
R13: sc around (36)
R14: sc around (36)
R15: sc around (36)
R16: sc around (36)
R17: sc around (36)
R18: sc around (36)
Insert a cut base disc above R7 if a flat display base is wanted. It should sit inside the stitch line rather than push against it.
R19: sc around (36)
R20: sc around (36)
R21: sc around (36)
R22: sc around (36)
R23: (4 sc, dec) ×6 (30)
R24: sc around (30)
R25: sc around (30)
R26: sc around (30)
R27: (3 sc, dec) ×6 (24)
R28: sc around (24)
R29: sc around (24)
R30: sc around (24)
R31: (2 sc, dec) ×6 (18)
R32: sc around (18)
R33: sc around (18)
If stuffing the piece, fill the lower body now. Use small amounts around the circumference and keep the neck area firm without stretching the stitches.
R34: (sc, dec) ×6 (12)
R35: sc around (12)
R36: sc around (12)
R37: sc around (12)
R38: sc around (12)
R39: sc around (12)
R40: sc around (12)
R41: sc around (12)
R42: sc around (12)
Do not fasten off. Continue directly into the rim.
Flared Rim
Yarn: deep red.
R43: (sc, inc) ×6 (18)
R44: (2 sc, inc) ×6 (24)
R45: sc around (24)
R46: (3 sc, inc) ×6 (30)
R47: sc around (30)
R48: sl st loosely around (30)
Fasten off. Weave the tail down through the neck so the lip retains its circular shape.
White Climbing Vines — Make 4
Yarn: white/ivory.
Ch 38.
Row 1: Starting in second ch from hook, sl st in each ch across (37).
Fasten off, leaving a 20 cm sewing tail at both ends.
- Vine A: ch 38
- Vine B: ch 31
- Vine C: ch 27
- Vine D: ch 22
The longest vine should travel from the lower body toward the shoulder. Pin each vine in a shallow S-curve before sewing.
Large Pointed Leaves — Make 6
Yarn: white/ivory.
R1: Ch 8.
R2: Beginning in second ch from hook: sl st, sc, hdc, dc, dc, hdc, 3 sc in final ch. Work down the opposite side of the foundation chain: hdc, dc, dc, hdc, sc, sl st.
R3: Sl st into first stitch, ch 1, sc around the perimeter, working 3 sc into the leaf tip and 2 sc around the rounded base as needed.
Fasten off. Leave a 15 cm sewing tail.
The finished leaves should measure approximately 4–5 cm with Sport-weight yarn and a 3 mm hook.
Medium Pointed Leaves — Make 6
Yarn: white/ivory.
R1: Ch 6.
R2: Starting in second ch: sl st, sc, hdc, dc, 3 sc in final ch. Continue along the opposite side: dc, hdc, sc, sl st.
R3: Ch 1, sc around, 3 sc at the tip, then sc back to the base.
Fasten off. Leave 15 cm for sewing.
Small Leaves — Make 4
Yarn: white/ivory.
R1: Ch 5.
R2: Starting in second ch: sl st, sc, hdc, 3 sc in final ch. Work along the opposite side: hdc, sc, sl st.
Fasten off with a 12–15 cm sewing tail.
Raised Leaf Veins
Yarn: white/ivory.
Thread a tapestry needle with a separate strand of yarn. Bring the needle from back to front at the base of each large or medium leaf. Make one long surface stitch toward the tip, then add two or three short diagonal stitches from the center line toward each side.
Keep the stitches flat. Pulling them too tightly will curl the appliqué.
Red Scroll Motifs — Make 3
Yarn: deep red.
Ch 18.
Row 1: 2 sc in second ch from hook and 2 sc in every remaining ch.
The strip will curl naturally. Fasten off, leaving a 15 cm sewing tail.
Coil the piece into a loose C shape and stitch the inner curve to the vase while leaving part of the outer edge slightly raised.
Optional White Teardrop Motifs — Make 3
Yarn: white/ivory.
R1: 6 sc in MR (6)
R2: inc ×6 (12)
R3: (sc, inc) ×6 (18)
Fold the flat circle lightly into a pointed oval and pinch one edge together with three small sewing stitches.
Fasten off. Leave approximately 15 cm for sewing.
Optional Crochet Heart Prop
The red heart visible beside the vase in the reference image is a separate decorative object. It can be omitted without changing the vase construction.
Heart Lobe — Make 2
Yarn: deep red.
R1: 6 sc in MR (6)
R2: inc ×6 (12)
R3: (sc, inc) ×6 (18)
R4: (2 sc, inc) ×6 (24)
R5: sc around (24)
R6: sc around (24)
Fasten off the first lobe only.
After completing the second lobe, join both pieces.
R7: sc around first lobe, then second lobe (48)
R8: sc around (48)
R9: sc around (48)
R10: (6 sc, dec) ×6 (42)
R11: sc around (42)
R12: (5 sc, dec) ×6 (36)
R13: sc around (36)
R14: (4 sc, dec) ×6 (30)
R15: sc around (30)
R16: (3 sc, dec) ×6 (24)
Stuff firmly enough to preserve the cleft between the two lobes.
R17: (2 sc, dec) ×6 (18)
R18: (sc, dec) ×6 (12)
R19: dec ×6 (6)
Fasten off. Thread the tail through all six final stitches and close.
Assembly
- Place the vase on a hard surface and check that the complete base circumference touches the surface.
- Shape the body by distributing stuffing or reinforcement evenly from R7 through R33.
- Center the longest white vine on the front and pin it from roughly R10 toward R30.
- Position the remaining vines around the front two-thirds of the vessel, leaving visible red areas between them.
- Sew the large leaves first, placing most bases directly against a vine and alternating their direction.
- Add the medium leaves between the larger motifs, then attach the small leaves around the shoulder.
- Stitch the raised leaf veins after the appliqués have been attached.
- Add the red scroll motifs in the open spaces between the white botanical elements.
- Check the rim from above. Reshape it if the opening has become oval during assembly.
- Weave each yarn tail through at least 3–4 cm of dense crochet fabric before trimming.
The completed vase should stand independently with a centered neck, circular rim and firmly attached botanical appliqués.
7 Technical Tips
- Stitch-marker drift: Move the marker after every completed round. Missing the round start by one stitch during the shoulder decreases can rotate the shaping and produce a twisted neck.
- Stuffing firmness: A common failure occurs when the lower body becomes hard while R30–R34 remain hollow. Keep the shoulder at roughly 80% of the firmness of the lower body.
- Invisible-decrease ridges: Standard decreases can leave six visible gaps around the shoulder. Work decreases through the front loops only and keep the working loop the same height as adjacent single crochets.
- Neck alignment: Check the opening after R36 and again after R42. If its center has shifted more than about 5 mm from the center of the base, redistribute the stuffing before making the rim.
- Tension variation: A difference of only 1 mm in average stitch width across 36 stitches can add more than 3 cm to the circumference. Use the same hook and yarn type throughout the red body.
- Appliqué pinning: Sewing a leaf from one end without pinning can rotate its point by 10–20 degrees. Pin the base, tip and widest point before sewing.
- Tail weaving: Leave at least 15 cm on appliqué sewing tails. Weave through three different stitch directions before cutting the yarn.
Conclusion
This project depends mainly on controlled shaping: a stable 36-stitch lower body, gradual shoulder decreases, a narrow neck and a separately expanded rim form the vase before the decoration is attached. Make an undecorated test body first if your Sport-weight yarn produces a different gauge, then measure the actual height and base diameter before positioning the appliqués. Pin the white vines while the vase is standing upright rather than lying flat. Save this crochet vase pattern to Pinterest and share the finished version on Instagram with #RedFloralCrochetVase. For your version, would you extend the white vine onto the neck or stop the decoration at the shoulder?









