Introduction
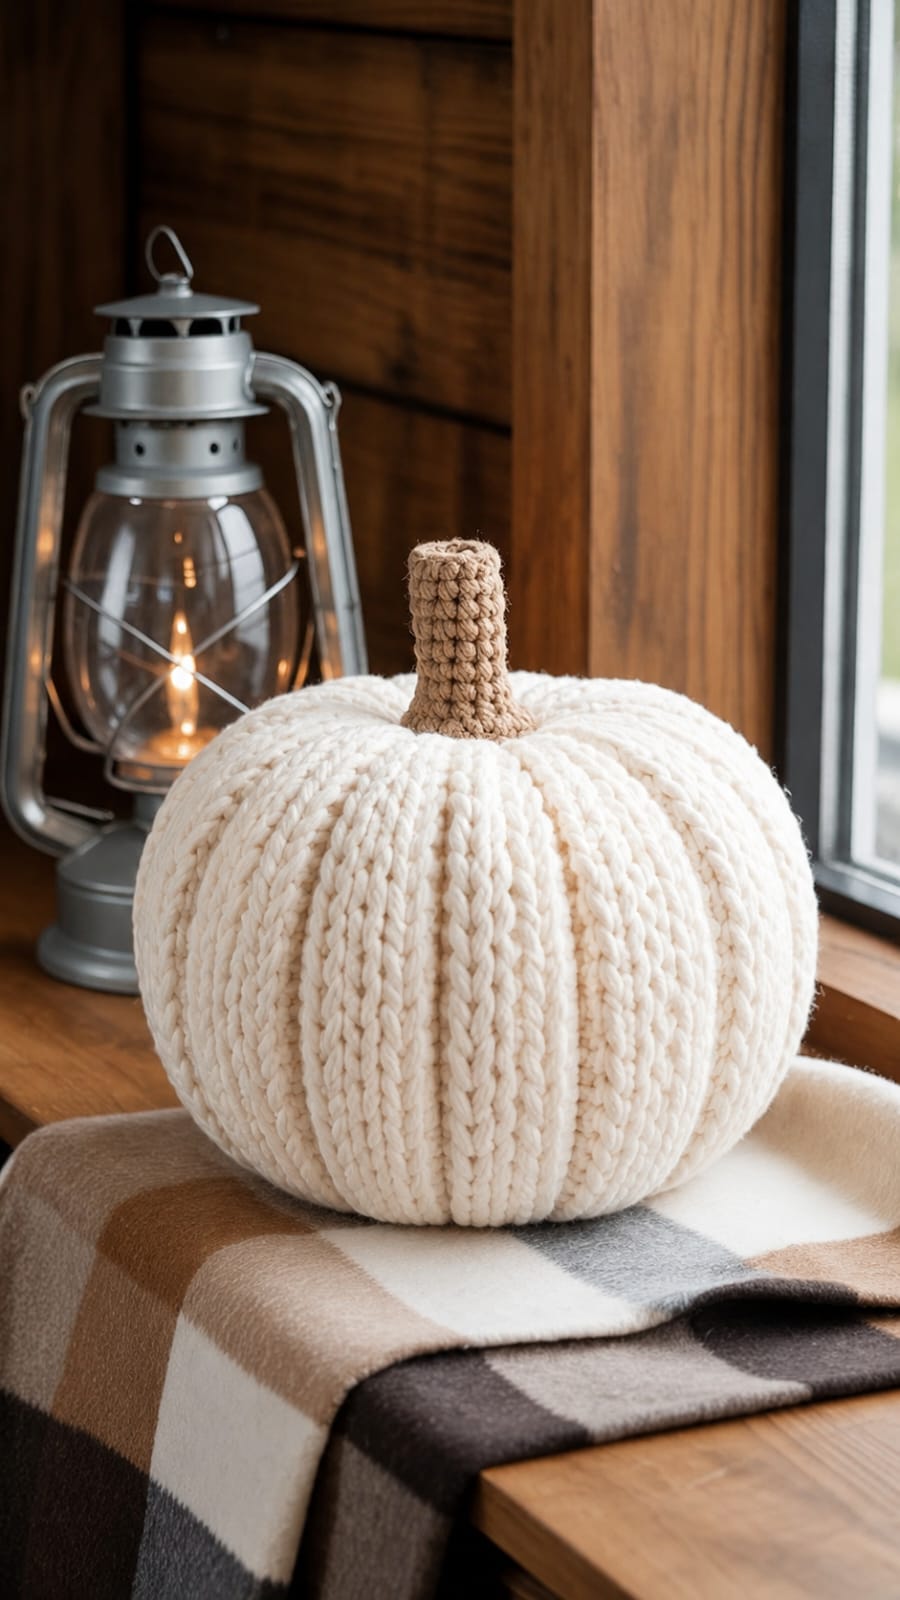
A cream pumpkin this wide needs deeper ribs than a palm-sized ornament or the finished shape reads as a round cushion with a stem. This crochet pumpkin pillow pattern uses a long ribbed rectangle, dense stuffing and controlled sculpting to produce the pronounced vertical sections shown in the reference. Work it with bulky #5 yarn and a 6.5 mm hook for a finished pumpkin approximately 36–38 cm wide.
The Design: What Makes This Crochet Pumpkin Different
The body is not worked as a conventional amigurumi sphere. Instead, a rectangular strip becomes the pumpkin after its short edges are joined and both open ends are gathered. That construction makes the vertical ribs part of the crochet fabric rather than relying entirely on surface shaping afterward.
The ribbed crochet pumpkin also uses a broad body-to-height ratio. More circumference than height creates the low, full silhouette visible in the photograph. A separate taupe stem provides enough contrast to identify the top without adding leaves or vines. One common failure with a chunky crochet pumpkin is making the rectangle too narrow. Heavy stuffing then stretches the ribs horizontally, reducing their depth and turning the pumpkin into a tall cylinder rather than a wide seasonal pillow.
Project Info at a Glance
| Skill Level | Time | Finished Size | Hook | Best For |
|---|---|---|---|---|
| Advanced beginner | 5–7 hours | Approx. 36–38 cm wide × 31–33 cm high | 6.5 mm | Fall displays, chairs, shelves and seasonal pillows |
The final measurement depends heavily on stuffing density. A firmly filled pumpkin becomes wider and more rounded, while an underfilled body collapses around the top and loses the strong rib structure.
Materials and Tools
Yarn
- Cream / warm ivory — bulky #5 yarn — approximately 400–500 g — pumpkin body.
- Warm taupe-brown — bulky #5 yarn — approximately 15–20 g — stem.
A smooth or lightly plied bulky yarn works well for this design because the vertical stitch columns remain visible after stuffing. Highly fuzzy yarn hides the rib definition.
Tools
- 6.5 mm crochet hook
- Polyester fiberfill — approximately 600–800 g
- Large-eye tapestry needle
- Strong cream yarn or matching upholstery thread for sculpting
- Stitch markers
- Scissors
- Measuring tape
Abbreviations
- ch — chain
- sc — single crochet
- hdc — half double crochet
- sl st — slip stitch
- BLO — back loop only
- st / sts — stitch / stitches
- RS — right side
- WS — wrong side
An invisible decrease is made through the front loops of two adjacent stitches, but the pumpkin body does not require decrease rounds because its shape comes from gathering and sculpting.
Pattern — Step by Step
The body is crocheted as one flat rectangle. Work all rows with the same stitch count. The number of rows controls the circumference of the pumpkin, while the number of stitches controls its height.
Ribbed Cream Pumpkin Body
Yarn: cream bulky #5.
Ch 37.
Row 1: hdc in second ch from hook and in each chain across. Ch 1, turn. (36)
Row 2: BLO hdc across. Ch 1, turn. (36)
Row 3: BLO sl st loosely across. Ch 1, turn. (36)
Row 4: BLO hdc across. Ch 1, turn. (36)
Row 5: BLO sl st loosely across. Ch 1, turn. (36)
Repeat Rows 4–5 until the rectangle measures approximately 72–76 cm along its long edge.
The exact row number depends on gauge. Aim for a width-to-height ratio close to 2:1 when the rectangle lies flat.
Do not fasten off yet.
Checking the Rib Structure
Stretch the fabric lightly across the row direction. The half double crochet rows should rise above the linked slip-stitch sections and form strong parallel ridges.
If the rectangle stretches excessively and the ribs flatten immediately, the slip stitches were worked too loosely. If the fabric curls sharply and cannot lie flat, they were worked too tightly.
Measure the short edge. The target is approximately 29–31 cm before gathering.
Joining the Body
Bring the foundation edge and final row together with the right sides facing.
Slip stitch through one loop of each corresponding edge stitch from bottom to top. Keep the seam flexible rather than pulling each slip stitch tight.
Fasten off with a 60 cm tail.
Turn the tube right side out. The seam should disappear between two vertical ribs.
Gathering the Bottom
Thread the 60 cm tail onto a tapestry needle.
Run the yarn in and out around the complete lower opening, approximately 1 cm from the edge. Catch a substantial strand of fabric every 1–1.5 cm rather than passing through only one small loop.
Pull gradually until the opening closes.
Pass the needle through the gathered center several times and tie securely inside the pumpkin.
A small opening of less than 1 cm is acceptable because it will sit underneath the finished pillow.
Stuffing the Pumpkin
Insert fiberfill in handful-sized portions.
Start by packing the outside wall rather than filling the center immediately. Push stuffing into the lower side edges so the pumpkin develops a broad circumference.
Continue adding fiberfill until the body measures approximately 36–38 cm across.
Keep the upper 5–7 cm slightly softer while stuffing. This allows the top opening to gather inward and creates the recessed area around the stem.
The pumpkin should resist light hand pressure but should not feel rigid.
Gathering the Top
Cut approximately 100 cm of strong cream yarn.
Thread the yarn through the upper edge using the same running-stitch method used at the bottom.
Pull the opening closed in stages. Redistribute the filling between pulls so one side does not become taller than the other.
Before closing completely, press the top center downward by approximately 3–4 cm.
Tighten the gathering yarn and knot securely.
Do not cut the remaining yarn until the main shape has been checked from every side.
Sculpting the Pumpkin Ribs
The crocheted texture already creates vertical ribs, but the reference pumpkin has deeper structural valleys. Add external sculpting after both openings are closed.
Cut a 150 cm length of strong cream yarn.
Insert the needle through the bottom center and bring it out at the top center.
Run the yarn down the outside of the pumpkin between two crochet ridges. Insert the needle through the bottom center again and return through the top.
Pull until the chosen channel sinks approximately 1–2 cm.
Repeat around the pumpkin to create 8 evenly spaced sections.
Check the silhouette after every two channels. Each segment should have approximately the same width.
Knot the sculpting yarn deeply inside the top recess where the stem will cover it.
Brown Crochet Stem
Yarn: warm taupe-brown bulky #5.
Ch 11.
Join with sl st to the first chain, taking care not to twist.
Round 1: sc in each chain around. (11)
Rounds 2–9: BLO sc around. (11)
Continue until the stem measures approximately 9–10 cm high.
Round 10: (sc 1, sc2tog) around as evenly as possible. (approximately 7)
Round 11: sc around. (7)
Fasten off and leave a 35 cm sewing tail.
Add a small amount of fiberfill to the bottom half of the stem only. Keeping the top slightly softer allows it to remain cylindrical instead of forming a rigid post.
Attaching the Stem
Position the stem directly over the gathered top center.
The base should cover the gathering knots and the ends of the sculpting yarn.
Pin in four places.
Using the long brown tail, whipstitch around the base while catching substantial strands of the pumpkin fabric.
After the first complete sewing round, repeat around the stem once more. A tall stem needs two attachment passes to resist sideways movement.
Fasten off inside the pumpkin body and hide the tail beneath the stem.
Assembly
- Measure the completed ribbed rectangle and confirm that the short edge is approximately 29–31 cm.
- Join the first and final rows to form one continuous cream tube.
- Gather the bottom opening firmly and reinforce the closure several times.
- Add fiberfill gradually, concentrating stuffing around the outer circumference before filling the middle.
- Gather the upper opening while pressing the top center downward by approximately 3–4 cm.
- Check the pumpkin from above and divide the circumference visually into eight equal sections.
- Add eight sculpting channels from top center to bottom center, tightening each channel by 1–2 cm.
- Stuff the brown stem lightly and position it over the top gathering point.
- Sew twice around the stem base to keep the tall stem vertical.
- Massage the fiberfill between all eight segments until the finished pumpkin sits level and the ribs appear evenly spaced.
The completed pillow has one ribbed cream body, eight sculpted pumpkin sections, a recessed center and one tall brown crochet stem.
7 Technical Tips
- Ribs flatten after stuffing: This occurs when the slip-stitch rows are too loose. Keep them noticeably shorter than the half-double-crochet rows so the raised columns remain visible under pressure.
- Pumpkin becomes too tall: The rectangle needs substantially more length than height. Aim for approximately 72–76 cm circumference before seaming with a 29–31 cm short edge.
- Bottom closure opens: Gathering through only one strand of each edge stitch can tear under 600–800 g of stuffing. Pass the needle through thicker sections of fabric approximately every 1–1.5 cm.
- Top remains dome-shaped: Press the center down 3–4 cm before the final gathering knot. That depression creates the characteristic pumpkin shoulder around the stem.
- Uneven pumpkin segments: Mark eight positions around the circumference before sculpting. A channel shifted by even 2–3 cm produces one visibly narrow segment beside a wide one.
- Sculpting thread breaks: Tightening all eight channels with one thin sewing thread concentrates too much force at the center. Use strong yarn or upholstery thread and tighten each channel gradually.
- Stem falls sideways: A 9–10 cm stem creates more leverage than a short stem. Keep the lower half lightly stuffed and sew around its base twice rather than relying on one attachment round.
How the Ribbed Construction Creates the Pumpkin Shape
The pumpkin begins as a rectangle, but the alternating stitch heights change how that rectangle behaves once curved into a tube.
Back-loop half double crochet creates raised horizontal bars when the work lies flat. After the rectangle is turned and seamed, those bars become vertical pumpkin ribs.
The shorter slip-stitch rows draw the fabric inward between the wider half-double-crochet sections. That difference creates natural valleys before any sculpting thread is added.
External shaping then deepens selected valleys rather than creating the complete structure from scratch. This matters on a large pillow because tightly wrapping a smooth crochet sphere with yarn can compress the stuffing excessively.
The combination of structural ribbing and moderate sculpting produces a fuller result. Each section remains rounded while the channels stay visible from the top to the base.
Choosing the Right Pumpkin Proportions
The photographed pumpkin is noticeably wider than it is tall. That proportion gives it a realistic squash-like profile instead of a cylindrical lantern shape.
For this version, the body target is approximately 36–38 cm across and around 25–27 cm high before the stem is added. The 9–10 cm stem brings the complete height into the low 30 cm range.
If a flatter pumpkin is wanted, increase the rectangle length without adding stitches to its short edge. This expands circumference while preserving body height.
For a taller pumpkin, add stitches to the starting chain rather than adding extra rectangle rows.
Do not change both dimensions at the same time unless making a fully scaled version. Altering circumference and height together makes it difficult to predict the finished shape after gathering.
Stuffing for Deep Pumpkin Ribs
Stuffing density determines how much sculpting yarn is required.
An underfilled pumpkin develops deep channels easily, but the rounded sections collapse between them. Excessive stuffing creates a firm sphere that requires extreme thread tension to shape.
The target is a body that springs back slowly when pressed with one hand. Add more filling around the outer perimeter than the center during the first stage.
Before closing the top, push stuffing downward from the center to create a natural hollow. This reduces resistance when the upper gathering yarn is tightened.
After sculpting, redistribute filling manually. Push small amounts from overly full sections toward narrow ones without opening the pumpkin.
Allow the finished pillow to sit for several hours, then check the channels again. Fiberfill settles slightly after initial shaping and one or two sculpting strands may need a minor retightening.
Changing the Pumpkin Size
The rectangle method scales more predictably when width and circumference are treated separately.
For a smaller tabletop pumpkin, begin with approximately 26–28 stitches and stop the ribbed rectangle when its long edge reaches about 50–55 cm. Use less stuffing and shorten the stem to 6–7 cm.
For an oversized floor pumpkin, increase the short edge to roughly 42–46 stitches and work until the rectangle reaches approximately 90–100 cm along the long direction.
Larger versions benefit from thicker sculpting cord because the increased stuffing creates more outward pressure.
Always crochet a short gauge swatch before scaling. Bulky #5 yarn varies significantly between manufacturers, so identical stitch counts can produce noticeably different physical measurements.
Using Neutral Colors for Fall Decor
The uploaded pumpkin avoids the conventional orange body. Cream shifts attention toward texture, allowing the vertical ribs to become the primary visual feature.
Warm taupe gives the stem enough contrast without introducing a saturated color. Other low-contrast combinations can follow the same structure: oatmeal with dark beige, pale gray with charcoal-brown, or soft sage with muted tan.
When using a light body color, weave all cream tails inside the pillow rather than carrying them along the surface. Dark knots and sculpting thread can become visible through large stitch openings.
A smooth yarn also photographs more clearly than heavily variegated yarn because each raised rib casts its own narrow shadow. The effect is especially useful on monochrome pumpkins where stitch direction supplies most of the detail.
Conclusion
Measure the ribbed rectangle before seaming because its proportions control the final pumpkin more reliably than stuffing can correct later. Keep the body wider than it is tall, close the top around a 3–4 cm recess and divide the circumference into eight equal sculpted sections. Save this crochet pumpkin pillow pattern to Pinterest with a side view that shows the rib depth, then share the finished cream version on Instagram using #RibbedCreamPumpkin. Record the finished body width and rectangle length before making another size. For this specific pumpkin, would you keep the tall taupe stem shown here or shorten it for a flatter farmhouse profile?









