Introduction
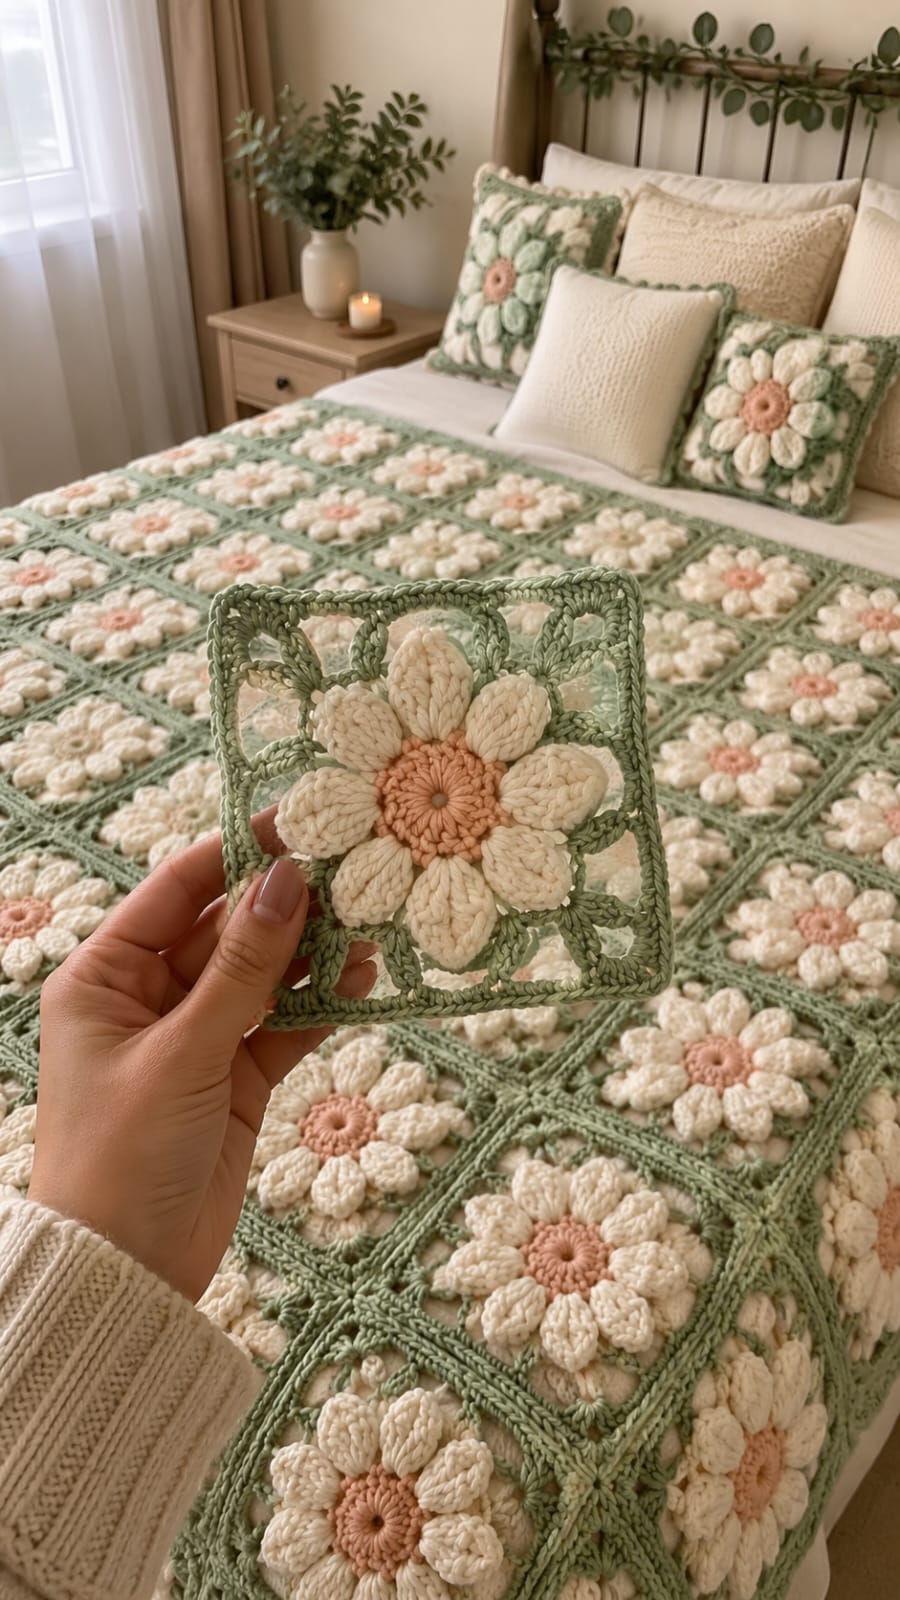
Eight oversized petals change the engineering of a daisy square: crowd them around a small center and the flower buckles before the green frame is added. This daisy granny square blanket crochet pattern spaces eight raised cream petals around a peach center, then converts the flower into a sage green square. With worsted yarn and a 5.5 mm hook, each blocked motif measures approximately 16.5 cm.
The Design: What Makes This Daisy Granny Square Different
The reference blanket uses large three-dimensional petals rather than twelve narrow daisy clusters. Eight cream petals create stronger separation between the flower and the open sage background, while the peach center stays broad enough to support their bases. The green frame is deliberately airy. Open chain sections expose the blanket beneath and keep a large bed-size project from becoming excessively heavy.
This 3D daisy granny square also relies on consistent blocking because every raised flower pulls differently across the center. The visible sage joining lines create a geometric grid that contrasts with the rounded petals. One common failure in a floral granny square blanket is joining motifs before they reach equal dimensions. A 4 mm difference seems minor in one block. Across ten squares, however, that discrepancy can create 4 cm of unwanted width.
Project Info at a Glance
| Skill Level | Time | Square Size | Hook | Best For |
|---|---|---|---|---|
| Intermediate | 25–35 minutes per square | Approx. 16.5 cm blocked | 5.5 mm | Throws, bed blankets and cushion covers |
A current worsted-weight daisy blanket reference produces approximately 16.5 cm squares with a 5.5 mm hook. A 10 × 12 arrangement creates a large throw in the range of 152 × 213 cm after joining and edging, depending on gauge.
Materials and Tools
Yarn
- Muted sage green — worsted / Aran #4 — approximately 1,300–1,450 g for a large throw — square backgrounds, joins and border.
- Cream / warm ivory — worsted / Aran #4 — approximately 1,050–1,200 g — raised daisy petals.
- Soft peach — worsted / Aran #4 — approximately 150–200 g — flower centers.
For a bed-size blanket, plan on roughly 2,500–2,800 g total yarn. A published daisy throw reference uses approximately 2,720 g, although final consumption changes with petal thickness, square count, border depth and individual tension.
Tools
- 5.5 mm crochet hook
- Locking stitch markers
- Yarn needle
- Sharp scissors
- Blocking mats
- Rust-resistant blocking pins
- Measuring tape
Abbreviations
- MR — magic ring
- ch — chain
- sc — single crochet
- hdc — half double crochet
- dc — double crochet
- tr — treble crochet
- cl — cluster
- sl st — slip stitch
- sp — space
- st / sts — stitch / stitches
An invisible decrease is worked through the front loops of two adjacent stitches, although decreases are not required in this square.
Pattern — Step by Step
Work each flower square separately with the right side facing. Fasten off at every color change rather than carrying yarn across the back of the open sections.
Peach Daisy Center
Yarn: soft peach.
Make an MR.
R1: ch 2, work 8 hdc into MR. Join with sl st to first hdc. (8)
R2: ch 1, work 2 sc in every stitch around. Join with sl st. (16)
R3: ch 1, (sc 1, 2 sc in next st) ×8. Join with sl st. (24)
Fasten off peach.
The center now provides three stitch positions for each of the eight petals. Keep the ring flat. If the 24-stitch round waves visibly, reduce hook size for the peach section only.
Raised Cream Petals — Make 8 Around the Center
Yarn: warm cream.
Join cream in any stitch of R3.
Each petal uses three center stitches.
Petal repeat: sl st in first stitch, ch 3, work a 5-tr cluster in the second stitch, ch 3, sl st in the third stitch.
Repeat the petal sequence eight times around. (8 petals)
To make the 5-tr cluster: yarn over twice, insert hook into the designated stitch, pull up a loop, yarn over and pull through two loops twice. Leave the final loop on the hook. Repeat until five partial treble stitches have been made, then yarn over and pull through all remaining loops.
Fasten off cream.
The petal round should sit above the peach center rather than flatten against it. Pull each cluster upward gently with your fingers before starting the green background.
Sage Foundation Behind the Petals
Yarn: muted sage green.
Turn the motif slightly so the spaces between petals are visible. Join sage in any gap between two petals.
R4: ch 1, sc in same gap, ch 4, sc in next gap; repeat around. Join with sl st. (8 sc, 8 ch-4 spaces)
Keep this round behind the cream petals. The green chains form the first structural ring without covering the raised flower.
Turning the Daisy Into a Square
Continue with sage.
The eight chain spaces alternate between corner positions and side positions.
R5: sl st into first ch-4 space. Ch 3, 2 dc, ch 2, 3 dc in same space. Ch 2, 3 hdc in next ch-4 space, ch 2.
Repeat the following sequence three more times:
(3 dc, ch 2, 3 dc) in next ch-4 space, ch 2, 3 hdc in next ch-4 space, ch 2.
Join with sl st to top of beginning ch-3.
The four double-crochet groups with ch-2 centers are the corners. The four 3-hdc groups sit at the midpoint of each side.
Open Sage Square Round
Continue with sage.
R6: sl st into first corner space. Ch 3, 2 dc, ch 2, 3 dc in corner.
Ch 3, sc in next side space, ch 3, sc in next side space, ch 3.
In the next corner work 3 dc, ch 2, 3 dc.
Repeat around all four sides. Join with sl st.
This round creates the open green arches visible between the flower and outer frame.
Outer Sage Frame
Continue with sage.
R7: sl st into corner. Ch 1, work 2 sc, ch 2, 2 sc in the corner.
Sc evenly across every stitch and chain space along the side. Work 2 sc, ch 2, 2 sc in each remaining corner.
Join with sl st.
R8: ch 1, sc in every stitch around. In each corner ch-2 space work sc, ch 2, sc. Join with sl st.
Fasten off and leave a 20 cm tail.
Block the motif to approximately 16.5 × 16.5 cm. Measure from outer edge to outer edge rather than from corner point to corner point.
How Many Daisy Squares to Make
The photographed blanket covers most of a bed and uses a large rectangular grid. Select the square count from the finished size rather than copying a fixed number without measuring your first blocked motif.
| Blanket | Layout | Total Squares | Approximate Motif Area Before Border |
|---|---|---|---|
| Baby | 5 × 6 | 30 | 82.5 × 99 cm |
| Lap | 7 × 8 | 56 | 115.5 × 132 cm |
| Throw | 8 × 10 | 80 | 132 × 165 cm |
| Bed-size | 10 × 12 | 120 | 165 × 198 cm |
The joining method can add several centimeters to the final width and length. A border adds more, so measure the assembled grid before selecting the number of edging rounds.
Blocking the Daisy Squares
Blocking is part of the construction rather than a cosmetic finishing step. The raised petals pull toward the center while the green corners pull outward, so unblocked squares rarely share exactly the same dimensions.
Pin each motif to 16.5 cm square. Place pins first in the four corners, then at the midpoint of every side.
Do not pin through the cream petals. They should retain their raised profile.
Block squares in batches using the same measurement. Allow them to dry completely before stacking because compressed damp petals can lose height.
Joining the Granny Squares
The reference blanket uses visible sage lines between motifs, so a flat slip-stitch join gives a closer visual match than an invisible whip stitch.
Arrange all blocked squares on the floor or another large flat surface before joining. Rotate every flower so the corner structure faces the same direction.
Horizontal Joining
Place two squares side by side with right sides facing upward.
Insert the hook through the corresponding outer loops of both squares. Join sage yarn and work one slip stitch through both loops.
Continue across the entire edge, pairing one stitch from the first square with one stitch from the second.
Do not skip the corner spaces.
Continue joining squares until one complete row has been assembled.
Vertical Joining
After all horizontal rows are complete, arrange them in final order.
Use the same flat slip-stitch method to join the long row edges.
At each four-square intersection, check that all corner spaces meet at one central point. An offset of even one stitch creates the stepped grid effect that becomes obvious across a large blanket.
Blanket Border
Yarn: muted sage green.
Join yarn in any outer corner of the assembled blanket.
Border R1: ch 1 and sc evenly around the entire blanket. Work sc, ch 2, sc in each corner.
Where two granny squares meet, work through the joining seam rather than leaving an extra chain space. This prevents small holes along the perimeter.
Border R2: ch 1, sc in every stitch around. Work sc, ch 2, sc in each corner.
Border R3: repeat R2.
Border R4: sl st loosely in every stitch around, working one sl st, ch 1, one sl st into each corner space.
Fasten off with a 30 cm tail.
For a broader frame like the blanket visible in the reference, add two or three additional single-crochet rounds before the final slip-stitch round.
Assembly
- Make one complete daisy granny square and block it to approximately 16.5 cm before calculating the blanket layout.
- Crochet the remaining peach centers with the same 24-stitch final count.
- Add eight cream cluster petals to every flower, using three center stitches per petal.
- Work the sage background rounds without catching the cream petals beneath the green chains.
- Block every finished square to the same dimensions before beginning any joins.
- Arrange the complete blanket grid and check flower orientation from one edge to the other.
- Join squares horizontally with sage flat slip-stitch seams.
- Join the completed rows vertically, aligning all four-square intersections.
- Work at least three solid sage border rounds around the assembled blanket.
- Weave every tail through at least 5 cm of matching-color stitches and complete one final flat blocking of the blanket while leaving the petals uncompressed.
The finished blanket consists of repeated eight-petal daisy squares, visible sage joining lines and a solid outer border.
7 Technical Tips
- Center ruffling: The peach center must finish R3 with exactly 24 stitches. An extra increase changes the spacing from three stitches per petal and pushes one flower section out of alignment.
- Unequal petals: Keep all five partial treble stitches in each cluster at approximately the same height. A petal only 5 mm shorter than its neighbors becomes visible once the flower is framed by straight green sides.
- Petal flattening: Do not crochet the first sage round through the cream cluster tops. Work in the gaps behind the petals so the eight cream sections remain raised above the background.
- Square distortion: Mark all four R5 ch-2 corner spaces before beginning R6. Missing one corner converts the motif into an uneven eight-sided shape that cannot be corrected by blocking.
- Size drift: Check every fifth completed motif against a 16.5 cm template. A gradual tension change of 3–4 mm per square creates visible irregularity across a ten-square blanket row.
- Join puckering: Slip stitches should match the natural width of the square edges. Pulling the join tight shortens each seam and produces raised ridges between otherwise flat motifs.
- Blocked petals: Pin only the sage frame during final blocking. Heavy pressure or pins through the cream clusters flatten the 3D flower texture that distinguishes this design.
Why Eight Petals Work for This Design
The uploaded reference uses noticeably broader petals than a conventional twelve-petal daisy granny square. Reducing the number to eight gives each cream cluster more visual space and allows the peach center to remain exposed between the petal bases.
The stitch math follows that structure directly. The peach center finishes with 24 stitches. Dividing 24 by eight provides exactly three anchor stitches per petal.
The first stitch anchors the left side, the middle stitch supports the raised cluster and the third stitch anchors the right side. Repeating that structure eight times keeps the petals evenly distributed around 360 degrees.
A twelve-petal version would require smaller petals or a larger center. Both changes would move the motif away from the broad floral proportions shown in the photo.
Creating the Open Sage Background
The green portion should frame the daisy instead of filling every gap with dense fabric. Chain arches create the open spaces visible around the petals while keeping the square lighter than an all-double-crochet background.
Corner placement matters more than the quantity of solid stitches. Four alternate spaces are converted into corners while the four spaces between them remain side centers.
After the square shape is established, the final single-crochet rounds stabilize the perimeter for joining. Without that solid outer edge, joining directly into chain arches can stretch individual motifs to different widths.
The result is a useful division of labor: open inner rounds provide the botanical appearance, and the denser perimeter carries the mechanical load of the blanket joins.
Yarn Planning for a Bed-Size Blanket
A large floral blanket consumes considerably more yarn than a flat granny-square design because every raised petal contains several partial treble stitches.
Published daisy throw specifications provide a useful reference of approximately 2,720 g total for a large project. The exact amount for this version depends on square count and the thickness of the 3D petals.
For a 10 × 12 layout, buy the sage background yarn in one dye lot when possible. Sage covers every square frame, every joining seam and the complete border, so even a slight color change is repeated across the entire blanket.
Cream is the second-highest requirement because eight raised petals appear on every motif. Peach uses much less yarn and can usually be purchased in a smaller quantity.
Making Matching Daisy Pillow Covers
The pillows visible behind the blanket use the same visual system: peach center, cream petals and sage background.
For a square cushion front, arrange four large motifs in a 2 × 2 grid or nine smaller motifs in a 3 × 3 layout. Join them using the same sage slip-stitch seam so the cushion coordinates with the blanket.
Measure the joined panel before making the back. Crochet fabric stretches differently from woven cushion fabric, so selecting an insert based only on the theoretical square dimensions can produce a loose cover.
A plain sage crochet back reduces bulk compared with placing raised daisies on both sides. It also prevents the dimensional petals from being compressed against the bed when the cushion is used.
Conclusion
Make and block one complete motif before committing yarn to the full blanket; the blocked square dimension determines the final grid more accurately than stitch count alone. Keep each peach center at 24 stitches and divide it into eight three-stitch petal sections before adding the sage frame. Save this daisy granny square blanket crochet pattern to Pinterest with a close view of the raised flower, then share the finished blanket on Instagram using #SageDaisyGrannyBlanket. Record the final square size and total yarn used for future projects. For this exact design, would you keep the soft peach centers or replace them with a muted golden yellow?









