Introduction
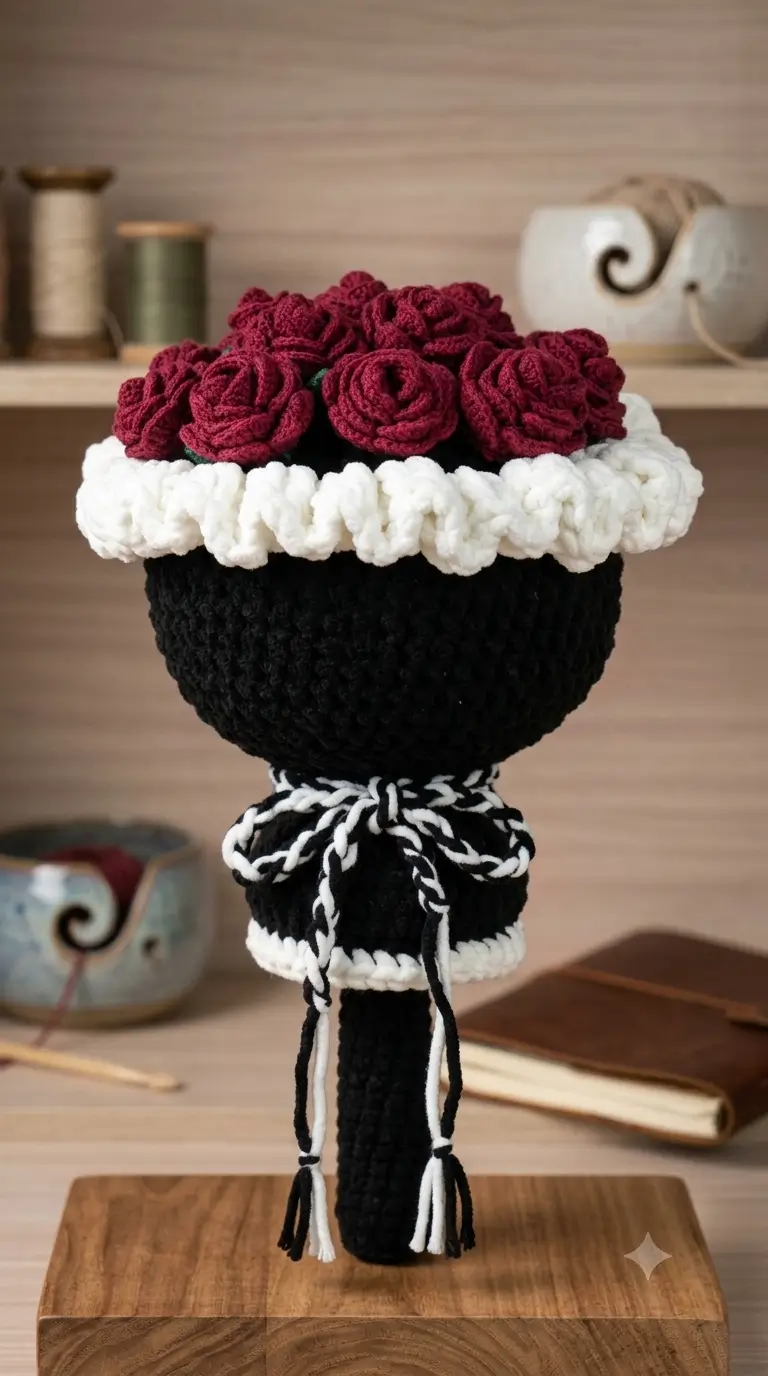
Fourteen dark roses packed into a black bowl create a different construction problem from a stemmed rose bouquet: the flower dome has to stay level without visible stems. This crochet rose bouquet pattern uses a 36-stitch rounded holder, layered burgundy blooms and white ruffled edging. The reference size is 20–23 cm with 5-ply yarn and a 3.0–3.5 mm hook. It suits intermediate crochet work and functions as freestanding floral decor.
The Design: What Makes This Rose Bouquet Different
The first structural decision is the stuffed bowl. Instead of wiring every rose onto a long stem, the flowers sit across a firm domed support, which keeps the top densely covered while hiding attachment points. A crochet flower bouquet pattern built this way also needs enough width at the rim to stop a heavy flower cluster from tipping.
Second, the white border is not simply a color-change round. It projects beyond the black holder as repeated three-dimensional scallops, separating the burgundy flowers from the base.
Finally, the black-and-white tie adds vertical contrast below the rim. A frequent error in a 3D crochet rose bouquet is spreading the roses evenly before testing the central cluster. That produces visible holes. Place the center flowers first, then work outward in offset rings so adjacent roses overlap slightly.
Project Info at a Glance
| Skill Level | Time | Finished Size | Hook | Best For |
|---|---|---|---|---|
| Intermediate | Not specified | 20–23 cm | 3.0–3.5 mm | Table decor, floral display, handmade gift |
Materials and Tools
Yarn
- Black — 5-ply milk cotton or light DK — up to 100 g — use for the rounded bouquet holder.
- Burgundy — same weight — about 50 g minimum — use for the roses.
- White — same weight — about 20 g — use for the projecting ruffle.
- Dark green — small remnant — use for calyx and leaf details.
- Black and white — small remnants — use for the contrasting tie.
The photograph appears to use a plush chenille-style yarn. If you substitute chenille for milk cotton or light DK, the finished bouquet may become larger because yarn thickness changes gauge.
Tools
- 3.0–3.5 mm crochet hook
- Polyester stuffing
- Yarn needle
- Locking stitch markers
- Scissors
- Pins
- Measuring tape
- Optional plastic canvas circle for a flatter base
Safety eyes are not required for this design.
Abbreviations
- MR — magic ring
- sc — single crochet
- inc — 2 sc in one stitch
- dec — invisible decrease over 2 stitches
- sl st — slip stitch
- ch — chain
- hdc — half double crochet
- dc — double crochet
- BLO — back loop only
- FLO — front loop only
For an invisible decrease, insert the hook through the front loops of the next two stitches, yarn over and complete one single crochet through both loops.
Pattern — Step by Step
Work the rounded sections in a continuous spiral unless otherwise stated. The bouquet holder increases from 6 stitches to a 36-stitch plateau before shaping the upper edge.
Black Bouquet Holder
Yarn: black
R1: 6 sc in MR (6)
R2: inc ×6 (12)
R3: (sc, inc) ×6 (18)
R4: (2 sc, inc) ×6 (24)
R5: (3 sc, inc) ×6 (30)
R6: (4 sc, inc) ×6 (36)
R7: sc around in BLO (36)
R8: sc around (36)
R9: sc around (36)
R10: sc around (36)
R11: sc around (36)
R12: sc around (36)
R13: sc around (36)
R14: sc around (36)
R15: (4 sc, dec) ×6 (30)
R16: sc around (30)
Begin stuffing at R13. Keep the bottom firm and the upper rim slightly softer so the flower dome can be sewn into it.
Fasten off. Leave a 30 cm tail.
The 36-stitch plateau gives the holder enough width to support a dense medium-size flower cluster while preserving the rounded bowl shape.
Upper Flower-Dome Insert
Yarn: black
R1: 6 sc in MR (6)
R2: inc ×6 (12)
R3: (sc, inc) ×6 (18)
R4: (2 sc, inc) ×6 (24)
R5: (3 sc, inc) ×6 (30)
R6: (4 sc, inc) ×6 (36)
R7: sc around (36)
R8: sc around (36)
R9: (4 sc, dec) ×6 (30)
R10: (3 sc, dec) ×6 (24)
Stuff lightly. The insert should form a low mound rather than a ball.
Fasten off. Leave a 35 cm sewing tail.
Sew this dome into the black holder just below its upper edge. The concealed mound gives every rose a firm attachment surface.
Burgundy Rose — Large (Make 8)
Yarn: burgundy
Ch 37.
Row 1: Starting in the second chain from the hook, sc across (36). Turn.
Row 2: Ch 2, then work:
- 2 hdc in each of the first 12 stitches
- 2 dc in each of the next 12 stitches
- 3 dc in each of the final 12 stitches
Fasten off, leaving a 35 cm tail.
Roll from the narrower hdc end toward the fuller dc end. Stitch through the lower straight edge as you roll. Keep the visible petal tops free of sewing stitches.
The finished rose should measure approximately 4–5 cm across with light DK or 5-ply yarn, depending on tension.
Burgundy Rose — Medium (Make 6)
Yarn: burgundy
Ch 31.
Row 1: Starting in the second chain from the hook, sc across (30). Turn.
Row 2: Ch 2, 2 hdc in each of the next 10 stitches, 2 dc in each of the next 10 stitches, 3 dc in each of the final 10 stitches.
Fasten off. Leave a 30 cm tail.
Roll tightly for the first three turns, then loosen the rolling tension slightly. Sew the lower edge after every complete turn.
Dark-Green Calyx (Make 6)
Yarn: dark green
R1: 6 sc in MR (6)
R2: (sl st, ch 4, sl st into second ch, sc in next 2 ch, sl st in next base st) ×6.
Fasten off. Leave a 15 cm tail.
Place calyx pieces under selected roses rather than underneath every flower. Only small green areas should remain visible between the burgundy blooms.
Small Leaves (Make 4)
Yarn: dark green
Ch 7.
Row 1: Starting in second chain: sl st, sc, hdc, dc, hdc, 3 sc in final chain. Continue down the opposite side: hdc, dc, hdc, sc, sl st.
Fasten off. Leave a 15 cm tail.
Fold each leaf gently along its chain spine before attaching it beneath the roses.
White Ruffled Rim
Yarn: white
Join white yarn to the exposed rim of the black holder.
Round 1: sc in each rim stitch (30).
Round 2: Repeat the following around:
(sl st in next st, ch 3, 3 dc in next st, ch 3, sl st in next st)
Distribute the motifs evenly around the rim. If the final repeat does not meet the first one cleanly, shift one slip stitch by a single base stitch.
Fasten off and weave the tail behind the white trim.
White Decorative Rosettes (Make 10–14 as Needed)
Yarn: white
R1: 6 sc in MR (6)
R2: (sl st in next st, ch 3, 3 dc in same st, ch 3, sl st in same st) ×6.
Fasten off. Leave a 12 cm tail.
Sew these rosettes over any flatter sections of the ruffled rim. Their purpose is to create the dense flower-like white border visible around the black holder.
Black-and-White Tie Cord
Yarn: one strand black and one strand white held together
Ch 85.
Row 1: sl st loosely in each chain back to the beginning.
Fasten off with 15 cm tails.
Make a second cord if you want a fuller tie. Leave at least 12–15 cm of each end hanging below the knot.
Optional Black Bow Loop
Yarn: black
Ch 40. Join with sl st without twisting.
Round 1: sc around (40).
Fasten off.
Flatten the loop, pinch the center and wrap several turns of white yarn around the middle. Stitch the bow beneath the holder rim.
Assembly
- Join the flower dome to the holder. Center the black insert inside the upper rim, add a small amount of stuffing underneath it and whipstitch it securely in place.
- Mark the rose positions. Position one large burgundy rose in the center, then arrange five large roses around it before adding the remaining flowers.
- Sew the central flowers first. Pass the needle through the firm lower edge of each rolled rose and through the black dome at least three times.
- Fill the second ring. Alternate large and medium roses so neighboring flower edges overlap by approximately 5–8 mm.
- Add the green details. Tuck the six calyx pieces and four leaves into selected gaps without covering large areas of the burgundy flower surface.
- Attach the white rim details. Check that the ruffle projects beyond the black holder around the entire circumference. Add white rosettes wherever the edge appears flat.
- Check the shape from the side. The center of the flower dome should sit slightly higher than the outer flowers rather than forming a completely flat surface.
- Add the tie. Wrap the black-and-white cord below the white ruffle and knot it at the front.
- Secure the hanging ends. Tack the knot to one black stitch so it cannot slide around the holder during handling.
- Finish the underside. Weave each structural yarn tail through at least five neighboring stitches, reverse direction once and bury it inside the stuffed base before trimming.
The completed piece forms a stuffed floral display with a 36-stitch structural base, layered burgundy rose dome, projecting white trim and contrasting black-and-white tie.
7 Technical Tips
- Prevent a drifting round start. Move the stitch marker after every completed round of the black holder. A one-stitch shift during R3–R6 can offset the increase columns and make the bowl lean.
- Avoid overstuffing the holder. Stop adding fiberfill when the surface still compresses about 5 mm under a fingertip. Packing the upper section too firmly can turn the rounded bowl into a cylinder.
- Hide decrease bars. Use front-loop invisible decreases at R15. Standard sc2tog decreases can create visible horizontal bars against the black yarn.
- Control gaps between roses. Keep neighboring flower edges no more than 5–8 mm apart before sewing. Larger gaps can expose the black support underneath.
- Control flower height. Pin every large rose before attaching the medium roses. Avoid placing the central flower more than about 1 cm higher than the surrounding blooms.
- Keep the white rim balanced. Pin the border at four quarter points before adding decorative rosettes. Concentrating extra shells on one side can pull the holder out of round.
- Secure structural tails. Weave each main sewing tail through at least five stitches, reverse direction and then bury it inside the stuffed base. Cutting after a single pass can allow flowers or the tie to loosen.
Conclusion
Check the bouquet from the front, side and directly above before trimming the final sewing tails. The central burgundy roses should cover the black support completely, while the white trim remains visible as a continuous ring underneath. Your next practical step is to crochet one large rose and test its diameter against the 36-stitch base before making the remaining flowers. Save this crochet rose bouquet pattern to Pinterest and share the completed holder on Instagram with #RuffledRoseBouquet. Photograph it against a plain background so the dark flower edges remain easy to distinguish. Would you keep the burgundy-and-black palette or change the rose color while retaining the white ruffled rim?









