Introduction
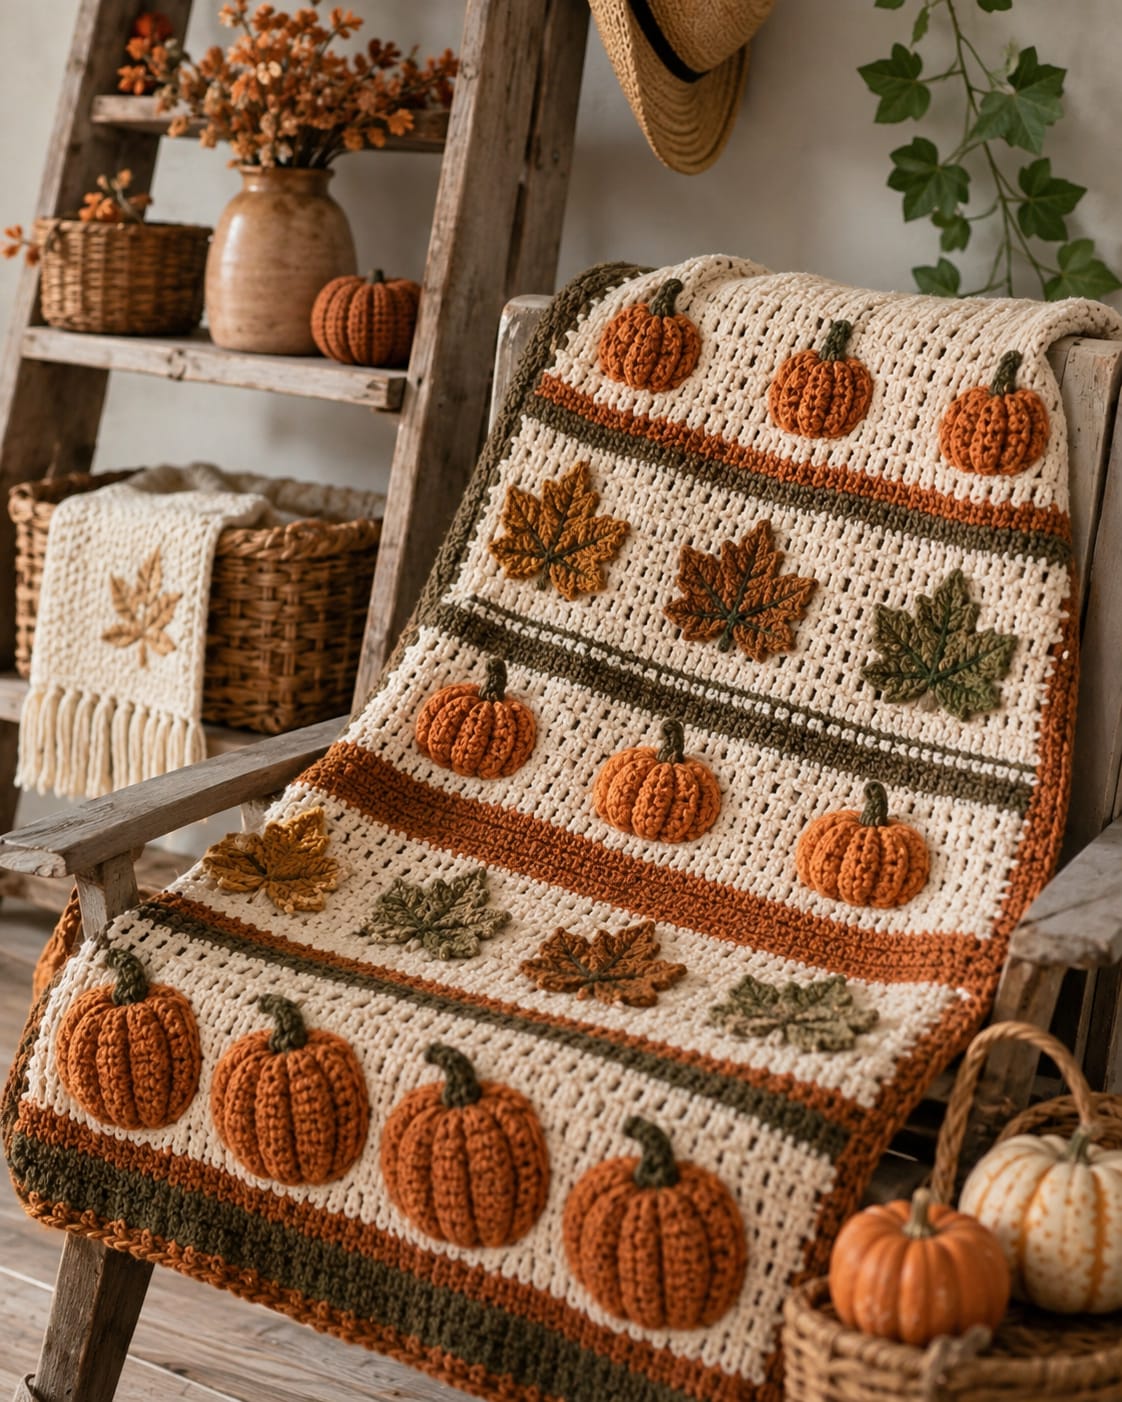
Four large pumpkins at the lower edge have to remain level with three smaller pumpkins almost a meter above them. This pumpkin and maple leaf crochet blanket pattern uses worsted or Aran yarn with 5 mm and 4 mm hooks to make an approximately 100 × 140 cm throw. Cream openwork bands, raised pumpkins, maple leaves and narrow harvest stripes create an intermediate appliqué project.
The Design: What Makes This Fall Blanket Different
The blanket is organized in horizontal bands instead of granny-square modules. Three small pumpkins sit near the top, followed by a row of broad maple leaves, three medium pumpkins, four smaller leaves and four large pumpkins near the lower edge. That gradual increase in pumpkin scale gives the surface a clear top-to-bottom direction. Narrow olive and rust stripes separate the cream openwork sections, so the motifs never appear to float on one uninterrupted background. The pumpkins are shallow dimensional pieces, while the maple leaves stay nearly flat. This difference limits bulk. A common mistake in a pumpkin applique crochet blanket is sewing the lower motifs too tightly. Because the bottom pumpkins are the largest pieces, a short attachment seam can pull the final cream panel inward and make the border bow.
Project Info at a Glance
| Skill Level | Time | Finished Size | Hooks | Best For |
|---|---|---|---|---|
| Intermediate | 30–40 hours | Approx. 100 × 140 cm | 5.0 mm blanket / 4.0 mm motifs | Fall throws, harvest displays and seasonal chair blankets |
Materials and Tools
Yarn
- Warm cream — worsted / Aran #4 — approximately 750–900 g — main openwork field and border accents.
- Pumpkin orange — worsted / Aran #4 — approximately 220–280 g — all ten pumpkin appliqués and rust-orange border details.
- Olive green — worsted / Aran #4 — approximately 130–170 g — stripe bands, stems, several leaves and border.
- Chocolate brown — worsted / Aran #4 — approximately 70–90 g — selected stems, leaf veins and narrow stripe details.
- Mustard gold — worsted / Aran #4 — approximately 45–60 g — maple leaves.
- Rust / burnt orange — worsted / Aran #4 — approximately 45–60 g — maple leaves and stripe accents.
Keep the orange, cream and olive yarns close in thickness. A heavier orange yarn will enlarge the raised pumpkins even when the row counts remain unchanged.
Tools
- 5.0 mm crochet hook for the blanket field and border
- 4.0 mm crochet hook for pumpkins, leaves and stems
- Polyester fiberfill — approximately 70–100 g
- Yarn needle
- Long tapestry needle
- Stitch markers
- Blocking mats
- Rust-resistant pins
- Scissors
- Measuring tape
Abbreviations
- MR — magic ring
- ch — chain
- sc — single crochet
- hdc — half double crochet
- dc — double crochet
- tr — treble crochet
- sl st — slip stitch
- inc — increase
- dec — decrease
- BLO — back loop only
An invisible decrease is worked through the front loops of the next two stitches before completing one single crochet through both loops.
Pattern — Step by Step
Work the complete blanket field before making the appliqués. Block the field and mark every motif row before sewing any pumpkin or maple leaf permanently.
Main Cream Blanket Field
Yarn: warm cream — Source: original reconstruction based on the visible proportions.
Foundation: ch 142.
Row 1: starting in the second chain, sc across. (141)
Row 2: ch 3, turn, dc across. (141)
Row 3: ch 1, turn, sc across. (141)
Row 4: ch 3, turn, dc in next 2 stitches, ch 1, skip 1 stitch; repeat across while retaining 141 working positions.
Row 5: ch 1, turn, sc across, placing one sc into each ch-1 space. (141)
Rows 6–28: repeat Rows 2–5.
Top Rust Stripe
Change to pumpkin orange or rust.
Rows 29–31: sc across. (141)
Change to olive.
Rows 32–35: hdc across. (141)
Change back to cream.
Upper Leaf Field
Rows 36–65: repeat the cream openwork sequence established in Rows 2–5.
Change to olive.
Rows 66–69: hdc across. (141)
Change to cream.
Rows 70–72: sc across. (141)
Middle Pumpkin Field
Rows 73–101: continue the cream openwork sequence.
Change to rust.
Rows 102–107: hdc across. (141)
Change to cream.
Lower Leaf Field
Rows 108–132: repeat the cream openwork sequence.
Change to olive.
Rows 133–136: hdc across. (141)
Change to rust.
Rows 137–139: sc across. (141)
Change to cream.
Lower Pumpkin Field
Rows 140–176: continue the cream openwork sequence.
Fasten off.
Target before border: approximately 90–94 cm wide × 128–132 cm long after blocking.
Block and Mark the Blanket
Pin all four corners first.
Mark the center of every horizontal motif band.
The top pumpkin row receives three motifs.
The upper leaf row receives three large leaves.
The central pumpkin row receives three motifs.
The lower leaf band receives four smaller leaves.
The bottom pumpkin row receives four large motifs.
Small Raised Pumpkin — Make 6
Yarn: pumpkin orange — Source: original ribbed BLO reconstruction.
Foundation: ch 8.
Row 1: starting in the second chain, 7 hdc. (7)
Rows 2–16: ch 1, turn, hdc BLO across. (7)
Fasten off with a 35 cm tail.
Bring Row 1 and Row 16 together.
Whip stitch the short ends to form a ribbed tube.
Gather the Small Pumpkin
Thread orange yarn through the sixteen row ends along one opening.
Pull gradually until the hole measures approximately 5 mm.
Secure the yarn.
Add only a small pinch of filling.
Gather the opposite opening to the same diameter.
Press both gathered centers toward one another.
Target finished width: approximately 8–10 cm.
Small Pumpkin Stem — Make 6
Yarn: olive or brown.
Ch 5.
Starting in the second chain, sl st in each chain. (4)
Fasten off with a 12 cm tail.
Fold slightly and sew behind the upper pumpkin center.
Large Raised Pumpkin — Make 4
Yarn: pumpkin orange.
Foundation: ch 12.
Row 1: starting in the second chain, 11 hdc. (11)
Rows 2–22: ch 1, turn, hdc BLO across. (11)
Fasten off with a 50 cm tail.
Join Row 1 to Row 22.
Gather one open edge.
Add a shallow layer of filling.
Gather the second edge.
Compress the two centers.
Target width: approximately 12–14 cm with 10–15 mm of projection.
Large Pumpkin Stem — Make 4
Ch 7 with olive or brown.
Starting in the second chain, sl st back through 6 chains.
Fasten off with a 15 cm tail.
Sew the lower 15 mm behind the pumpkin.
Shape the Pumpkin Ribs
The BLO rows create fine ribs automatically.
Add two additional shaping strands to each pumpkin to create three broader sections.
Pass matching orange yarn from the rear center over one rib valley and return through the back.
Pull only 2–3 mm deeper than the surrounding ridges.
Repeat on the opposite side.
Large Maple Leaf — Make 3
Yarn: rust, mustard or olive — Source: original maple-leaf reconstruction informed by standard pointed-leaf geometry.
R1: 6 sc in MR. (6)
R2: inc ×6. (12)
R3: (sc, inc) ×6. (18)
Do not fasten off.
Large Leaf Point 1
Ch 8.
Starting in the second chain work:
sl st, sc, hdc, dc, tr, dc, sc.
Sl st into the next two stitches of R3.
Large Leaf Point 2
Ch 10.
Starting in the second chain work:
sl st, sc, hdc, dc, 2 tr, dc, hdc, sc.
Sl st into the next three stitches of R3.
Large Center Leaf Point
Ch 13.
Starting in the second chain work:
sl st, sc, hdc, dc, 4 tr, dc, hdc, sc.
Sl st into the next three stitches of R3.
Large Leaf Points 4 and 5
Repeat Point 2 and then Point 1 on the opposite side.
Fasten off with a 30 cm sewing tail.
Large Leaf Stem
Join at the lower center.
Ch 10.
Sl st back through the chain.
Fasten off.
Large Leaf Veins
Use brown, dark olive or matching yarn.
Surface slip stitch from the stem base toward the center point.
Add four shorter diagonal lines into the side lobes.
Keep the surface stitches loose enough for the leaf to remain flat.
Small Maple Leaf — Make 4
Yarn: mustard, olive or rust.
R1: 6 sc in MR. (6)
R2: inc ×6. (12)
Work five pointed sections around the ring.
For side points, ch 6 and return with sl st, sc, hdc, dc, sc.
For the center point, ch 9 and return with sl st, sc, hdc, dc, 2 tr, dc, sc.
Fasten off.
Add a ch-7 stem and one central surface vein.
Target size: approximately 7–8.5 cm.
Arrange the Top Pumpkin Row
Place three small pumpkins across the first cream motif field.
Keep the centers approximately 25–28 cm apart.
Leave roughly equal cream space between the outer pumpkins and the side borders.
All three stems should point generally upward without matching at exactly the same angle.
Arrange the Upper Leaf Row
Place one large maple leaf on the left, one near the center and one on the right.
Rotate neighboring leaves by approximately 10–20 degrees.
Keep all leaf tips clear of the olive stripe below them.
Arrange the Middle Pumpkin Row
Place three small-to-medium pumpkins in the next broad cream section.
These motifs may sit slightly lower than the center line to leave more open cream above them.
Check that they visually align with the three top pumpkins without forming perfectly rigid columns.
Arrange the Four Small Leaves
Place four smaller leaves through the next cream band.
Alternate mustard, olive and rust.
Rotate each one independently.
Keep at least 4–5 cm between the widest leaf edges.
Arrange the Four Large Pumpkins
Place four large pumpkins across the lowest cream field.
Keep approximately 5–7 cm between neighboring motifs.
The bottom of each pumpkin should remain several centimeters above the inner border.
Check that all four raised centers project by approximately the same amount.
Attach the Pumpkins
Use matching orange yarn.
Begin at the lower rear edge.
Sew through the pumpkin perimeter and cream field at approximately 10–12 mm intervals.
Leave the central ribs free.
Stop halfway and inspect the surrounding cream fabric.
If the field lifts more than approximately 5 mm, loosen the most recent stitches.
Attach the Maple Leaves
Sew each leaf mainly through its center and lower lobe edges.
Leave the outer 15–25 mm of several points free.
Tack the stem separately.
Do not pull the central vein tight against the background.
Border Round 1 — Olive
Join olive in one corner.
Sc evenly around the complete blanket.
Work (2 sc, ch 2, 2 sc) at each corner.
Join.
Border Round 2 — Olive
Hdc in every stitch.
At each corner work (2 hdc, ch 2, 2 hdc).
Join.
Border Round 3 — Cream
Join cream.
Repeat sc, ch 1, skip 1 along each side.
At every corner work (sc, ch 2, sc).
Border Round 4 — Rust
Join rust.
Sc in every stitch and ch-1 space.
At each corner work (sc, ch 2, sc).
Border Round 5 — Pumpkin Orange
Join orange.
Hdc around.
At corners work (2 hdc, ch 2, 2 hdc).
Final Olive Edge
Join olive.
Repeat:
sl st in next stitch, ch 2, sc in same stitch, skip 1 stitch.
Continue around all four sides.
Fasten off.
Assembly
- Crochet the 141-stitch blanket field through 176 rows, changing among cream, rust and olive at the stated horizontal bands.
- Block the field and mark the five motif levels before attaching any decorative piece.
- Make six small or medium ribbed orange pumpkins and four larger versions, then attach olive or brown stems.
- Shape each pumpkin with two broad sculpting channels while keeping the appliqué shallow enough to lie against the blanket.
- Crochet three large maple leaves and four smaller leaves in rust, mustard and olive, adding stems and surface veins.
- Arrange three pumpkins at the top, three large leaves below, three pumpkins at center, four small leaves below them and four large pumpkins at the bottom.
- Sew the ten pumpkins through their rear perimeter while leaving the raised central ribs free.
- Attach the seven maple leaves through their centers and lower edges, leaving several pointed tips partly free.
- Work the olive, cream, rust and orange border rounds followed by the narrow olive textured edge.
- Block the field and border without flattening the appliqués, then reshape all pumpkin ribs, leaf points and stems by hand.
The finished blanket should show five clearly separated harvest motif bands, with pumpkin size increasing toward the lower edge and maple leaves providing flatter contrast between the raised orange sections.
7 Technical Tips
- Horizontal stripes bow downward: Appliqué sewing has shortened the cream field. Keep pumpkin attachment stitches approximately 10–12 mm apart and loosen them if the nearest stripe curves by more than about 5 mm.
- Large pumpkins become heavier than the top row: Too much filling has been added. Limit the bottom motifs to approximately 10–15 mm of projection and the smaller pumpkins to around 8–10 mm.
- Pumpkin ribs disappear after sewing: Attachment stitches cross the raised center. Sew only through the rear perimeter and leave at least the central 60 percent of the motif free.
- Maple-leaf points curl inward: The central vein is tighter than the leaf body. Surface stitch with the piece lying flat and stop if a lobe lifts more than approximately 5 mm.
- Three-pumpkin rows look uneven: Motifs were aligned from their outer edges rather than their centers. Mark center points approximately 25–28 cm apart before pinning the row.
- Bottom border flares: Too many stitches have been added along the row-end edge. Count working stitches in repeated 20 cm sections before beginning the cream border round.
- Large pumpkin stem tilts after washing: Only the tip has been sewn. Tack the lower 15–20 mm of each stem behind the pumpkin and add one concealed attachment through the upper pumpkin center.
Why Horizontal Bands Work for This Blanket
The motif rows are not independent blocks. They rely on long cream fields separated by narrow color stripes, so the viewer reads the blanket from top to bottom rather than as a grid.
This structure also permits different motif counts. Three pumpkins can occupy one band while four leaves fit another without forcing every row into the same column system.
The olive and rust bands serve as visual dividers. They also create useful measurement references while arranging the appliqués.
Why the Pumpkin Scale Changes
The bottom four pumpkins are visibly larger than the three near the top.
That change creates depth without using complex perspective crochet.
Small eight-to-ten-centimeter motifs suit the upper bands. Twelve-to-fourteen-centimeter pumpkins create greater weight near the lower border.
Keep the stem scale connected to body size as well. A large bottom pumpkin needs a slightly longer stem than one of the upper pieces.
Why the Leaves Stay Flatter
Seven dimensional leaves plus ten heavily filled pumpkins would produce a thick, rigid throw.
The maple leaves therefore rely on tall stitches, pointed lobes and surface veins rather than padding.
This contrast matters visually too. Rounded pumpkin forms alternate with angular leaf silhouettes, stopping the blanket from becoming one continuous sequence of oval shapes.
Changing the Motif Colors
Burnt orange, mustard and olive reproduce the supplied harvest palette closely.
For a lighter blanket, make two of the bottom pumpkins cream.
A deeper fall version can add burgundy maple leaves.
Sage can replace dark olive for a softer field.
Repeat each accent shade in at least two places so a single leaf or stripe does not appear unrelated to the rest of the throw.
Changing the Blanket Size
For a shorter lap blanket, remove one cream motif band and reduce the body to roughly 140 rows.
For a wider throw, add stitches in multiples of four so the openwork rhythm remains easy to repeat.
Resize the motif spacing only after the field is blocked.
Do not enlarge every pumpkin automatically when making a wider blanket; additional cream margin can preserve the airy composition.
Changing the Pumpkin Count
A simplified version can use three pumpkins at the top, three in the center and three large pumpkins below for nine total.
An expanded blanket can add a fourth pumpkin to the upper rows.
Keep adequate background between motifs.
When neighboring pumpkin edges come within about 4 cm of one another, the design starts to lose the open horizontal-band effect.
Controlling the Openwork Background
The cream fabric should remain soft enough to drape but firm enough to support the appliqués.
Check the width after the first twenty rows.
If the field grows noticeably wider during the double-crochet sections, move down a hook size for the complete project rather than correcting the difference with a tight border.
Attaching Raised Motifs Without Puckering
Pin every pumpkin at four points before sewing.
Add another pin between those positions on the larger motifs.
Work around half the perimeter and stop.
Lay the section flat before continuing.
This checkpoint is important because distortion is easier to correct after ten stitches than after an entire 14 cm pumpkin has been attached.
Final Blocking
Pin the blanket corners first.
Align every horizontal stripe before pinning the long sides.
Do not cover the raised pumpkins with heavy towels or blocking boards.
Allow the background and perimeter to dry flat.
Afterward, lift the pumpkin ribs and maple-leaf points by hand.
View the full blanket vertically and correct any motif that makes one horizontal row appear lower than its neighbor.
Conclusion
Block the complete striped field before making the final motif layout because the olive and rust bands provide the reference lines for every pumpkin and maple leaf. Your next step is to finish the 141-stitch background, mark its five decorative levels and test one small and one large pumpkin against those spaces. Keep all pumpkin filling shallow and the leaf points mostly free. Share the finished pumpkin and maple leaf crochet blanket pattern project on Pinterest with every horizontal band visible, then post a close-up on Instagram using #HarvestStripePumpkinBlanket. For this blanket specifically, would you keep all four lower pumpkins orange or replace one with warm cream?









