Introduction
A butterfly needs four wings that stay visually separate even when the crochet fabric is only a few centimeters wide. This free crochet butterfly pattern builds that shape with compact wing sections, a narrow center body, and short antennae. Use DK cotton or acrylic yarn with a 3 mm hook. Finished butterflies measure about 4–7 cm depending on yarn and tension, making them practical for garlands, appliqués, gift decoration, and floral displays.
The Design: What Makes This Crochet Butterfly Different
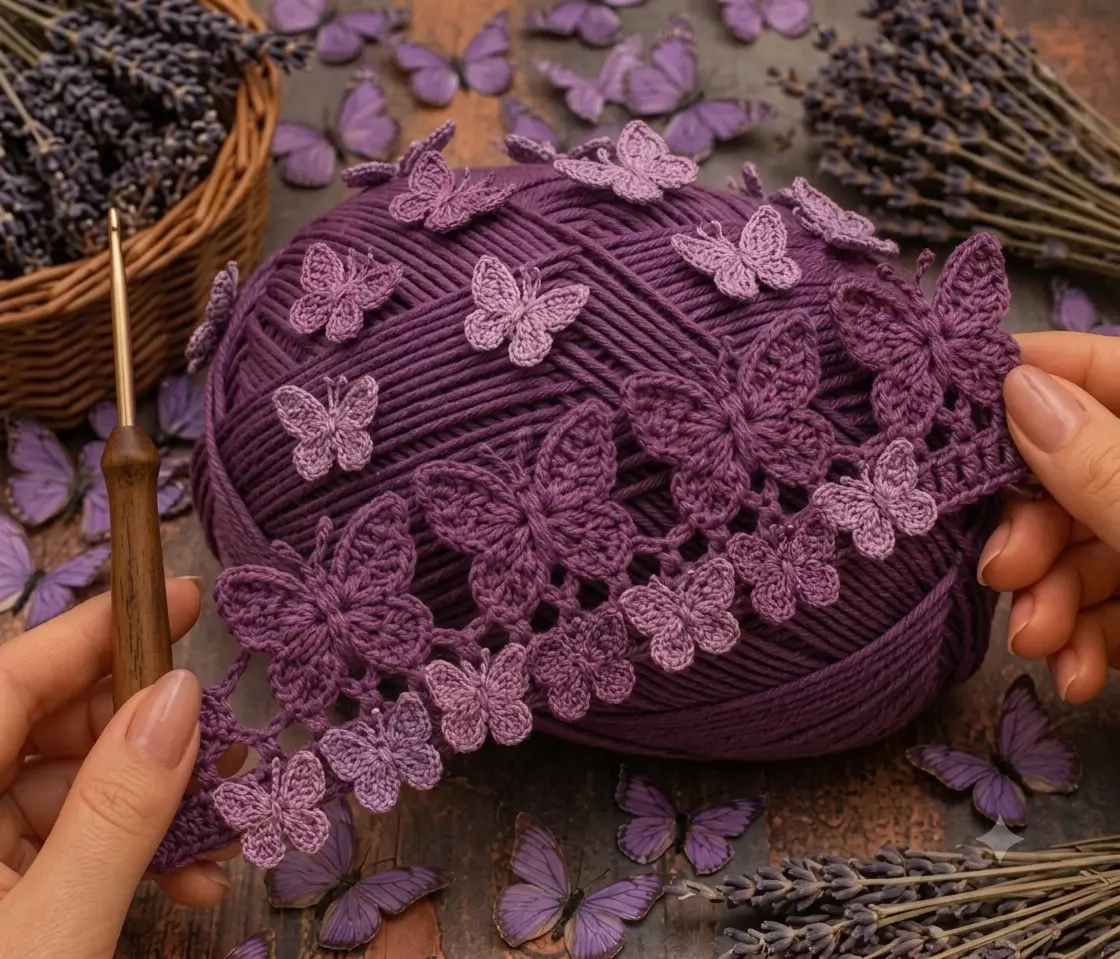
The butterfly in the reference image depends on three structural choices. First, the upper wings are made slightly larger than the lower wings so the silhouette reads clearly as a butterfly instead of a four-petal flower. Second, the center is kept narrow because a bulky body would hide the inner wing edges. Third, the antennae are worked as short chains rather than stuffed pieces, keeping the finished motif flat enough for sewing onto another project.
This crochet butterfly appliqué also uses closely packed stitches around the wing edges. That creates definition without adding wire or internal supports. A common mistake is making all four wings identical. The result usually looks square. Keeping the upper pair longer and the lower pair shorter produces the proportion visible in most butterfly crochet motifs.
Project Info at a Glance
| Skill Level | Time | Finished Size | Hook | Best For |
|---|---|---|---|---|
| Advanced beginner / Intermediate | 20–40 minutes per butterfly | Approx. 4–7 cm | 3 mm | Garlands, appliqués, bags, décor and gifts |
Materials and Tools
Yarn
- Dark lavender or plum — DK weight — approximately 3–5 g per large butterfly
- Light lavender — DK weight — approximately 2–3 g per small butterfly
- Optional coordinating purple — DK weight — small amount for mixed-size garlands
Cotton yarn gives the wings firmer edges. Acrylic yarn creates a slightly softer motif. For a garland similar to the reference image, combining two or three shades of the same color family gives each butterfly enough contrast without changing the overall palette.
Tools
- 3 mm crochet hook
- Yarn needle
- Small scissors
- Stitch markers, optional
- Blocking pins, optional
Abbreviations
- MR — magic ring
- ch — chain
- sl st — slip stitch
- sc — single crochet
- hdc — half double crochet
- dc — double crochet
- tr — treble crochet
- inc — increase
An invisible decrease is mainly required for stuffed amigurumi pieces; this flat butterfly motif does not require decreases in the wing construction below.
Pattern — Step by Step
Work the butterfly as a flat motif. Keep the center ring firm, but do not pull it so tightly that the four wing sections overlap.
Butterfly Center and Wings
Yarn: lavender, plum or another DK-weight color.
R1: Make an MR.
Work the following sequence into the ring:
- ch 3
- 3 tr
- 2 dc
- ch 3
- sl st into MR
This forms the first large upper wing.
Repeat the same sequence once more for the second upper wing:
- ch 3
- 3 tr
- 2 dc
- ch 3
- sl st into MR
Now make the first smaller lower wing:
- ch 2
- 2 dc
- 2 hdc
- ch 2
- sl st into MR
Repeat for the second lower wing:
- ch 2
- 2 dc
- 2 hdc
- ch 2
- sl st into MR
Pull the magic ring closed until the four wing bases meet at the center. Do not pull so firmly that the wings fold over each other.
Butterfly Body
Cut a separate strand of yarn approximately 25–30 cm long.
Wrap the strand two or three times around the center of the butterfly between the upper and lower wing pairs. Knot securely at the back.
For a thicker crocheted body, attach yarn at the lower center and work:
Row 1: ch 5.
Row 2: Starting in second ch from hook, sc in each ch across (4).
Fasten off. Leave a 15 cm tail and sew the narrow strip vertically over the butterfly center.
Antennae
Attach yarn at the top of the body.
Antenna 1: ch 5, sl st back down the chain.
Return to the center top.
Antenna 2: ch 5, sl st back down the chain.
Fasten off and weave the yarn end into the back of the body.
For smaller butterflies, use ch 3 or ch 4 rather than ch 5. Antennae longer than about one-third of the wing width can curl excessively after handling.
Optional Defined Upper Wings
The reference image includes butterflies with long, pointed upper wings. To make that variation, replace each standard upper-wing sequence with:
- ch 4
- 2 tr
- 1 double treble crochet
- 2 tr
- ch 4
- sl st into MR
The extra height creates a more elongated wing tip while keeping the center compact.
Optional Small Butterfly
Use the same basic construction with shorter stitches.
Make an MR.
Upper wing 1: ch 2, 2 dc, 1 hdc, ch 2, sl st into MR.
Upper wing 2: ch 2, 2 dc, 1 hdc, ch 2, sl st into MR.
Lower wing 1: ch 2, 2 hdc, ch 2, sl st into MR.
Lower wing 2: ch 2, 2 hdc, ch 2, sl st into MR.
Pull the ring closed. Wrap a short yarn strand around the center and add two ch-3 antennae.
This version works well between larger motifs because it prevents a butterfly garland from becoming visually repetitive.
Optional Two-Layer Butterfly
For a more dimensional butterfly, crochet one large motif and one small motif in a lighter or darker shade.
Place the smaller butterfly on top of the larger butterfly. Align both bodies and sew only through the center.
Leave the outer wing edges unattached. They can then sit slightly above the lower layer instead of forming a single flat surface.
Butterfly Garland Cord
The butterflies in the reference image can be joined into a decorative chain rather than sewn separately.
Using the main yarn:
R1: ch 12.
Attach the first butterfly with 1 sl st through the back of its center.
R2: ch 10–16 depending on the spacing required.
Attach the next butterfly with 1 sl st.
Repeat until the garland reaches the required length.
For a dense garland, keep approximately 2–4 cm between motifs. For a lighter arrangement, increase the chain section between butterflies.
Assembly
- Pull the magic ring closed and position the four wings before weaving in the center tail.
- Spread the two upper wings so their tips point slightly upward and outward.
- Position the lower wings below them with a smaller overall span.
- Wrap or sew the body over the center where all four wing bases meet.
- Attach both antennae at the upper edge of the body.
- Weave the wing-center yarn ends through stitches on the reverse side.
- Trim any yarn ends only after they have passed through several stitches.
- Pin the butterfly to shape if the wings curl after crocheting.
- Join multiple butterflies to a chain for a garland, or leave individual motifs separate for appliqué use.
- Allow blocked motifs to dry completely before removing the pins.
The finished butterfly should lie flat at the center while the wing tips remain clearly separated.
7 Technical Tips
- Mark the ring opening. If the first and fourth wing sections overlap, the magic ring has usually been tightened before all wing groups were positioned. Arrange all four sections first, then close the center.
- Control upper-wing length. Upper wings should extend roughly 15–30% farther than the lower wings. Equal wing lengths can make the motif look more like a flower.
- Keep the center narrow. A body wider than about one-quarter of the complete butterfly width can cover the inner wing structure. Wrap the center only two or three times when using DK yarn.
- Check antenna symmetry before fastening off. A one-chain difference is visible on motifs only 4–7 cm wide. Count both chains rather than estimating their length.
- Pin curled wings. If a wing edge rotates toward the center, pin its outer tip and inner edge separately during blocking. Avoid stretching the motif wider than its natural stitch span.
- Match hook size to stitch density. If large gaps appear beside the treble crochet stitches, reduce the hook by 0.25–0.5 mm or tighten the working loops slightly. Excessively dense stitches can make the wings rigid and narrow.
- Hide tails through the body. Loose ends woven only through the outer wings may show from the front. Pass each tail through several center stitches before trimming it.
Using the Crochet Butterflies as a Garland
A mixed-size arrangement matches the layered appearance shown in the reference image more closely than repeating one butterfly size. Place one large butterfly after every two or three small motifs. Rotate individual butterflies slightly rather than aligning every body vertically.
Color placement also affects the final pattern. Dark plum butterflies can form the visual anchors, while lighter lavender motifs fill the spaces between them. A single-color version remains effective when wing sizes vary.
For a hanging garland, join each butterfly through the back of the center body. Avoid attaching through a wing tip because the weight of the next motif can distort that wing.
How to Make the Wings More Defined
The wing outline depends more on stitch height than on adding extra rounds. Treble stitches produce the long upper sections, while half double crochet and double crochet keep the lower pair compact.
If the upper wings appear too round, add one taller stitch at the center of each upper-wing group. If they become too narrow, place an additional treble crochet on each side of the tallest stitch.
Blocking can correct minor differences, but it should not be used to compensate for major stitch-count inconsistencies. Both sides should contain the same stitch sequence before the motif is pinned.
Choosing Yarn for a Lavender Butterfly Motif
DK yarn provides enough stitch definition for small wings while keeping the motif light. Cotton produces crisp edges and works particularly well for appliqués attached to bags, blankets or wall pieces. Acrylic creates a softer shape and can be useful for long decorative garlands.
Very fuzzy yarn makes the inner wing spaces harder to see. Thick chenille also changes the scale significantly, so the compact construction shown here is better suited to smooth DK yarn or light worsted yarn.
For the purple palette in the image, choose one deep plum, one medium lavender and one muted lilac. Using several values of the same hue gives the garland variation without changing its core color scheme.
Adjusting the Butterfly Size
Changing yarn and hook size is the simplest way to scale this pattern. With finer yarn and a smaller hook, the same stitch sequence produces miniature butterflies suitable for cards, clips or jewelry components. Thicker yarn creates motifs suited to wall hangings and larger textile projects.
You can also change stitch height. Replace treble crochet with double crochet for shorter upper wings. To create longer wings, use one double treble crochet at the highest point of each upper section.
Keep the lower wings shorter in every version. That proportion is more important than the exact finished measurement.
Conclusion
This free crochet butterfly pattern uses four controlled wing groups, a narrow center body and short chain antennae to create the lavender motifs shown in the reference style. Make one test butterfly first, measure its finished width, then adjust yarn weight or hook size before producing a full garland. For the closest visual match, combine large plum butterflies with smaller lilac motifs and vary the spacing between them. Save the pattern to Pinterest or share the finished project on Instagram with #LavenderButterflyCrochet. When you arrange your garland, will the largest butterfly sit at the center or repeat at regular intervals?









