Introduction
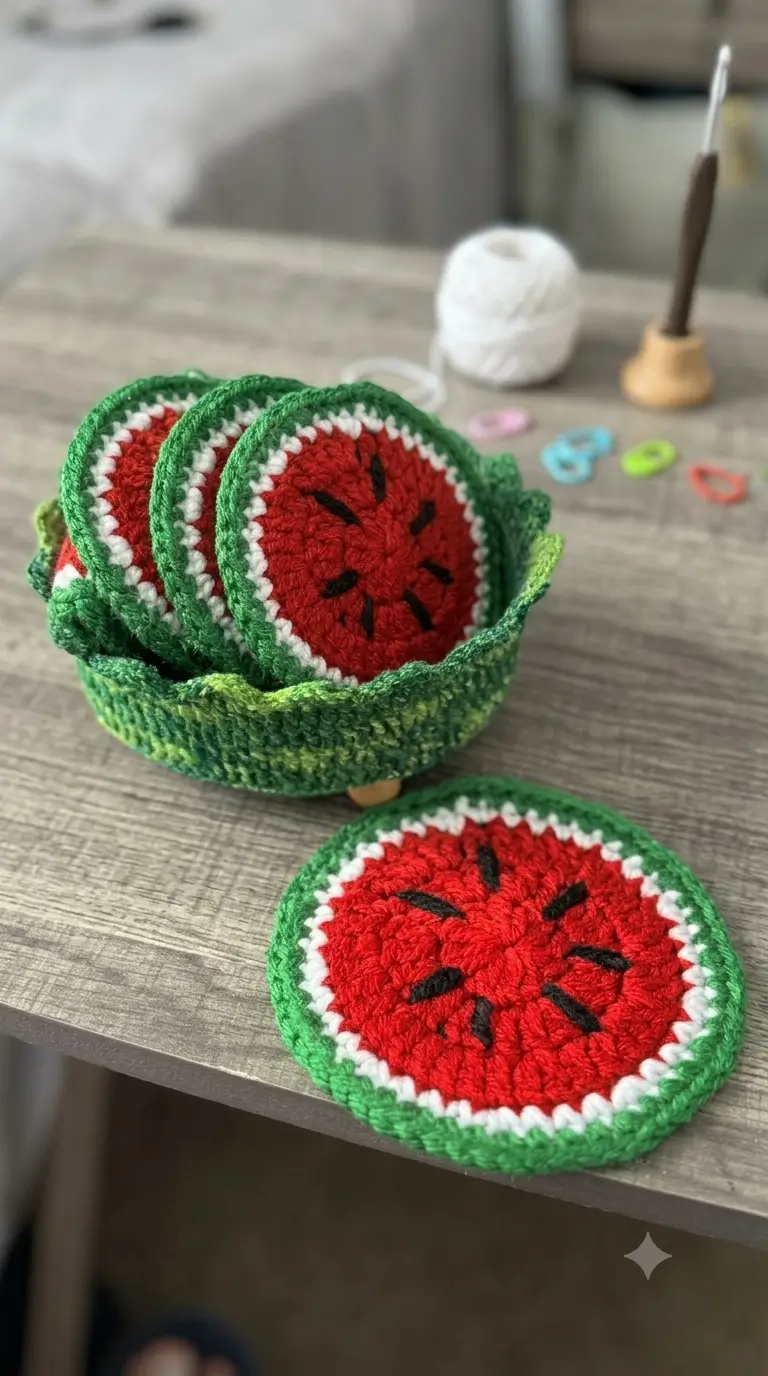
A watermelon slice needs three visible boundaries before it reads correctly: red flesh, pale inner rind, then green skin. This crochet watermelon coaster pattern builds those layers into a 10.5 cm round coaster using DK yarn and a 3 mm hook, then adds a matching low holder. The project suits an advanced beginner and produces a washable table set that stores its own coasters.
The Design: What Makes This Watermelon Set Different
The red center is kept broad because the fruit flesh occupies most of the visible diameter in the reference photo. A narrow white band separates it from the green edge; without that contrast line, a watermelon crochet coaster can read as a generic red-and-green disc. The outer rind is thicker than the white band so the coaster keeps a clean circular outline.
Black seeds are embroidered after the crochet is complete. This keeps the working rounds regular and lets the maker vary seed angle without interrupting stitch math. The matching watermelon coaster holder repeats the green rind instead of introducing another color.
One frequent failure is adding the green round too early. That shrinks the apparent flesh area and makes the finished crochet fruit coaster look more like a decorative target than a watermelon cross-section.
Project Info at a Glance
| Skill Level | Time | Finished Size | Hook | Best For |
|---|---|---|---|---|
| Advanced beginner | About 35–50 min per coaster; holder extra | 10.5 cm coaster | 3.0 mm | Drink coasters, kitchen sets, market-table sets |
Materials and Tools
Yarn
- Watermelon red — DK/light #3 — start with 25 g for a four-coaster set — cotton or cotton-blend
- White — DK/light #3 — start with 10 g — cotton or cotton-blend
- Medium green — DK/light #3 — start with 20 g — cotton or cotton-blend
- Dark green — DK/light #3 — start with 20 g — cotton or cotton-blend
- Black — DK yarn or embroidery-weight strand — under 5 g — used only for seeds
The gram quantities are practical allowances for a four-coaster set and holder. Exact consumption varies with yarn construction and tension.
Tools
- 3.0 mm crochet hook
- Tapestry needle
- Scissors
- Locking stitch marker
- Measuring tape
- Rust-resistant blocking pins
- Optional non-slip fabric dots
No safety eyes are required. The black details are embroidered watermelon seeds.
Abbreviations
- MR — magic ring
- sc — single crochet
- inc — 2 sc in the same stitch
- dec — single-crochet decrease
- sl st — slip stitch
- ch — chain
- BLO — back loop only
- st/sts — stitch/stitches
- FO — fasten off
For an invisible decrease, insert the hook under the front loop of each of the next two stitches, then complete one single crochet through the collected loops.
Pattern — Step by Step
Work in a continuous spiral unless a joined decorative edge is specified. Use a stitch marker to identify the first stitch of each round.
Watermelon Flesh Disc — Make 4
Yarn: watermelon red.
R1: 6 sc in MR (6)
R2: inc ×6 (12)
R3: (sc, inc) ×6 (18)
R4: (2 sc, inc) ×6 (24)
R5: (3 sc, inc) ×6 (30)
R6: (4 sc, inc) ×6 (36)
Lay the piece flat after R6. If the center cups noticeably, relax the working tension before continuing rather than adding unplanned stitches.
R7: (5 sc, inc) ×6 (42)
The coaster now reaches a 42-stitch flat-circle plateau.
Do not fasten off.
White Inner Rind — Make as Part of Each Coaster
Yarn: white.
Change to white on the last yarn-over of R7.
R8: sc in each st around (42)
Keep this band to one round. A wide white section changes the fruit proportion and weakens the contrast between flesh and skin.
Do not fasten off.
Green Outer Rind — Make as Part of Each Coaster
Yarn: medium green, then dark green.
Change to medium green.
R9: sc in each st around (42)
Change to dark green.
R10: sl st loosely in each st around (42)
Fasten off. Leave a 12 cm tail and weave it through the back of the dark-green edge.
This final slip-stitch ring adds visual weight without increasing the diameter by another full single-crochet round. If the edge contracts, redo the round with a larger hook or deliberately loose slip stitches.
Black Seed Embroidery — Repeat on All 4 Coasters
Yarn: black.
Thread approximately 60 cm of black yarn onto a tapestry needle.
Place 7–9 seeds per coaster.
Each seed uses two short overlapping surface stitches, approximately 7–9 mm long. Angle each mark toward the center of the disc rather than aligning all seeds vertically.
Keep the innermost seed at least 18 mm from the magic-ring center. Keep the outermost seeds roughly 15 mm inside the white rind.
Do not pull hard enough to pucker the red disc.
Fasten the black yarn on the reverse with two small woven passes under red stitches rather than a bulky knot.
Holder Base
Yarn: dark green.
The holder base should be only slightly larger than a coaster so a stacked set does not slide sideways.
R1: 6 sc in MR (6)
R2: inc ×6 (12)
R3: (sc, inc) ×6 (18)
R4: (2 sc, inc) ×6 (24)
R5: (3 sc, inc) ×6 (30)
R6: (4 sc, inc) ×6 (36)
R7: (5 sc, inc) ×6 (42)
Measure the base. It should sit close to the coaster diameter.
Holder Lower Wall
Yarn: dark green.
R8: BLO sc in each st around (42)
R9: sc in each st around (42)
R10: sc in each st around (42)
The BLO round forms a visible fold between the base and the wall and directs the sides upward.
Holder Watermelon Stripe
Yarn: medium green.
Change to medium green.
R11: sc in each st around (42)
R12: sc in each st around (42)
Change back to dark green.
R13: sc in each st around (42)
At this stage the holder is a low circular basket. The raised back section supports the stacked watermelon coasters while leaving the front accessible.
Holder Raised Back Section
Yarn: dark green.
Flatten the holder and mark a centered 24-stitch section along the back half.
Row 1: join yarn at first marker, ch 1, sc across 24 sts, turn (24)
Row 2: ch 1, dec, 20 sc, dec, turn (22)
Row 3: ch 1, sc across, turn (22)
Row 4: ch 1, dec, 18 sc, dec, turn (20)
Row 5: ch 1, sc across, turn (20)
Row 6: ch 1, dec, 16 sc, dec, turn (18)
Row 7: ch 1, sc across (18)
Fasten off. Leave a 15 cm tail.
This creates the higher green wall visible behind the stacked watermelon slices while keeping the front lower.
Holder Side Wings — Make 2
Yarn: medium green.
Row 1: ch 7, sc in second ch from hook and across (6)
Row 2: ch 1, sc across (6)
Row 3: ch 1, dec, 2 sc, dec (4)
Row 4: ch 1, sc across (4)
Row 5: ch 1, dec ×2 (2)
Row 6: ch 1, dec (1)
Fasten off. Leave a 20 cm sewing tail.
Sew one wing to each side of the holder, with the broad six-stitch edge positioned at the base and the narrow point directed upward.
Holder Edge Trim
Yarn: dark green.
Join at the low front edge.
Work sl st evenly around the entire holder rim, including the side wings and raised back section.
At each pointed wing tip, work: sl st, ch 1, sl st in the same location.
Continue around and join to the first slip stitch.
Fasten off. Weave the tail along the inside wall.
The holder is complete when four dry coasters can stand inside without the wall collapsing outward.
Assembly
- Block each coaster to approximately 10.5 cm diameter.
- Allow all four discs to dry flat before adding seed embroidery if wet blocking has been used.
- Position 7–9 black seeds on each red center and check the spacing from the white rind before stitching.
- Finish every black yarn tail on the reverse so no knot sits beneath a drinking glass.
- Shape the holder base flat, then press the BLO fold between R7 and R8 with your fingers.
- Center the raised back section opposite the low front opening.
- Pin the two side wings into the transitions between the low and high walls.
- Sew the wing edges through both loops of the wall stitches, keeping the seam inside the basket.
- Place the four finished coasters into the holder and check that the side walls grip the stack without bending the discs.
- Trim or weave every remaining tail, then re-form the circular rim by hand.
The completed set consists of four 10.5 cm watermelon coasters and one matching green storage holder.
7 Technical Tips
- Use a stitch marker at every round transition. Losing the R6-to-R7 boundary often produces 41 or 43 stitches instead of the required 42, which creates a visible flat spot or ripple.
- Keep the finished disc close to 10.5 cm. If R10 measures more than roughly 11 cm before blocking, the hook, yarn, or tension is producing a larger fabric than the intended size.
- Do not over-tighten the final slip-stitch rind. A contracted edge causes the coaster to cup upward by several millimeters rather than resting flat beneath a glass.
- Place seeds only after the red disc is structurally complete. Embroidering before the white and green rounds makes it harder to judge the required 15 mm visual margin from the rind.
- Pin both holder wings before sewing either one. A 5–8 mm height difference between the two sides is easy to create and makes the coaster stack lean.
- Use the invisible-decrease method on holder shaping rows. A normal decrease can leave a raised bar at the side transition, particularly with smooth cotton yarn.
- Weave tails across at least 3 cm of reverse-side stitches. Short tails can work loose during repeated washing, while large knots create bumps beneath a cup.
Conclusion
Finish one test coaster before producing the full set, then compare its blocked diameter with the 10.5 cm target and adjust hook size only if needed. That single measurement keeps the four discs uniform and helps the holder fit without excessive side pressure. Photograph one coaster flat, one inside the holder, and the complete stacked set so readers can see both the stitch structure and the storage design. Save the finished crochet watermelon coaster pattern to Pinterest and share the completed set on Instagram with #WatermelonCoasterSet. Would you keep the rind in two shades of green, or make the outer edge entirely dark green?









