Introduction
A raised apron seam around the toe is what makes a moccasin look different from an ordinary crochet bootie. These crochet baby moccasin booties reproduce that structure with DK yarn, a 4 mm hook and a finished sole close to 9 cm. The project suits an intermediate maker because the toe panel must be centered accurately. Its low-profile construction also makes the pair useful for pre-walking indoor wear or photography.
The Design: What Makes These Moccasins Different
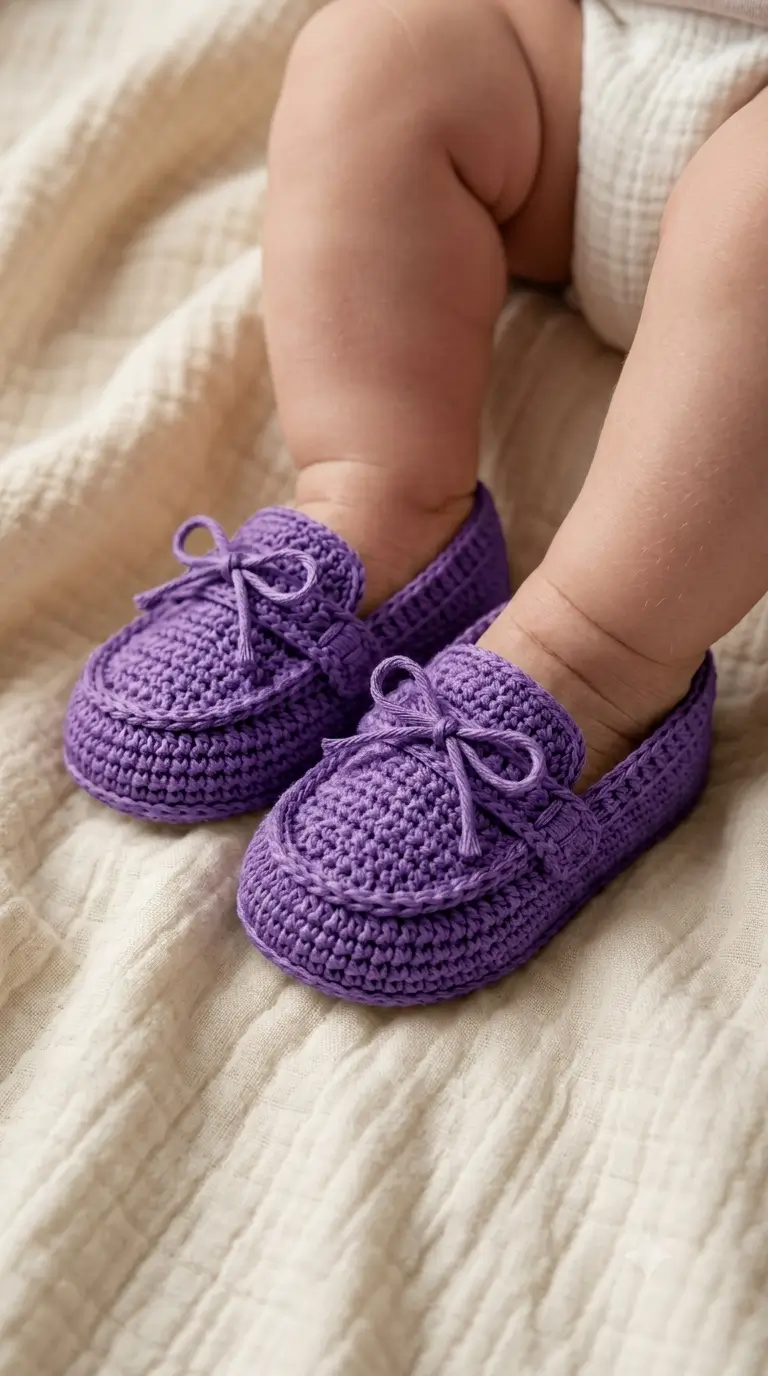
Three structural choices define this crochet baby moccasin booties design. First, the sole is worked as a flat oval rather than a circular amigurumi base because a shoe requires extra length without equal expansion in every direction. Second, the rounded vamp is made separately and attached across the front opening. That produces the raised moccasin apron visible in the photograph instead of relying only on decreases to shape the toe.
The low heel is the third decision. A tall ribbed cuff would change the silhouette into a conventional bootie, while the photographed pair sits below the ankle and uses a lace to control the opening.
A frequent mistake in a crochet baby loafers pattern is sewing the vamp one or two stitches off center. The error may look minor on the worktable, but the finished toe then rotates toward one side. Mark the sole centerline before attaching the panel.
Project Info at a Glance
| Skill Level | Time | Finished Size | Hook | Best For |
|---|---|---|---|---|
| Intermediate | 3–4 hours per pair | Approx. 9 cm sole | 4.0 mm | Pre-walking indoor wear, photo styling, handmade gifts |
The 9 cm reference size and 4 mm hook pairing are consistent with published DK baby-bootie sizing.
Materials and Tools
Yarn
- Purple DK/light-worsted yarn — 35–40 g — a smooth cotton, cotton-acrylic or soft baby acrylic works for clear stitch definition.
- Purple yarn for laces and piping — included in the 35–40 g allowance — use the same yarn for the monochrome photographed finish.
A recent DK bootie tutorial reports approximately 35 g of yarn, which provides a useful material benchmark for a small pair.
Tools
- 4.0 mm crochet hook
- Tapestry needle
- 2 locking stitch markers
- Flexible measuring tape
- Small scissors
- Rust-proof pins for positioning the vamp
No safety eyes, buttons, beads or stuffing are required.
Abbreviations
- ch — chain
- sc — single crochet
- hdc — half double crochet
- dc — double crochet
- inc — two stitches in one stitch
- dec — single crochet two together
- sl st — slip stitch
- BLO — back loop only
- FLO — front loop only
- st/sts — stitch/stitches
An invisible decrease draws the front loops of two adjacent stitches together before completing one single crochet, reducing bulk on shaped areas.
Pattern — Step by Step
This is an original, photo-inspired construction rather than a transcription of any commercial pattern. Measure the first completed sole before continuing. Yarn structure, hook style and personal gauge can change an infant shoe by more than one size.
Unlike an amigurumi sphere, a footwear sole must lengthen faster than it widens. Six-stitch circular increase rules and a six-single-crochet magic ring therefore do not apply to this oval foundation.
Sole — Make 2
Yarn: purple DK
Ch 11.
R1: Sc in second ch from hook and next 8 ch, 5 sc in final ch. Rotate the work and crochet along the unused side of the foundation chain: sc in next 8 ch, 4 sc in final foundation loop. Join with sl st. (26)
R2: Ch 1. Inc in first 2 sts, sc in next 8 sts, inc in next 5 sts, sc in next 8 sts, inc in final 3 sts. Join. (36)
R3: Ch 1. Sc in first st, inc in next st, sc in next 10 sts, alternate sc and inc across the front curve until five additional stitches have been added, sc evenly down the opposite side, then distribute three increases around the heel curve. (44)
At this point, measure heel to toe without stretching. The target is approximately 9 cm.
If the sole is more than 5 mm long, change hook size rather than removing random stitches.
Fasten off only after confirming both soles match.
Sidewall / Shoe Body — Make 2
Yarn: purple DK
Join yarn at the center back.
R1: Ch 1, sc BLO around. Join with sl st. (44)
R2: Ch 1, sc around through both loops. Join. (44)
R3: Ch 1, sc around. Join. (44)
The BLO round produces a visible change of direction between outsole and upper.
Place one marker at the toe center. Count 10 stitches toward the left and place a second marker. Return to toe center, count 10 stitches toward the right and place the third working reference with a scrap of yarn if needed.
Heel and Quarters
Yarn: purple DK
The back and side quarters form the low opening visible behind the vamp.
Row 1: Beginning at the left front marker, sc around the heel to the right front marker. (24)
Row 2: Ch 1, turn, sc across. (24)
Row 3: Ch 1, turn, dec, sc 20, dec. (22)
Row 4: Ch 1, turn, sc across. (22)
Row 5: Ch 1, turn, dec, sc 18, dec. (20)
Fasten off. Leave a 15 cm tail for tidying the front corners if required.
The quarter should finish below the ankle. Extending these rows changes the shoe from a moccasin profile into an ankle boot.
Rounded Vamp — Make 2
Yarn: purple DK
Ch 9.
Row 1: Sc in second ch from hook and across. (8)
Row 2: Ch 1, turn, inc, sc 6, inc. (10)
Row 3: Ch 1, turn, inc, sc 8, inc. (12)
Row 4: Ch 1, turn, sc across. (12)
Row 5: Ch 1, turn, inc, sc 10, inc. (14)
Rows 6–7: Ch 1, turn, sc across. (14)
Row 8: Ch 1, turn, dec, sc 10, dec. (12)
Row 9: Ch 1, turn, dec, sc 8, dec. (10)
Do not fasten off yet.
Work single crochet evenly down one side, around the rounded front and up the opposite side. Avoid adding stitches to the straight back edge.
Fasten off with a 35 cm sewing tail.
Pin the curved front of the panel over the toe. Its widest point should cross the shoe centerline at exactly 90 degrees to the long axis of the sole.
Raised Moccasin Piping — Make 2
Yarn: purple DK
Join yarn at one rear corner of the vamp after the panel has been pinned or sewn.
Slip stitch through both the vamp edge and the upper beneath it, working around the curved perimeter of the toe panel.
Keep every slip stitch relaxed enough that the panel remains flat.
Fasten off. Leave a 10 cm tail and bury it inside the upper.
This surface line creates the corded apron edge that gives the shoe its moccasin profile.
Tongue — Make 2
Yarn: purple DK
Ch 8.
Row 1: Sc in second ch from hook and across. (7)
Rows 2–5: Ch 1, turn, sc across. (7)
Row 6: Ch 1, turn, dec, sc 3, dec. (5)
Row 7: Ch 1, turn, sc across. (5)
Fasten off with a 20 cm tail.
Sew the lower edge of the tongue behind the vamp so approximately 4–5 rows remain visible above the toe panel.
Do not stitch the tongue to the side quarters. It needs enough free movement for the opening to spread when the shoe is put on.
Lace Loops
Yarn: purple DK
At the upper front corner of the left quarter, join yarn.
Ch 3, sl st into the same edge location to make a small loop.
Fasten off.
Repeat at the right front corner.
Make two loops per shoe if a more secure lace path is wanted, spacing the second pair approximately 8–10 mm behind the first.
Crochet Laces — Make 2
Yarn: purple DK
Ch until the cord measures approximately 45 cm without stretching.
Sl st loosely back through every chain for a rounded cord, or leave the chain unworked for a finer lace closer to the photographed pair.
Fasten off.
Thread the cord through the lace loops and tie a small bow over the tongue.
Safety note: Loose cords should not be left within reach of an unattended infant.
Assembly
- Place both soles side by side and compare their heel-to-toe measurements; correct any difference greater than 3 mm before building the uppers.
- Work the three sidewall rounds on each sole, keeping the center-back join in the same position.
- Crochet each low heel-and-quarter section and check that its front endpoints mirror one another.
- Fold each sole lightly along its long axis and mark the exact toe center.
- Pin each vamp with its central stitch aligned to that marker, then sew the curved edge to the upper.
- Work the slip-stitch piping around the vamp edge without pulling the panel inward.
- Sew each tongue behind the straight rear edge of the vamp, leaving the upper rows free.
- Form the lace loops at matching heights on both front quarters.
- Thread one approximately 45 cm cord through each shoe and tie it over the tongue.
- Weave every yarn tail into several neighboring stitches on the inside, trim the ends and measure both finished soles again.
The completed pair should have matching 9 cm soles, centered toe panels and low heel openings.
7 Technical Tips
- Use the center-back stitch as a permanent reference point. Losing that reference can rotate the toe shaping several stitches sideways, which becomes obvious after the vamp is attached.
- Stop adding material once the sole reaches about 9 cm. A difference of only 5–10 mm can move an infant shoe into another size range.
- Do not pack the toe with stuffing. These are shoes, not amigurumi; stuffing changes the fit and permanently stretches the vamp.
- Keep the vamp center within one stitch of the sole centerline. A two-stitch shift can make the finished apron look visibly twisted even when the sole itself is symmetrical.
- Work the decorative piping with lower tension than ordinary single crochet. Tight slip stitches can shorten the curved edge and cause the toe panel to cup upward.
- Pin at three points before sewing: center toe and both rear vamp corners. Attaching one side first without those references frequently leaves excess fabric on the opposite side.
- Bury lace-loop tails for at least 3 cm through dense stitches. A short tail can pull out under repeated tension from tying and untying the bow.
Sizing Notes
Infant footwear should be sized by finished sole length, not age alone. Published patterns vary considerably in their age labels, so the same 9 cm sole may be assigned to different age ranges by different designers.
That discrepancy does not necessarily mean the measurements are incorrect. Yarn thickness, gauge, intended ease and sizing conventions can all change the recommended age range.
Measure the baby’s foot and compare it with the finished crochet sole rather than choosing a pattern only from an age heading. The photographed pair appears fitted with limited excess length, which contributes to the loafer-like silhouette.
Why the Raised Vamp Matters
The toe panel carries most of this design’s visual identity. Standard baby booties often form the forefoot by decreasing stitches directly across the front of a continuous upper. That method creates a single shell.
A moccasin requires a different visual boundary.
Here, the vamp sits visibly over the upper and receives its own corded edge. The seam traces a rounded U-shape around the forefoot. That construction gives a lace-up baby booties crochet pattern more definition without adding buttons, beads or appliqués.
The tongue also changes the proportions. If it is too wide, it hides the front quarters. If it is too narrow, the gap beside the tongue becomes dominant. A finished width near 3–3.5 cm is a practical target for a 9 cm sole.
Yarn and Gauge Adjustments
Hook number alone cannot control fit. Different DK and light-worsted yarns can produce noticeably different sole lengths even when the same hook is used.
If the sole measures too long, change to a smaller hook first. Removing foundation chains alters both toe and heel proportions, so it requires rewriting later stitch placement.
When changing yarn, crochet one sole as the gauge specimen. Measure it on a flat surface. A dense fabric is preferable for shape retention, but the sole should still flex easily between the fingers.
The photographed yarn has clear stitch definition rather than a fuzzy halo. Cotton, cotton-acrylic or a smooth baby acrylic will reproduce that surface more closely than chenille or velvet.
Photo-Matching Details
Color matters less here than construction. The uploaded pair uses one violet shade from sole through lace, so the seam lines come from relief and shadow rather than contrasting yarn.
Keep the sidewall low. Make the vamp broad. Let the piping sit slightly proud of the panel.
The bow should fall over the base of the tongue rather than at ankle height. A lace positioned too high makes the pair resemble miniature trainers.
Also watch the heel. The photographed shoe rises just enough to cup the back of the foot. Adding several extra quarter rows would produce a more conventional bootie and remove much of the loafer profile.
Conclusion
Measure the first sole before making the second; the target for this version is approximately 9 cm from heel to toe. After that measurement is fixed, concentrate on the feature that controls the final appearance: the centered rounded vamp and its raised slip-stitch border. Keep the heel low, position the tongue directly behind the toe panel and compare both shoes before weaving the final tails. Save the finished crochet baby moccasin booties to Pinterest or share the pair on Instagram with #PurpleMoccasinBooties. For the next version, record the actual finished sole length beside the hook and yarn label. Would you keep the monochrome purple laces, or work the apron piping in a second color?









