Introduction
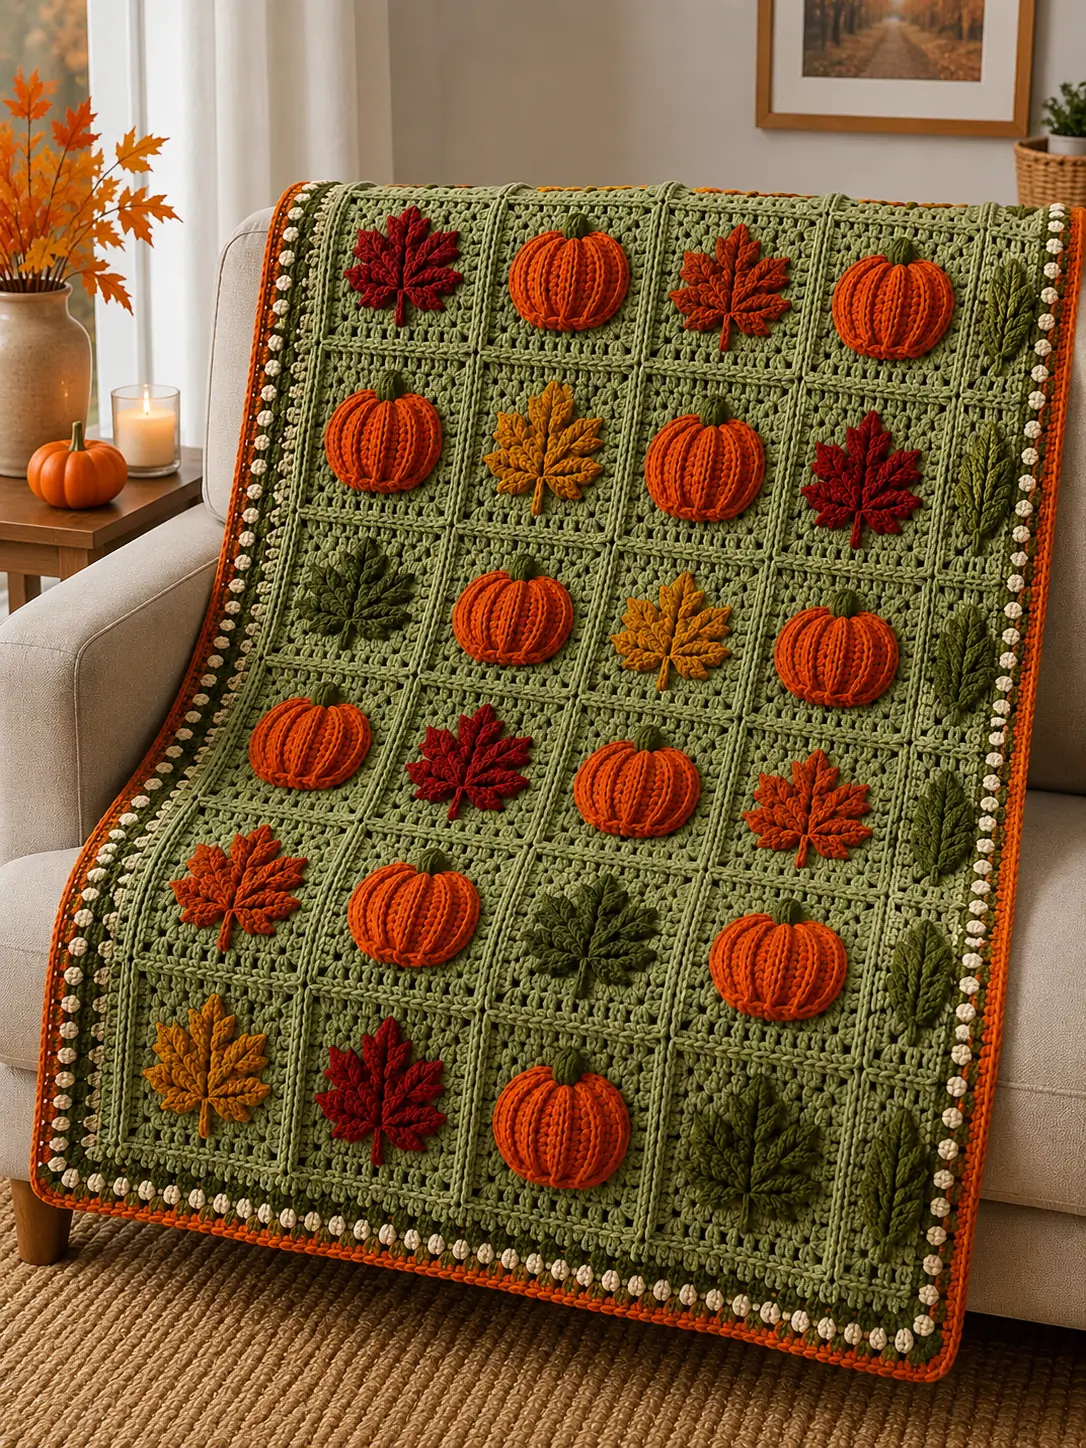
Pumpkins do not stay spherical when they are sewn flat to a blanket, so the ribs have to supply the missing volume. This fall pumpkin crochet blanket pattern uses twenty sage panels, ten raised pumpkins, ten maple leaves and a contrasting border to produce an approximately 104 × 128 cm throw. Work with Aran or worsted yarn at intermediate level. The modular format makes damaged or stained panels individually replaceable.
The Design: What Makes This Autumn Throw Different
Three structural choices control the result. First, each motif sits on its own green panel rather than being worked as intarsia; that gives the pumpkins and leaves enough relief to remain visible against one dominant background. Second, the pumpkin is made as a ribbed appliqué, because vertical ridges imitate pumpkin segments more closely than a plain flat disk. Third, the crochet maple leaf applique uses multiple stitch heights and pointed lobes so the outline remains recognizable.
The joining lines are also part of the composition rather than hidden seams. A raised join divides the surface into a measured grid and prevents the appliqués from reading as one crowded field. A common error in an autumn crochet blanket of this type is sewing motifs on before every square has been blocked to equal dimensions; irregular panels then force the seams to wave.
Project Info at a Glance
| Skill Level | Time | Finished Size | Hooks | Best For |
|---|---|---|---|---|
| Intermediate | 30–40 hours | Approx. 104 × 128 cm | 6.5 mm panels; 4.0 mm motifs | Sofa throw, autumn display blanket |
Materials and Tools
Yarn
- Sage/olive green — Aran/worsted — 900 g target
- Burnt orange — Aran/worsted — 180 g target
- Rust red — Aran/worsted — 50 g
- Mustard — Aran/worsted — 40 g
- Dark olive — Aran/worsted — 40 g
- Rust/copper — Aran/worsted — 40 g
- Cream — Aran/worsted — 100 g
- Brown or deep green — Aran/worsted — 20 g
Tools
- 6.5 mm crochet hook for panels
- 4.0 mm crochet hook for appliqués and detailed edging
- 5.0 mm crochet hook optional for border adjustment
- Tapestry needle
- Locking stitch markers
- Scissors
- Tape measure
- Blocking mats and rust-resistant pins
No safety eyes or stuffing are required.
Abbreviations
- MR — magic ring
- ch — chain
- sc — single crochet
- hdc — half double crochet
- dc — double crochet
- tr — treble crochet
- inc — 2 stitches in one stitch
- dec — decrease
- sl st — slip stitch
- st/sts — stitch/stitches
- BLO — back loop only
- yo — yarn over
- pc — popcorn stitch
For an invisible decrease, insert the hook through the front loop of each of the next two stitches, yarn over, draw through both front loops, then complete the single crochet.
Pattern — Step by Step
Gauge Panel and Finished Module
With the 6.5 mm hook, work a test swatch in the chosen panel stitch. The objective is a blocked 24 × 24 cm module. Exact stitch gauge matters less than identical finished panel measurements because all twenty pieces must join without puckering.
The photo shows a compact open-texture square. The following mesh-like panel construction reproduces that visual weight.
Sage Square Panel — Make 20
Yarn: sage/olive.
With 6.5 mm hook:
Row 1: Ch 37. Hdc in 2nd ch from hook and across. (36)
Row 2: Ch 1, turn, hdc in each st across. (36)
Row 3: Ch 3, turn, sk 1 st, dc in next st, *ch 1, sk 1, dc in next st* across. (18 dc + 17 ch-1 spaces)
Row 4: Ch 1, turn, hdc in every dc and ch-1 space, placing the final hdc into turning chain. (36)
Rows 5–22: Repeat Rows 3–4 nine times.
Row 23: Ch 1, turn, hdc in each st across. (36)
Row 24: Ch 1, turn, hdc in each st across. (36)
Fasten off, leaving a 25 cm tail only if that tail will be used for joining.
Block every square to 24 × 24 cm. Do not attach a motif to a square that is more than 5 mm outside the target width or height.
Ribbed Pumpkin Appliqué — Make 10
Yarn: burnt orange; 4.0 mm hook.
The pumpkin is worked flat in short ribbed rows, then shaped by sewing.
Row 1: Ch 14. Hdc in 2nd ch from hook and across. (13)
Row 2: Ch 1, turn, hdc BLO across. (13)
Rows 3–18: Repeat Row 2. (13)
Fasten off with a 35 cm tail.
Bring Row 1 and Row 18 together and whipstitch them to form a ribbed tube. Thread the yarn through the row ends along one long edge and draw them inward, but do not close the opening completely. Flatten the tube into an oval, then secure the opposite edge with several anchoring stitches.
The finished pumpkin should measure roughly 9–11 cm wide.
Use orange yarn to make two or three controlled tacking stitches from top to bottom through the center. These stitches pull the middle inward and divide the ribbed surface.
Fasten off. Leave a separate 50 cm sewing strand for attachment.
Pumpkin Stem — Make 10
Yarn: dark olive or brown.
Row 1: Ch 6. Sc in 2nd ch from hook and next 4 ch. (5)
Row 2: Ch 1, turn, sc BLO across. (5)
Row 3: Ch 1, turn, sc BLO across. (5)
Fasten off, leaving a 20 cm tail.
Fold the stem slightly lengthwise and stitch it behind the top center of the pumpkin before the pumpkin is attached to its panel.
Maple Leaf Appliqué — Make 10
Use a mixed palette: approximately three red, three mustard or rust, two copper and two dark olive leaves.
Yarn: Aran/worsted; 4.0 mm hook.
R1: 6 sc in MR. Join with sl st. (6)
R2: Ch 1, inc in each st around. Join. (12)
R3: *Sc in next st, inc in next st* ×6. Join. (18)
Do not fasten off. The five lobes are worked around the outer edge.
Lobe 1: Ch 5, sl st in 2nd ch from hook, sc in next ch, hdc in next ch, dc in next ch; sl st into next 3 sts of R3.
Lobe 2: Ch 7, sl st in 2nd ch, sc, hdc, dc, tr, dc across remaining chains; sl st into next 3 sts of R3.
Center Lobe: Ch 9, sl st in 2nd ch, sc, hdc, dc, tr in next 2 ch, dc, hdc across; sl st into next 4 sts of R3.
Lobe 4: Repeat Lobe 2 over the next 3 available base stitches.
Lobe 5: Repeat Lobe 1 over the remaining base stitches.
For the stem, ch 8 from the base of the fifth lobe, sl st back through all 7 chains, then sl st into the base round.
Fasten off with a 45 cm tail for sewing.
Steam or wet-block the leaf under pins so all five points are clearly defined.
Raised Vein — Make on Each Leaf
Thread matching or slightly darker yarn onto a tapestry needle.
Sew one straight line from stem to center lobe. Add four diagonal branches, one toward each side lobe. Keep the embroidery loose enough that the leaf remains flat.
Blanket Layout
Arrange the twenty panels in five rows of four.
| Leaf | Pumpkin | Leaf | Pumpkin |
| Pumpkin | Leaf | Pumpkin | Leaf |
| Leaf | Pumpkin | Leaf | Pumpkin |
| Pumpkin | Leaf | Pumpkin | Leaf |
| Leaf | Pumpkin | Leaf | Pumpkin |
Rotate leaf colors so identical shades do not share a horizontal edge.
Attaching the Pumpkin Motifs
Center each pumpkin on its square with at least 6 cm clearance from the square edge.
Pin at the top, bottom and two sides. Sew around the outer back edge using small whipstitches. Do not pull the center ribs flat; only the perimeter is anchored tightly. Add one hidden tack at the center back if the pumpkin tips outward more than 15 mm.
Attaching the Maple Leaves
Place each leaf so the center lobe points toward the top of the blanket.
Pin all five lobes before sewing. Stitch the center, outer lobe edges and stem. Leave the last 5–8 mm of each pointed lobe unstitched so the shape remains distinct.
Raised Joining Seam
Yarn: sage.
Place two squares wrong sides together.
With the 6.5 mm hook, join through both edge loops and work sc evenly from one corner to the next. Keep the seam on the right side so it forms the raised grid visible in the design.
Join four squares into each horizontal row first. Then join the five completed rows vertically.
The finished blanket body should measure about 96 × 120 cm before the outer border, assuming each blocked square is 24 cm.
Foundation Border
Yarn: sage; 5.0–6.5 mm hook according to edge tension.
R1: Join sage in any corner. Sc evenly around the complete blanket, placing 3 sc in each corner. Join with sl st.
R2: Ch 1, sc in each st around, placing 3 sc in each corner center stitch. Join.
Keep the edge flat. If it begins to flare, work fewer stitches along the panel sides. If it draws inward, add stitches evenly across the affected section.
Cream Popcorn Border
Yarn: cream.
To make pc: work 5 dc in the same stitch, remove hook from active loop, insert hook through first dc, pick up active loop and pull through.
R3: Attach cream. *Sc in next 3 sts, pc in next st* around, adjusting the final repeat near each corner. Place 3 sc in every corner stitch. Join.
Do not force an exact four-stitch repeat through a corner. The corners must remain flat.
Orange Outer Edge
Yarn: burnt orange.
R4: Join orange. Ch 1, sc in each stitch around; place 3 sc in each corner. Join.
R5: Ch 1, reverse sc in each stitch around, working one reverse sc in each corner stitch. Join.
Fasten off. Weave the final tail through at least 6 cm of neighboring stitches.
Assembly
- Block all twenty sage panels to 24 × 24 cm and allow them to dry fully before measuring again.
- Shape all ten pumpkins, attach their stems, and keep the dimensional centers uncompressed.
- Block all ten maple leaves with the five lobe points pinned separately.
- Lay out the five-by-four checkerboard and photograph the arrangement before moving any pieces.
- Pin each pumpkin or leaf at the center of its assigned panel, maintaining roughly equal margin on all sides.
- Sew the leaves first, working around the center and lobe bases while leaving the final points slightly free.
- Sew the pumpkins around their back perimeter and add one center tack only when needed to control projection.
- Join the panels into five horizontal strips with the raised seam facing the front, then join those strips vertically.
- Work two sage foundation rounds, the cream popcorn round and the orange finishing rounds.
- Weave every tail through multiple stitch directions, block the complete blanket to approximately 104 × 128 cm, and trim no end until the fabric is dry.
The completed piece is a 20-panel autumn throw with ten raised pumpkins, ten maple leaves and a two-color dimensional border.
7 Technical Tips
- Stitch-marker drift: Mark the first and last stitch of every panel row. Losing one edge stitch can reduce a square by 1–2 cm after twenty-four rows and create a visibly stepped joining seam.
- Pumpkin compression: Do not stitch through every rib when attaching the appliqué. A pumpkin flattened below roughly 10–15 mm of relief loses the segmented appearance that separates it from a plain orange oval.
- Leaf curling: Pin all five lobe points during blocking. One unblocked lobe turning upward by even 5 mm is conspicuous beside a flat neighboring leaf.
- Panel-size mismatch: Rework any blocked square more than 5 mm outside the 24 cm target. A four-square row can otherwise accumulate 2 cm of misalignment before the vertical joins are added.
- Raised-seam puckering: The joining single crochets must match the panel-edge spacing rather than being packed into every visible gap. Excess joining stitches produce a ruffled grid; too few pull the blanket inward at each seam.
- Popcorn-border flare: Check the border after every 30–40 cm. If the cream round begins to wave, reduce the number of plain sc between popcorns near that section instead of correcting the distortion in the orange edge.
- Tail failure: Weave each joining and appliqué tail through at least 6 cm of fabric and change direction once. A short straight tail can migrate out during washing, particularly where three-dimensional pumpkins are repeatedly handled.
Conclusion
Block one 24 cm sage panel and make one pumpkin plus one maple leaf before committing yarn to the remaining nineteen modules. That sample establishes scale, motif clearance and border proportions while corrections are still inexpensive. Once those measurements hold, batch the panels first, the pumpkins second and the leaves by color; the repeated workflow reduces counting errors. Photograph the finished grid square-on for Pinterest, then post a detail image of the raised pumpkin ribs on Instagram with #FallPumpkinMapleBlanket. This fall pumpkin crochet blanket pattern can also be extended to six rows without altering any motif instructions. Which leaf distribution fits your version better: equal red, mustard, rust and olive, or a stronger red-and-orange bias?









