Introduction
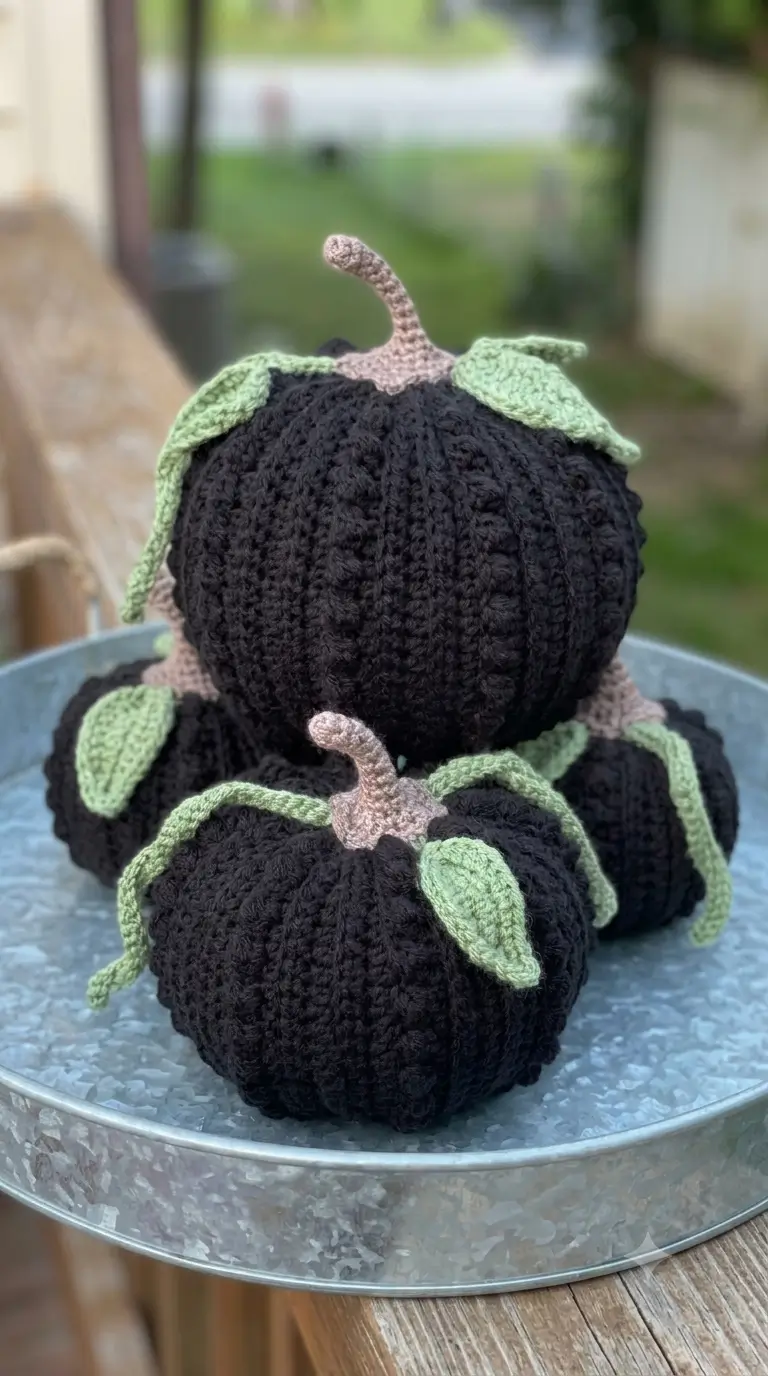
A black pumpkin needs its ribs to read clearly, or the silhouette collapses into a plain sphere. This black pumpkin amigurumi crochet pattern uses a 42-stitch body, external sculpting lines, a curved brown stem, green leaves, and narrow tendrils to reproduce the structure visible in the reference photo. Worked in worsted-weight yarn with a 3.5 mm hook, the medium version measures approximately 11–13 cm across and suits an intermediate-level maker. The compact construction also makes it practical for grouped Halloween table displays.
The Design: What Makes This Black Crochet Pumpkin Different
The body is built as a closed sphere first, then compressed vertically with eight sculpting lines. That second operation matters because stuffing alone creates a ball rather than the deep pumpkin lobes visible in the photograph. A 42-stitch plateau gives enough circumference for defined sections without making the finished piece oversized. The stem begins as a narrow six-stitch tube before expanding into a flat cap, which keeps it upright while still allowing a curved profile. Three green leaves break up the dark body and are positioned asymmetrically around the stem. This construction gives the crochet black pumpkin a botanical profile instead of a generic round ornament. A common error in a Halloween pumpkin crochet pattern is pulling the shaping strands too tightly; that produces sharp folds and exposes stuffing between stitches.
Project Info at a Glance
| Skill Level | Time | Finished Size | Hook | Best For |
|---|---|---|---|---|
| Intermediate | 2–3 hours | Approx. 11–13 cm wide | 3.5 mm | Halloween decor, table displays, pumpkin sets |
Materials and Tools
Yarn
- Black — worsted / weight 4 — approximately 45–55 g — matte cotton, cotton-acrylic, or smooth acrylic.
- Sage green — DK or light worsted — approximately 8–12 g — used for leaves and tendrils.
- Taupe or light brown — DK or light worsted — approximately 5–8 g — used for the curved stem and stem cap.
A published small crochet pumpkin using DK yarn requires one 25 g ball, while other amigurumi pumpkin designs use approximately 50 g of yarn. The quantities above allow additional yarn for the deeper sculpted ribs required by this version.
Tools
- 3.5 mm crochet hook
- Polyester fiberfill — approximately 20–30 g
- Tapestry needle
- Stitch marker
- Scissors
- Long doll needle — optional but useful for shaping the ribs
- Safety eyes: none; the reference design is face-free
Abbreviations
- MR — magic ring
- sc — single crochet
- inc — increase, work 2 sc in one stitch
- dec — decrease over the next 2 stitches
- sl st — slip stitch
- ch — chain
- BLO — back loop only
- st / sts — stitch / stitches
- R — round or row
For an invisible decrease, insert the hook through the front loops of the next two stitches, yarn over, pull through both front loops, then complete the single crochet.
Pattern — Step by Step
Work the main pumpkin body in a continuous spiral unless another method is specified. Move the stitch marker after the first stitch of every round.
Pumpkin Body
Yarn: black. The 6-stitch increase structure follows standard amigurumi sphere mathematics.
R1: 6 sc in MR (6)
R2: inc × 6 (12)
R3: (1 sc, inc) × 6 (18)
R4: (2 sc, inc) × 6 (24)
R5: (3 sc, inc) × 6 (30)
R6: (4 sc, inc) × 6 (36)
R7: (5 sc, inc) × 6 (42)
R8: 42 sc (42)
R9: 42 sc (42)
R10: 42 sc (42)
R11: 42 sc (42)
R12: 42 sc (42)
R13: 42 sc (42)
R14: 42 sc (42)
R15: 42 sc (42)
R16: (5 sc, dec) × 6 (36)
R17: (4 sc, dec) × 6 (30)
R18: (3 sc, dec) × 6 (24)
Begin stuffing. Add small pieces rather than one large wad. Keep the center firm but leave enough compression for the shaping strands.
R19: (2 sc, dec) × 6 (18)
R20: (1 sc, dec) × 6 (12)
Finish stuffing before the opening becomes smaller.
R21: dec × 6 (6)
Fasten off. Leave a 35–40 cm tail. Pass the tail through the front loops of the final six stitches and pull the opening closed.
Creating the Eight Pumpkin Ribs
Cut approximately 180 cm of black yarn and thread it onto a long tapestry or doll needle. Insert the needle through the center of the bottom closure and bring it out through the center of the top.
Carry the yarn down the outside of the pumpkin and insert the needle again through the bottom center. Bring it back out through the top. Pull only until the surface forms a visible indentation.
Repeat this operation around the body to create eight sections. Space each shaping line at approximately one eighth of the circumference. The strand should compress the stuffing by about 5–8 mm rather than cutting deeply into the crochet fabric.
After the eighth section, compare the widths of all lobes from above. Adjust individual strands before knotting the yarn securely inside the top opening area.
Curved Stem
Yarn: taupe or light brown.
R1: 6 sc in MR (6)
R2: 6 sc (6)
R3: 6 sc (6)
R4: 6 sc (6)
R5: 6 sc (6)
R6: 6 sc (6)
R7: 6 sc (6)
R8: 6 sc (6)
Stuff only the lower half of the stem. Leaving the upper section unstuffed lets it bend into the hook-shaped form shown in the photograph.
R9: inc × 6 (12)
R10: (1 sc, inc) × 6 (18)
Fasten off. Leave a 25 cm sewing tail.
Curve the narrow section before attaching it. The upper end should lean approximately 25–40 degrees rather than standing vertically.
Large Leaves — Make 2
Yarn: sage green. Work around both sides of the foundation chain.
R1: ch 10.
Starting in the second chain from the hook: sl st, 1 sc, 1 hdc, 1 dc, 1 dc, 1 hdc, 1 sc, sl st, 3 sc in the final chain.
Continue along the opposite side of the foundation chain: sl st, 1 sc, 1 hdc, 1 dc, 1 dc, 1 hdc, 1 sc, sl st.
Fasten off. Leave a 20 cm tail for sewing.
The finished leaf should be approximately 5–6 cm long with worsted yarn. Do not stuff.
Small Leaf — Make 1
Yarn: sage green.
R1: ch 8.
Starting in the second chain from the hook: sl st, 1 sc, 1 hdc, 1 dc, 1 hdc, 1 sc, sl st, 3 sc in the final chain.
Work back along the opposite side: sl st, 1 sc, 1 hdc, 1 dc, 1 hdc, 1 sc, sl st.
Fasten off. Leave a 20 cm sewing tail.
This shorter leaf fills the space behind the stem without covering a complete pumpkin section.
Long Tendril — Make 1
Yarn: sage green.
R1: ch 28.
Starting in the second chain from the hook, work 2 sc in each chain to the end.
Fasten off. Leave a 15 cm sewing tail.
The doubled stitches force the chain into a loose spiral. Stretch and release the piece before attachment so the curl distributes along its full length.
Short Tendril — Make 1
Yarn: sage green.
R1: ch 20.
Starting in the second chain from the hook, work 2 sc in each chain to the end.
Fasten off. Leave a 15 cm sewing tail.
Use the shorter tendril on the opposite side of the stem to keep the top arrangement asymmetrical.
Optional Larger Pumpkin
The reference photograph contains pumpkins of more than one size. To produce the larger version while preserving the same structure, continue the body increases beyond 42 stitches.
R8: (6 sc, inc) × 6 (48)
R9: (7 sc, inc) × 6 (54)
R10–R19: 54 sc (54)
R20: (7 sc, dec) × 6 (48)
R21: (6 sc, dec) × 6 (42)
R22: (5 sc, dec) × 6 (36)
R23: (4 sc, dec) × 6 (30)
R24: (3 sc, dec) × 6 (24)
R25: (2 sc, dec) × 6 (18)
R26: (1 sc, dec) × 6 (12)
R27: dec × 6 (6)
Fasten off and sculpt the body with eight strands using the same method as the medium version. Depending on yarn and tension, this modification produces a pumpkin approximately 15–18 cm across.
Assembly
- Check that the black body is fully closed and that all eight sculpting lines meet cleanly at the top and bottom centers.
- Place the brown stem over the top closure. Its expanded 18-stitch base should cover the convergence point of the shaping strands.
- Sew the stem around its outer edge with small stitches. Keep the narrow section free so its curve remains visible.
- Pin one large green leaf beside the stem with its tip extending over one pumpkin lobe.
- Position the second large leaf roughly 140–170 degrees from the first when viewed from above.
- Add the smaller leaf between the two large leaves, slightly behind the stem rather than directly in front of it.
- Sew only the inner 1–2 cm of each leaf to the pumpkin. Leaving the tips unattached preserves the layered appearance visible in the reference photo.
- Attach the long tendril beneath one large leaf and allow the spiral to extend down the side of the body.
- Sew the shorter tendril on the opposite side. Keep its attachment point hidden beneath a leaf edge.
- Bury every remaining yarn tail through at least 3 cm of the stuffed body before trimming, then redistribute the filling between the ribs with your fingers.
The completed piece is a face-free black crochet pumpkin with eight defined sections, one curved stem, three leaves, and two trailing tendrils.
7 Technical Tips for a Better Black Pumpkin
- Control marker drift. A misplaced stitch marker can rotate the decrease line by several stitches and make the top closure look off-center. Move the marker immediately after the first stitch of every round.
- Do not overfill the body. A pumpkin packed until completely rigid resists the sculpting strands and becomes nearly spherical. Stop adding fiberfill when thumb pressure can compress the center by approximately 5–8 mm.
- Use invisible decreases on R16–R21. Standard decreases can create raised bars that are especially visible in black yarn under direct light. Catch only the front loops of the next two stitches before completing each decrease.
- Skip safety eyes for the photographed version. The reference object has no face, so eye placement would change its botanical design. If a face is added as a personal variation, install the eyes before R18 while the body opening is still accessible.
- Watch gaps in dark yarn. Stuffing becomes visible when stitch openings exceed about 2 mm at rest. If that happens with worsted yarn, move from a 3.5 mm hook to a 3.25 mm hook rather than increasing tension excessively.
- Pin the leaves before sewing. Placing all three leaves on the same half of the stem shifts the visual weight to one side. Set the two large leaves roughly 140–170 degrees apart when the pumpkin is viewed from above.
- Bury structural tails deeply. Shaping threads that end directly under the surface can work loose after repeated handling. Pass every sculpting tail through at least 3 cm of dense stuffing before trimming it.
Adjusting the Size
The easiest way to resize this black pumpkin amigurumi crochet pattern is to change yarn thickness while retaining the same stitch sequence. DK yarn with a 2.5–3 mm hook produces a smaller decoration, while worsted yarn with a 3.5–4 mm hook gives a medium pumpkin. Published crochet pumpkin patterns demonstrate a broad range: DK versions are listed at approximately 3, 4, and 5.5 inches, while another worsted design measures around 10 cm.
Changing hook size without changing yarn also affects density. A smaller hook produces tighter fabric and more resistance during sculpting. A larger hook makes the fabric softer but may expose white fiberfill through black stitches.
For a matched group like the photograph, vary both body diameter and stem height. Keep the leaf proportions close to one third or one half of the pumpkin radius so they remain visible without covering several ribs.
Why the Ribs Matter on a Black Pumpkin
Dark yarn reduces visible contrast between adjacent crochet stitches. The outline therefore carries more of the design than it would on an orange or cream pumpkin. Eight recessed lines divide the body into readable lobes, and each line catches a different angle of light. Without those indentations, the black surface appears much closer to a stuffed ball.
The shaping threads also flatten the top and bottom slightly. That change improves stability when the pumpkin sits on a shelf or tray. Pull each thread incrementally, rotating the body after every adjustment. The finished base should touch the surface across several lobes rather than balancing on one central point.
The photographed pumpkins also use contrasting botanical pieces. Sage green leaves and a taupe stem create three separate value zones: dark body, medium foliage, and lighter stem. A monochrome version can work, but the leaf edges become less distinct against the pumpkin.
Yarn Choice and Surface Definition
A smooth worsted yarn is the most predictable option for this version. Cotton gives crisp stitch definition and holds the sculpted recesses firmly. Acrylic is lighter and compresses more easily, which can be useful when making several pumpkins for a display.
Very fuzzy or chenille yarn changes the proportions. The same stitch count produces a larger object, and the sculpting strands may sink into the pile. Published chunky pumpkin patterns commonly move to hooks around 4–5 mm and can use roughly 50 g or more for one body.
For the structure in the photograph, matte yarn is preferable to highly reflective fiber because the vertical ribs should provide most of the surface contrast. If the chosen yarn is especially soft, add the shaping strands twice around each groove instead of pulling a single strand harder.
Conclusion
The final structure depends on three measurements: a 42-stitch medium body, eight evenly spaced sculpting channels, and leaves positioned around rather than directly beneath the stem. Crochet the first body in black worsted yarn, check the finished diameter, then use the larger 54-stitch variation if a multi-size display is required. Save this black pumpkin amigurumi crochet pattern to Pinterest so the sizing notes remain available, and share a finished set on Instagram with #BlackPumpkinAmigurumi. For the next version, compare the top view before sewing the foliage: would two broad leaves like the front pumpkin in the photograph or three smaller leaves give your stem the closer match?









