Introduction
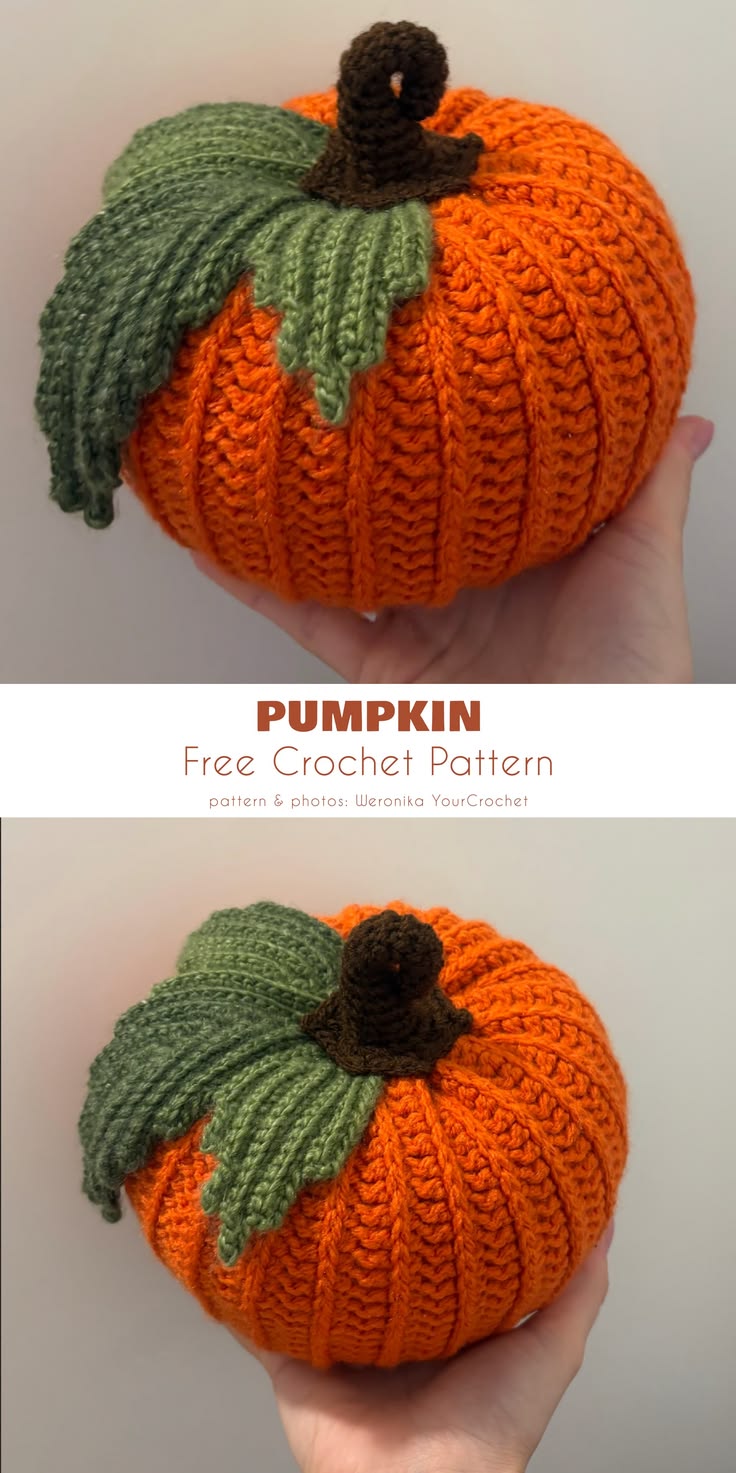
A five-lobed leaf covering one-third of a pumpkin crown will hide the ribbing unless its attachment stays above the widest orange section. This ribbed crochet pumpkin pattern uses medium yarn with a 5 mm body hook and finer yarn with a 3 mm accessory hook. The finished pumpkin measures about 15 cm wide and 15 cm high, with a large green leaf and brown stem.
The Design: What Makes This Pumpkin Different
The orange body uses horizontal third-loop texture on a flat panel, which becomes vertical ribbing after the short edges are joined. That method creates many narrow raised channels without requiring a separate sculpting strand for every visible rib. The crown is compressed after stuffing, giving the pumpkin its broad 15 cm silhouette and recessed stem position. Its green leaf is intentionally oversized. Five elongated lobes spread over the upper left portion of the body, contrasting with the narrow vertical ribs beneath them. A flared brown stem covers the central gathering and anchors the foliage. One common mistake in a textured crochet pumpkin is pulling the top closure too tightly before the stuffing has been distributed. The center sinks sharply while the outer body stays cylindrical instead of forming a balanced pumpkin profile.
Project Info at a Glance
| Skill Level | Time | Finished Size | Hooks | Best For |
|---|---|---|---|---|
| Easy–Intermediate | 4–6 hours | 15 cm wide × 15 cm high including stem | 5.0 mm body / 3.0 mm accessories | Fall tables, shelves, centerpieces and seasonal displays |
Materials and Tools
Yarn
- Pumpkin orange — medium / worsted #4 — approximately 80–100 g — ribbed pumpkin body and structural shaping.
- Moss or sage green — fine-weight yarn — approximately 15–20 g — large five-lobed leaf.
- Dark brown — fine-weight yarn — approximately 8–12 g — stem and flared stem base.
A firm orange yarn gives the ribs enough definition to remain visible after stuffing. The green yarn can be slightly softer because the leaf needs to bend over the pumpkin rather than stand vertically.
Tools
- 5.0 mm crochet hook for the body
- 3.0 mm crochet hook for leaf and stem
- Polyester fiberfill
- Long tapestry needle
- Standard yarn needle
- Stitch markers
- Dressmaking pins
- Scissors
- Measuring tape
Abbreviations
- MR — magic ring
- ch — chain
- sc — single crochet
- hdc — half double crochet
- dc — double crochet
- tr — treble crochet
- inc — increase
- dec — decrease
- sl st — slip stitch
- BLO — back loop only
- TLO — third loop only
An invisible decrease is worked through the front loops of two neighboring stitches before completing one single crochet through both loops.
Pattern — Step by Step
This is an original reconstruction based on the visible structure and verified dimensions of the photographed pumpkin. The body is worked flat, then joined and stuffed.
Orange Ribbed Pumpkin Panel
Yarn: pumpkin orange — original reconstruction using third-loop ribbed geometry.
Foundation: ch 25.
Row 1: Starting in the second chain from the hook, hdc across. (24)
Ch 1 and turn. The turning chain does not count as a stitch.
Row 2: hdc TLO across. (24)
Rows 3–38: ch 1, turn, hdc TLO across. (24)
Fasten off with approximately 100 cm of orange yarn remaining for assembly.
Target relaxed panel dimensions: approximately 15–17 cm high × 40–44 cm long.
Check the Ribbed Panel
Count several completed rows.
Each one should contain 24 hdc.
Lay the rectangle flat and compare both long edges.
The panel should remain rectangular without tapering.
Third-loop half double crochet creates pronounced horizontal ridges on the flat fabric. Those lines will become vertical when the rectangle is converted into a tube.
If your panel measures less than approximately 40 cm long, continue adding TLO rows in pairs.
If it exceeds approximately 44 cm, test-wrap the piece into a cylinder before removing rows. Yarn elasticity changes the final circumference.
Seam the Pumpkin Tube
Bring Row 1 and Row 38 together.
Keep the stronger rib texture facing outward.
Match all 24 stitch positions.
Use mattress stitch or a relaxed whipstitch to join the short edges.
Do not pull the seam tighter than the neighboring ridges.
The seam should disappear into the vertical texture after stuffing.
Gather the Bottom
Cut approximately 90 cm of orange yarn.
Thread it through a long tapestry needle.
Run the needle through the row ends around one open edge of the tube.
Pull in several stages rather than one motion.
Pause when the opening reaches approximately 20–25 mm and distribute the folds evenly.
Continue until the hole is approximately 8–10 mm.
Cross the center two or three times with the yarn needle.
Push the closure approximately 5 mm into the body.
Secure the yarn on the inside.
Stuff the Pumpkin
Add fiberfill around the outer wall first.
Rotate the tube while working so every vertical rib receives similar support.
Place less stuffing in the central core.
The outside should feel firm, while the middle remains compressible.
Press the upper and lower openings toward each other occasionally.
Stop adding fiberfill when the body can still shorten by approximately 15–20 mm under moderate pressure.
Overfilling makes the crown difficult to recess and reduces the broad pumpkin profile.
Gather the Crown
Thread another long orange strand around the upper row ends.
Pull until the opening measures approximately 20 mm.
Add the final small amounts of stuffing around the outer crown.
Keep the exact center comparatively soft.
Continue gathering until the opening narrows to approximately 10–12 mm.
Secure temporarily.
Compress the Pumpkin Vertically
Pass a long orange strand from the crown center through the stuffed body and out through the bottom center.
Return through the same axis.
Pull in small increments.
Target a body height of approximately 12 cm before the stem is attached.
The widest diameter should settle close to the verified 15 cm finished width.
Stop tightening once the crown and bottom both recess and the middle pushes outward.
Secure the strand underneath.
Refine the Vertical Ribs
The third-loop fabric already creates substantial narrow ribbing, so heavy external sculpting is unnecessary.
If more segmentation is needed, add four evenly spaced orange shaping passes from crown to base.
Place each strand in an existing low channel.
Pull only until that channel becomes approximately 3–5 mm deeper.
Strong external tension can overwhelm the fine rib pattern visible in the reference.
Brown Stem
Yarn: dark brown, 3.0 mm hook.
R1: 6 sc in MR (6)
R2: sc around (6)
R3: sc around (6)
R4: sc around (6)
R5: sc around (6)
R6: sc around (6)
R7: (2 sc, inc) ×2 (8)
R8: sc around (8)
R9: (3 sc, inc) ×2 (10)
R10: (4 sc, inc) ×2 (12)
Do not fasten off.
Flared Stem Base
R11: inc ×12 (24)
R12: sc around (24)
Fasten off with a 35 cm sewing tail.
Target visible stem height: approximately 3 cm.
Stuff only the lower half very lightly.
Shape the Stem
The stem in the reference is slightly irregular rather than a rigid straight cylinder.
Curve the narrow upper portion gently with your fingers.
If it immediately straightens, take one short concealed brown stitch along the inside of the intended bend.
Keep the 24-stitch flared base flat because it must cover the central pumpkin gathering.
Large Green Leaf
The leaf is formed from five elongated lobes around one compact center. Work each lobe separately into the same central ring.
Leaf Center
Yarn: moss or sage green, 3.0 mm hook.
R1: 10 sc in MR. (10)
Join with sl st.
Do not fasten off.
Leaf Lobe 1 — Long Center Lobe
Ch 13.
Starting in the second chain from the hook, work:
sl st, sc, hdc, hdc, dc, dc, tr, tr, dc, dc, hdc, sc.
Work 3 sc into the same center stitch where the chain began.
Rotate and work back along the opposite side of the foundation chain:
sc, hdc, dc, dc, tr, tr, dc, dc, hdc, hdc, sc, sl st.
Sl st into the next center stitch.
Leaf Lobe 2 — Long Side Lobe
Ch 11.
Starting in the second chain:
sl st, sc, hdc, dc, dc, tr, dc, dc, hdc, sc.
Work 3 sc at the base.
Return along the opposite side with the mirrored stitch sequence.
Sl st into the next two center stitches.
Leaf Lobe 3 — Short Side Lobe
Ch 9.
Starting in the second chain:
sl st, sc, hdc, dc, tr, dc, hdc, sc.
Work 3 sc at the base.
Return along the opposite side in mirrored order.
Sl st into the next two center stitches.
Leaf Lobe 4 — Short Side Lobe
Repeat Lobe 3.
Angle this lobe in the opposite direction.
Leaf Lobe 5 — Long Side Lobe
Repeat Lobe 2.
Fasten off with approximately 50 cm of green yarn remaining.
Shape the Leaf
Spread the five lobes on a flat surface.
The center lobe should extend farthest.
Two medium lobes sit beside it, and the two shorter lobes fill the lower sides.
Target an overall leaf span of approximately 11–13 cm.
Do not block the leaf into a rigid flat star.
The reference leaf drapes over the curved pumpkin surface, so a slight natural bend is useful.
Add Leaf Veins
Thread a length of matching green yarn through a needle.
Work one surface stitch line down the center of each lobe.
Keep the vein stitches approximately 8–10 mm long.
Pull only enough to define the center line.
The leaf should not contract noticeably after the veins are added.
Position the Green Leaf
Place the leaf over the crown before attaching the stem.
Turn the longest lobe toward the lower left or front-left side of the pumpkin.
Allow the medium lobes to spread across neighboring ribs.
The leaf should cover roughly one-quarter to one-third of the visible pumpkin surface from above.
Keep the central green ring directly around the gathered crown opening.
Attach the Leaf
Pin the center first.
Sew through the 10-stitch center ring and several orange crown stitches.
Add one concealed tack approximately halfway down each lobe.
Leave the final 25–35 mm of every lobe unattached.
Those free tips create the layered appearance visible in the photograph.
Attach the Stem
Center the flared brown base over the green leaf center.
The 24-stitch base should overlap both green and orange fabric.
Pin four opposite positions.
Sew through the brown edge, green center and orange crown beneath it.
Check the stem from each side after several stitches.
Its narrow section may curve slightly, but the wide base should remain centered.
Assembly
- Crochet the 24-stitch by 38-row orange third-loop panel and check for approximately 15–17 cm of height by 40–44 cm of relaxed length.
- Join the two short panel edges through all 24 stitch positions while keeping the ribbed seam as relaxed as the surrounding fabric.
- Gather the lower row ends to an 8–10 mm opening and push the closure approximately 5 mm inside the body.
- Stuff around the outer wall first while leaving the center soft enough for approximately 15–20 mm of vertical compression.
- Gather the crown, then compress the body until it measures approximately 12 cm high and 15 cm wide.
- Add only light external shaping if needed, using existing rib valleys rather than creating deep new channels.
- Crochet the five-lobed green leaf, add its surface veins and position the longest lobe across the front-left crown.
- Sew the leaf center firmly while leaving the outer 25–35 mm of each lobe free.
- Crochet the brown stem with its 24-stitch flared base and sew it through the leaf center into the orange crown.
- Set the finished pumpkin on a flat surface, reshape any compressed ribs and weave every remaining tail through matching interior stitches.
The completed pumpkin should measure about 15 cm across, with a 12 cm orange body, dense vertical ribbing, a five-lobed green leaf and a short flared brown stem.
7 Technical Tips
- Ribs disappear after stuffing: Excess filling stretches the third-loop ridges until they flatten. Stop adding fiberfill while the body can still compress approximately 15–20 mm from crown to base.
- Pumpkin becomes cylindrical: The panel circumference is too short relative to its 15–17 cm height. Extend the rectangle toward approximately 40–44 cm before seaming rather than trying to correct width with stuffing.
- Bottom rocks on the table: The gathered closure is projecting below the surrounding body. Push the center inward approximately 5 mm and redistribute stuffing into three or four lower areas.
- Leaf hides too much orange ribbing: All five lobes have been positioned downward. Keep the center lobe long but angle at least two side lobes across the upper crown so no more than roughly one-third of the pumpkin is covered.
- Leaf tips curl tightly: Surface-vein stitches or attachment stitches are contracting the fabric. Leave the last 25–35 mm of every lobe unsewn and pull the vein yarn only until the center line becomes visible.
- Stem falls sideways: Sewing only through the narrow six-stitch tube creates a pivot point. Attach the full 24-stitch base through both the green center and several orange crown stitches.
- Panel seam becomes the deepest groove: Whipstitch tension is too high. Match all 24 edge positions and stop pulling once the edges touch rather than cinching the seam closed.
Why Third-Loop Ribbing Works
The raised texture is the defining structural feature of this ribbed crochet pumpkin pattern. Half double crochet creates a third loop behind the normal top loops, and working into that strand shifts the unused top loops toward the surface.
On a flat rectangle, the ribs run horizontally.
After the panel becomes a tube, they rotate vertically around the pumpkin.
This creates numerous fine channels without requiring every groove to be formed with external yarn.
The result differs from a smooth amigurumi sphere sculpted only after stuffing. Here, most of the visual segmentation already exists before assembly.
Adjusting the Pumpkin Size
For a smaller pumpkin, reduce both panel dimensions rather than changing only the foundation chain.
A panel approximately 11–12 cm high can be worked until it measures roughly 30–34 cm long.
For a larger centerpiece, increase the foundation until the short edge reaches about 20 cm, then extend the ribbed rows until the long edge is approximately 50–56 cm.
Measure before seaming.
When changing yarn weight, the physical panel proportions are more dependable than repeating the same number of stitches and rows.
Adjusting the Leaf
The large crown leaf is what separates this pumpkin visually from many simpler ribbed versions.
For a smaller leaf, subtract two chains from every lobe foundation.
For a larger leaf, add two chains to the center and medium lobes but leave the short lobes unchanged.
That keeps the foliage asymmetrical rather than turning it into a uniform five-point star.
You can also omit one short lobe for a four-lobed botanical shape, though it will differ more noticeably from the supplied reference.
Changing the Color Palette
Bright orange, moss green and dark brown match the reference closely.
Rust orange can create a deeper autumn version, while ochre gives the body a muted harvest tone.
For a neutral interpretation, use cream for the pumpkin, olive for the leaf and espresso brown for the stem.
The large leaf needs enough contrast against the body for the five-lobed shape to remain readable.
A green too close in value to the pumpkin color can make the crown details merge from normal viewing distance.
Finishing the Pumpkin
Final blocking is unnecessary once the body is stuffed.
Shape the vertical ribs by hand after the leaf and stem are attached.
Inspect the pumpkin from above and confirm that the stem sits close to the crown center.
Then check the lower profile on a hard surface.
Several orange ribs should share contact with the table rather than the gathered center carrying the weight.
Lift each green lobe away from the body and arrange the free tips so the largest one drapes visibly down the front-left section.
Conclusion
Build the pumpkin body before sizing the leaf because the foliage needs to cover the crown without hiding the majority of the vertical rib structure. Your next step is to finish one 24-stitch by 38-row panel, seam and stuff it, then confirm a body near 15 cm wide before crocheting the five lobes. Keep the leaf tips free rather than sewing them flat. Share the finished ribbed crochet pumpkin pattern project on Pinterest with the large leaf visible, then post the third-loop texture on Instagram using #FiveLobeCrochetPumpkin. For this pumpkin specifically, would you keep the oversized moss-green leaf or reduce it to three lobes?









