Introduction
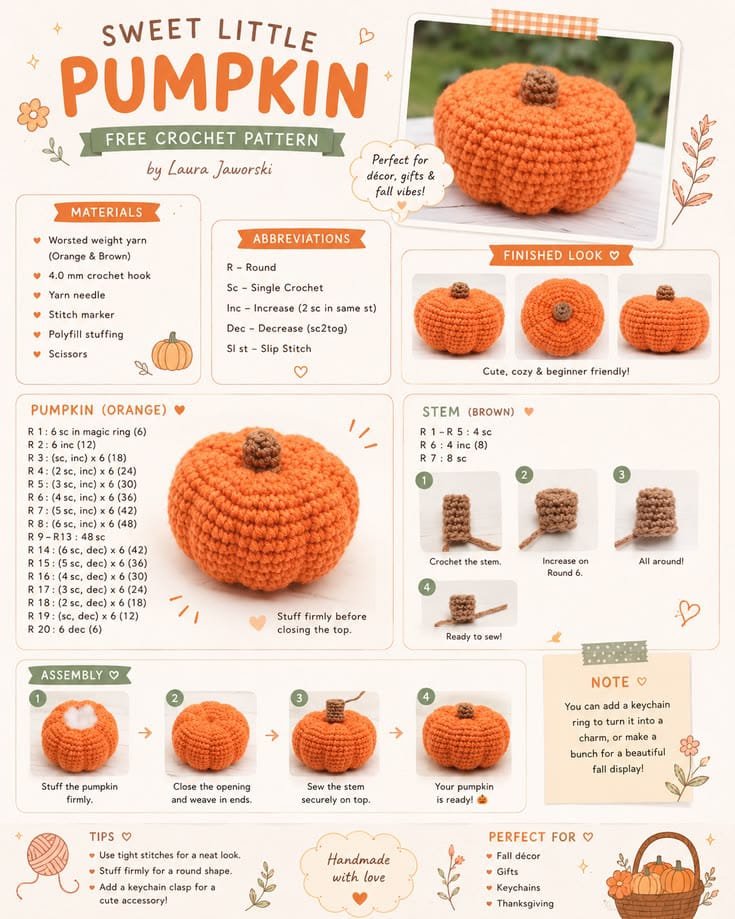
A three-inch pumpkin needs a recessed crown without losing enough height to become a flat pincushion. This small crochet pumpkin pattern uses worsted yarn and a 4 mm hook to make an approximately 8–9 cm decoration. A 30-stitch body, controlled stuffing, six sculpted lobes and a short brown stem create an easy compact project for fall displays or small seasonal arrangements.
The Design: What Makes This Small Pumpkin Different
The body is built as one continuous spiral rather than a ribbed rectangle, which produces the smooth stitch texture visible in the reference. Its maximum circumference stops at 30 stitches because this is a small pumpkin; additional width comes from several plateau rounds instead of expanding to a much larger sphere. Six shaping strands are added only after stuffing, allowing the maker to control lobe depth independently from the crochet fabric. A short brown stem expands at its base so it can cover the gathered crown without requiring a separate large topper. The common mistake with a mini pumpkin amigurumi is overfilling the center. Dense stuffing prevents top-to-bottom compression, so the object stays spherical even after the outside sculpting strands are tightened.
Project Info at a Glance
| Skill Level | Time | Finished Size | Hook | Best For |
|---|---|---|---|---|
| Easy | 2–3 hours | Approx. 8–9 cm high × 10–12 cm wide | 4.0 mm | Fall displays, bowl fillers and small handmade gifts |
Materials and Tools
Yarn
- Pumpkin orange — worsted / medium #4 — approximately 35–45 g — pumpkin body and sculpting strands.
- Medium brown — worsted / medium #4 — approximately 4–6 g — short crochet stem.
Choose a smooth medium-weight yarn that creates a closed single-crochet fabric with a 4 mm hook. Cotton, acrylic and firm blends can all work, but the finished gauge should hide the stuffing between stitches.
Tools
- 4.0 mm crochet hook
- Polyester fiberfill — approximately 25–35 g
- Long tapestry needle
- Standard yarn needle
- Stitch marker
- Six removable markers for lobe placement
- Scissors
- Measuring tape
Abbreviations
- MR — magic ring
- sc — single crochet
- inc — increase
- dec — decrease
- sl st — slip stitch
- ch — chain
- BLO — back loop only
An invisible decrease is worked through the front loops of the next two stitches before completing one single crochet through both loops.
Pattern — Step by Step
Work the pumpkin body in a continuous spiral. Place a marker in the first stitch of every round and move it upward as the work progresses.
Pumpkin Body
Yarn: pumpkin orange — original reconstruction using standard small-amigurumi geometry.
R1: 6 sc in MR (6)
R2: inc ×6 (12)
R3: (sc, inc) ×6 (18)
R4: (2 sc, inc) ×6 (24)
R5: (3 sc, inc) ×6 (30)
R6: sc around (30)
R7: sc around (30)
R8: sc around (30)
R9: sc around (30)
R10: sc around (30)
R11: sc around (30)
R12: sc around (30)
R13: (3 sc, dec) ×6 (24)
R14: sc around (24)
R15: (2 sc, dec) ×6 (18)
R16: (sc, dec) ×6 (12)
R17: dec ×6 (6)
R18: sc around (6)
Begin stuffing after R14. Add small pieces around the outer wall first and leave the exact center slightly softer.
Fasten off with an orange tail approximately 100 cm long.
Close the Pumpkin
Thread the long orange tail through a yarn needle.
Pass the needle through the front loops of the six remaining stitches.
Pull until the opening closes to approximately 5–7 mm.
Do not cut the tail.
The same strand will be used to compress the body and form part of the structural shaping.
Check the Stuffing Before Sculpting
Hold the pumpkin between your palms and press the top toward the bottom.
The body should lose approximately 10–15 mm of height without extreme force.
If it barely compresses, the center contains too much stuffing.
Open the last six stitches slightly, remove a small quantity of fiberfill and close the opening again.
The outside circumference should remain firm enough that individual stitches do not collapse inward.
Compress the Top and Bottom
Push the long needle through the center of the pumpkin and exit through the magic-ring area at the opposite end.
Return through the same vertical axis.
Pull gradually.
Target approximately 8–12 mm of permanent compression.
The crown and base should both recess while the widest part of the pumpkin moves outward.
Secure the strand temporarily underneath without cutting it.
Mark Six Pumpkin Lobes
View the body from directly above.
Place six removable markers around the widest circumference at roughly 60-degree intervals.
Measure visually before adding any external shaping yarn.
One section significantly narrower than the others will become more noticeable after the valleys are tightened.
Move the markers until the six planned lobes are approximately equal.
Sculpting Groove 1
Yarn: matching pumpkin orange.
Anchor a long orange strand at the bottom center.
Bring it over the outside through the first marked valley.
Insert the needle at the crown center and return through the stuffed body to the bottom.
Pull until the channel sits approximately 5–7 mm below the fullest neighboring surface.
Leave the strand temporarily unsecured.
Sculpting Groove 2
Work the valley directly opposite Groove 1.
Compare both lobes from the side.
Matching visible depth is more useful than applying identical pulling force because stuffing density can differ slightly.
Sculpting Grooves 3 and 4
Move to the second opposing pair of markers.
Repeat the center-to-center shaping route.
Stop if a lobe becomes narrow enough to form a pointed wedge.
The intended profile is rounded rather than sharply segmented.
Sculpting Grooves 5 and 6
Complete the final opposite pair.
Set the pumpkin on a hard surface.
Compare all six sections before tying the shaping yarn permanently.
Adjust individual strands until neighboring lobe widths differ by no more than approximately 5–8 mm.
Secure the yarn beneath the pumpkin and bury the tails through the stuffed center.
Shape the Crown Recess
The stem needs a central seat rather than a rounded dome.
Thread approximately 50 cm of orange yarn through the upper center.
Pass it to the bottom center and return.
Pull until the crown sits approximately 8–10 mm below the highest point of the surrounding lobes.
Keep the recess broad enough to accept the stem base.
Secure the strand underneath.
Brown Stem
Yarn: medium brown — original reconstruction.
R1: 6 sc in MR (6)
R2: sc around (6)
R3: sc around (6)
R4: sc around (6)
R5: sc around (6)
R6: inc ×6 (12)
R7: sc around (12)
Place only a very small amount of yarn tail or fiberfill inside the lower stem. Keep the upper tube comparatively soft.
Fasten off with a 30 cm sewing tail.
Target approximately 2.5–3.5 cm of visible height.
Shape the Stem
Pinch the six-stitch upper portion lightly between your fingers.
A perfectly rigid cylinder looks less natural on a small pumpkin.
Allow the stem to lean by approximately 5–10 degrees if desired.
Keep the 12-stitch lower round flat because that section forms the attachment flange.
Attach the Stem
Center the 12-stitch stem base over the crown recess.
Pin two opposite points first.
Sew through every second stitch around the base.
Pass each sewing stitch into orange fabric several millimeters away from the gathered center rather than attaching only through the closure hole.
Check the stem from four directions during sewing.
Fasten off and bury the brown tail through the pumpkin body.
Refine the Six Lobes
Place the finished pumpkin on a table.
Press outward beneath the center of each lobe with your fingertips.
Support both neighboring valleys while shaping.
If one lobe appears smaller, move a little filling toward it by massaging the stuffed fabric.
Do not tighten the neighboring grooves as the first correction because that can make the imbalance larger.
Adjusting the Finished Height
The finished pumpkin should sit close to 8–9 cm high including the brown stem.
If the body is taller than expected, increase the top-to-bottom compression slightly.
Do not reduce body height by pulling the six lobe strands tighter.
Those strands control segmentation, while the central compression strand controls the squat profile.
Keeping those two jobs separate makes later corrections much easier.
Assembly
- Crochet the orange body from the 6-stitch magic ring to the 30-stitch plateau and complete all rounds through the six-stitch closure.
- Stuff the outer wall firmly but keep the central core slightly softer so the body can compress by approximately 10–15 mm.
- Close the six final stitches while leaving a long orange tail for structural shaping.
- Pass the tail through the vertical center and compress the body by approximately 8–12 mm.
- Mark six lobe positions at roughly 60-degree intervals around the widest circumference.
- Sculpt the six channels as three opposite pairs and keep each valley approximately 5–7 mm deep.
- Pull the upper center inward until the crown sits approximately 8–10 mm below the surrounding lobe tops.
- Crochet the brown stem from 6 stitches to a 12-stitch attachment base and leave a 30 cm sewing tail.
- Center the stem on the recessed crown and sew its base into several surrounding orange stitches.
- Set the pumpkin on a flat surface, reshape uneven lobes by moving stuffing and bury all remaining tails through the interior.
The finished pumpkin should have six rounded lobes, a compact recessed crown and one short brown crochet stem.
7 Technical Tips
- Body remains spherical: The center is overfilled or the vertical compression is too light. Leave the core slightly softer and reduce body height by approximately 8–12 mm before sculpting the lobes.
- Lobes become narrow wedges: The external strands are pulled too firmly. Limit each visible valley to approximately 5–7 mm below the neighboring rounded sections.
- Bottom will not sit flat: The center closure projects below the six lobes. Recess the bottom by approximately 5 mm and shift filling into three evenly spaced lower sections.
- Stuffing shows through: Hook size or tension is too loose for the chosen worsted yarn. Test the 30-stitch plateau under light stretching and drop approximately 0.5 mm in hook size if white fiberfill becomes visible.
- Crown stays rounded: Lobe sculpting alone does not pull the central axis inward. Add a separate center-to-center strand and target an 8–10 mm crown depression.
- Stem rocks after sewing: Attaching only into the tiny closure hole creates a narrow pivot. Sew the 12-stitch base into orange fabric around the recess at several points.
- Round marker drifts: Losing the first stitch in a continuous spiral shifts increase and decrease placement. Move the marker after every round and recount at all 30-, 24-, 18- and 12-stitch transitions.
Why This Reconstruction Uses a 30-Stitch Plateau
The photographed pumpkin is small, so the independent reconstruction stops at 30 stitches rather than building a medium or large amigurumi sphere. Five standard expansion rounds create enough circumference for worsted yarn at a 4 mm hook, while seven plateau rounds add horizontal fullness.
This relationship also leaves room for post-stuffing sculpting.
A larger maximum stitch count would require fewer plateau rounds or stronger compression to stay near the same final size.
Gauge still matters. If your 30-stitch circumference is much wider than expected, change hook size before altering the shaping sequence.
Changing the Pumpkin Size
To make a smaller ornament, use DK yarn with a 3 mm hook while keeping the same 30-stitch geometry.
For a larger pumpkin, move to a 36-stitch plateau by adding one standard expansion round of (4 sc, inc) ×6. Add several matching plateau rounds before beginning the decreases.
A substantially larger version can use a 42-stitch plateau, but the stem should also be widened so its base remains proportional.
When scaling, compare finished circumference and body height before adding lobe strands.
Changing the Number of Lobes
Six sections give this small pumpkin enough definition without crowding the surface.
Eight lobes are possible, but each valley becomes closer to its neighbor and the body reads as more deeply ribbed.
For eight sections, mark the circumference at approximately 45-degree intervals.
Reduce sculpting depth slightly so the orange surface does not collapse between neighboring strands.
Four very broad lobes also work, but they produce a more stylized shape than the reference.
Choosing Yarn Colors
Classic orange and medium brown match the supplied image closely.
Rust, terracotta and cinnamon create darker fall versions.
Cream, oatmeal or pale sage can produce a neutral pumpkin while preserving the same construction.
If making several pumpkins for a bowl display, keep the brown stem consistent while changing the body colors.
That repeated stem color ties the group together even when each pumpkin uses a different yarn.
Finishing the Pumpkin
No wet blocking is required after stuffing.
Shape the pumpkin by hand after every strand has been secured.
View the body from above and check that the stem sits near the center of the six lobes.
Then inspect the side profile.
The widest point should fall around the middle rather than near the crown.
Finally, test the base on a hard table and redistribute filling if the pumpkin rocks toward one side.
Conclusion
Control the stuffing before tightening the sculpting strands because a small pumpkin has little spare fabric to absorb shaping errors. Your next step is to crochet one 30-stitch test body, stuff it lightly and measure the amount of vertical compression needed before making additional pumpkins. Keep the six channels shallow and adjust shape by moving filling first. Share the completed small crochet pumpkin pattern project on Pinterest with an overhead view showing the six lobes, then post the stem profile on Instagram using #SmallSculptedCrochetPumpkin. For this pumpkin specifically, would you keep six broad lobes or divide the next one into eight narrower sections?









