Introduction
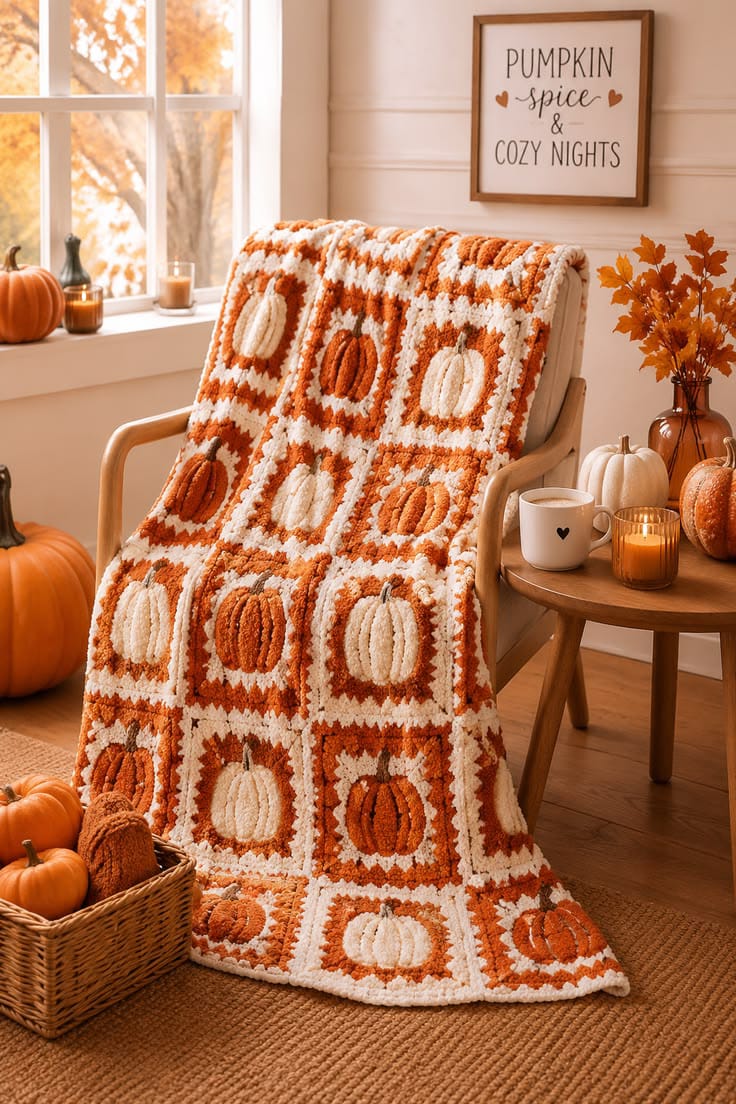
An ivory pumpkin sewn half an inch off-center becomes obvious when twenty-three neighboring pumpkins form a rigid grid. This pumpkin granny square blanket crochet pattern uses worsted yarn with 5 mm and 4 mm hooks to make an approximately 85 × 125 cm throw. Twenty-four large blocks alternate raised orange and cream pumpkins, producing an intermediate fall blanket with strong dimensional texture.
The Design: What Makes This Pumpkin Blanket Different
The pumpkins sit above completed background squares instead of being built into the granny rounds. That structural choice creates the pronounced relief visible in the reference and allows every pumpkin to carry separate raised rib lines. Twelve orange pumpkins alternate with twelve cream pumpkins, while both versions use the same rust-and-ivory square framework. Large 19–21 cm blocks reduce the total motif count to 24, so each pumpkin remains visually substantial instead of becoming a small repeated icon. A cream joining edge separates neighboring rust sections and keeps the grid readable across the complete blanket. One common failure in a raised pumpkin crochet square is sewing the appliqué too tightly around its entire perimeter. The central square contracts, corners begin to lift, and the finished joined row develops waves even when every background block originally measured correctly.
Project Info at a Glance
| Skill Level | Time | Finished Size | Hooks | Best For |
|---|---|---|---|---|
| Intermediate | 32–42 hours | Approx. 85 × 125 cm | 5.0 mm squares / 4.0 mm appliqués | Fall throws, chair blankets and seasonal living-room decor |
Materials and Tools
Yarn
- Burnt pumpkin orange — worsted / Aran #4 — approximately 600–700 g — square frames, 12 pumpkin appliqués and border details.
- Warm cream / ivory — worsted / Aran #4 — approximately 550–650 g — square backgrounds, 12 pumpkin appliqués, joining and outer border.
- Medium brown — worsted / Aran #4 — approximately 20–30 g — 24 pumpkin stems.
Use orange and cream yarns from the same line or with very similar thickness. A small difference in stitch height becomes significant across four joined 20 cm blocks.
Tools
- 5.0 mm crochet hook — background squares and border
- 4.0 mm crochet hook — pumpkin appliqués
- Yarn needle
- Stitch markers
- Scissors
- Blocking mats
- Rust-resistant blocking pins
- Measuring tape
Abbreviations
- MR — magic ring
- ch — chain
- sc — single crochet
- hdc — half double crochet
- dc — double crochet
- sl st — slip stitch
- inc — increase
- dec — decrease
- BLO — back loop only
An invisible decrease is worked through the front loops of the next two stitches before one single crochet is completed through both loops.
Pattern — Step by Step
Make all 24 background squares first. Block them to one target measurement before starting the raised pumpkins.
Background Square — Round 1
Yarn: warm cream.
Make an MR.
Ch 3, 2 dc, ch 2.
Work (3 dc, ch 2) three more times into the ring.
Join with sl st to the top of the beginning ch-3.
You now have four 3-dc clusters and four corner spaces.
Background Square — Round 2
Yarn: burnt pumpkin orange.
Join in any corner.
Work (3 dc, ch 2, 3 dc) in the corner.
Ch 1.
Repeat the same doubled cluster in each remaining corner, placing ch 1 between corner groups.
Join and fasten off.
Background Square — Round 3
Yarn: warm cream.
Join in any corner.
Work (3 dc, ch 2, 3 dc) in the corner.
Ch 1, work 3 dc in the next side space, ch 1.
Continue around, placing one 3-dc cluster in every side space and a doubled cluster in every corner.
Join.
Background Square — Round 4
Yarn: burnt pumpkin orange.
Work one 3-dc cluster in every side space.
Place (3 dc, ch 2, 3 dc) in every corner.
Ch 1 between neighboring clusters.
Join and fasten off.
Background Square — Round 5
Yarn: warm cream.
Repeat the standard granny construction: one 3-dc cluster in every side space and two clusters separated by ch 2 in every corner.
Join.
Background Square — Round 6
Yarn: burnt pumpkin orange.
Repeat the same granny construction around.
Join and fasten off.
Target approximately 18–19 cm before the joining edge.
Cream Joining Edge — Make on All 24 Squares
Yarn: warm cream.
Join in any corner.
Ch 1.
Sc evenly across the first side.
In the corner space work (sc, ch 1, sc).
Continue around all four sides.
Join and fasten off.
Target finished blocked square: approximately 19–21 cm.
Block the 24 Squares
Pin every square to one chosen measurement before making the pumpkins.
For this reconstruction, use 20 cm as the working target if your yarn and gauge permit it.
Measure horizontally and vertically.
Both dimensions should stay within approximately 5 mm of one another.
Measure several blocks after they are completely dry.
If one color combination consistently produces a larger square, reduce the hook by approximately 0.25–0.5 mm for those blocks rather than stretching the smaller squares harder.
Orange Raised Pumpkin Appliqué — Make 12
Yarn: burnt pumpkin orange — original dimensional appliqué reconstruction.
Foundation: ch 14.
Row 1: starting in second ch, sc across. (13)
Ch 1 and turn.
Row 2: inc, 11 sc, inc. (15)
Ch 1 and turn.
Row 3: inc, 13 sc, inc. (17)
Ch 1 and turn.
Row 4: inc, 15 sc, inc. (19)
Ch 1 and turn.
Row 5: dec, 15 sc, dec. (17)
Ch 1 and turn.
Row 6: dec, 13 sc, dec. (15)
Ch 1 and turn.
Row 7: dec, 11 sc, dec. (13)
Do not fasten off.
Orange Pumpkin Edging
Sc evenly around the complete pumpkin body.
Place 2 sc near the broadest point of each side if needed to keep the curve smooth.
Sl st to the starting point.
Fasten off with a 50 cm sewing tail.
Target approximately 11–13 cm wide × 9–11 cm high.
Cream Raised Pumpkin Appliqué — Make 12
Yarn: warm cream.
Repeat the complete seven-row pumpkin construction and edging used for the orange version.
Keep the cream pumpkins within approximately 5 mm of the orange pumpkins in both height and width.
A color change can alter gauge even when the yarn label is identical, so compare completed pieces before making all 12.
Pumpkin Stem — Make 24
Yarn: medium brown.
Ch 5.
Starting in the second chain, sc in all 4 chains.
Ch 1 and turn.
Sc across. (4)
Fasten off with a 15 cm sewing tail.
Target approximately 2–2.5 cm of visible stem above the pumpkin.
Pumpkin Rib Line 1
Yarn: matching pumpkin color.
Thread approximately 40 cm onto a yarn needle.
Mark the vertical center of the pumpkin.
Work one line of surface backstitch from the upper center to the lower center.
Keep the stitches approximately 7–10 mm long.
Pull only until a shallow channel forms.
Pumpkin Rib Lines 2 and 3
Work one curved line approximately 15–18 mm to the left of center.
Repeat on the right.
Both lines should begin close to the top center, spread outward through the middle and return toward the lower center.
Do not pull hard enough to fold the appliqué.
Pumpkin Rib Lines 4 and 5
Add one shorter curved line near each outer side.
These lines should be shallower than the central three.
The finished appliqué should show approximately five rounded pumpkin sections rather than five deep folds.
Attach the Brown Stem
Place one stem behind the upper center of each pumpkin.
Leave approximately 2 cm visible.
Sew through the lower 8–10 mm of the brown rectangle.
Do not stitch the complete stem flat.
A slightly raised upper section keeps the dimensional effect visible.
Position the Pumpkin on the Square
Lay one blocked square flat.
Place the pumpkin in the center with its stem pointing toward the top edge.
Leave approximately the same visible background above, below and beside the pumpkin body.
For a 20 cm square and a 12 cm pumpkin, the side margins should be roughly 4 cm.
Measure from the pumpkin center to all four square edges before pinning.
A placement difference greater than approximately 5 mm becomes noticeable after multiple blocks are joined.
Sew the Raised Pumpkin Appliqué
Use the long matching sewing tail.
Attach the pumpkin around its outer edge with stitches approximately 8–10 mm apart.
Do not pull each stitch tightly against the background.
Leave the middle of the appliqué unattached except where the rib lines naturally touch the square.
This produces the dimensional surface visible in the reference.
After sewing half the perimeter, lay the block on a table.
If the square corners lift more than approximately 5 mm, loosen the most recent attachment stitches.
Alternate Pumpkin Colors
Make 12 blocks with orange pumpkins and 12 with cream pumpkins.
The background framework remains the same on every block.
Only the raised center motif changes color.
That repetition creates the alternating pumpkin rhythm visible across the reference blanket without introducing additional square designs.
Blanket Layout
Arrange the 24 completed blocks into 4 columns × 6 rows.
Row 1: Cream Pumpkin – Orange Pumpkin – Cream Pumpkin – Orange Pumpkin.
Row 2: Orange Pumpkin – Cream Pumpkin – Orange Pumpkin – Cream Pumpkin.
Repeat these two rows until six rows are complete.
This produces 12 pumpkins of each color.
Photograph the complete layout before stacking the blocks for joining.
Join the Squares
Yarn: warm cream.
Place two blocks with right sides facing upward and corresponding edges touching.
Use mattress stitch for a nearly flat join, or place wrong sides together and use a relaxed slip-stitch join if you want a more visible cream grid.
Join the four blocks in each row first.
Make six complete horizontal strips.
Then join those strips from top to bottom.
Check every four-square intersection before proceeding beyond it.
The four corners should meet at one point without one row shifting above the next.
Outer Border — Round 1
Yarn: warm cream.
Join at any blanket corner.
Sc evenly around all four edges.
At each square seam, skip any redundant loop that causes extra fullness.
In every blanket corner work (2 sc, ch 2, 2 sc).
Join.
Outer Border — Round 2
Yarn: burnt pumpkin orange.
Join in one corner.
Hdc in every stitch around.
Work (2 hdc, ch 2, 2 hdc) in each corner.
Join and fasten off.
Outer Border — Round 3
Yarn: warm cream.
Sc in every stitch around.
At each corner work (sc, ch 2, sc).
Join and fasten off.
Outer Border — Round 4
Repeat Round 3 in warm cream for the substantial ivory frame visible in the reference.
Fasten off and weave the tail through at least 8–10 cm of border stitches.
Assembly
- Crochet all 24 six-round orange-and-cream background squares and add one cream joining edge to every block.
- Block each square to approximately 19–21 cm, keeping horizontal and vertical measurements within roughly 5 mm.
- Make 12 orange and 12 cream seven-row pumpkin appliqués with matching edging.
- Add approximately five surface rib lines to every pumpkin and attach one brown stem at the upper center.
- Pin one pumpkin to each blocked square, leaving roughly equal margins on all four sides.
- Sew the appliqués with relaxed stitches about 8–10 mm apart while keeping the central pumpkin surface raised.
- Arrange the 24 blocks in a 4 × 6 checkerboard, alternating cream and orange pumpkins in every neighboring position.
- Join each four-square horizontal row first, then connect the six rows while aligning every square intersection.
- Work the cream, orange and two cream border rounds around the assembled blanket.
- Block the completed blanket to approximately 85 × 125 cm, correct any waving seams and weave every remaining tail into matching stitches on the reverse.
The finished blanket should show a regular 4 × 6 grid of raised pumpkins with alternating orange and ivory centers, repeated rust-and-cream frames and a substantial cream outer border.
7 Technical Tips
- Square corners lift after the pumpkin is attached: The appliqué sewing tension is too high. Use stitches approximately 8–10 mm apart and loosen the seam if any corner rises more than about 5 mm from a flat surface.
- Pumpkin looks flat: Sewing through the center removes the relief created by the separate appliqué. Attach primarily around the perimeter and leave most of the central 7–9 cm free from the background.
- Rib lines pucker the pumpkin: Surface embroidery has been pulled too firmly. Tighten only until a shallow channel forms and stop before the appliqué width contracts by more than approximately 5 mm.
- Orange and cream pumpkins finish at different sizes: Color-specific yarn tension can change gauge. Compare the first two appliqués and keep their width and height within approximately 5 mm before making the remaining 22.
- Joined row becomes shorter: Mattress or slip-stitch seams are tighter than the blocked square edges. A four-square strip should lose less than approximately 15 mm compared with the combined blocked widths.
- Border begins waving: Extra stitches have accumulated at square joins. Skip duplicated seam loops and use only the stated corner increases before laying the border flat again.
- Pumpkins drift out of alignment: Eye-balling center placement creates cumulative errors across the grid. Measure from each pumpkin midpoint to all four square edges and keep placement differences below approximately 5 mm.
Why the Pumpkins Are Separate Appliqués
A separate pumpkin provides stronger dimensional texture than flat tapestry colorwork. The background square can be blocked first, giving every block an identical foundation before the center motif is added.
The appliqué also makes color alternation simple. Twelve pumpkins can be worked in orange and twelve in cream without changing the square geometry.
Another advantage is rib control. Surface lines can be tightened independently from the background, so each pumpkin receives visible segmentation while the granny square remains flat.
The tradeoff is assembly time. Twenty-four appliqués require careful placement and sewing, which is why blocking and measurement should happen before the first pumpkin is permanently attached.
Changing the Blanket Size
This pumpkin granny square blanket crochet pattern scales by adding complete blocks.
For a smaller chair throw, use 3 columns × 5 rows for 15 squares. Alternate pumpkin colors through each row; one color will appear eight times and the other seven.
For a larger throw, use 5 columns × 7 rows for 35 blocks.
A 6 × 8 layout gives 48 squares and preserves an equal number of orange and cream pumpkins.
Calculate yarn from the first completed square and appliqué before buying the full quantity. Large gauge differences can alter total yardage considerably.
Changing the Pumpkin Colors
The reference relies on only two pumpkin colors, which keeps the blanket controlled despite the strong raised texture.
Rust and cream provide the closest match.
A broader autumn palette could replace several orange pumpkins with ochre, terracotta or muted cinnamon.
For a neutral blanket, use ivory, oatmeal and camel pumpkins against cream-and-taupe squares.
Keep the stems consistently brown across the complete blanket. Repeating one stem color gives the varied pumpkin centers a shared visual detail.
Controlling the Raised Rib Texture
Do not attempt to form deep ridges through very tight embroidery alone.
The pumpkin appliqué already has dimensional freedom because its center is not sewn flat.
Use the surface lines mainly to divide that raised fabric into sections.
The center line may be slightly deeper than the two outer pairs.
After attachment, slide your fingers beneath each lobe and lift it gently away from the square.
If one lobe remains completely flat, loosen the nearest rib line rather than adding another layer of yarn.
Joining Without Distorting the Pumpkins
Stack completed squares carefully because the raised centers make a tall pile and can catch on neighboring stems.
Join the background edges only.
Do not catch pumpkin appliqué yarn in the seam.
After each horizontal strip is complete, spread it on a table and check all top edges against one straight line.
Correct a contracted seam immediately.
Once six strips are joined vertically, one short row can pull several neighboring squares out of alignment.
Finishing and Blocking
Final blocking should focus on the square grid rather than flattening the pumpkins.
Pin the four blanket corners first.
Next, pin along the outside edge at every square junction.
Do not place pins through the raised pumpkin centers.
After drying, lift each appliqué gently with your fingertips and reshape its ribs.
The outer cream border should lie flat while the pumpkin motifs remain visibly higher than their backgrounds.
Conclusion
Block the background squares before sewing the pumpkins because every raised motif depends on a fixed center point. Your next step is to make one complete 20 cm test square, one orange pumpkin and one cream pumpkin, then compare the appliqué dimensions before beginning the full batch. Keep the attachment stitches relaxed so the grid stays flat. Share the finished pumpkin granny square blanket crochet pattern project on Pinterest with the full checkerboard visible, then post a close view of the raised ribs on Instagram using #RaisedPumpkinGrannyBlanket. For this blanket specifically, would you keep the pumpkins evenly split between orange and cream or make one color dominant?









