Introduction
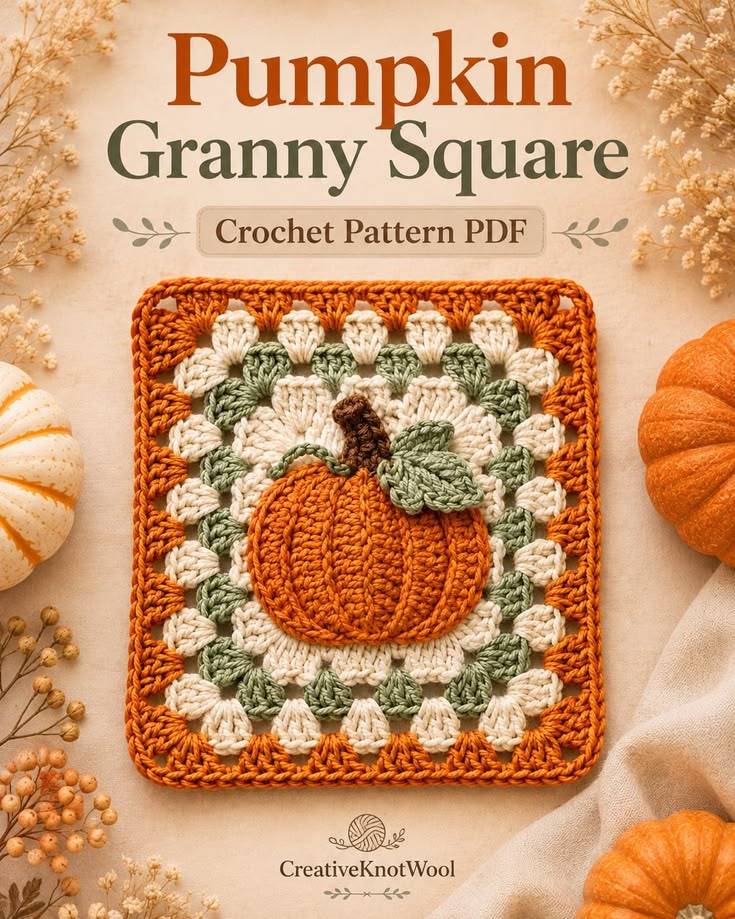
A pumpkin this large can distort a granny square before the final orange border is even attached. This pumpkin granny square crochet pattern uses worsted-weight yarn and a 5 mm hook to make an approximately 18–20 cm block with a raised orange pumpkin, brown stem, sage leaf and curling vine. The intermediate construction is designed for cushion panels, seasonal runners, bags and joined autumn blankets.
The Design: What Makes This Pumpkin Granny Square Different
The pumpkin sits on top of the completed granny background instead of being built into its first round. That decision creates the pronounced dimensional effect visible in the reference and lets the cream and sage cluster pattern remain readable around the appliqué. A broad orange outer frame repeats the pumpkin color and gives the square a stronger visual boundary. The pumpkin itself is intentionally wider than it is tall, while surface lines divide the orange fabric into rounded ribs. A brown stem, sage leaf and short spiral vine break the symmetry at the upper edge. The common failure in a crochet pumpkin granny square of this type is sewing the appliqué down too tightly. When the center fabric contracts by even 5–8 mm, the completed block begins to cup and becomes difficult to join with neighboring squares.
Project Info at a Glance
| Skill Level | Time | Finished Size | Hook | Best For |
|---|---|---|---|---|
| Intermediate | 3–5 hours | Approx. 18–20 cm square | 5.0 mm | Blankets, cushions, bags, runners and fall wall panels |
Materials and Tools
Yarn
- Burnt orange — worsted / Aran — approximately 35–45 g — pumpkin appliqué and outer square frame.
- Warm cream — worsted / Aran — approximately 30–35 g — center and alternating granny rounds.
- Sage green — worsted / Aran — approximately 18–22 g — granny clusters, leaf and vine.
- Dark brown — worsted / Aran — approximately 3–5 g — pumpkin stem.
Use yarns with similar thickness and twist so the cream, sage and orange rounds expand at comparable rates. A noticeably heavier orange yarn can tighten the final frame even when the stitch counts are correct.
Tools
- 5.0 mm crochet hook
- Yarn needle
- Scissors
- Stitch markers
- Dressmaking pins
- Blocking mat
- Rust-resistant blocking pins
- Measuring tape
Abbreviations
- MR — magic ring
- sc — single crochet
- hdc — half double crochet
- dc — double crochet
- tr — treble crochet
- inc — increase
- dec — decrease
- sl st — slip stitch
- ch — chain
- BLO — back loop only
An invisible decrease is made through the front loops of the next two stitches before completing one single crochet through both loops.
Pattern — Step by Step
Work the square in joined rounds. Turn the work after selected rounds if your granny clusters begin leaning noticeably in one direction.
Center Round
Yarn: warm cream — original reconstruction using standard granny-square geometry.
R1: In MR, ch 3, 2 dc, ch 2, 3 dc, ch 2, 3 dc, ch 2, 3 dc, ch 2. Join with sl st to top of beginning ch 3.
You now have four 3-dc groups and four corner spaces.
Pull the magic ring firmly closed.
Round 2 — Cream Expansion
Yarn: warm cream.
Sl st into the first corner space.
Ch 3, 2 dc, ch 2, 3 dc in the same corner.
In each remaining corner work:
(3 dc, ch 2, 3 dc).
Join with sl st.
You should have eight 3-dc clusters and four corners.
Round 3 — Sage Green
Yarn: sage green.
Join in any corner.
Work (3 dc, ch 2, 3 dc) in each corner space.
Work 3 dc in each side space between the corner groups.
Repeat around and join.
The square now contains three cluster groups along each side when the corner halves are included.
Round 4 — Warm Cream
Yarn: warm cream.
Join in a corner.
Work (3 dc, ch 2, 3 dc) in the corner.
Place one 3-dc cluster in every space across the side.
Repeat at all four sides and corners.
Join with sl st.
Lay the square flat before continuing. The corners should remain close to 90 degrees rather than flaring outward.
Round 5 — Sage Green
Yarn: sage green.
Repeat the standard granny-square expansion:
Work (3 dc, ch 2, 3 dc) in every corner.
Work 3 dc into each space between clusters across each side.
Join and fasten off.
The alternating cream and sage rounds should now frame the future pumpkin without being hidden completely by it.
Round 6 — Warm Cream
Yarn: warm cream.
Join in any corner.
Work (3 dc, ch 2, 3 dc) in each corner.
Work one 3-dc cluster into every side space.
Join with sl st.
Measure the square. It should be approaching approximately 14–16 cm before the outer orange frame.
Round 7 — Burnt Orange Frame
Yarn: burnt orange.
Join in any corner.
Work (3 dc, ch 2, 3 dc) into the corner.
Work 3 dc into every space across each side.
Repeat around.
Join with sl st.
Round 8 — Solid Orange Border
Yarn: burnt orange.
Ch 1.
Work 1 sc in every dc across the first side.
In each corner ch-2 space work (2 sc, ch 1, 2 sc).
Continue around all four sides.
Join with sl st.
Do not tighten the final round. A contracted sc border is one of the main causes of curled granny-square edges.
Round 9 — Finishing Edge
Yarn: burnt orange.
Ch 1.
Work loose sl st around the complete square.
At each corner ch-1 space work (sl st, ch 1, sl st).
Fasten off.
Target finished dimensions of approximately 18–20 cm after blocking.
Raised Pumpkin Appliqué
Yarn: burnt orange — independent oval construction.
Ch 13.
R1: Starting in the second ch from hook, sc in next 11 ch, 3 sc in final ch. Rotate the foundation and work 10 sc along the opposite side, 2 sc in the final chain. Join. (26)
R2: ch 1, inc, 9 sc, inc ×3 across the rounded end, 9 sc, inc ×3. Join. (32)
R3: ch 1, sc, inc, 9 sc, (sc, inc) ×3, 9 sc, (sc, inc) ×2, sc. Join. (38)
R4: ch 1, 2 sc, inc, 10 sc, (2 sc, inc) ×3, 10 sc, (2 sc, inc) ×2. Join.
Check the shape rather than forcing an exact oval if your gauge differs. The target is approximately 9–11 cm wide and 7–8.5 cm high.
Fasten off with a 60 cm tail.
Pumpkin Rib Line 1
Yarn: matching burnt orange or a slightly darker orange.
Thread approximately 40 cm of yarn onto a needle.
Make one vertical surface line from the lower center of the appliqué toward the upper center.
Do not pull hard enough to fold the appliqué.
Pumpkin Rib Lines 2 and 3
Place one line approximately 15–18 mm to the left of the center line.
Place the second the same distance to the right.
These three divisions create four major visible sections.
Pumpkin Rib Lines 4 and 5
Add one additional line near each outer edge if more segmentation is required.
Keep the outer lines shallower than the center lines.
The reference pumpkin uses ribbing as surface texture rather than deep amigurumi sculpting.
Brown Stem
Yarn: dark brown.
R1: 6 sc in MR (6)
R2: sc around (6)
R3: sc around (6)
R4: sc around (6)
R5: sc around (6)
Do not stuff.
Flatten the tube lightly.
Fasten off with a 20 cm sewing tail.
Target approximately 25–30 mm in length.
Sage Leaf
Yarn: sage green.
Ch 9.
Starting in the second chain from the hook:
sl st, sc, hdc, dc, dc, hdc, sc, 3 sc in final ch.
Rotate and work along the opposite side:
sc, hdc, dc, dc, hdc, sc, sl st.
Join at the base.
Ch 1 and work a loose sc edging around the leaf.
At the tip work (sc, ch 1, sc).
Fasten off with a 20 cm sewing tail.
Target approximately 5–6 cm long.
Leaf Center Vein
Yarn: sage green.
Thread approximately 25 cm onto a yarn needle.
Work one relaxed surface stitch from the leaf base toward the tip.
Add two short diagonal stitches toward each side.
Do not tighten the embroidery enough to cup the leaf.
Curly Vine
Yarn: sage green.
Ch 16.
Starting in the second chain from the hook, work 3 sc into each chain.
The foundation will contract into a spiral.
Fasten off with a 15 cm sewing tail.
Target approximately 4–5 cm of relaxed curl.
Positioning the Pumpkin
Block the granny square before attaching the appliqué. Pin all four corners to the same measurement and allow the piece to dry completely.
Place the pumpkin approximately 10–15 mm below the exact center of the square. That slight downward shift leaves room for the stem, leaf and vine while keeping the complete topper inside the orange frame.
The orange pumpkin should cover much of the central cream area but should not hide the sage round completely. Keep at least one visible granny cluster between the appliqué edge and outer frame on all four sides.
Attaching the Pumpkin Appliqué
Use the long orange tail to sew the pumpkin to the granny background.
Take small stitches approximately 8–12 mm apart through the rear loops of the appliqué edge.
Leave the upper 15–20 mm slightly less restricted so the pumpkin retains a raised profile.
Do not pull the sewing yarn until the background puckers. After every five or six stitches, place the square on the table and check that the center remains flat.
The appliqué should appear dimensional without containing stuffing.
Attaching the Stem, Leaf and Vine
Place the brown stem behind the upper center of the pumpkin.
Sew the lower 10–12 mm to both the appliqué and granny background.
Position the sage leaf diagonally across the right side of the stem. Sew only its lower third so the outer half remains raised.
Attach the curly vine on the opposite side.
Sew only its first 10 mm and, if required, add one concealed tack stitch through a middle curl.
Leave the final spiral free.
Assembly
- Complete all cream and sage granny rounds before adding the orange frame.
- Work the final orange rounds and block the square to approximately 18–20 cm with four equal sides.
- Crochet the orange pumpkin appliqué and check that it measures roughly 9–11 cm across before adding surface ribs.
- Add three to five orange rib lines, keeping the central grooves more visible than the two outer divisions.
- Pin the pumpkin 10–15 mm below the exact center of the blocked square.
- Sew around the pumpkin edge at approximately 8–12 mm intervals without contracting the granny background.
- Attach the brown stem behind the upper center through an area approximately 10–12 mm deep.
- Position the sage leaf diagonally beside the stem and sew only its lower third.
- Attach the green spiral on the opposite side and leave its outer curl free from the square.
- Place the finished block flat, correct any puckering, then weave each tail through at least 4 cm of matching stitches on the reverse.
The completed block should remain flat at the border while the pumpkin, leaf and vine rise slightly above the granny-square surface.
7 Technical Tips
- Square begins cupping: The pumpkin appliqué has probably been sewn with excessive tension. Loosen any attachment section that shortens the center by more than approximately 5 mm.
- Outer orange frame waves: The border contains more effective circumference than the inner granny rounds. If the edge rises by more than 5–8 mm between corners, reduce a few side stitches or change to a hook 0.5 mm smaller for the final round.
- Corners become rounded: Missing corner space separates the two sides poorly. Keep a clear ch-2 space in every granny-round corner and a ch-1 space in the solid orange border.
- Pumpkin looks circular: An appliqué shorter than about 1.2 times its height loses the broad pumpkin profile. Target approximately 9–11 cm wide by 7–8.5 cm high before sewing.
- Rib lines fold the pumpkin: Surface stitches pulled too tightly turn a flat appliqué into pleats. Tighten each line only until it becomes visible and keep the outer two ribs shallower than the center groove.
- Leaf cups upward: Sewing the complete leaf perimeter removes its flat oval structure. Fix only the lower third, roughly 15–20 mm, and leave the tip unsupported.
- Vine loses its spiral: A foundation worked with fewer than three single crochets per chain produces weak curls. Use 3 sc in every chain and avoid stretching the completed 4–5 cm tendril during attachment.
Using the Square in Larger Projects
A single block works as a decorative panel, but the construction is also suitable for repeated fall projects. For a cushion cover, make enough blocks to reach the planned width and join them through the orange outer rounds.
For a blanket, alternate pumpkin blocks with plain cream, sage or orange granny squares. The raised appliqué is substantial, so using it on every block creates a heavier surface than a conventional granny blanket.
A table runner can use three to five pumpkin blocks in one line. Rotate the leaf direction on alternating squares to prevent the toppers from forming a repeated diagonal.
For a tote bag, position pumpkin motifs only on the exterior face. Plain granny squares on the back reduce bulk against the body.
Adjusting the Finished Size
Published pumpkin granny squares vary considerably. Current examples include approximately 10 cm blocked squares, 11 cm Aran motifs and 14 cm DK blocks, while one published pattern reaches about 18 cm when made with heavier yarn and a larger hook.
To make this reconstruction smaller, use DK yarn with a 4 mm hook and stop before the final orange cluster round. Scale the pumpkin appliqué to approximately 7–8 cm wide.
For a larger block, add one additional granny round before the orange frame. Continue the standard pattern of one cluster in every side space and (3 dc, ch 2, 3 dc) in each corner.
Measure after blocking rather than relying only on round count because yarn thickness, hook size and individual tension can change the final dimensions by several centimeters.
Conclusion
Keep the granny background flat before treating the pumpkin as decoration; correcting a distorted center after the appliqué is attached takes more work than adjusting it during assembly. Your next step is to block the completed square to four equal sides, mark a point 10–15 mm below center and pin the pumpkin there before sewing. Attach the stem, leaf and vine only after the orange motif remains flat. Share the finished pumpkin granny square crochet pattern project on Pinterest and post a close side view of the raised appliqué on Instagram using #RaisedPumpkinGrannySquare. For this specific square, would you keep the sage-and-cream background or replace the sage round with dark brown?









